To reset display settings in Windows 11, open Settings > System > Display and choose the options marked (Recommended) for Scale and Display resolution, because Windows has no single reset button for them.
This guide also resets orientation, HDR calibration, Night light, colors and filters, and fixes a black or grey screen that stops you reaching those settings.
How to reset display settings in Windows 11
These steps restore the main layout settings on the Display page. If more than one monitor is connected, repeat them for each one.
- Select Start > Settings > System > Display.
- If several displays are connected, select the one you want to change at the top of the page.
- Under Scale & layout, open Scale and choose the option marked (Recommended).
- Open Display resolution and choose the option marked (Recommended).
- Open Display orientation and choose the orientation Windows recommends for your screen.
- Turn off Night light and HDR on the same page if colors still look wrong.
You can open Display settings another way if the Start menu route is not convenient.
Reset all display settings in Windows 11
Each setting has its own page, so change only what looks wrong. Match the problem to a row and follow that section.
| What looks wrong | Setting to reset | Where to find it |
|---|---|---|
| Blurry, stretched or small picture with black edges | Display resolution | Settings > System > Display |
| Text and apps too large or too small | Scale and text size | Display, then Accessibility > Text size |
| Picture sideways or upside down | Display orientation | Settings > System > Display |
| Yellow or orange tint | Night light | Settings > System > Display > Night light |
| Washed-out or over-saturated colors | HDR and color profile | Display > HDR and Display > Color profile |
| Unusual color palette across the whole screen | Color filters | Settings > Accessibility > Color filters |
| Black, white or high-contrast windows | Contrast themes | Settings > Accessibility > Contrast themes |
| Wrong taskbar, window or accent colors | Colors and theme | Settings > Personalization |
| Black screen, or a picture you cannot use | Graphics driver or low-resolution mode | The black screen section below |
Reset the display resolution
Lower resolutions can make text look less sharp, and the picture can appear small, centered, edged with black or stretched. The recommended value suits most screens.
- Select Start > Settings > System > Display.
- Select the display at the top of the page if you have more than one.
- Open the Display resolution list.
- Choose the value marked (Recommended).
If the resolution changes again without you touching it, the graphics driver may need an update. Check Windows Update in Settings.
Reset the scaling settings
Scale changes the size of text, apps and other items, while Text size changes only text. Check both, because either one can make the desktop look wrong.
- Select Start > Settings > System > Display.
- Under Scale & layout, open Scale and choose the option marked (Recommended).
- If you set a custom scale earlier, expand Scale and follow the on-screen option to turn it off, then choose the recommended value.
- Go to Settings > Accessibility > Text size.
- Move the Text size slider back to the smallest value if you enlarged text earlier.
Microsoft accepts custom scale values from 100% to 500% but does not recommend using them.
Reset display orientation
A wrong orientation leaves the picture sideways or upside down. If you change the orientation of a monitor, you also need to rotate the screen physically.
- Select Start > Settings > System > Display.
- Select the affected display at the top of the page.
- Open the Display orientation drop-down.
- Choose the orientation Windows recommends, which is usually Landscape on a standard monitor.
Reset HDR calibration
The Windows HDR Calibration app saves a color profile. Removing that profile undoes the calibration, and the app has no separate reset option.
- Select Start, search for
color managementand open Color Management. - Open the All Profiles tab.
- Select the profile the calibration app created, then select Remove.
- To start again, open Windows HDR Calibration from All apps with HDR turned on.
- Drag each of the three test pattern sliders until the pattern is no longer visible.
- Move the color saturation slider toward the left, where the default sits, for less vivid colors.
The app needs Windows 11, an HDR-capable display and a WDDM 2.7 or later driver. To remove HDR altogether, turn off the HDR toggle under Settings > System > Display.
Reset Night light preferences
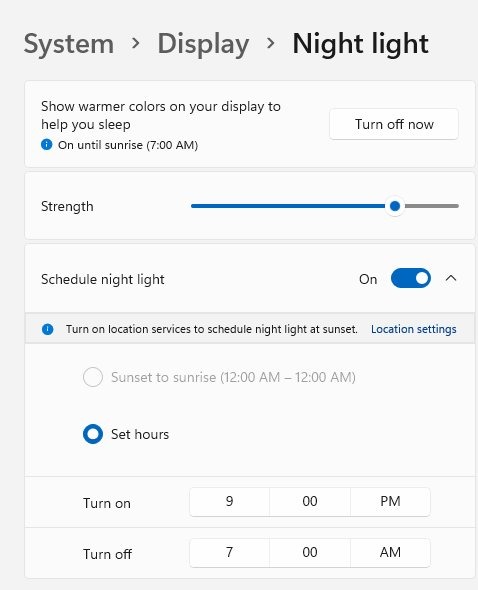
Night light reduces blue light and gives the screen a warmer look, and a schedule can turn it back on later. Clear both the toggle and the schedule.
- Select Start > Settings > System > Display > Night light.
- Select Turn off now.
- Turn off Schedule night light so it does not return at sunset or a set time.
- Move the Strength slider to a lower value if you keep using Night light.
If the toggle is grayed out, update your display driver. Night light is not available with some drivers, such as DisplayLink or Basic Display.
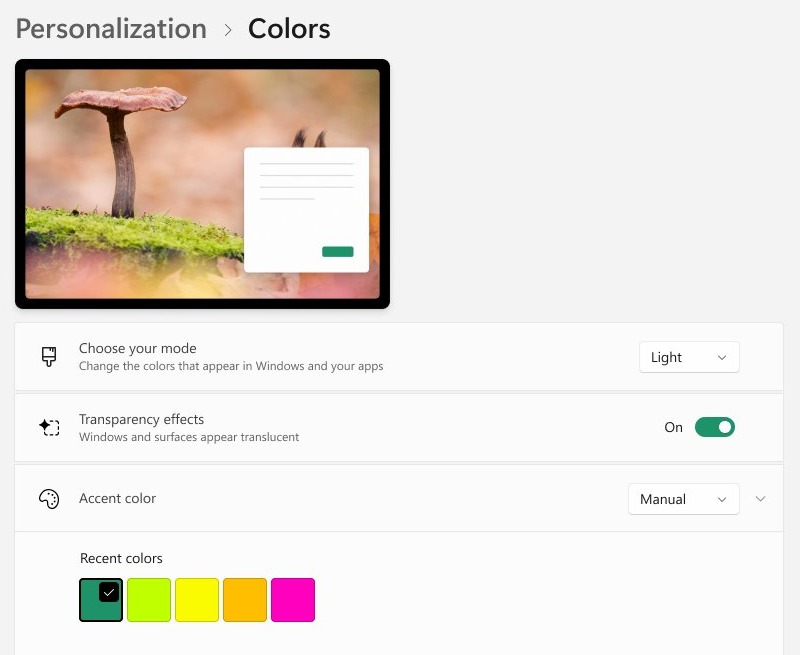
Reset Windows colors
Accent colors and modes live under Personalization, separate from the display settings. These steps clear manual color choices.
- Open Settings > Personalization > Colors.
- Under Choose your mode, select Light or Dark.
- Under the accent color section, select Automatic so Windows picks a color from your background.
- Turn off Show accent color on Start and taskbar.
- Turn off Show accent color on title bars and window borders.
- Turn on transparency effects if windows look flat and fully opaque.
Reset the mouse pointer
Pointer size and color sit under Accessibility, and pointer schemes sit in the older Mouse Properties window. Check both if the pointer still looks wrong.
- Press Windows + U to open Accessibility settings, then select Mouse pointer and touch.
- Under Mouse pointer style, select the white pointer.
- Move the Size slider down to shrink an enlarged pointer.
- Go to Settings > Bluetooth & devices > Mouse.
- Under Related settings, select Additional mouse settings.
- On the Pointers tab, pick the default option from the Scheme list, then select OK.
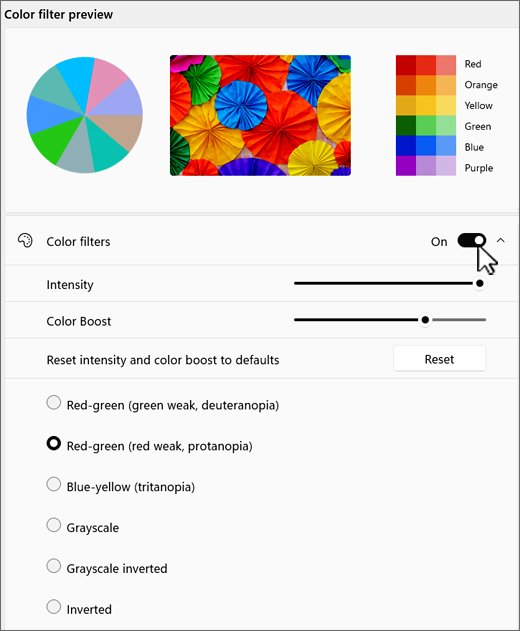
Disable color filters
Color filters change the color palette across the whole screen, which can look like a fault with the monitor or graphics card.
- Press Windows + U to open Accessibility settings.
- Select Color filters.
- Turn off the Color filters switch.
- Check that normal colors have returned on the desktop.
Disable contrast themes
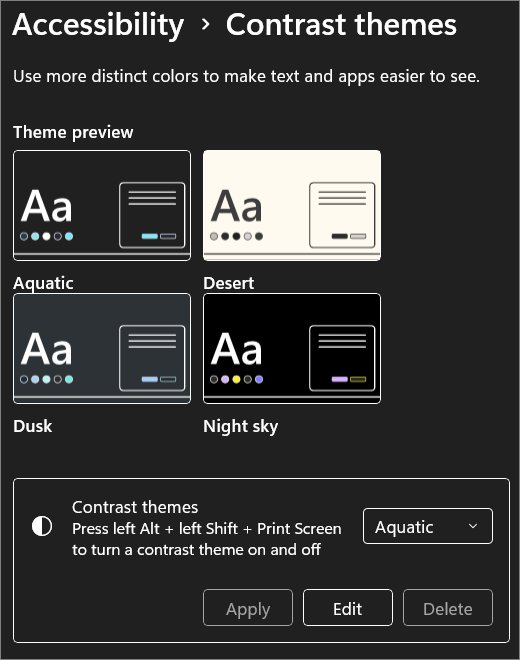
Pressing left Alt + left Shift + Print Screen switches high contrast on or off, so a contrast theme can appear by accident. That shortcut also works for a quick exit.
- Select Start > Settings > Accessibility > Contrast themes.
- Open the Contrast themes drop-down.
- Choose None.
- Select Apply, and wait while Windows shows Please wait and restores the default colors.
Reset the Windows theme
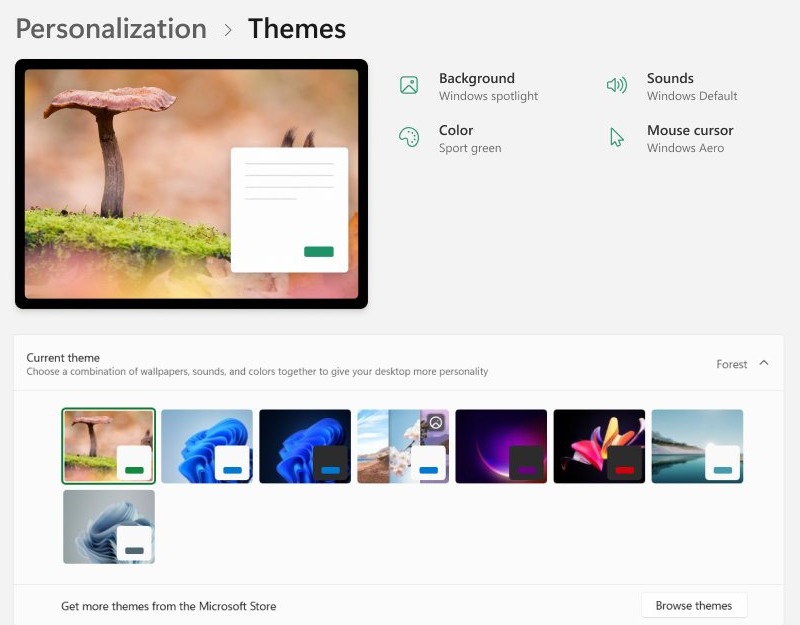
A theme bundles the background, colors, sounds and mouse cursor, so applying a default theme replaces all of them at once. Save a custom theme first if you want it back later.
- Open Settings > Personalization > Themes.
- To keep your current look, select Save and enter a name.
- Select one of the default themes shown to apply it to the desktop.
- Right-click any saved theme you no longer need and select Delete.
Default Windows themes cannot be deleted, so you can always return to one of them.
Reset visual effects
Windows keeps these effects in two places. The Accessibility page handles transparency and animations, and the older Visual Effects tab handles individual effects.
- Select Start > Settings > Accessibility > Visual effects.
- Turn on Transparency effects and Animation effects.
- Select Start, type Adjust the appearance and performance of Windows and open it.
- On the Visual Effects tab, move the selection away from Adjust for best performance to the option that lets Windows decide.
- Select OK to close the window.
How to tell if display settings are back to default
Windows labels the values it suggests, so you can read the result directly from the Display page.
- Open Settings > System > Display.
- Check that Scale and Display resolution both show the value marked (Recommended).
- Check that Night light and HDR are in the state you want.
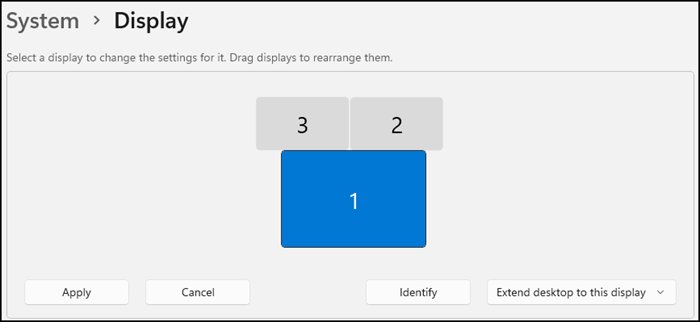
- Select Identify if you have several monitors, and repeat these checks for each numbered display.
Changed resolution, now black screen on Windows 11
Try the two keyboard shortcuts first, because they work without a visible picture. Low-resolution mode is the built-in route to reset display settings when neither helps.
- Press Windows logo key + Ctrl + Shift + B to reset the graphics driver. A beep or brief flicker means it ran.
- Press Windows logo key + P, press P again, then press Enter to switch display mode.
- Interrupt startup twice by forcing a shutdown. On the third restart, select Advanced options on the Automatic Repair screen.
- Go to Troubleshoot > Advanced options > Startup Settings and select Restart.
- Press 3 or F3 to select Enable low-resolution video.
- Sign in, open Settings > System > Display, and choose the (Recommended) value for Display resolution.
- Restart the PC normally.
Have your BitLocker recovery key ready if the device is encrypted, because Startup Settings can ask for it.
Grey screen after update in Windows 11 [Fix]
Work from the quickest check to the most involved. Microsoft warns you to understand the risks before removing a security update, so leave that step until last.
- Press Windows logo key + Ctrl + Shift + B to reset the graphics driver.
- If the desktop is visible but colorless, press Windows + U, select Color filters and turn the switch off.
- Right-click Start, select Device Manager and expand Display adapters.
- Right-click the adapter and select Properties.
- On the Driver tab, select Roll Back Driver, then Yes, and restart the PC.
- If rollback is unavailable, open Settings > Windows Update > Update history > Uninstall updates, then remove the recent update and restart.
If the screen stays unusable, start in Safe Mode with Networking from Startup Settings by pressing 5 or F5, then roll back the driver from there.
Over-saturated colors on my main monitor in Windows 11
Over-saturated or washed-out colors usually trace back to HDR, a color profile or Night light. Change one at a time so you can see which one fixes the picture.
- Go to Settings > System > Display and turn off HDR on that monitor to compare the colors.
- With HDR on, rerun Windows HDR Calibration and move the saturation slider toward the left.
- Go to Display > Color profile, select the monitor, expand the current profile and select Remove.
- Go to Display > Night light, then lower the Strength slider or select Turn off now.
- On HDMI, switch to DisplayPort if the monitor supports HDR over it.
- If you must stay on HDMI, update the graphics driver or lower the refresh rate to 30 Hz under Display > Advanced display.
If Windows settings make no difference, use the monitor's own buttons to check its picture mode and color controls, which sit outside these Windows settings.
Reset display driver by reinstalling the graphics adapter
Reinstalling the driver is the deepest reset short of reinstalling Windows. Save your work first, because the screen can change resolution or flicker during the process.
- Right-click Start, select Device Manager and expand Display adapters.
- Right-click the adapter and select Properties.
- On the Driver tab, select Uninstall Device.
- Check Attempt to remove the driver for this device, then select OK.
- Restart the PC so Windows can reinstall the driver.
- If Windows does not reinstall it, open Device Manager, right-click the adapter, select Update driver, then Search automatically for updated driver software.
If the checkbox is missing, start the PC in Safe Mode and try again.
Windows display keeps resetting
Windows display keeps resetting to a different resolution
Microsoft points to the graphics driver when resolution changes unexpectedly.
- Open Settings > Windows Update and select Check for updates.
- Install anything offered and restart the PC.
- Open Device Manager, expand Display adapters, right-click the adapter and select Update driver.
- Set Display resolution back to the value marked (Recommended).
Display settings reset after connecting or removing a monitor
A loose cable, dock or adapter can make a monitor drop out and return with different settings.
- Secure the cable, try a different one, and remove docks, dongles and adapters to test.
- Press Windows logo key + P and select the display mode you want, such as Extend.
- Open Settings > System > Display > Multiple displays and select Detect.
- Check Remember window locations based on monitor connection in the same section.
Tips for resetting display settings in Windows 11
| Tip | Why it helps |
|---|---|
| Note your current values before changing them | You can return to them if a change makes the picture worse |
| Change one setting at a time | You can see which setting caused the problem |
| Select each monitor before changing it | Resolution, scale and orientation apply to the selected display |
| Keep the (Recommended) resolution and scale unless you have a reason to change them | Lower resolutions can blur text or add black edges |
| Update the graphics driver if a setting will not stay | Unexpected resolution changes can come from an outdated driver |
| Save a custom theme before applying a default one | A saved theme restores your background, colors, sounds and cursor together |
| Avoid custom scale values | Microsoft does not recommend them |
Customize your display settings again
Once the picture looks right, add your preferences back one at a time. A problem that returns then points to the last change you made.
- Open Settings > System > Display and adjust Brightness.
- Choose a larger Scale value if text is too small at the recommended setting.
- Open Night light, set the Strength slider and turn on Schedule night light if you want it.
- Open Advanced display and select a value next to Choose a refresh rate.
- Open Color profile, select your display and turn on Automatically manage color for apps if your display supports it.
- Open Settings > Personalization to choose a theme and accent color.
A rate marked with an asterisk changes your resolution as well, so change the refresh rate carefully if you just reset it.
Reset display settings FAQ
How do I reset all display settings in Windows 11?
Windows 11 has no single reset button for display settings. Set Scale and Display resolution to their (Recommended) values under Settings > System > Display, then turn off Night light, HDR, color filters and contrast themes.
How do I find my display settings in Windows 11?
Select Start > Settings > System > Display. You will find Scale, Display resolution, Display orientation, Night light and HDR on that page, with Advanced display further down for refresh rate.
Can I reset display settings without uninstalling the adapter?
Yes. Most problems clear by choosing the (Recommended) resolution and scale in Settings. Uninstall the display adapter only if the picture stays wrong or the driver is faulty, because Windows then has to reinstall it.
Will resetting display settings delete any of my data?
No. Changing resolution, scale, colors or filters does not touch your files, and neither does reinstalling the graphics driver. Only Reset this PC removes apps and settings, and Remove everything also deletes personal files.
What if my screen resolution is incorrect after resetting?
Update the graphics driver through Windows Update or Device Manager, then check the Display resolution list again. Microsoft links unexpected resolution changes to the driver, and a loose cable or adapter is worth checking too.
How do I update my display driver?
Right-click Start, select Device Manager, expand Display adapters, right-click the adapter and select Update driver. Choose Search automatically for updated driver software, or download the latest driver from the manufacturer if Windows finds nothing.
How do I reset display color settings in Windows 11?
Turn off Night light and color filters, remove any added profile under Display > Color profile, then remove HDR calibration profiles from the All Profiles tab in Color Management. Set Accent color to Automatic under Personalization > Colors.
How do I completely reset display settings?
The most complete route is to reset every Windows setting with Reset this PC. It removes your apps and settings too, so try the individual display resets and a driver reinstall first.
How do I reset display settings on Windows 10?
Select Start > Settings > System > Display and choose the (Recommended) values for scale and resolution. You can also change display settings in Windows 10 for orientation and other options, which sit on similar pages.
Why does my Windows display keep resetting?
An outdated graphics driver is the first thing to check, since Microsoft points to it when resolution changes unexpectedly. Also check the cable, dock and adapters, because a monitor that drops out can return with different settings.