You can record video on a Mac using apps already included with macOS. QuickTime Player records video from your MacBook camera, an external webcam, or an iPhone, while the built-in Screenshot tool records your entire screen or a selected area. Photo Booth is another quick option when you only need to record yourself with the Mac camera.
For a normal camera recording, QuickTime Player gives you the most control because you can choose the camera, microphone, and recording quality before you start. For tutorials, presentations, or software demonstrations, press Shift + Command + 5 and use macOS Screen Recording.
This guide covers recording webcam video, screen video, video with microphone audio, using an iPhone as a higher-quality Mac camera, choosing recording quality, saving the finished video, and fixing common camera or microphone problems.
How to Record Video on Mac with QuickTime Player
QuickTime Player is the simplest built-in tool for recording a video of yourself on a MacBook, iMac, Mac mini with a webcam, or Mac Studio with an external camera. You do not need to download a separate video recorder.
- Open QuickTime Player from Applications, Launchpad, or Spotlight.
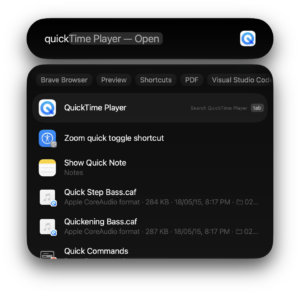
- From the menu bar, choose File > New Movie Recording.
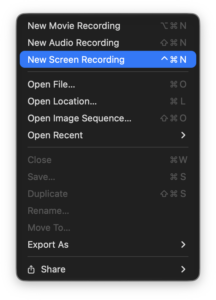
- Your Mac camera should turn on and show a live preview.
- Click the menu beside the Record button to choose your camera, microphone, and video quality.
- Click the red Record button.
- Click the Stop button when you finish.
- Choose File > Save, enter a filename, and select where you want to save the video.
You can also open a new movie recording with the keyboard shortcut Option + Command + N.
Choose the Camera and Microphone Before Recording
If your Mac has several cameras or microphones connected, QuickTime lets you choose which ones to use before recording. Open the menu beside the Record button and select the device under Camera and Microphone.
For example, you can record video with your MacBook camera while using a USB microphone for clearer speech, or use an external webcam while keeping the MacBook microphone as the audio source.
QuickTime High vs Maximum Video Quality
QuickTime currently offers High and Maximum recording quality when recording from the Mac camera.
| Quality | Video and audio | Best for |
|---|---|---|
| High | H.264 video with AAC audio | Most recordings, smaller files, easier sharing |
| Maximum | Apple ProRes 422 video with uncompressed Linear PCM audio | Editing and situations where maximum source quality matters |
High is the better choice for most people because H.264 creates much smaller files while maintaining good video quality. Maximum quality produces very large ProRes files, so check your available storage before recording a long video.
How to Record Video on MacBook with the Built-In Camera
MacBooks with a built-in camera can record video directly through QuickTime Player or Photo Booth. When an app starts using the camera, the green camera indicator beside the display turns on.
For the best result, position the MacBook so the camera is close to eye level, face a light source rather than placing one behind you, and clean the camera area before recording. These small changes usually improve the picture more than changing software settings.
To record with the built-in camera in QuickTime:
- Open QuickTime Player.
- Choose File > New Movie Recording.
- Open the recording options menu.
- Select your Mac camera under Camera.
- Select the microphone you want to use.
- Choose High or Maximum quality.
- Click Record.
How to Record Video on Mac with Photo Booth
Photo Booth is useful when you want a straightforward webcam recording without choosing codecs or other recording settings. It supports the Mac’s built-in camera, compatible external cameras, and an iPhone used as a Continuity Camera.
- Open Photo Booth.
- Click the Video button in the lower-left corner.
- Check the camera preview.
- Click the Record Video button.
- Click Stop when you are finished.
The finished recording appears as a thumbnail inside Photo Booth. To save a normal video file elsewhere, select the recording and choose File > Export, or drag its thumbnail to the desktop. Photo Booth exports video clips as MOV files.
Record Without the Photo Booth Countdown
Photo Booth normally gives you a short countdown before recording starts. Hold the Option key while clicking the Record Video button if you want recording to begin without the countdown.
How to Screen Record on Mac
macOS includes a screen recorder that can capture the complete display or only part of it. The fastest way to open it is with Shift + Command + 5.
- Press Shift + Command + 5.
- Select Record Entire Screen or Record Selected Portion.
- Click Options if you want to change the microphone, save location, timer, or pointer settings.
- Click Record.
- When finished, click the Stop Recording button in the menu bar.
macOS saves screen recordings as MOV files. The default location is usually the desktop unless you select another destination under Options > Save to.
Record Only Part of the Mac Screen
After pressing Shift + Command + 5, select Record Selected Portion. A frame appears on the screen. Drag the edges to include only the area you want viewers to see, then click Record.
This works well for browser tutorials, app demonstrations, and recordings where notifications or other open windows should remain outside the video.
How to Screen Record on Mac with Audio
The built-in Mac screen recorder can record audio from a microphone while capturing the screen. This is useful for tutorials, presentations, demonstrations, and narrated walkthroughs.
- Press Shift + Command + 5.
- Choose an entire-screen or selected-area recording.
- Click Options.
- Under Microphone, select your Mac microphone or another connected microphone.
- Click Record.
If None is selected under Microphone, the resulting screen recording will not include your voice.
Can Mac Screen Recording Capture System Audio?
The built-in Screenshot recorder is designed to capture microphone audio and does not provide a general option for recording all internal Mac system audio. Recording sound directly from an app, browser tab, game, or other system source normally requires software that supports system-audio capture or an appropriate audio-routing setup.
This matters when recording videos, music, meetings, or gameplay. Selecting the Mac microphone records whatever the microphone hears in the room, which is different from directly capturing the application’s audio stream.
How to Screen Record on Mac with QuickTime Player
QuickTime Player can also start a screen recording, although on current macOS versions it opens the same Screenshot recording controls used by Shift + Command + 5.
- Open QuickTime Player.
- Choose File > New Screen Recording.
- Select the entire screen or a selected portion.
- Open Options to choose a microphone or save location.
- Click Record.
- Click the Stop button in the menu bar when finished.
The keyboard shortcut for starting a QuickTime screen recording is Control + Command + N.
How to Record Video on Mac Using an iPhone Camera
If your Mac and iPhone support Continuity Camera, you can use the iPhone’s rear cameras as a Mac webcam. This can produce a noticeably better picture than the built-in camera on some Mac models and gives you more flexibility when positioning the camera.
For wireless Continuity Camera, keep Wi-Fi and Bluetooth turned on, use the same Apple Account on both devices, and keep the iPhone near the Mac. You can also connect the iPhone with a USB cable.
To record the iPhone camera through QuickTime:
- Position the iPhone securely with its rear camera facing you or the subject.
- Open QuickTime Player on the Mac.
- Choose File > New Movie Recording.
- Open the camera selection menu beside the Record button.
- Select your iPhone under Camera.
- Choose the microphone you want to record.
- Click Record.
If the iPhone does not appear, open Settings > General > AirPlay & Continuity on the iPhone and make sure Continuity Camera is enabled.
How to Record Video with an External Webcam on Mac
QuickTime Player and Photo Booth can record from compatible USB webcams and other external cameras recognized by macOS.
- Connect the camera to the Mac.
- Turn the camera on if required.
- Open QuickTime Player.
- Choose File > New Movie Recording.
- Open the camera menu beside the Record button.
- Select the external webcam under Camera.
- Select your microphone and recording quality.
- Start recording.
If the camera does not appear in QuickTime, disconnect and reconnect it, close other apps that are using the camera, and confirm that macOS recognizes the device.
Where Are Video Recordings Saved on Mac?
The save location depends on the recording method.
| Recording method | Where the video goes |
|---|---|
| QuickTime Movie Recording | You choose the filename and folder when you save it |
| macOS Screen Recording | Desktop by default, or the location selected under Options |
| Photo Booth | Stored inside Photo Booth until you export or drag out the video |
To change where screen recordings are saved, press Shift + Command + 5, select Options, and choose Desktop, Documents, Clipboard, Mail, Messages, QuickTime Player, or another folder under Save to.
How to Trim a Video Recording on Mac
You can quickly remove unwanted footage from the beginning or end of a recording with QuickTime Player.
- Open the recorded video in QuickTime Player.
- Choose Edit > Trim.
- Drag the yellow handles to select the section you want to keep.
- Click Trim.
- Save the edited video.
QuickTime also supports splitting a video into clips, rearranging clips, rotating footage, and adding another movie clip, which covers basic edits without installing a full video editor.
Fix Mac Camera Not Working When Recording Video
Allow Camera Access
If QuickTime, Photo Booth, or another recording app cannot use the camera:
- Open System Settings.
- Select Privacy & Security.
- Open Camera.
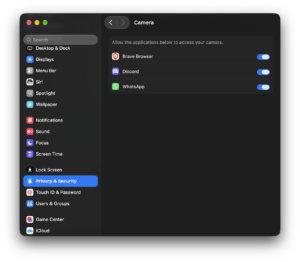
- Enable access for the app you want to use.
- Quit and reopen the recording app.
Allow Microphone Access
If the video records without your voice, open System Settings > Privacy & Security > Microphone and allow access for the recording app. Then check that the correct microphone is selected inside QuickTime or the Screenshot tool.
Close Apps Already Using the Camera
FaceTime, Zoom, Teams, Google Meet, OBS, browser tabs, and other apps can already be using the camera or microphone. Close those apps and start the recording again.
The green camera indicator remains visible whenever an app is actively using the Mac camera, which can help identify whether the camera is already in use.
Restart the Recording App or Mac
If camera permissions are correct but the preview remains black or frozen, quit QuickTime or Photo Booth completely and reopen it. Restart the Mac if the camera still does not respond.
Frequently Asked Questions
How do I record a video of myself on a Mac?
Open QuickTime Player and select File > New Movie Recording. Choose your Mac camera and microphone, click Record, and save the video when you finish.
How do I record video on a MacBook Air?
MacBook Air uses the same QuickTime method as other Macs. Open QuickTime Player > File > New Movie Recording, choose the built-in camera, and start recording.
How do I record video on a MacBook Pro?
Open QuickTime Player, choose New Movie Recording, select the MacBook Pro camera and microphone, and click Record. Photo Booth also works when you want a simpler camera recorder.
What is the keyboard shortcut to record the screen on Mac?
Press Shift + Command + 5 to open the macOS Screenshot toolbar, then choose to record the entire display or a selected portion.
Can QuickTime record webcam video?
Yes. QuickTime Player can record from the Mac’s built-in camera, supported external webcams, and compatible iPhones or other connected Apple devices.
Can I record video and audio at the same time on Mac?
Yes. QuickTime Movie Recording captures camera video and the microphone you select. Screen Recording can also capture microphone audio while recording the display.
Can I record my Mac screen with sound?
Yes, if you want microphone sound. Press Shift + Command + 5, open Options, and choose a microphone. The built-in screen recorder does not provide general direct capture of all Mac system audio.
What format does Mac screen recording use?
macOS saves screen recordings as MOV video files.
What format does QuickTime camera recording use?
QuickTime’s High setting records H.264 video with AAC audio. Maximum quality records Apple ProRes 422 video with uncompressed Linear PCM audio.
Why is my QuickTime recording file so large?
You probably selected Maximum recording quality, which uses ProRes video and uncompressed audio. Select High for much smaller H.264 recordings when you do not need an editing-quality source file.
Can I use my iPhone to record video on my Mac?
Yes. Compatible Macs and iPhones support Continuity Camera, allowing QuickTime and other camera apps to use the iPhone as a webcam. Select the iPhone from QuickTime’s Camera menu before recording.
Do I need to download a video recorder for Mac?
No for basic recording. macOS already includes QuickTime Player, Photo Booth, and the Screenshot screen-recording tool. Additional software is useful when you need internal system-audio capture, multiple video sources, live streaming, overlays, or more advanced recording controls.