To enable TPM in Windows 10, go to Settings > Update & Security > Recovery, restart into UEFI Firmware Settings, and turn on the TPM option, usually labeled Intel PTT or AMD fTPM.
This guide covers how to check your TPM, the setting names by manufacturer, Dell and ASUS menus, Windows 10 virtual machines, TPM 2.0 for Windows 11, how to turn TPM off and how to fix a TPM that Windows cannot find.
Step-by-step tutorial on how to enable TPM in Windows 10
The switch sits in your PC's firmware, not in Windows, so these steps take you out of Windows and back again. Save your open work first, because the PC restarts twice.
- Open Settings, then go to Update & Security > Recovery.
- Under Advanced startup, select Restart now.
- On the blue menu, select Troubleshoot > Advanced options > UEFI Firmware Settings, then select Restart.
- In the firmware menu, open the submenu that holds the TPM option. It is usually named Advanced, Security or Trusted Computing.
- Turn on the TPM option. The label depends on your hardware: Intel PTT or Intel Platform Trust Technology on Intel systems, AMD fTPM switch or AMD PSP fTPM on AMD systems, or Security Device, Security Device Support or TPM State on others.
- Save your changes and exit the firmware menu so Windows starts again.
- Press Win + R, type
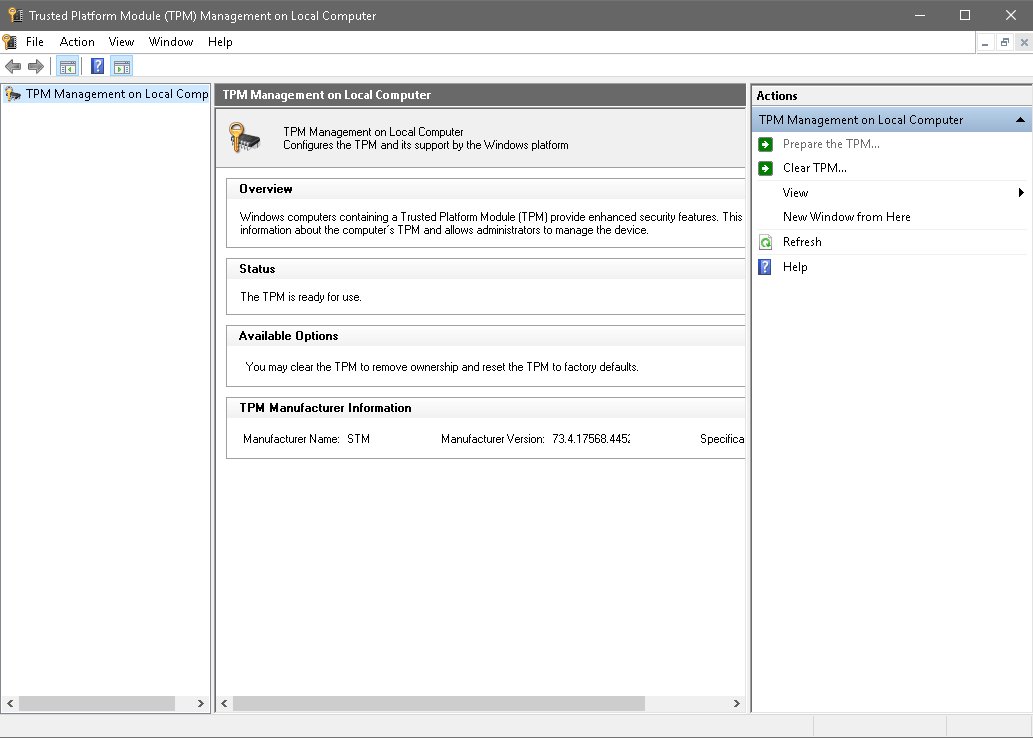
tpm.mscand select OK. The console should report that the TPM is ready for use.
Windows initializes the TPM and takes ownership of it on its own, so you do not need to create an owner password or run anything else after this.
How do I know if my computer has TPM?
Check this before or after you change the firmware. A missing entry does not prove the hardware is absent, because a TPM that is turned off in firmware looks the same to Windows as no TPM at all.
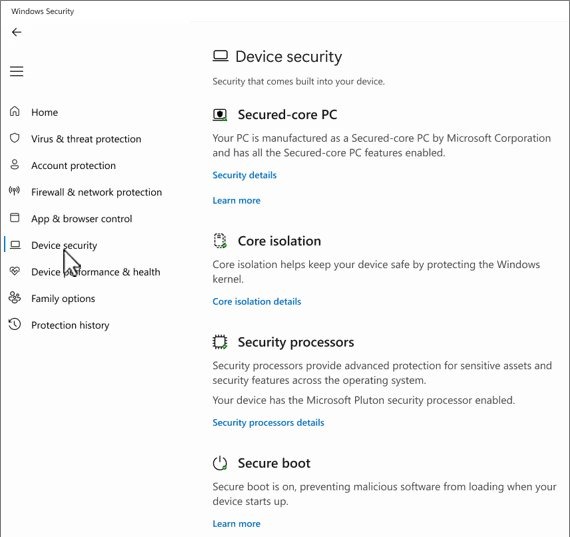
- Go to Settings > Update & Security > Windows Security > Device security.
- Look for a Security processor section. If it is there, your PC has an active TPM.
- Select Security processor details and read the Specification version. It shows 1.2 or 2.0.
- For a second check, press Win + R, type
tpm.mscand select OK, then read Specification Version under TPM Manufacturer Information. - Right-click Start, open Device Manager and expand Security devices. A healthy TPM appears there as Trusted Platform Module 2.0 with no warning icon.
TPM setting names in BIOS on Windows 10 PCs
Firmware menus differ by maker and model, which is why no single path works everywhere. Match your hardware to a row, then look for the setting name it lists.
| Your hardware | Setting name to look for | Where it usually sits |
|---|---|---|
| Intel processor | Intel PTT, Intel Platform Trust Technology | Advanced, Security or Trusted Computing |
| AMD processor | AMD fTPM switch, AMD PSP fTPM | Advanced, Security or Trusted Computing |
| Other systems | Security Device, Security Device Support, TPM State | Advanced, Security or Trusted Computing |
| Dell | Intel Platform Trust Technology (Intel PTT), Trusted Platform Module, TPM 2.0 Security, Firmware TPM | Security |
| ASUS with Intel chipset | PTT | Advanced > PCH-FW Configuration |
| ASUS with AMD chipset | TPM Device Selection, set to Firmware TPM | Advanced > AMD fTPM configuration |
| Surface Pro, Pro 2, Pro 3 and Surface 3 | TPM, set to Enabled | BIOS menu: hold volume-up, press and release power, release volume-up at the Surface logo |
| HP and Lenovo | Any name in the first three rows, or your model's support page | Reach it through UEFI Firmware Settings, as in the steps above |
Retail motherboards in self-built PCs often ship with TPM turned off, even when the board supports it, so check the firmware before you assume the hardware is missing.
How to enable TPM in Windows 10 on Dell
Dell's route skips the Windows menus and uses the startup key for the Dell BIOS instead.
- Save your work and restart the computer.
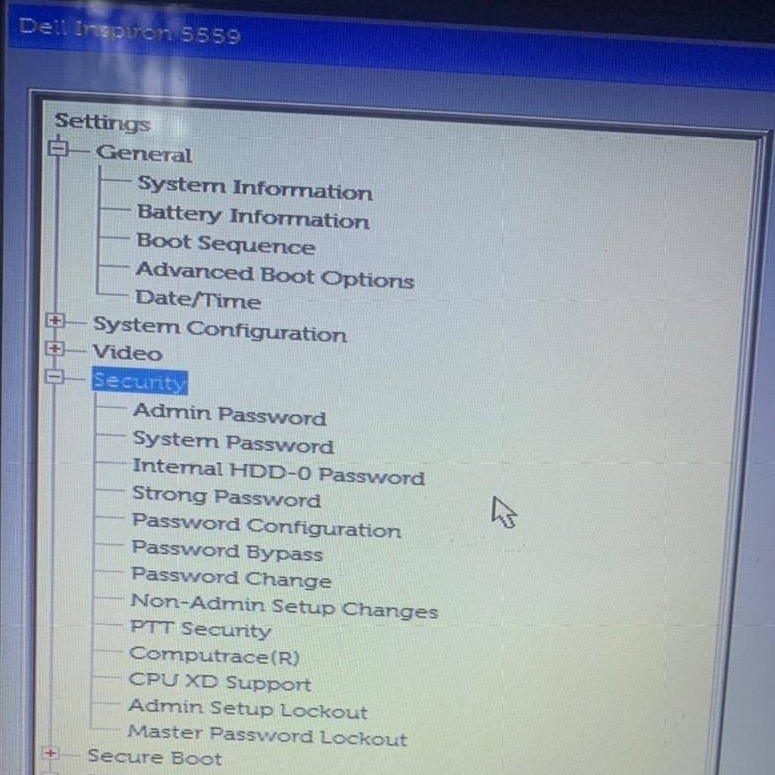
- Press F2 about once per second as soon as the Dell logo appears. If Windows loads instead, restart and try again.
- Open the Security settings. The location varies by model, and your owner's manual lists the exact one.
- Find Intel Platform Trust Technology (Intel PTT), Trusted Platform Module, TPM 2.0 Security or Firmware TPM, and set it to On or Enabled.
- Save the change and exit BIOS setup.
- In Windows, right-click Start, open Device Manager, expand Security devices and look for Trusted Platform Module 2.0 with no warning icon.
How to enable TPM in Windows 10 on ASUS motherboards
ASUS splits the setting by chipset. Press Del when the ASUS or ROG logo appears to open the BIOS, then follow the row for your board. ASUS notes that names can differ across models and BIOS versions.
| Your board | BIOS path | Set this | Save |
|---|---|---|---|
| Intel chipset | Advanced > PCH-FW Configuration | Enable PTT, then click OK on the notice | Press F10 to save and reboot |
| AMD chipset | Advanced > AMD fTPM configuration | Set TPM Device Selection to Firmware TPM | Press F10 to save and reboot |
Back in Windows, press Win + R, type tpm.msc and check that TPM version 2.0 appears.
How to enable TPM in Windows 10 without BIOS
You cannot turn on a TPM from Windows when the firmware has it off or hidden, because Windows cannot see it. The one route inside Windows applies when the TPM was turned off from the TPM console earlier, and even that route ends at a firmware prompt.
- Press Win + R, type
tpm.mscand select OK. - In the Action pane, select Turn TPM On to open the Turn on the TPM Security Hardware page, and read the instructions on it.
- Select Shutdown or Restart, then follow the prompts on the UEFI screen.
- After the restart and before you sign in, accept the prompt to reconfigure the TPM. This proves a person is physically at the PC.
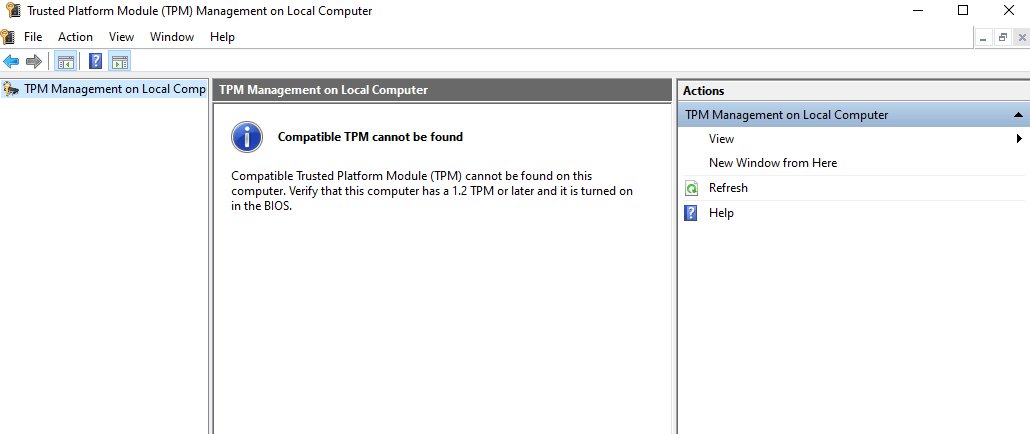
If the console says a compatible TPM cannot be found, there is nothing to turn on from here. Use the firmware steps at the top of this page.
Enable TPM Windows 10 command line
Microsoft documents no Windows command that flips the firmware switch; its published route is the UEFI menu. What the command line gives you is a fast read of the TPM state before and after you make the change.
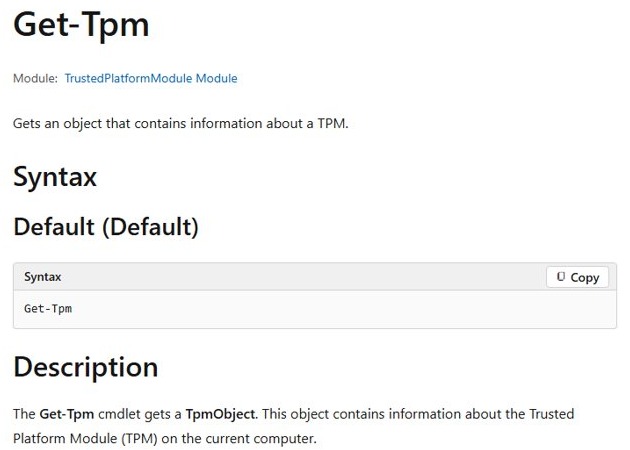
Get-TpmRun it in Windows PowerShell opened as administrator. It returns the state of the TPM on this computer, including TpmPresent, TpmReady, TpmEnabled, TpmActivated and TpmOwned.
You should see: TpmPresent : True and TpmReady : True mean Windows can see the TPM and has it prepared for use.
Initialize-Tpm performs part of the provisioning process for a TPM, but it does not replace the firmware setting, and Windows already provisions the TPM automatically. Avoid its -AllowClear switch unless you intend to clear the TPM.
How to enable TPM in Windows 10 VM
On Hyper-V, a virtual TPM belongs to generation 2 virtual machines, and it is emulated inside the guest whether or not the host PC has a TPM. Client Hyper-V itself needs Windows Pro or a higher edition, and virtualization must be on in the host's BIOS.
- On the host, open Windows PowerShell as administrator.
- Give the VM a key protector with
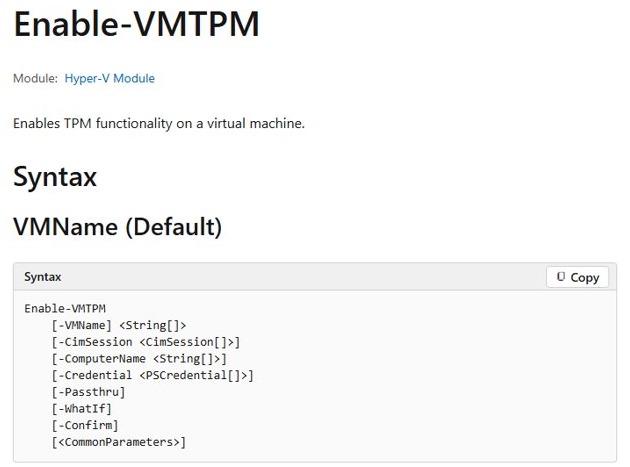
Set-VMKeyProtector -VMName "VM01" -NewLocalKeyProtector, replacing VM01 with your VM's name. - Turn on the virtual TPM with
Enable-VMTPM -VMName "VM01". - Start the VM, press Win + R inside it, type
tpm.mscand select OK to confirm the TPM is ready.
A VM that starts on another host may refuse to boot until you update its key protector to authorize that host. Other hypervisors have their own TPM setting, so use that vendor's documentation.
What does TPM do in Windows 10
A Trusted Platform Module is a secure crypto-processor that handles keys and boot checks in tamper-resistant hardware. It comes as a discrete chip, an integrated component or a firmware TPM, and Windows uses any compatible one the same way. Secure Boot is a separate feature, and the two are often confused, so it helps to understand TPM 2.0 and Secure Boot as a pair.
| What it does | What that means for you |
|---|---|
| Generates, stores and limits the use of cryptographic keys | A key bound to the TPM cannot be copied off the PC and used elsewhere |
| Authenticates the device with a unique RSA key burned into the chip | The PC can prove its identity to services that ask |
| Measures the boot process | Firmware and boot components can be checked for tampering |
| Holds keys for BitLocker | The encrypted drive unlocks only under the expected boot conditions |
| Protects Windows Hello data | PINs and biometric sign-in data stay protected on the device |
| Limits repeated authorization guesses | Too many wrong attempts trigger its dictionary attack protection |
Do I need TPM for Windows 10?
Not to use Windows 10 itself on an older PC. Microsoft's TPM 2.0 rule applies to the manufacturing of new devices since July 28, 2016, and specific features set their own needs.
| Windows feature | TPM required? | Versions supported |
|---|---|---|
| BitLocker | No | 1.2 and 2.0, with 2.0 recommended |
| Device Encryption | Yes | 2.0 only |
| Windows Hello | No | 1.2 and 2.0, with 2.0 recommended |
| Credential Guard | No | 1.2 and 2.0 |
| Measured Boot | Yes | 1.2 and 2.0 |
| Device Health Attestation | Yes | 1.2 and 2.0 |
| Virtual Smart Card | Yes | 1.2 and 2.0 |
| UEFI Secure Boot | No | 1.2 and 2.0 |
TPM 1.2 vs TPM 2.0 on Windows 10
| Difference | TPM 1.2 | TPM 2.0 |
|---|---|---|
| Algorithms | RSA and SHA-1 only | More flexible, with support for newer algorithms |
| Form | Discrete chip, typically soldered to the motherboard | Discrete, integrated or firmware |
| Lockout policy | Varies by implementation | Configured by Windows, so it stays consistent |
| Firmware mode | No UEFI-only rule | Native UEFI only, with Legacy and CSM modes disabled |
| Windows 11 | Does not meet the requirement | Required |
How to enable TPM 2.0 for Windows 11
Most people change this setting because a Windows 10 PC fails the Windows 11 check. Windows 10 support ended on October 14, 2025, and Microsoft recommends moving to Windows 11, which requires TPM 2.0 and UEFI firmware that is Secure Boot capable.
- Press Win + R, type
tpm.mscand select OK. - Read Specification Version under TPM Manufacturer Information. A value of 2.0 means the TPM already meets the requirement.
- If no compatible TPM is found, turn the TPM on in firmware with the steps at the top of this page.
- While you are in the firmware, check that the boot mode is native UEFI with Legacy and CSM turned off.
- Restart and check Specification Version again.
Menu names change from board to board, and this TPM 2.0 BIOS example for Windows 11 shows one Gigabyte layout.
Tips for enabling TPM 2.0 for Windows 11
| Tip | Why it matters |
|---|---|
| Read the specification version, not just the TPM status | A version below 2.0 does not meet the Windows 11 requirement |
| Run MBR2GPT before you change a legacy install to UEFI | Changing the BIOS mode alone stops a legacy Windows install from booting |
| Turn on Secure Boot once the PC is in UEFI mode | Windows 11 needs firmware that is Secure Boot capable |
| Pick one TPM on a board that has two, and leave it | Windows does not support toggling between TPMs, and switching puts BitLocker into recovery |
| Look for an add-on module if the board has no firmware TPM | Some desktop boards can take a TPM 2.0 module instead |
Tips for enabling TPM in Windows 10
| Tip | Why it matters |
|---|---|
| Back up your BitLocker recovery key before you open the firmware | TPM and firmware changes are common triggers for BitLocker recovery mode |
| Stay at the PC during the restart | A TPM change can ask you to confirm it on screen before sign-in |
| Change only the TPM setting on that visit | One change at a time makes any boot problem easy to trace back |
| Leave the TPM console alone afterward | Windows initializes the TPM itself, and Microsoft advises against configuring it through tpm.msc in most cases |
| Never clear the TPM from the firmware menu | Microsoft says to clear it only from inside Windows, because clearing deletes TPM-bound keys |
| Ask your IT team first on a work or school PC | Those devices may have policies and encryption tied to the TPM |
How to disable TPM in Windows 10
Turning off or disabling the TPM is on Microsoft's list of BitLocker recovery triggers. If your drive is encrypted, have the recovery key in hand before you start, or the PC can stop at the recovery screen on the next boot.
- Press Win + R, type
tpm.mscand select OK. - In the Action pane, select Turn TPM Off.
- Choose how to authorize it: I have the owner password file, I want to enter the password or I do not have the TPM owner password.
- Follow the dialog and any UEFI prompts that appear, then restart.
- If you prefer the firmware route, open UEFI Firmware Settings, set the same TPM option to disabled, then save and exit.
Compatible TPM cannot be found in Windows 10
tpm.msc says a compatible TPM cannot be found
The TPM is off or hidden in firmware, or the PC is not in UEFI mode.
- Open UEFI Firmware Settings and turn on the TPM option for your hardware.
- Check that the TPM is not hidden from the operating system.
- For TPM 2.0, confirm the firmware is in native UEFI mode, not Legacy or CSM.
- Save, restart and run
tpm.mscagain.
The TPM option is missing from the BIOS menu
The name differs by maker, or the firmware is out of date.
- Look through Advanced, Security and Trusted Computing for each name in the table above.
- Check your model's manual or the manufacturer's support page for the exact location.
- Update the firmware from the manufacturer's site, which is the step ASUS lists for a TPM that is not recognized.
Trusted Platform Module shows a yellow triangle in Device Manager
The TPM driver needs attention.
- Right-click Trusted Platform Module 2.0 in Device Manager.
- Select Update driver and check for updates.
- On a Dell PC, you can also get the driver from Dell's Drivers & Downloads site.
BitLocker says no TPM is present
A non-Microsoft TPM driver can stop the default driver from loading.
- Open Device Manager and expand Security devices to see which driver is installed.
- Remove the non-Microsoft driver.
- Restart and let Windows initialize the TPM.
Windows asks for the BitLocker recovery key after the change
A change to the TPM or firmware put the drive into recovery mode.
- Enter the 48-digit recovery password from wherever you saved it, such as your Microsoft account.
- Let Windows finish starting.
- Before your next planned firmware change, select Start, type
BitLocker, open Manage BitLocker and select Suspend protection.
Windows cannot initialize the TPM
The TPM state needs a reset. Clearing it deletes every key it holds, including sign-in PINs.
- Back up any data protected by the TPM and save your BitLocker recovery key.
- Open Windows Security and select Device security > Security processor details > Security processor troubleshooting.
- Select Clear TPM and restart when prompted. You might have to press a button to confirm.
- Let Windows prepare the TPM again after the restart.
How to enable TPM in Windows 10 FAQ
How do I turn on TPM in Windows 10?
Go to Settings > Update & Security > Recovery and restart under Advanced startup. Select Troubleshoot > Advanced options > UEFI Firmware Settings, turn on the TPM option such as Intel PTT or AMD fTPM, then save and exit.
How do I enable TPM in Windows 10 Home?
Use the same firmware steps as any other edition. The TPM setting lives in UEFI, outside Windows, so your edition does not change the route. Microsoft's TPM 2.0 rules for new PCs cover Home, Pro, Enterprise and Education alike.
How do I enable TPM 2.0 in Windows 10 with advanced restart?
Advanced restart is the route Microsoft documents. Select Restart now under Advanced startup in Settings, then choose Troubleshoot > Advanced options > UEFI Firmware Settings > Restart. Turn on the TPM option in the firmware, then save and exit.
How do I enable TPM in BIOS on Windows 10?
Open the firmware through UEFI Firmware Settings or your PC's startup key, such as F2 on Dell or Del on ASUS boards. Open Advanced, Security or Trusted Computing, turn on the TPM option, then save and exit so Windows restarts.
What is TPM?
TPM stands for Trusted Platform Module. It is a secure crypto-processor that generates and stores cryptographic keys and records measurements of the boot process. Windows features such as BitLocker and Windows Hello use it to protect keys and sign-in data.
Can I enable TPM on a virtual machine?
Yes. On Hyper-V, use a generation 2 VM, set a key protector with Set-VMKeyProtector, then run Enable-VMTPM. The virtual TPM 2.0 is emulated inside the guest, regardless of whether the host has a TPM or which version it has.
Is enabling TPM safe?
Yes. A TPM is security hardware that Windows initializes automatically once it is on. The risk comes from turning it off or clearing it later, since those actions can trigger BitLocker recovery or delete keys bound to the TPM.
How do I disable TPM in Windows 10?
Open tpm.msc and select Turn TPM Off in the Action pane, or set the TPM option to disabled in UEFI Firmware Settings. Keep your BitLocker recovery key ready first, because turning off the TPM can trigger BitLocker recovery.
How do I enable TPM in Windows 10 on Dell?
Press F2 about once per second at the Dell logo to open BIOS setup. In the Security settings, turn on Intel Platform Trust Technology, Trusted Platform Module, TPM 2.0 Security or Firmware TPM, whichever your model lists, then save and exit.
How do I enable TPM for Windows 11 on a Windows 10 PC?
Turn on the TPM in firmware with the same steps, then open tpm.msc and check that Specification Version shows 2.0. A lower version does not meet the Windows 11 requirement, and the firmware must also run in UEFI mode.