To disable SysMain in Windows 11, open Services, set the SysMain service's Startup type to Disabled, then select Stop and OK.
This guide shows how to confirm SysMain is really the cause first, how to turn it off from Services, PowerShell or Command Prompt, how to optimize it without disabling it, and how to turn it back on.
How to disable SysMain using Services
The Services console is the quickest route and works the same way on Windows 11 and Windows 10. Sign in with an administrator account first, because a standard account cannot change a system service.
- Press Windows + R to open the Run box.
- Type
services.mscand press Enter. - Scroll to SysMain (older builds list it as Superfetch), right-click it and select Properties.
- Write down the current Startup type so you can restore it later.
- Open the Startup type list and select Disabled.
- Select Apply, then select Stop under Service status.
- Select OK and close the Services console.
Disabled means the service cannot be started by you, an app or Windows until you change the startup type again. The change survives a restart, which is what makes it permanent.
What SysMain does in Windows 11
SysMain is the current service name for the feature Windows used to call Superfetch. Its job is to keep the data your PC reads most often ready in memory, so it does not have to come off the disk every time.
| Detail | What Microsoft documents |
|---|---|
| Service name | SysMain |
| Older display name | Superfetch |
| Service description | Maintains and improves system performance over time |
| What it prepares | Data that is frequently read at startup, stored in the hibernation file (Fast Startup and hibernate) or in RAM (standby) |
| Why | To avoid heavy disk reads when the PC starts or resumes |
| What drives its workload | How much data your startup apps, services and sign-in components read |
| Microsoft's recommendation on disabling it | No guidance; it is not listed as required, and Microsoft disables it on its own soft real-time device builds |
When SysMain can slow down your PC
SysMain does its reading in the background, so on most PCs you never notice it. It becomes visible when that background reading competes with what you are doing.
| Situation | What you see | Why SysMain is involved |
|---|---|---|
| Right after sign-in or a restart | Disk activity stays high for a few minutes | It reads startup data into memory while your apps are also loading |
| A slow hard disk (HDD) | Apps stall while the disk light stays on | Its reads queue behind your own reads on a drive with little spare speed |
| Many startup apps | Long busy period after every boot | More startup data means more for SysMain to prepare |
| Low free RAM | Frequent pauses when switching apps | Cached data has less room and is dropped and re-read more often |
| Low free disk space | General sluggishness alongside SysMain activity | Windows has less room for paging and temporary files |
If none of these match, SysMain is rarely the reason a PC feels slow, and turning it off will not change much.
How to check whether SysMain is causing performance issues
Check this before you change anything. SysMain runs inside a shared Service Host process, so you need to match the process to the service.
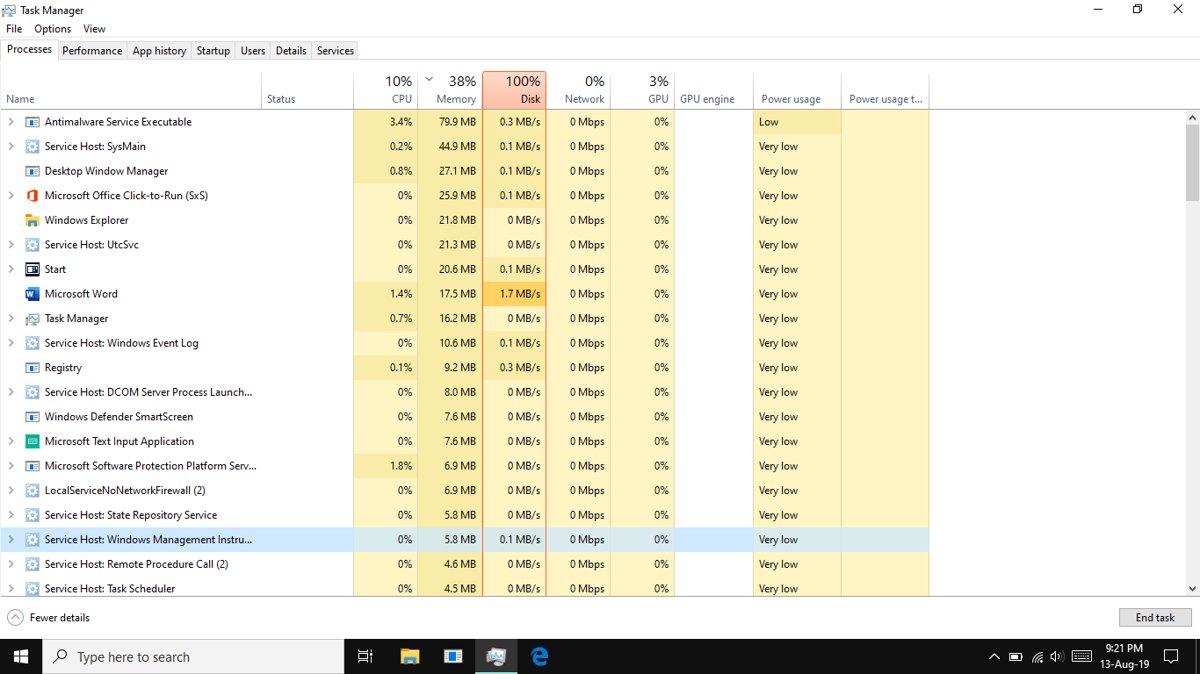
- Press Ctrl + Shift + Esc to open Task Manager while the PC feels slow.
- On the Processes tab, select the Disk column header, then the CPU column header, so the busiest processes sort to the top.
- Expand any entry named Service Host: SysMain and note its disk and CPU figures.
- Select Start, type
resmonand select Resource Monitor for a second view; on the CPU tab, sort by Average CPU. - Open Command Prompt and run
tasklist /svcto see which svchost.exe process ID hosts SysMain. - Restart the PC, wait until the desktop settles, and compare the same figures; activity that fades after a few minutes is normal startup work.
Disable SysMain only when it stays at the top of the Disk or CPU column well after startup. If another process leads, fix that process instead.
SysMain enable or disable: which setting fits your PC
| Your situation | What to do | Why |
|---|---|---|
| SysMain stays at the top of Task Manager long after startup | Disable it | It is the measured cause, and Windows runs without it |
| Activity only appears for a few minutes after boot | Keep it enabled | That is the startup data being prepared, and it ends on its own |
| You want it off for testing only | Set it to Manual or stop it once | Easy to compare before and after without a permanent change |
| Older PC with a hard disk and many startup apps | Trim startup apps first, then decide | Less startup data means less SysMain work |
| You prefer the command line or manage several PCs | Use PowerShell or Command Prompt | One line sets the startup type and stops the service |
| Nothing in Task Manager points to SysMain | Leave it alone | Disabling it will not speed up the PC |
How to disable SysMain using PowerShell or Command Prompt
Both shells need to run as administrator. Select Start, type PowerShell or Command Prompt, right-click the result, select Run as administrator and accept the User Account Control prompt.
- PowerShell: run
Set-Service -Name SysMain -StartupType Disabledto stop it starting again. - PowerShell: run
Set-Service -Name SysMain -Status Stoppedto stop the running service now. - PowerShell: run
Get-Service SysMain | Select-Object -Property Name, StartType, Statusand confirm Disabled and Stopped. - Command Prompt: run
sc stop SysMainto stop the running service. - Command Prompt: run
sc config SysMain start= disabledto block it from starting again; keep the space afterstart=. - Command Prompt: run
sc query SysMainand confirm the STATE line reads STOPPED.
Without administrator rights, both shells refuse the change with an access error. sc config fails if the space after start= is missing.
Check that SysMain is disabled in Windows 11
- Restart the PC.
- Press Windows + R, type
services.mscand press Enter. - Find SysMain: the Status column should be empty and Startup Type should read Disabled.
- Press Ctrl + Shift + Esc and confirm no Service Host: SysMain entry appears on the Processes tab.
- Use the PC normally for a day and compare disk and CPU activity with the figures you noted before.
If the PC is no faster after a day, SysMain was not the bottleneck. Turn it back on and work through the optimization table below.
How to turn SysMain back on in Windows 11
Restore the startup type you wrote down before the change. If you did not note it, Automatic lets Windows start the service at every boot.
- Press Windows + R, type
services.mscand press Enter. - Right-click SysMain and select Properties.
- Set Startup type to the value you noted, or Automatic.
- Select Apply, then select Start.
- Select OK.
- From an admin PowerShell window instead, run
Set-Service -Name SysMain -StartupType Automaticand thenSet-Service -Name SysMain -Status Running. - From an admin Command Prompt, run
sc config SysMain start= autoand thensc start SysMain.
Ways to optimize SysMain without disabling it
SysMain's workload grows with what your PC loads at startup and shrinks when the system has spare memory and disk. Reduce that load and SysMain gets quieter while it keeps doing its job.
| Change | Where to do it | Effect on SysMain |
|---|---|---|
| Reduce startup load | Task Manager > Startup apps, right-click an app > Disable | Less startup data to read and prepare |
| Stop apps running in the background | Settings > Apps > Installed apps > More options (…) > Advanced options > Let this app run in the background > Never | Frees RAM so cached data is not dropped and re-read |
| Free up disk space | Settings > System > Storage > Storage Sense > Run Storage Sense now, or Temporary files > Remove files | Leaves room for paging and temporary files |
| Check the drive and optimize it | Select Start, type Defragment and Optimize Drives, select the drive > Optimize | A well-maintained drive answers SysMain's reads faster |
| Let Windows finish background maintenance | Settings > Windows Update > Check for updates, install, then restart | Post-update activity settles instead of overlapping with SysMain |
| Use a manual startup type as a compromise | Services > SysMain > Properties > Startup type > Manual | Windows or an app can still start it on demand, but it does not start at every boot |
| Use a delayed start as a compromise | Services > SysMain > Properties > Startup type > Automatic (Delayed Start) | Starts shortly after the other automatic services, so boot is less crowded |
On older hardware these steps help less. A move from a hard disk to a solid-state drive, or more RAM, usually does more than any service setting.
When you should keep SysMain enabled
| Situation | Why SysMain is worth keeping |
|---|---|
| Task Manager does not show SysMain near the top | Disabling it removes a feature without fixing anything |
| You use Fast Startup, sleep or hibernate a lot | SysMain prepares the startup data those features resume from |
| The busy period ends a few minutes after boot | That work is what makes later app launches quicker |
| The PC has plenty of RAM and a fast drive | SysMain's reads finish quickly and do not compete with you |
| A work or school PC managed by IT | Service settings may be enforced by policy; ask the administrator first |
SysMain still running or PC still slow after disabling it
SysMain starts again after a restart
The service was stopped but its startup type was left at Automatic or Manual.
- Open Services and double-click SysMain.
- Set Startup type to Disabled and select Apply.
- Select Stop, then OK.
- Restart and check the Startup Type column again.
The command fails or says access is denied
The shell is not elevated, or the space after start= is missing.
- Close the window, select Start, type Command Prompt, right-click it and select Run as administrator.
- Accept the User Account Control prompt.
- Type the command again exactly as
sc config SysMain start= disabled. - Run
sc query SysMainto confirm the change.
Disabling SysMain did not improve performance
Another process or a hardware limit is the real bottleneck.
- Open Task Manager and sort the Processes tab by Disk and then CPU.
- Disable unneeded entries under Startup apps.
- Run Storage Sense and Optimize the system drive.
- Run a Quick scan from Windows Security > Virus & threat protection.
- Turn SysMain back on if nothing changed, because it was not the cause.
SysMain in Windows 11: frequently asked questions
Is it safe to disable SysMain in Windows 11?
Yes. Windows keeps running without SysMain, and Microsoft disables it on its own soft real-time device builds. The trade-off is that Windows no longer prepares frequently used startup data, so some app launches and resumes can take a little longer.
Should I disable SysMain in Windows 11?
Only if Task Manager shows Service Host: SysMain at the top of the Disk or CPU column well after startup. If its activity ends a few minutes after boot, or another process leads the list, leave SysMain enabled and fix the real cause.
Does disabling SysMain improve performance?
It helps only when SysMain is the measured bottleneck, usually on a hard disk that stays busy after startup. On a PC where SysMain is quiet, disabling it changes nothing you will notice and removes the startup preparation it does.
What will happen if I disable SysMain?
The SysMain service stops and cannot start again until you change its startup type. Windows, your apps and your files work as before. Windows no longer pre-reads frequently used startup data into memory or the hibernation file.
Will disabling SysMain fix 100% disk usage?
Only if SysMain is the process holding the disk at 100%. Sort the Task Manager Processes tab by the Disk column first. If Service Host: SysMain is not at the top, disabling it will not lower disk usage.
Should I disable SysMain if my PC has an SSD?
Not by default. A solid-state drive answers SysMain's reads quickly, so the service rarely competes with you. Apply the same test as on any PC: disable it only if Task Manager shows SysMain using the disk or CPU long after startup.
How do I stop SysMain permanently?
Set its startup type to Disabled, not just stop it. In Services, open SysMain's Properties, choose Disabled under Startup type, select Apply and Stop. Or run sc config SysMain start= disabled from an admin Command Prompt.
How do I know if SysMain is slowing down my computer?
Open Task Manager with Ctrl + Shift + Esc and sort the Processes tab by Disk and CPU. If Service Host: SysMain stays near the top for more than a few minutes after startup, it is slowing the PC.
How do I turn off SysMain in Windows 10?
The steps match Windows 11. Press Windows + R, type services.msc, open SysMain's Properties, set Startup type to Disabled, select Apply, then Stop and OK. The PowerShell and sc commands are identical on Windows 10.
Can I optimize SysMain without fully disabling it?
Yes. Disable unneeded startup apps, free disk space with Storage Sense, optimize the drive, and set SysMain's startup type to Manual or Automatic (Delayed Start). Each change reduces how much SysMain competes with your work at boot.
Bottom line: should you disable SysMain in Windows 11?
Measure first: disable SysMain only when Task Manager shows it holding the disk or CPU long after startup, and otherwise trim startup apps and keep it on. SysMain exists to make startup and app launches faster, and turning it off is a fix only when it is the measured bottleneck. The change takes one minute to undo from Services if the PC is no faster.