To check RAM on Windows 11, open Settings > System > About and read the Installed RAM line under Device specifications.
This guide also covers RAM speed in Task Manager, each module and free slot in PowerShell, the firmware view, and a memory test with Windows Memory Diagnostic.
The fastest way to check RAM on Windows 11
Microsoft lists the About page as the place to see installed RAM, next to the processor, system type and Windows version.
- Press Win + R, type
ms-settings:aboutand press Enter. Or select Start > Settings > System > About. - Find Device specifications at the top of the page.
- Read Installed RAM. That is the total memory in the PC, such as 16.0 GB.
Settings shows the total only. For speed, open Task Manager with Ctrl + Shift + Esc; for each module and slot, use the PowerShell method below.
Why checking RAM on Windows 11 matters
Each reason below needs a different figure, so match yours to the tool before you start clicking.
| Why you are checking | The figure that matters | Reference point |
|---|---|---|
| Windows 11 install or upgrade | Total installed RAM | Windows 11 needs 4 GB or more; the PC Health Check app tests this for you |
| A slow PC or laggy apps | How much memory is in use right now | Microsoft suggests 8 GB for everyday use and 16 GB for gaming and creative work |
| Planning an upgrade | Module sizes, free slots and the maximum the board accepts | Windows 11 Home supports up to 128 GB; Pro and Education 2 TB; Enterprise and Pro for Workstations 6 TB |
| Buying matching memory | Speed, manufacturer and part number of each module | Shown per module by PowerShell |
| Crashes or random restarts | Memory health | Windows Memory Diagnostic tests the modules |
What you can check (and what you can’t)
Windows reads module details from the firmware's SMBIOS tables. It can report what the firmware describes, but it cannot see inside the case.
| Detail | Can Windows show it? | Where |
|---|---|---|
| Total installed RAM | Yes | Settings > System > About, System Information, PowerShell |
| Memory in use right now | Yes | Task Manager > Performance > Memory |
| Configured speed in MHz | Yes | Task Manager, PowerShell ConfiguredClockSpeed |
| Size, slot label, maker and part number of each module | Yes | PowerShell Win32_PhysicalMemory |
| Number of slots on the board | Yes, if the firmware reports it | PowerShell Win32_PhysicalMemoryArray |
| Whether memory is faulty | Yes, with a test | Windows Memory Diagnostic |
| Whether RAM is soldered or upgradeable | No | The PC maker's specifications for your model |
| The speed printed on the module's label | No | The module label or the maker's page for its part number |
Prerequisites before you start
| Method | What you need |
|---|---|
| Settings, Task Manager, System Information | Nothing extra; a standard account works |
PowerShell (Get-CimInstance) |
Windows PowerShell, which is built into Windows 11; no admin rights needed to read memory details |
Command Prompt wmic |
An older Windows 11 build that still includes WMIC; versions 24H2 and 25H2 no longer have it |
| Windows Memory Diagnostic | Administrator credentials if prompted, and time for a restart; save your work first |
| BIOS/UEFI | A restart; menu names differ by PC maker |
If you are not sure which Windows 11 version you run, see how to check what version of Windows you have before you try WMIC.
Method 1: Check RAM in Settings
Settings is the quickest check, and the number matches what an app installer or a support agent asks for.
- Select Start, then Settings.
- Select System in the left pane.
- Scroll to the bottom and select About.
- Under Device specifications, read Installed RAM.
- Check System type on the same card; Windows 11 is 64-bit, so all installed RAM up to your edition's limit is available to it.
If other tools show less memory available than this figure, the gap is usually memory reserved for hardware, covered in the troubleshooting section.
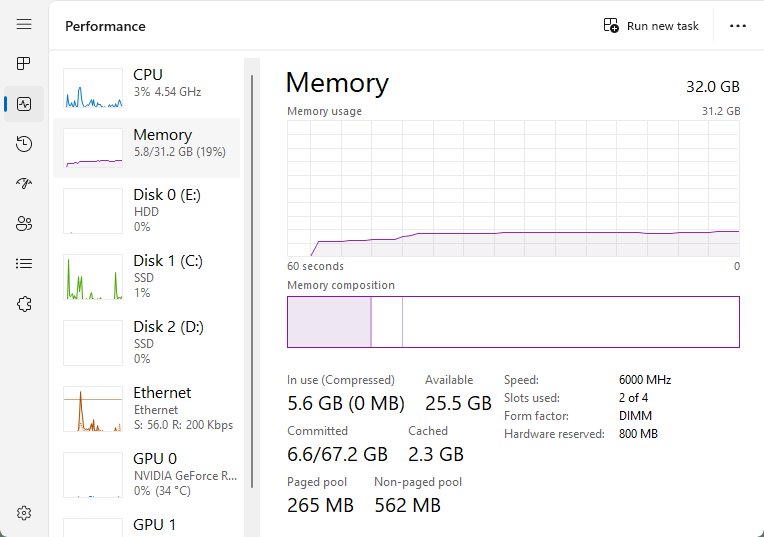
Method 2: Check RAM in Task Manager
Task Manager adds live usage and the memory speed to the total. Use it when the question is "why is my PC slow" rather than "how much do I have".
- Press Ctrl + Shift + Esc, or right-click Start and select Task Manager.
- Select Performance in the left pane.
- Select Memory.
- Read the total memory shown for the page and the usage graph for memory in use.
- Read Speed and Hardware reserved in the figures under the graph.
Microsoft notes that Task Manager can misread SMBIOS data, so its Speed and Hardware reserved figures may differ from the firmware. If a figure looks wrong, confirm it with PowerShell or Resource Monitor.
Method 3: Check RAM with System Information (msinfo32)
System Information shows RAM alongside the BIOS version, motherboard model and other hardware, which helps when you are writing up specs for a support request.
- Press Win + R.
- Type
msinfo32and press Enter. - Keep System Summary selected in the left pane.
- Scroll the right pane to the physical memory entries to see installed and available memory.
- Note the BIOS version and motherboard model in the same list if you plan to look up your board's memory support.
System Information reports totals, not individual modules. Use PowerShell for a per-slot list.
Method 4: Check RAM using Command Prompt
systeminfo works on every Windows 11 build. Microsoft describes it as showing hardware properties, including RAM, along with operating system details.
systeminfoOpen Command Prompt from Start, type the command and press Enter. It prints the operating system configuration and hardware properties for this PC, including physical memory totals.
You should see: After a few seconds a long list appears. Read the physical memory lines in the middle of the list for the total and available memory.
WMIC is gone from current builds. Microsoft says Windows 11 versions 24H2 and 25H2 no longer include it, and it can't be added back as a Feature on Demand. On an older build that still has it, wmic path Win32_PhysicalMemory get BankLabel,Capacity,ConfiguredClockSpeed,DeviceLocator lists each module.
If Command Prompt says wmic is not recognized, that is the removal, not a fault. Use the PowerShell method instead; it reads the same data.
Method 5: Check RAM using PowerShell
PowerShell is the most detailed built-in method. Get-CimInstance reads the Win32_PhysicalMemory class, which lists one entry per installed module.
- Select Start, type PowerShell and open Windows PowerShell.
- Get the total installed RAM in GB:
(Get-CimInstance -ClassName Win32_PhysicalMemory | Measure-Object -Property Capacity -Sum).Sum / 1GB - List each RAM module with its capacity and speed:
Get-CimInstance -ClassName Win32_PhysicalMemory | Format-Table DeviceLocator, BankLabel, Capacity, ConfiguredClockSpeed, Manufacturer, PartNumber - Read Capacity in bytes (17179869184 is 16 GB) and ConfiguredClockSpeed in MHz. DeviceLocator is the slot label, such as DIMM 1.
- Show the memory slots on the board:
Get-CimInstance -ClassName Win32_PhysicalMemoryArray | Format-Table MemoryDevices, MaxCapacityEx - Compare MemoryDevices, the number of slots, with the number of rows from step 3 to see how many slots are free. MaxCapacityEx is the board's maximum in kilobytes.
Use ConfiguredClockSpeed for speed rather than the older Speed property; Microsoft documents ConfiguredClockSpeed in MHz and returns 0 when the speed is unknown.
Search the PartNumber value on the memory maker's site to find the module's type and rated speed before buying a match.
Method 6: Check installed RAM and speed in BIOS/UEFI
The firmware setup screen shows memory as the motherboard detects it, before Windows loads. Use it when Windows reports less RAM than you installed.
- Save your work and close open apps.
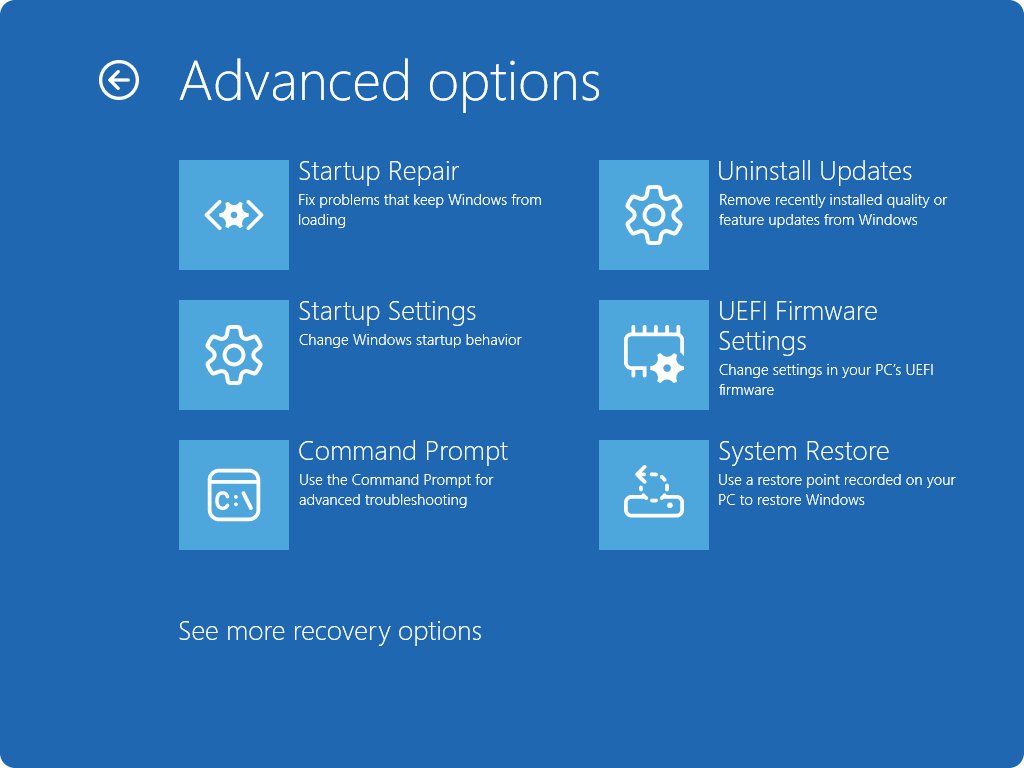
- Open Settings > System > Recovery.
- Next to Advanced startup, select Restart now.
- On the Choose an option screen, select Troubleshoot > Advanced options > UEFI Firmware Settings.
- Select Restart. The PC opens the UEFI firmware settings screen.
- Find the memory or system information page. Its name and location depend on your PC maker; check the maker's manual for your model.
- Exit without saving changes to return to Windows.
If UEFI Firmware Settings is missing from Advanced options, the PC maker's documentation lists the key to press at power-on instead.
Test RAM health with Windows Memory Diagnostic
Checking capacity does not tell you whether the memory works. Run this test after crashes, blue screens or random restarts.
- Save your work; the PC restarts during the test.
- Press Win + R, type
mdschedand select OK. Provide administrator credentials if prompted. - Select Restart now and check for problems (recommended).
- Let the Standard test run. For a deeper check, press F1 during the test, pick Extended with the arrow keys, and press F10 to apply.
- After Windows restarts, read the result in the notification that appears.
- If you miss it, right-click Start > Event Viewer and open Application and Services Logs > Microsoft > Windows > MemoryDiagnostics-Results > Debug.
- Look for Event ID 2001, which means no memory errors were detected.
How to confirm RAM modules and slots add up
- Note Installed RAM from Settings > System > About.
- Add up the Capacity values from the PowerShell module list; the sum should match the Settings total.
- Count the module rows and compare them with MemoryDevices; the difference is your free slots.
- Check that every module reports the same ConfiguredClockSpeed. Microsoft's guidance for unstable PCs is to verify all memory runs at the same speed.
- If the totals disagree, compare them with the firmware's memory page from Method 6 before opening the case.
Quick comparison: which method should you use?
| Your question | Use this | Why |
|---|---|---|
| How much RAM do I have? | Settings > System > About | One screen, no commands |
| Is my RAM full, and how fast is it? | Task Manager > Performance > Memory | Live usage graph plus speed |
| I need full specs for a support ticket | System Information (msinfo32) |
RAM, BIOS and board details in one list |
| I only have a command line | systeminfo in Command Prompt |
Works on every build now that WMIC is removed |
| What is in each slot, and how many are free? | PowerShell Get-CimInstance |
Per-module size, speed and part number, plus slot count |
| Windows shows less RAM than I installed | BIOS/UEFI setup screen | Shows what the board detects before Windows loads |
| Is my RAM faulty? | Windows Memory Diagnostic | The only built-in tool that tests the memory |
Common issues and troubleshooting
Windows shows less RAM than you installed
Part of the memory is reserved for hardware, such as graphics, or a module is not detected by the board.
- Open Task Manager > Performance > Memory and read Hardware reserved; that amount is not available to Windows.
- Run the PowerShell module list and check that every module you installed appears with the right Capacity.
- If a module is missing there, check the firmware memory page from Method 6; if the board does not see it either, the module or slot needs attention.
- Check your edition's limit: Windows 11 Home uses at most 128 GB of physical memory.
Memory speed shows weird numbers
Task Manager can parse SMBIOS memory data incorrectly, and the older WMI Speed property is not the MHz figure.
- Run
Get-CimInstance -ClassName Win32_PhysicalMemory | Format-Table DeviceLocator, ConfiguredClockSpeedand read the speed in MHz. - Compare it with the speed on the firmware's memory page.
- For hardware reserved memory, use Resource Monitor, which Microsoft names as the accurate alternative to Task Manager.
PowerShell shows fewer RAM modules than you installed
Windows lists only the modules the firmware reports, so an undetected or unseated module is invisible to it.
- Restart and check the memory page in UEFI (Method 6).
- If the firmware also shows less, check the PC maker's manual for supported module sizes and slot order.
- Run Windows Memory Diagnostic once the missing module is detected again.
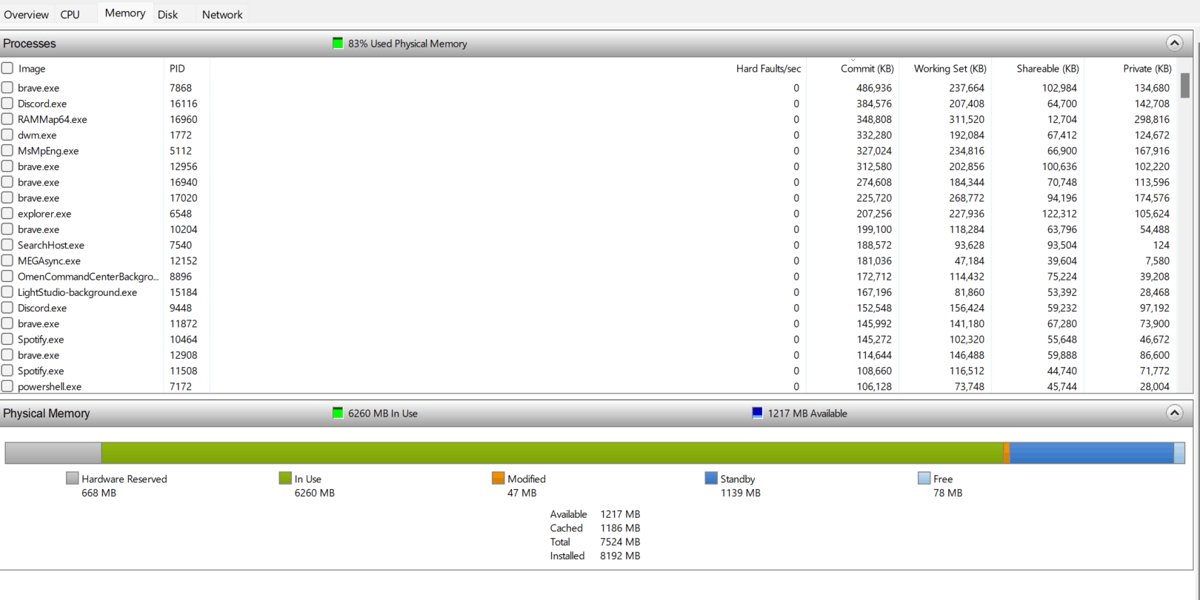
Task Manager shows low available memory but total looks right
The RAM is fine; open apps and browser tabs are using most of it.
- In Task Manager, open the processes list and sort it by memory to find the heaviest apps.
- Close the apps and tabs you are not using.
- If memory stays full with only a few apps open, compare your total with the 8 GB and 16 GB guidance in the table above.
Command Prompt says wmic is not recognized
WMIC is removed from Windows 11 versions 24H2 and 25H2 and cannot be reinstalled.
- Use
systeminfofor totals. - Use the PowerShell commands in Method 5 for modules, speed and slots.
Frequently asked questions
How do I check how much RAM I have on Windows 11?
Open Settings > System > About and read Installed RAM under Device specifications. You can also press Win + R, type ms-settings:about and press Enter to jump straight to that page. The figure is the total memory installed in the PC.
How do I check RAM on a Windows 11 laptop?
Use the same Settings > System > About page as on a desktop. Laptops often have some memory soldered to the board, which Windows cannot flag. Check the laptop maker's specifications for your model before planning an upgrade.
Can I check RAM speed in Windows 11?
Yes. Open Task Manager with Ctrl + Shift + Esc, select Performance, then Memory, and read Speed. For a per-module figure in MHz, run Get-CimInstance -ClassName Win32_PhysicalMemory in PowerShell and read ConfiguredClockSpeed.
How do I check how many RAM slots I have on Windows 11?
Run Get-CimInstance -ClassName Win32_PhysicalMemoryArray | Format-Table MemoryDevices in PowerShell. MemoryDevices is the number of slots. Count the rows from Win32_PhysicalMemory to see how many are filled; the rest are free.
How do I check my RAM type on Windows 11?
Run the PowerShell module list and copy the PartNumber of a module. Search that part number on the memory maker's site to see its type and rated speed. The firmware memory page and your PC maker's specifications also list it.
How do I test my RAM on Windows 11?
Press Win + R, type mdsched and select OK, then choose Restart now and check for problems (recommended). The test runs during the restart. Event ID 2001 in the MemoryDiagnostics-Results log means no memory errors were detected.
How do I check RAM usage on Windows 11?
Open Task Manager, select Performance, then Memory. The graph shows how much memory is in use. The processes list in Task Manager shows which apps use the most.
How do I check VRAM on Windows 11?
VRAM is memory on the graphics card, separate from system RAM, so the About page does not include it. Open Task Manager > Performance and select GPU, or press Win + R and run dxdiag, to see your graphics adapter's details.
Why does Windows 11 show less RAM than it says on my box?
Some memory is reserved for hardware such as integrated graphics, and Task Manager lists it as Hardware reserved. If the gap is a whole module, check the firmware memory page, because the board may not be detecting it.
How do I check RAM on Windows 10?
Open Settings > System > About on Windows 10 too; Installed RAM is on the same card. Task Manager, msinfo32 and the PowerShell commands in this guide work the same way on Windows 10.
Bottom Line
Read Installed RAM in Settings > System > About for the total, and run the PowerShell Win32_PhysicalMemory command when you need speed, slots or part numbers. Settings answers the common question in three clicks, while PowerShell is the only built-in tool that lists every module now that WMIC is gone from current Windows 11 builds.


List of All Windows 11 Hardware Requirements - Techdows
[…] Check it under Settings > System > About > Installed RAM. For slot counts, speed and other detail, follow the steps to check RAM on Windows 11. […]