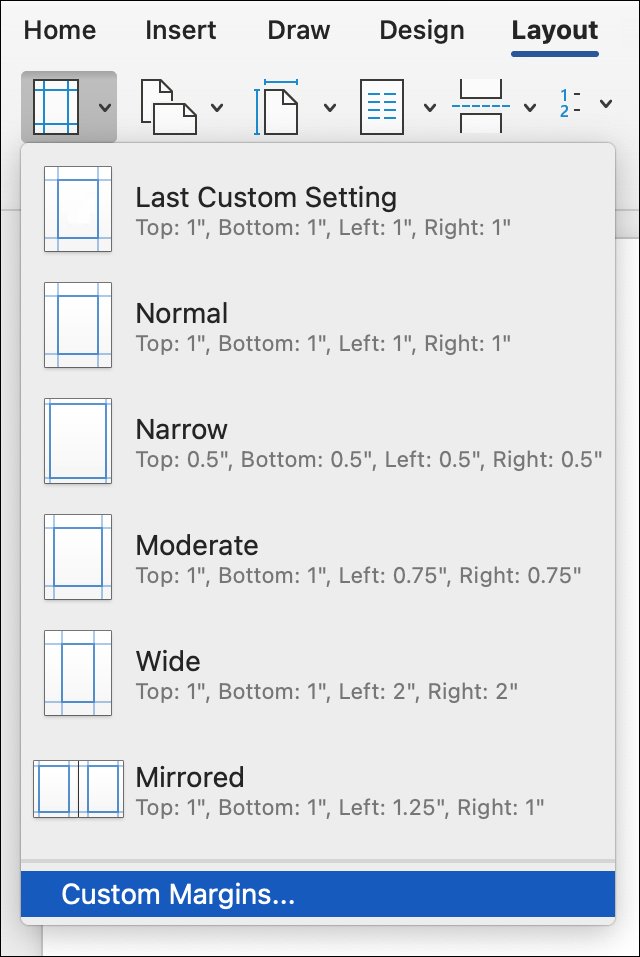
To change margins in Word for Microsoft 365, select Layout > Margins and pick a preset, or choose Custom Margins to type your own values.
This guide covers custom margins, margins for a single page, new default margins, gutter and mirror margins, and the same task in Word for Mac, the web and mobile.
Step by step tutorial to change Microsoft Word margins in Office 365
Every new Word page starts with a one-inch margin on each side. These steps work in Word for Microsoft 365, Word 2024, Word 2021, Word 2019 and Word 2016 on Windows.
- Open the document and click anywhere in the section you want to change.
- Select the Layout tab on the ribbon.
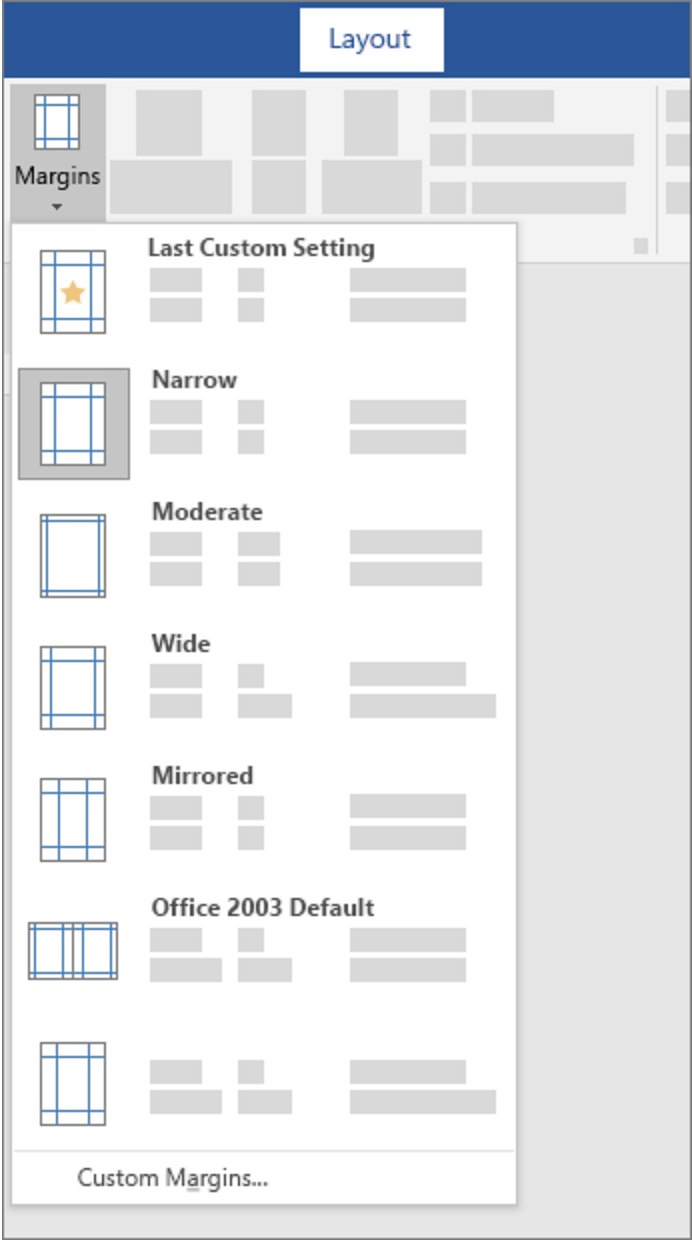
- Select Margins to open the margin gallery. Each preset shows its measurements.
- Pick a preset to apply it straight away, or select Custom Margins to set your own values.
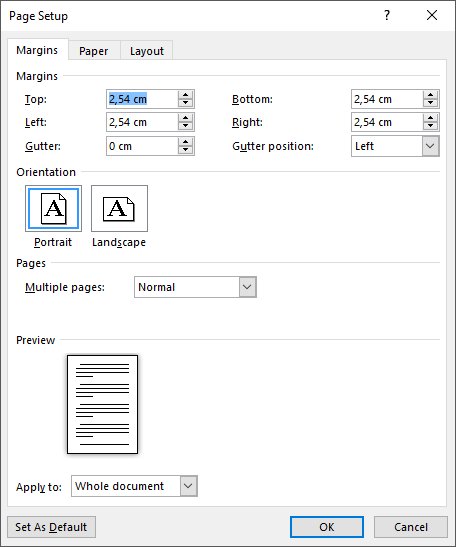
- In the dialog that opens, enter new values in Top, Bottom, Left and Right.
- Select OK to apply the margins.
If the Layout tab is missing, the ribbon is collapsed. Show the Word ribbon first, then repeat the steps.
What are margins in Microsoft Word?
A margin is the blank space between the page edge and your text. Word stores margins per section, so one document can hold several margin sets.
| Setting in Custom Margins | What it controls | When to change it |
|---|---|---|
| Top and Bottom | Space above and below the text on every page | Fit more lines, or leave room for a letterhead |
| Left and Right | Space beside the text | Widen the text area, or meet a school or publisher rule |
| Gutter | Extra space added to the side or top margin for binding | Documents you will staple, punch or bind |
| Gutter position | Whether the gutter sits on the Left or Top | Top-bound reports or flip pads |
| Mirror margins (under Multiple pages) | Turns Left and Right into Inside and Outside | Double-sided books, booklets and magazines |
Margins are not the same as indents. Indents move a paragraph inside the margins and are set from the Paragraph dialog on the Home tab.
Microsoft Word change margins on one page
Word has no per-page margin switch. To give one page its own margins, wrap it in section breaks; a margin change then applies only to the current section.
- Click at the very start of the page that needs different margins.
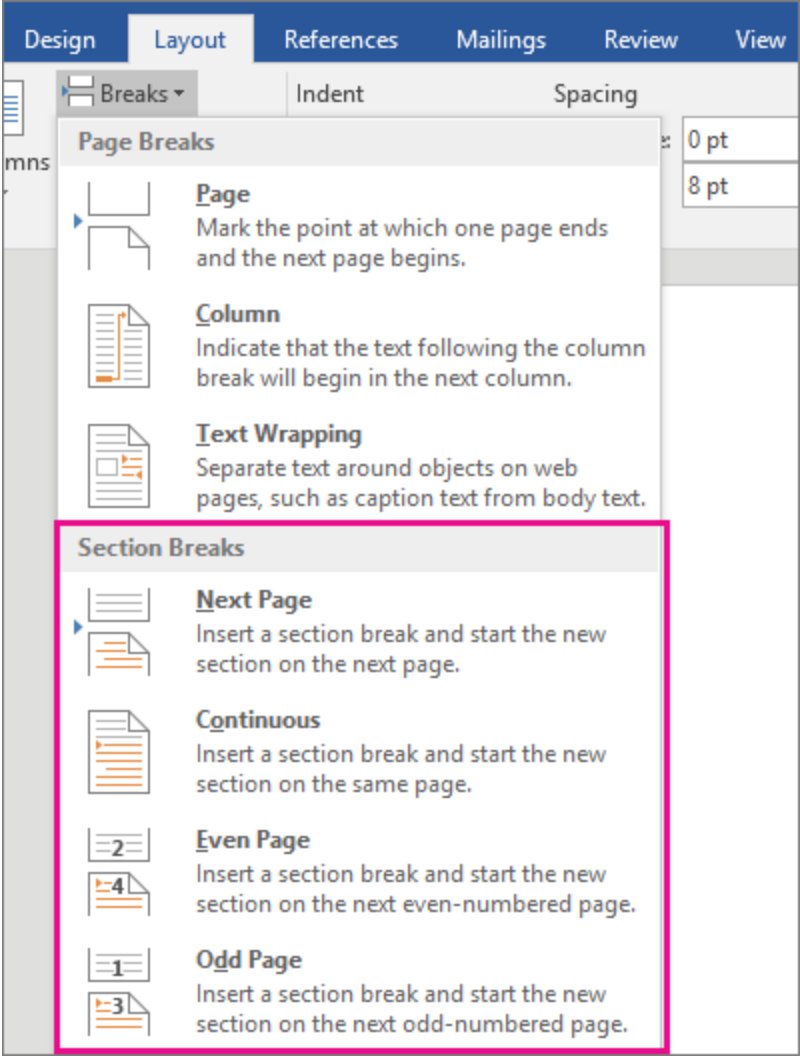
- Select Layout > Breaks and choose Next Page under section breaks.
- Click at the end of that same page and insert another Next Page section break.
- Click anywhere inside the page you just isolated.
- Select Layout > Margins > Custom Margins.
- Enter the new values and select OK. Only the current section changes.
If the change lands on the wrong pages, press Ctrl + Z, move the cursor to just after the section break, and try again. Section breaks can also leave an empty page behind, so delete a blank page in Word if one appears.
Change Microsoft Word default margins
New blank documents take their margins from the Normal template, Normal.dotm. Change the margins inside that template and every future document starts with them.
- In Word on Windows, select File > Open.
- Go to
C:\Users\user name\AppData\Roaming\Microsoft\Templates, replacing *user name* with your Windows account name. - Open Normal.dotm.
- Select Layout > Margins > Custom Margins, enter the margins you want and select OK.
- Select File > Save, then close the template.
- Create a new blank document to see the new default margins.
Existing documents keep their own margins. Only documents you create after saving Normal.dotm pick up the change.
How to set gutter margins in Word
A gutter adds space so binding does not hide your text. Mirror margins make left and right pages reflect each other for double-sided printing.
- Select Layout > Margins > Custom Margins.
- In the Gutter box, enter the width the binding needs.
- In the Gutter position box, choose Left or Top.
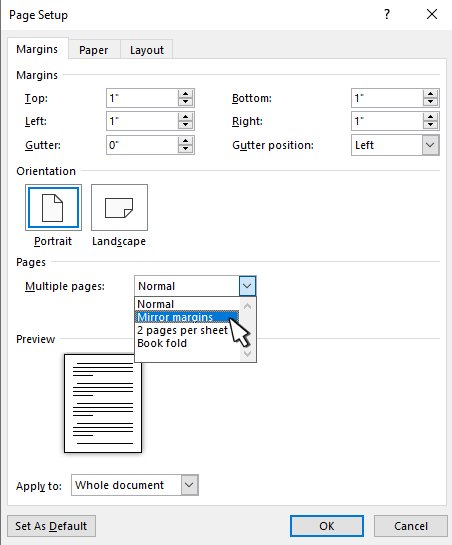
- For facing pages, open Multiple pages and choose Mirror margins.
- Enter widths in the Inside and Outside boxes.
- Select OK.
Gutter position greys out with Mirror margins, 2 pages per sheet or Book fold, because Word places the gutter itself.
How to change margins in Word for the web
Word for the web in a browser offers the same presets and custom values as the desktop app.
- Open the document in Word for the web and switch to editing if it opened in viewing mode.
- Select Page Layout > Margins.
- Pick a preset, or select Custom Margins.
- Set the top, bottom, left and right values.
- Select OK.
How to change margins in Word for Mac
Word for Mac uses the Layout tab for one document and the Format menu for new default margins.
- Select the Layout tab, then select Margins.
- Pick a preset, or select Custom Margins and enter new values, then select OK.
- To change the default, open the Normal template or a document based on it.
- Select Format > Document and open the Margins tab.
- Set the margins and select Default so new blank documents use them.
If you change the Mac Normal template by mistake, delete, rename or move it. Word rebuilds it with the original settings the next time it opens.
How to change margins in Word on iPhone, iPad and Android
The Word mobile app sets a default margin on every page and lets you swap it from a gallery.
- On a tablet, tap Layout. On a phone, tap the Edit icon, tap Home, then tap Layout.
- On the Layout tab, tap Margins.
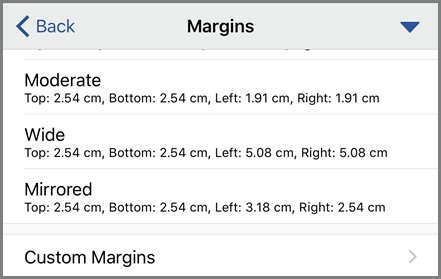
- Select a preset from the gallery; each one lists its measurements.
- Select Mirrored for facing pages.
- Select Custom Margins, if your version shows it, and enter Top, Left, Right and Bottom values.
Custom margins are not offered in every mobile version of Word. If the option is missing, set the margins in Word on a computer and reopen the file on your phone.
Change Word margin measurement to inches or centimeters
Word can show margins in inches, centimeters, millimeters, points or picas. Switching the unit also changes the ruler and other measurements.
- Select File > Options > Advanced.
- Scroll down to Display.
- Choose inches, centimeters, millimeters, points or picas in Show measurements in units of.
- Select OK, then reopen Custom Margins to see the new units.
Pros of changing Microsoft Word margins
| Benefit | Margin setting that delivers it |
|---|---|
| Fit more text on each page | A narrower preset or smaller custom values |
| Meet a style guide such as one-inch margins | Custom Margins with exact values |
| Keep text clear of staples or binding | Gutter with a Left or Top position |
| Print neat double-sided booklets | Mirror margins with Inside and Outside widths |
| Give one page, such as a wide table, extra room | Section breaks around that page plus its own margins |
| Start every new document the same way | Margins saved in Normal.dotm |
Wide tables sometimes need more than margins. Splitting text into columns in Microsoft Word also uses the Layout tab and works inside the same section breaks.
Cons of changing Microsoft Word margins
| Drawback | How to avoid it |
|---|---|
| Very small margins can be cut off when printed | Keep margins inside your printer's printable area |
| A change applies only to the current section | Select the whole document or check each section |
| Editing Normal.dotm affects every future document | Back up Normal.dotm before you edit it |
| Shifted margins move page breaks, tables and pictures | Review the whole document after the change |
| Mobile apps may not offer custom values | Set exact margins on Windows, Mac or the web |
Word margins keep changing
Margins that seem to change on their own almost always trace back to sections or the Normal template.
New documents keep going back to one-inch margins
New blank documents use Normal.dotm, and the template was renamed, damaged or moved, so Word rebuilt it with the original defaults.
- Open Normal.dotm from
C:\Users\user name\AppData\Roaming\Microsoft\Templates. - Set the margins again with Layout > Margins > Custom Margins.
- Select File > Save and keep a backup copy of the file.
Margins changed on only part of the document
The document has several sections, and Word applies a new margin only to the current one.
- Select Home > Show/Hide to display section breaks.
- Click in each section that still has the old margins.
- Apply the same values with Layout > Margins > Custom Margins.
Top and bottom margins look missing on screen
White space between pages is hidden in Print Layout view.
- Point to the top or bottom edge of a page until the pointer becomes a double-pointed arrow.
- Double-click to show the margins again.
“The margins of section are set outside the printable area of the page”
Margins are closer to the paper edge than the printer can print.
- Click in the section named in the message.
- Open Layout > Margins > Custom Margins and select OK.
- When Word warns that one or more margins are outside the printable area, select Fix to raise them to the printer's minimum.
- Print again.
Microsoft Word margins FAQ
How do I change margins in Microsoft Word?
Select Layout > Margins and choose a preset, or select Custom Margins and type values for Top, Bottom, Left and Right, then select OK. The change applies to the section that holds your cursor.
Can I set different margins for different pages in a document?
Yes. Put section breaks before and after the pages, click inside that section, then set new values in Layout > Margins > Custom Margins. Word applies margins per section, so the rest of the document keeps its own margins.
What’s the difference between margin and padding in Word?
Word pages have margins, not padding. Margins set the space between the page edge and the text. Indents, set in the Paragraph dialog, move individual paragraphs inside those margins, and text boxes have their own internal margins on the Shape Format pane.
How do I apply new margin settings to my entire document?
If the document has one section, any margin change already covers every page. If it has several sections, apply the same values in each one, or remove the section breaks you no longer need before you change the margins.
What are the standard margin sizes in Word?
Word gives every new page a one-inch margin on all four sides by default. The Margins gallery on the Layout tab lists the other presets with their measurements, so you can compare them before you apply one.
How do I know if my printer can print with the margins I set?
Word warns you when margins fall outside the printable area of the page. Open Custom Margins and select OK; if Word reports a problem, select Fix to raise the margins to your printer's minimum.
How do I change the default margins in Word?
On Windows, open Normal.dotm from your Templates folder, set the margins, and save the template. On a Mac, select Format > Document, open the Margins tab, set the values, and select Default.
Why do my Word margins keep changing?
Usually the document has several sections with different margins, or the Normal template was reset. Check each section with section breaks shown, and set the margins again inside Normal.dotm so new documents keep them.