Press Ctrl + H in Word, type ^b in Find what, leave Replace with empty and select Replace All to remove every section break at once.
The steps below also cover deleting one break, the Mac route, Word for the web, adding breaks back, and keeping your headers, footers and page layout intact.
How to remove all section breaks at once
This works in the Word desktop app on Windows. Save a copy of the document first, because removing every break can change the layout of the whole file.
- Press Ctrl + H, or go to Home > Editing > Replace.
- Click in Find what and type
^b, the search code for a section break. - Leave Replace with empty.
- Select Replace All.
- Select Close and scroll through the document to check the layout.
Prefer the menus? Select More in the same dialog, then Special, and choose the section break item. Word fills in the code for you.
What is a section break in Word?
A section break divides a document into parts that can each have their own layout. Word has four types, and all four are matched by ^b.
| Section break type | Where the next section starts | Typical use |
|---|---|---|
| Next Page | On the following page | Starting a new chapter |
| Continuous | On the same page | Changing the number of columns mid-page |
| Even Page | On the next even-numbered page | Keeping chapters on even pages |
| Odd Page | On the next odd-numbered page | Keeping chapters on odd pages |
Page orientation, headers and footers, page numbering, columns and page borders can all change from one section to the next. A manual page break only moves text to a new page, and you remove page breaks in Word with a different code.
Remove all section breaks from a Word document without losing formatting
When a break goes, the text before and after it becomes one section, and that section takes the formatting of the part that came after the break. Remove every break and the entire document follows the formatting of its final section.
| If your document has | What can change | What to do |
|---|---|---|
| Different headers or footers per section | Earlier sections pick up the header and footer of the later section | Use Link to Previous instead of deleting the break when you want the earlier section's header or footer to carry forward |
| A landscape page among portrait pages | The merged text takes one orientation | Keep the breaks around that page and remove only the others |
| Two or three columns on part of a page | The column layout is lost or spreads to other text | Keep those Continuous breaks and remove the rest one at a time |
| Page numbers that restart in a section | Numbering runs on as one sequence | Set page numbers from a specific page again after the breaks are gone |
Press Ctrl + Z straight after Replace All if the result looks wrong.
Remove multiple or all section breaks in MS Word
The same dialog handles more than a blanket removal. Open it with Ctrl + H, then match your goal to a row.
| What you want | Find what | Replace with | Button |
|---|---|---|---|
| Remove every section break in the document | ^b |
Empty | Replace All |
| Remove only the breaks in one part of the document | ^b, with that part selected first |
Empty | Replace All |
| Decide on each break in turn | ^b |
Empty | Find Next, then Replace on the ones to remove |
| Swap each break for a manual page break | ^b |
^m |
Replace All |
| Swap each break for a new paragraph | ^b |
^p |
Replace All |
Swapping for ^m keeps each new chapter on its own page, even though the document is now one section.
Removing a section break in Microsoft Word for Windows and Mac
Use this when only one break needs to go, such as one that is pushing text onto a new page. The steps are the same on both systems.
- Go to Home and select Show/Hide, the paragraph mark icon.
- Find the marker labelled Section Break at the spot you want to fix.
- Select the break, or place the cursor just before it.
- Press Delete.
- Check that the text after the break still has the layout you expect.
If that leaves an empty page behind, you can delete the blank page in Word as a separate step.
Microsoft Word remove all section breaks on a Mac
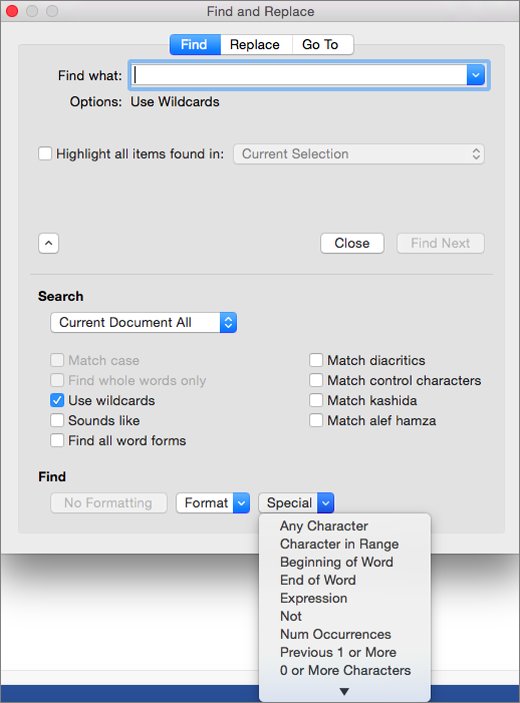
The search box on a Mac only offers basic replacing, so go through Advanced Find & Replace to reach the Special menu.
- Select View > Navigation Pane.
- In the pane, select the magnifying glass, then the Settings gear, then Advanced Find & Replace.
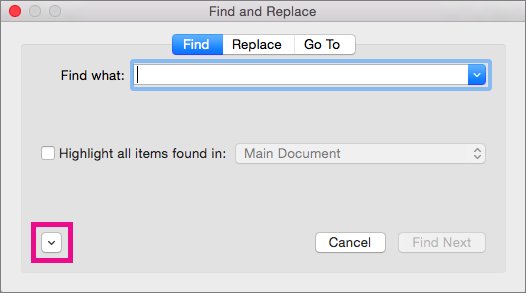
- Select the Replace tab, then the arrow at the bottom of the dialog to show all options.
- Click in Find what, open the Special menu and choose the section break item.
- Leave Replace with empty.
- Select Replace All.
Can you delete a section break in Microsoft Word Online?
No. Word for the web cannot delete, change or insert section breaks, and its replace box only supports matching case and whole words. Open the file in the desktop app instead, and your saved changes stay in the original location.
- Open the document in Word for the web.
- Select Open in Word.
- In the desktop app, press Ctrl + H and run the
^breplacement, or delete a single break with Show/Hide on. - Save the document and close the desktop app.
- Reopen the file in the browser to confirm the breaks are gone.
How to change a section break in Word instead of deleting it
A break that starts a new page by accident often only needs a different type. Changing Next Page to Continuous closes the gap and keeps each section's formatting.
- Click in the section that comes after the break.
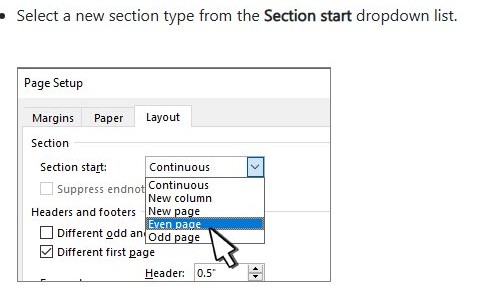
- On Windows, go to the Layout tab and select the small arrow at the bottom-right of the Page Setup group.
- On a Mac, go to Format > Document.
- Open the Layout tab in the dialog.
- Pick the new type from the Section start list.
- Select OK.
Word for the web cannot do this either, so use the desktop app.
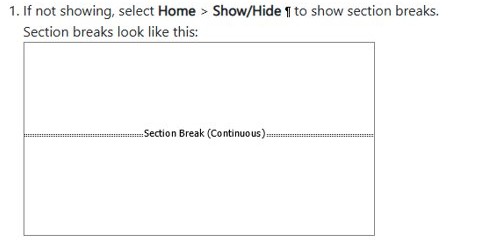
How to show section breaks in Word
Section breaks stay hidden until you turn on formatting marks. Use these steps before you remove anything, and again afterward to prove they are gone.
- Go to the Home tab.
- Select Show/Hide, the paragraph mark icon, so it is highlighted.
- Scroll through the document and look for labelled Section Break markers.
- Press Ctrl + H, type
^bin Find what and select Find Next to jump to any that remain. - Select Show/Hide again when you are done to hide the marks.
How to add section breaks to a Microsoft Word document
If a removal went too far, put back only the breaks you need. Word for Windows and Mac use the same menu.
- Click where the new section should begin.
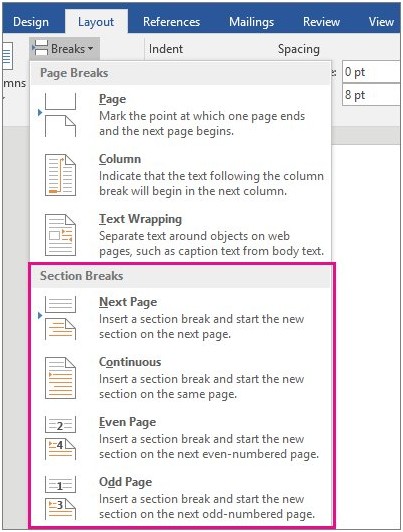
- Go to Layout > Breaks.
- Under the section break types, choose Next Page, Continuous, Even Page or Odd Page.
- Click inside the new section and apply the layout you want, such as a new orientation or a different number of columns.
Find and Replace not working in Word and Excel
Word does not find any section breaks with ^b
A leftover search option is changing how Word reads the code, or the document has no section breaks.
- In Find and Replace, select More.
- Clear Use wildcards, because that option makes Word read Find what as a search operator.
- Select No Formatting to clear any font or style criteria from an earlier search.
- Retype
^bin Find what and select Find Next. - Turn on Show/Hide to confirm whether the document has section breaks at all.
Word will not let you replace anything
The document is protected against editing.
- Go to Review > Restrict Editing.
- Select Stop Protection.
- Enter the password if the owner set one.
- Run the replacement again.
Special options are missing in the browser
Word for the web only offers matching case and whole words.
- Select Open in Word.
- Run the replacement in the desktop app.
- Save the file to the same location.
Excel Replace misses cells you can see
Search options narrow the match, and the Replace tab only looks in formulas.
- Press Ctrl + H and select Options>>.
- Set Within to Sheet or Workbook.
- Clear Match case and Match entire cell contents.
- Clear any criteria set through Format.
- Put a tilde before a literal
?,*or~in Find what, such asfy91~?.
Ctrl + H opens the Find tab in Excel 2016
A known bug in Excel 2016 Version 1708 (Build 8420.xxxx), since fixed.
- Go to File > Account.
- Select Update Options > Update Now.
- Reopen Excel and press Ctrl + H again.
Word section breaks FAQ
How do I remove all section breaks in Word?
Press Ctrl + H, type ^b in Find what, leave Replace with empty and select Replace All. Word deletes every section break in the document in one step, and Ctrl + Z restores them if the layout changes in a way you do not want.
Is there a way to delete all section breaks in Word?
Yes. Find and Replace with the ^b code is the built-in way, and it needs no macro or add-in. On a Mac, reach the same search through Advanced Find & Replace and the Special menu. Word for the web cannot do it.
How do I delete a section break in Word?
Go to Home and select Show/Hide so the break appears. Select the break or put the cursor just before it, then press Delete. The text on both sides becomes one section that uses the formatting of the part after the break.
How do I get rid of a section break without changing the formatting?
Change the break type instead of deleting it. A Next Page break set to Continuous no longer starts a new page, and both sections keep their own layout. For headers and footers, Link to Previous carries the earlier section's content forward.
What is the Find and Replace code for a section break?
The code is ^b. Type it in the Find what box of the Find and Replace dialog. It matches all four break types: Next Page, Continuous, Even Page and Odd Page. Related codes include ^m for a manual page break and ^p for a paragraph mark.
Is there a way to remove all page breaks in a Word document?
Yes. Use the same dialog with ^m in Find what and an empty Replace with, then select Replace All. This removes manual page breaks only. Word adds automatic page breaks where a page fills up, and those cannot be removed.
Why can't I remove a section break in Word online?
Word for the web does not support modifying or deleting section breaks. Select Open in Word to edit the file in the desktop app, remove the break there and save. The change is stored in the same location as the original file.
How do I take out a section break on a Mac?
Go to Home and select Show/Hide, select the break, and press Delete. To clear all of them, open View > Navigation Pane, select the magnifying glass, then the Settings gear and Advanced Find & Replace, and use the Special menu.