To fix screen resolution problems in Windows 11, open Settings > System > Display, select the right display and pick the Display resolution marked (Recommended); if that option is missing or keeps changing, update or reinstall the graphics driver.
This guide covers why the resolution will not change, driver fixes, the black screen after a resolution change, the grey screen after an update, over-saturated colors and how to tell which display driver Windows is using.
How to fix screen resolution problems in Windows 11/10
Most resolution problems come down to the wrong value being picked or the wrong display being selected. Start here before touching drivers.
- Select Start > Settings > System > Display.
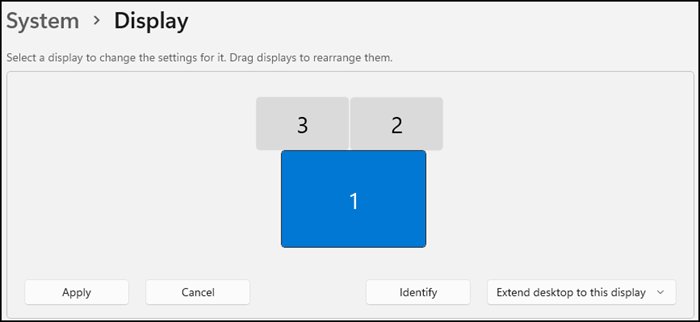
- If more than one monitor is connected, select the display you want to change at the top of the page. Select Identify if you are not sure which number belongs to which screen.
- In the Display resolution row, open the list and choose the option marked (Recommended).
- Under Scale & layout, set Scale to the value marked (Recommended) if text looks too big or too small.
- If the resolution list is short or the setting changes by itself, select Start > Settings > Windows Update > Check for updates to get the latest graphics driver.
- Press Windows + Ctrl + Shift + B to reset the graphics driver if the screen still looks wrong. A beep or a brief flicker means the reset ran.
A monitor can run below its native resolution, but text will not look as sharp, and the picture can be small, centered, edged with black or stretched.
Why can't I change resolution in Windows 11?
The Display resolution list only shows what the active graphics driver reports for the selected monitor. Match what you see to a row.
| What you see | Likely cause | What to do |
|---|---|---|
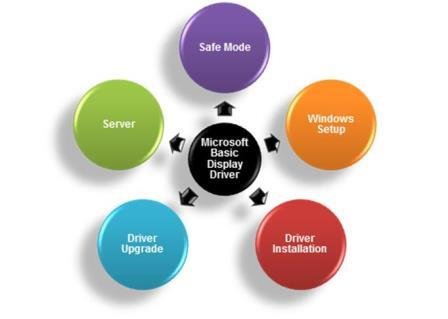
| Resolution list is greyed out or has one entry | Windows is using the Microsoft Basic Display Adapter, which cannot change modes on UEFI PCs | Install the graphics driver through Windows Update or Device Manager |
| Resolution changes on its own | The graphics driver needs an update | Run Windows Update and install optional driver updates |
| Problem started after a driver update | The new display driver does not suit the hardware | Roll back the display driver |
| External monitor shows a low resolution | Loose or faulty cable, adapter or dock | Reseat or swap the cable, try another video port, remove docks and dongles |
| You changed the wrong screen | Another display was selected in Settings | Select the correct display at the top of Display settings |
| Text is blurry at a lower resolution | The monitor is running below its native resolution | Switch back to the (Recommended) value and use Scale instead |
How to update the graphics driver to fix Windows 11 resolution
Windows Update installs recommended drivers automatically, but optional driver updates have to be picked by hand.
- Select Start > Settings > Windows Update > Advanced options.
- Turn on Receive updates for other Microsoft products.
- Under Additional options, select Optional updates.
- If a display or graphics driver is listed, select it and then select Download and install.
- Restart the PC by right-clicking Start and selecting Shut down or sign out > Restart, even if Windows does not ask for it.
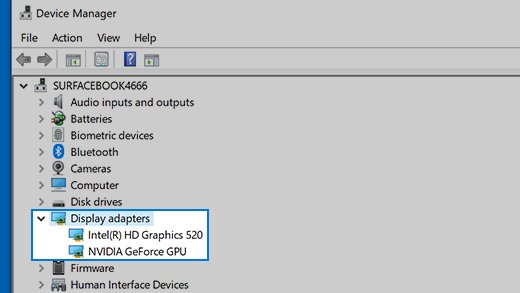
- If nothing is offered, right-click Start, select Device Manager, expand Display adapters, right-click the adapter and select Update driver > Search automatically for updated driver software.
- If Windows still finds nothing, get the driver from the PC or graphics card manufacturer's own website, then in Update driver select Browse my computer for drivers and point it at the extracted folder.
Avoid driver sites other than the manufacturer's official one. If the screen also flickers, fix Windows 11 screen flickering with the same driver steps.
Windows 11 display resolution wrong after a driver update
If the resolution went wrong right after an update, return to the previous driver first. You need to be signed in as an administrator.
- Right-click Start and select Device Manager.
- Expand Display adapters.
- Right-click your display adapter and select Properties.
- Open the Driver tab and select Roll Back Driver.
- Choose a reason when prompted, select Yes and restart the PC.
- If Roll Back Driver is not available, right-click the adapter, select Uninstall device, tick Attempt to remove the driver for this device and select Uninstall.
- Restart the PC, open Device Manager again, right-click the adapter under Display adapters and select Update driver > Search automatically for updated driver software.
Windows 11 screen resolution not available
When the resolution you want is missing from the list, check which driver is in charge and list every mode the adapter reports.
- Right-click Start, select Device Manager and expand Display adapters.
- If the only entry is Microsoft Basic Display Adapter, the manufacturer's driver is not installed. Install it with the steps in the driver section above.
- If your Intel, AMD or NVIDIA adapter is listed, open Settings > System > Display > Advanced display.
- Select Display adapter properties.
- On the Adapter tab, select List All Modes.
- Pick a mode from the list and select OK.
A resolution higher than the panel's native value will not appear in this list. Windows can only offer modes the monitor and adapter both support.
Changed resolution, now black screen on Windows 11
A monitor that cannot show the new mode goes black. These steps get a picture back and let you choose a supported resolution.
- Press Windows + Ctrl + Shift + B to reset the graphics driver.
- Press Windows + P, press P again and press Enter to cycle through display modes such as PC screen only, Duplicate and Extend.
- If the screen stays black, hold the power button for 10 seconds to shut down. Repeat 2-3 times until Windows opens the recovery environment.
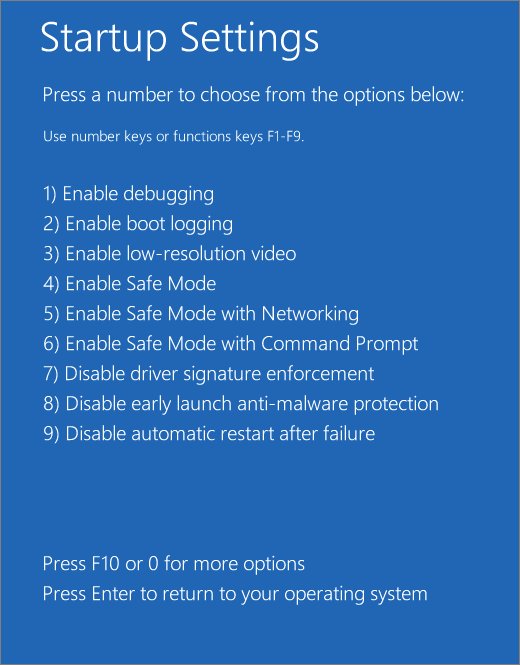
- Select Troubleshoot > Advanced options > Startup Settings > Restart.
- On the Startup Settings screen, press 3 or F3 for Enable low-resolution video.
- Sign in, open Settings > System > Display and set Display resolution to the (Recommended) value.
- Restart normally.
Low-resolution video mode starts Windows with the current video driver at low resolution and refresh rate settings, which is exactly what resetting display settings needs. Have the BitLocker recovery key ready if the drive is encrypted. For a black screen that has nothing to do with resolution, fix Windows 11 black screen problems separately.
Grey screen after update in Windows 11 [fix]
A blank or grey screen after an update is usually an incompatible display driver or an incomplete update. Work from the lightest fix down.
- Press Windows + Ctrl + Shift + B to reset the graphics driver.
- If you see a cursor, press Ctrl + Shift + Esc to open Task Manager, right-click Windows Explorer and select Restart. If it is not listed, select Run new task, type
explorer.exeand press Enter. - If nothing responds, force Windows into the recovery environment and select Troubleshoot > Advanced options > Startup Settings > Restart, then press 5 or F5 for Safe Mode with Networking.
- In Safe Mode, open Device Manager, expand Display adapters, right-click the adapter and select Properties > Driver > Roll Back Driver.
- If the screen is still grey after a normal restart, return to the recovery environment and select Troubleshoot > Advanced options > System Restore.
- Choose a restore point from before the update and finish the wizard.
Over-saturated colors on my main monitor in Windows 11
Over-saturated or tinted colors usually come from night light, HDR or a wrong color profile, not from the resolution itself.
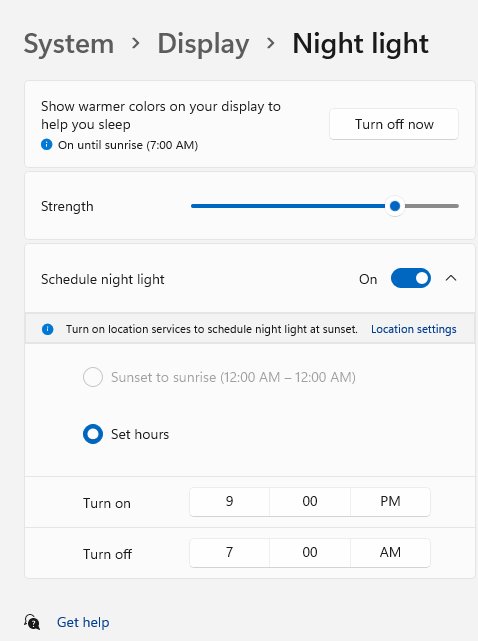
- Open Settings > System > Display > Night light. Drag Strength to the left or select Turn off now, because night light can over-saturate an HDR display.
- On an HDR laptop, plug it in before restarting. HDR turns off on battery by default, which can leave colors under- or over-saturated after a restart.
- To keep HDR on battery, open Settings > System > Display > HDR and clear Turn off HDR when my PC is running on battery.
- Open Settings > System > Display > Color profile, select the main monitor and set the correct profile with Set profile.
- On supported displays, turn on Automatically manage color for apps on the same page.
- Select Calibrate display and follow the steps to build a new color profile for that monitor.
HDR displays on HDMI can show color fringes around text. Use DisplayPort if the monitor supports HDR over it, or drop to 30 Hz or 1920 by 1080 at 60 Hertz in List All Modes.
Windows 11 screen resolution issues
Screen resolution keeps changing in Windows 11
Microsoft points to a graphics driver that needs updating.
- Select Start > Settings > Windows Update > Check for updates.
- Install any display driver under Advanced options > Optional updates.
- If it started after a driver update, roll back the driver in Device Manager.
Cannot adjust screen resolution in Windows 11
The Microsoft Basic Display Adapter is loaded, so no mode changes are possible on UEFI PCs.
- Open Device Manager and expand Display adapters.
- Right-click Microsoft Basic Display Adapter and select Update driver > Search automatically for updated driver software.
- If that fails, install the driver from the PC or graphics card maker's website.
Windows 11 monitor resolution wrong on an external display
A loose cable, faulty adapter or dock limits the signal.
- Disconnect docks, dongles and adapters and connect the monitor directly.
- Reseat the cable, then try a different cable.
- Plug the monitor into another video port such as HDMI or DisplayPort.
- Open Settings > System > Display > Multiple displays and select Detect.
Windows 11 display resolution wrong after the PC worked fine
The graphics driver stopped responding.
- Press Windows + Ctrl + Shift + B.
- Select Start > Power > Restart.
- If that fails, select Power > Shut down and turn the PC back on.
How to see which display driver Windows 11 is using
The adapter name tells you whether the manufacturer's driver is running or Windows has fallen back to the basic one.
- Right-click Start and select Device Manager.
- Expand Display adapters and read the manufacturer and adapter name.
- An Intel, AMD or NVIDIA name means the vendor driver is installed. Microsoft Basic Display Adapter means it is not.
- If the screen still looks wrong with the vendor driver listed, open Settings > System > Display and confirm the Display resolution row shows the (Recommended) value.
Windows 11 screen resolution FAQ
How do I fix monitor resolution in Windows 11?
Open Settings > System > Display, select the monitor at the top and choose the Display resolution marked (Recommended). If the right value is missing, update the graphics driver through Windows Update or Device Manager, then check the cable and video port on an external monitor.
How do I fix display resolution in Windows 11 on a laptop?
Set the built-in screen to the (Recommended) resolution in Settings > System > Display and use Scale to adjust text size. If the list is greyed out, Windows is likely using the Microsoft Basic Display Adapter, so install the laptop maker's graphics driver.
Why can't I change resolution in Windows 11?
Windows can only offer modes that the active graphics driver reports. With the Microsoft Basic Display Adapter loaded, resolution changes are not possible on UEFI PCs. Installing the manufacturer's display driver restores the full resolution list.
Can't change screen resolution in Windows 11 after an update?
Roll back the display driver. Open Device Manager, expand Display adapters, right-click the adapter, select Properties > Driver > Roll Back Driver and restart. If rollback is unavailable, uninstall the device and let Windows reinstall the driver.
Why does my screen resolution keep changing in Windows 11?
Unexpected resolution changes usually mean the graphics driver needs an update. Run Windows Update, install any optional display driver, and restart. If the changes began right after a driver update, roll that driver back instead.
How do I get a 1920×1080 resolution on a 1366×768 screen on Windows 11?
A 1366×768 panel cannot show more pixels than it physically has, so 1920×1080 does not appear in Display settings. You can set a custom resolution on Windows 11, but text looks softer than at the panel's native resolution.
How do I reset screen resolution if the screen goes black?
Press Windows + Ctrl + Shift + B first. If the screen stays black, boot to the recovery environment, open Startup Settings, press 3 for Enable low-resolution video, then set the (Recommended) resolution in Settings > System > Display.