The fastest way to boost your Outlook efficiency is to let new Outlook sort, park and repeat work for you: Focused Inbox, Pin, Snooze, Sweep, Schedule send, Quick steps and My Day do most of it.
Below are 43 new Outlook tips and features for Windows, grouped into mail, calendar and settings, each with the exact click path, the keyboard shortcut where one exists, and a practical way to use it. Outlook on the web is the same app, so nearly every tip works there too; the exceptions are marked.
How to use Outlook efficiently
Seven changes give the biggest return in new Outlook for Windows. Make them once and every day after that starts from a cleaner inbox.
- Turn on Focused Inbox: select View > View settings > Mail > Message list and tick Sort messages into Focused and Other (tip 1).
- Right-click the two or three emails you refer to all week and select Pin (tip 2).
- Select a newsletter you never read in full and choose Sweep to delete or move that sender's mail automatically (tip 4).
- On the Home tab, open the arrow next to Quick steps > Manage quick steps and build one step for the two actions you repeat most, with the shortcut Ctrl+Shift+5 (tip 6).
- Select My Day at the top right and drag any email you must act on into the To Do tab (tips 26 and 27).
- Use the arrow next to Send > Schedule send for anything you write outside the recipient's working hours (tip 5).
- Press ? to see every keyboard shortcut, and learn Ctrl+R, Ctrl+Enter, Insert and Ctrl+Q first (tip 37).
Those seven cover the best Outlook tips for email management and time management on a busy inbox. The rest of the list adds depth: search, templates, calendar sharing, Copilot and the settings that decide what works offline.
How to organize emails in Outlook
New Outlook gives you nine different tools for getting a message out of the way, and each suits a different kind of email. Match the message to the tool and the inbox stays short without daily effort.
Should you use folders or the Archive in Outlook? Archive anything finished that you would only ever search for. Keep folders for sets of mail you open together, such as a live project or monthly receipts.
| The email | Use this in new Outlook | Why |
|---|---|---|
| Reference you need again this week (travel booking, approval) | Pin (tip 2) | Stays at the top while new mail arrives below it |
| Something you can't act on until later | Snooze (tip 3) | Leaves the inbox and comes back at the time you pick |
| Recurring newsletters and promotions | Sweep (tip 4) | Deletes or moves that sender's mail once a day |
| Mail from one sender or project that always goes to one place | Rule (tip 7) | Acts the moment the message arrives |
| Finished thread you might need to find | Archive (tip 9) | One click, nothing deleted |
| Mail that belongs to a client or project across folders | Categories (tip 10) | Several labels per message, clickable as a filter |
| Anything that needs a reply or action | Flag (tip 11) or To Do (tip 26) | Becomes a task in To Do's Flagged email list |
| A reply-all thread you don't need | Ignore (tip 13) | Future replies skip the inbox |
| Low-priority mail you still want to read | Focused Inbox Other tab (tip 1) | Out of sight until you choose to look |
Mail features in new Outlook
Tips 1 to 25 cover the inbox, writing and sending. When a feature seems to be missing, the account type is the usual reason, so check this table first.
| Mail feature | Account or licence limit |
|---|---|
| Focused Inbox (tip 1) | Doesn't work in shared mailboxes |
| Schedule send (tip 5) | Not available for IMAP or POP accounts |
| Rules (tip 7) | Not for Gmail, Yahoo or iCloud; client-side rules from classic Outlook don't run |
| Categories (tip 10) | Not supported on IMAP accounts |
| Mail templates and My Templates (tip 16) | Qualifying Microsoft 365 subscription |
| Automatic replies (tip 18) | Not for Gmail, Yahoo or other POP and IMAP accounts |
| @mention indicator (tip 19) | Exchange Online or Outlook.com mailboxes |
| Reactions (tip 20) | Work or school account with a qualifying Microsoft 365 subscription |
| Read and delivery receipts (tip 21) | Not for IMAP or POP; Outlook.com accounts need Microsoft 365 |
| Encryption (tip 22) | Qualifying Microsoft 365 subscription |
| Blocking senders (tip 23) | Not for Gmail, Yahoo or iCloud accounts |
| Copilot (tip 25) | Microsoft 365 Copilot licence, or Microsoft 365 Personal or Family AI credits |
1. Focused Inbox
Focused Inbox splits the inbox into Focused and Other tabs. Outlook learns from the people you write to and pushes bulk and automated mail to Other, and it gets more accurate each time you correct it.
- Select View > View settings.
- Go to Mail > Message list and pick the account.
- Tick Sort messages into Focused and Other, then select Save.
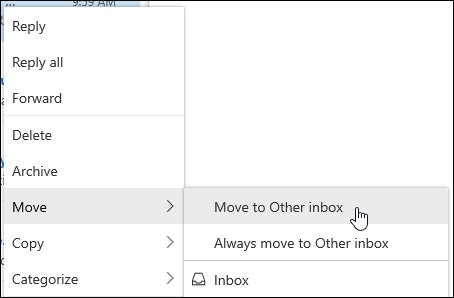
- To train it, right-click a misplaced message and select Move > Always move to Focused inbox or Always move to Other inbox.
Some Microsoft pages place the same switch under Settings > Mail > Layout; it is one setting either way.
Use it like this: work through Focused first each morning, then clear Other in one batch after lunch. Utilise the Other tab as a reading pile rather than a source of alerts.
2. How to pin an email in Outlook
Pin keeps a message at the top of the inbox while new mail arrives underneath it. It only works when the folder is sorted by date.
- Right-click the message in the message list.
- Select Pin. A pin icon appears and the email moves to the top.
- To unpin it, hover over the message and select the pin icon again.
- If nothing moves, select the sort button at the top of the message list and sort by Date.
Use it like this: pin this week's travel booking, the open approval request and the onboarding checklist, and unpin each one the moment it's done. A pinned stack of three is useful; a stack of fifteen is just a second inbox.
3. Snooze emails
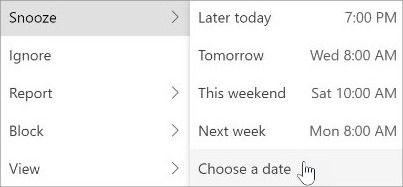
Snooze takes an email out of the inbox and re-delivers it at the time you choose, so it lands back on top when you can act on it. Snoozed mail waits in the Snoozed folder, and Snooze works offline.
- Right-click the message, or select it and choose Snooze on the ribbon.
- Pick one of the suggested times, or choose your own date and time.
- Open the Snoozed folder if you need the message back early.
Use it like this: snooze a vendor quote until the morning of the budget meeting, or snooze a next-quarter request to the first Monday of that quarter. Utilize email scheduling and snooze together: schedule your reply for the morning (tip 5) and snooze the original until the answer is due.
4. Sweep function
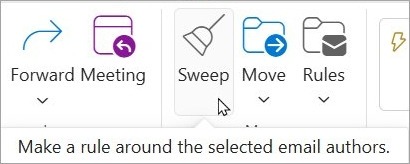
Sweep cleans the inbox sender by sender. From one selected message it can delete or move everything from that sender, keep only the latest message, or delete messages older than 10 days.
Sweep runs once a day, while inbox rules run the moment mail arrives, so use Sweep for clutter and rules for anything time-sensitive.
- Select a message from the sender you want to clean up.
- Select Sweep on the ribbon.
- Choose what happens to that sender's mail, including messages that arrive later if you want an ongoing clean-up.
- Select Sweep to apply it.
Sweep isn't available in Junk Email, Drafts, Sent Items or Deleted Items.
Use it like this: sweep away incoming email from a daily deals list so only the newest offer is ever in your inbox. It is the quickest way to clean your emails without writing a rule.
5. Schedule send
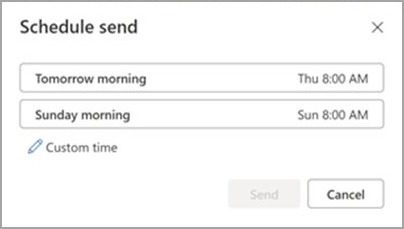
Schedule send lets you write now and deliver later, so a reply drafted at 11 p.m. arrives at 9 a.m. It isn't available for IMAP or POP accounts.
- While writing, select the arrow next to Send.
- Select Schedule send.
- Pick a suggested time, or choose a custom date and time, then select Send.
- The message waits in Drafts until it goes out. To send it now, open it in Drafts, select Cancel send, then select Send.
Schedule send is the new Outlook answer to classic Outlook's Delay Delivery for individual messages. New Outlook also has Undo send, which can cancel a message just after you select Send, and it works offline.
Use it like this: answer a colleague in another time zone at the end of your day and schedule it for their morning, so it sits on top of their inbox instead of under a night of newsletters. Managing your time this way also stops after-hours mail from setting expectations.
6. How to use Outlook Quick Steps
Quick steps run several actions with one click, such as pinning a message and marking it unread, or moving it to a folder and adding a category. They can't be undone with Ctrl+Z, because some actions, like permanent delete, can't be reversed.
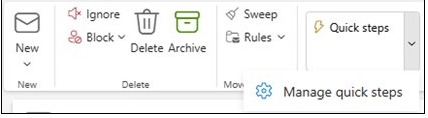
- In Mail, on the Home tab, select the arrow next to Quick steps > Manage quick steps.
- Select +New quick step and type a name.
- Under Choose an action, pick the first action, then select Add another action for each extra one.
- In Choose a shortcut, assign one of Ctrl+Shift+5 to Ctrl+Shift+9, and add a description that shows on hover.
- Select Save. The step appears in the Quick steps group on the ribbon, and the up and down arrows in the same page change their order.
Use it like this: build a Waiting on step that moves a message to a Waiting folder, applies a Waiting category and flags it. Fire it with Ctrl+Shift+5 every time you send a request that needs an answer. Quick steps also work in popped-out message windows.
7. How to create rules in Outlook
Rules act on mail as it arrives: move it, flag it, categorize it, forward it or delete it. They give you automated email processing without macros, which is how you automate Microsoft Outlook now that VBA isn't supported in new Outlook.
In new Outlook, rules work for Microsoft accounts and work or school accounts. Gmail, Yahoo and iCloud keep their own filters on the provider's website.
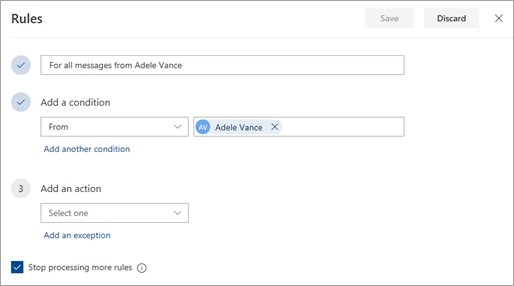
- Right-click a message from the sender, hover over Rules and select Create rule.
- Pick the folder and select OK for a simple move rule.
- For more control, select More options and give the rule a name, a condition and an action, using Add a condition, Add an action and Add an exception as needed.
- Tick Stop processing more rules if later rules shouldn't touch these messages, then select Save.
- Manage every rule in Settings > Mail > Rules: reorder with the arrows, pause one with its toggle, or run it on messages already in the folder.
Creating and managing rules is the same whether you start from a message or from Settings. Rules migrated from classic Outlook that ran client-side don't work in new Outlook, so recreate those. With a Microsoft 365 Copilot licence, Copilot chat can also create and edit rules from a plain-language request.
Use it like this: one rule that moves every message with invoice in the subject to an Invoices folder and adds a Finance category replaces dozens of manual drags a week. Rules are how you create filters to sort emails before you ever see them.
8. How to create a new folder in Outlook
Folders still matter for mail you browse as a set. New Outlook adds custom folder order, folder icon colors and pinned Favorites.
- In the folder pane, right-click your email address, or hover over it and select More options > Create new folder.
- For a subfolder, right-click the parent folder > Create new subfolder.
- Type the name and press Enter.
- Right-click the folder and select Add to Favorites to keep it at the top of the pane; pin Favorites from View > Folder pane > Favorites > Pin favorites.
- To drag folders into any order, first choose View > Folder pane > Sort folders > Custom folder order.
Press Ctrl+Y to jump to the folder pane, then type the first letter of a folder name to land on it.
Use it like this: keep five or six action folders, such as Waiting, Reference and Receipts, rather than a deep tree, and let rules and search do the rest. Use folders to sort emails only where you browse by project.
9. How to archive emails in Outlook
Archive moves a message out of the inbox into the Archive folder in one click. Nothing is deleted; the message simply stops competing for attention.
- Select one or more messages; Shift+Down arrow extends the selection.
- Select Archive on the ribbon.
- Open Archive under Folders to see archived mail.
- To restore one, select it in Archive, choose Move to, and pick the original folder.
Use it like this: end each email session by archiving every thread you've answered. The inbox then holds only open work, which is the whole point of inbox zero.
10. How to create categories in Outlook
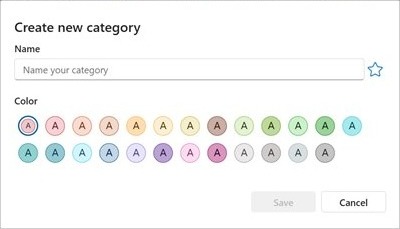
Categories are colored labels you can stack on mail and calendar items. New Outlook shows the category name on each message, lets you click it to see everything with that label, and can apply several categories in one action. IMAP accounts don't support them.
- Right-click a message and select Categorize, then pick a category. Repeat for a second or third one.
- To make a new one, select Categorize > New category, name it, pick a color and select Save.
- Rename the default Red Category and Blue Category labels in Settings > Accounts > Categories with the Edit button.
- Add a category to Favorites (right-click it > Add to Favorites) for a one-click view of every item that carries it.
Categories also make an easier Eisenhower time management matrix. Create four categories for the Eisenhower matrix quadrants: Do now (urgent and important), Schedule (important, not urgent), Delegate (urgent, not important) and Drop (neither). The benefit of the Eisenhower technique is that every email gets a decision, not just a read.
Use it like this: tag each message with one quadrant during triage, then open Do now from Favorites first. The None color option lets a category exist without a color if you only want the label.
11. How to flag an email in Outlook
A flag marks an email for follow-up and turns it into a task: flagged messages appear in To Do's Flagged email list. Use flags to mark important messages that need action, and pins for messages that only need to stay visible.
- Hover over the message and select the flag icon, or select it and press Insert.
- Press Insert again on a flagged message to mark it complete.
- With a Microsoft 365 account, right-click a flagged message and select Add reminder.
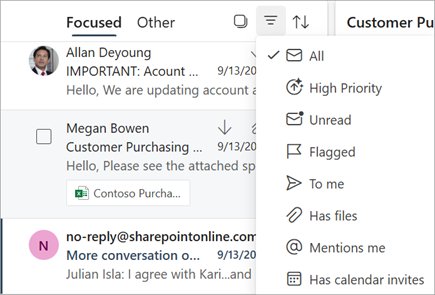
- To see every flagged message, select Filter at the top of the message list > Flagged.
Use it like this: flag every request you promise to answer, then plan the afternoon from the Flagged email list in To Do instead of re-reading the inbox. A category added to a flagged email syncs to its task, so project labels follow the work.
12. Conversation view
Conversation view groups every message with the same subject into one thread, so a 20-reply chain takes one line of the message list. Most accounts start with it on.
- Select Settings > Mail > Layout (some builds label this page Reading pane).
- Under Message organization, choose Group messages by conversation.
- Choose Group messages by branches within conversations if replies split into side threads, or Do not group messages to list every email separately.
- In the same section, choose whether the reading pane shows the whole conversation or only the selected message, and whether deleted items stay in the thread.
Use it like this: keep conversations on for project mail, and take advantage of conversation view with Ignore (tip 13), which removes a whole thread in one action.
13. How to ignore emails in Outlook
Ignore moves every message in a conversation to Deleted Items and sends future replies there too, so a reply-all storm never reaches the inbox. It works offline.
- Select the conversation, or any message in it.
- On the Home tab, select Ignore.
- Confirm with Ignore Conversation.
- To undo it, find the thread in Deleted Items, select Ignore again and choose Stop Ignoring Conversation.
You can only recover an ignored conversation while it is still in Deleted Items. Use it like this: ignore the all-company thread about the car park the moment it starts, and you'll never see the forty replies that follow.
14. Advanced search capabilities
The search box at the top of new Outlook searches mail, people, files and calendar, including many attachments, and its suggestions can be narrowed to Files, People or Mail. Classic Outlook's Advanced Find functionality maps to the filter button on the right of the search box, plus the refine options on the Search tab.
Operators make search exact. Type them in the search box; AND, OR and NOT must be uppercase.
| Type this | To find |
|---|---|
from:dana |
Mail from Dana (type from: and a few letters for suggestions) |
subject:"budget review" |
That phrase in the subject |
hasattachment:yes |
Messages with attachments |
received:"this week" |
Mail that arrived this week (also today, yesterday, last month) |
category:red |
Items whose category name includes red |
messagesize:>5 MB |
Messages larger than 5 MB |
hasflag:true |
Flagged items |
read:no |
Unread items |
budget NOT draft |
budget without draft (AND and OR work the same way) |
"bob" |
The exact word only, not bobby or bobbin |
Only the first 1,000 results are shown, number strings shorter than five digits are ignored, and size words such as messagesize:large don't work in new Outlook, so use numbers.
For refined filters on the folder you're in, select Filter above the message list and pick Unread, Flagged or @ Mentions me. The Sorted by button also jumps straight to a section, such as Last Month, without scrolling.
Use it like this: from:dana hasattachment:yes received:"last month" finds the spreadsheet Dana sent in seconds, wherever a rule filed it.
15. Use search folders for more efficient searches
Search Folders are virtual folders that collect matching mail from across the mailbox without moving or copying it. New Outlook gained People and Categories types in July 2024 and moved Search Folder setup into Settings in March 2026; they use predefined types, and fully custom criteria remain classic-only.
- Select Settings > Mail > Search folders, or select the Search Folders button in the folder pane > Create new search folder.
- Pick a type, such as Unread mail, Flagged for follow-up, Mail from specific people, Categorized mail, Mail with attachments, Large mail, Old mail or Mail with specific words.
- Optionally turn on Filter to specific folders and Search subfolders.
- Select Create, then add the folder to Favorites for one-click access.
Deleting a Search Folder never deletes the messages it shows. Search Folders can't combine results from several .pst files.
Use it like this: a Mail from specific people folder for your manager and your two biggest clients gives you a VIP inbox, whichever folder a rule moved each message into.
16. Get creative with templates
Mail templates save a whole email, including recipients, subject, formatting and attachments. The My Templates add-in stores short text snippets instead. Both need a qualifying Microsoft 365 subscription.
- Select New > Mail and write the email you want to reuse, including recipients and attachments.
- On the Message ribbon, select Mail template > Save email as template, type a name and select Save. The File tab also has template commands.
- To use it, on the Home ribbon select New > Mail from template and pick the template.
- For snippets, on the Message tab select My Templates > +Template, add a title and text, and select Save.
- Review saved templates in Settings > Mail > Templates, listed by account.
Edits you make to a message opened from a template don't change the template. Quick Parts, the classic way to send similar emails quickly, is now listed as available in new Outlook as well, but templates cover most of the same jobs and are the faster way to save time on repeat messages.
Use it like this: a Weekly status template with the distribution list, the subject and empty section headings already in place turns the weekly write-up into a fill-in-the-blanks job. Keep a My Templates snippet for the reply you type most, such as your bank details or a meeting-link paragraph.
17. Customise your signatures for different accounts or contacts
New Outlook keeps several signatures per account and can use a different default for new messages and for replies. The Signatures settings page was redesigned in March 2026 with more editing options.
- Select Settings > Accounts > Signatures.
- Pick the account if you have more than one.
- Select Add signature, give it a name, then format the text, links and images.
- Use the checkboxes to make it the default for new messages, for replies and forwards, or neither, then select Save.
- To switch while writing, on the Message tab in the Insert group, select Signature and pick another one.
Use it like this: a full signature with phone number and booking link for new external mail, and a one-line name-and-title signature for replies, so long threads don't repeat your contact block in every message. Keep a third signature for one key contact or client if they need different details.
18. Set up automatic replies
Automatic replies tell people you're away, and each sender gets the reply only once. They don't work for Gmail, Yahoo or other POP and IMAP accounts.
- On the View tab, select View settings.
- Go to Accounts > Automatic replies and turn the Automatic replies toggle on.
- Select Send replies only during a time period and enter the start and end times.
- Write the message. With a work or school account you also get Send replies outside your organization; pair it with Send replies only to contacts so newsletters and junk don't get a reply.
- Select Save.
Use it like this: set the time period before you leave, so the reply starts and stops on its own and you never come back to a week of out-of-office replies you forgot to switch off.
19. Mention people
Typing @ and a name highlights that person in the body and adds them to the To line. Their message list shows an @ marker, so they know a line is meant for them.
- In the body of an email or meeting invite, type @ and the first letters of a first or last name.
- Pick the person from the suggestions; the full name appears and they're added to To.
- Delete part of the mention, such as the surname, if the first name reads better.
- To find mail that mentions you, select Filter above the message list > @ Mentions me.
The @ marker in the message list needs an Exchange Online or Outlook.com mailbox. Use it like this: in a status email to eight people, @mention the two who owe an answer right next to their question, and everyone else can skim.
20. React with emojis
Reactions acknowledge an email with a like or another emoji instead of a thanks reply that clutters every inbox on the thread. They need a work or school account with a qualifying Microsoft 365 subscription, and they fully work only when both mailboxes are on Exchange Online.
- Open the message and select the reactions button near the top.
- Pick a reaction; the sender and everyone on the To and Cc lines can see it.
- Select a different reaction to replace yours.
- Point at a reaction on your own mail to see who reacted; reactions also show in Notifications.
If the sender isn't on Exchange Online, the reaction arrives as a fallback email, and reactions don't work in shared mailboxes. Use it like this: react with a thumbs-up to an approved, go-ahead message instead of replying.
21. Read and delivery receipts
A delivery receipt confirms a message reached the mailbox; a read receipt confirms it was opened, and the recipient can refuse to send one. Receipts aren't available for IMAP or POP accounts such as Gmail, Yahoo or iCloud, and Outlook.com accounts need a Microsoft 365 subscription.
- In the message you're writing, open the Options tab.
- In Tracking, tick Request a Delivery Receipt, Request a Read Receipt or both.
- If you can't see them, select More options at the right end of the ribbon.
- To decide how you answer other people's requests, go to Settings > Mail > Message handling > Read receipts.
Use it like this: request a delivery receipt only on contract or deadline mail where proof of delivery matters. On everyday mail, receipts mostly generate more email.
22. Encrypt emails
Encryption keeps a message readable only by its recipients. New Outlook supports Microsoft Purview Message Encryption and S/MIME. Both need a qualifying Microsoft 365 subscription, and Purview needs an Office 365 Enterprise E3 licence on the mail server.
- In a new message, select Options > Encrypt.
- Pick the protection, such as Encrypt or Do Not Forward.
- For S/MIME, select Options > More options and tick Encrypt this message (S/MIME), plus Digitally sign this message (S/MIME) if you want a signature.
- To encrypt everything you send, go to Settings > Mail > S/MIME and turn on Encrypt contents and attachment for all messages I send.
Purview-encrypted mail opens directly in new Outlook, Outlook on the web and the Outlook mobile apps; people on other mail services get instructions for opening it. S/MIME needs a certificate set up first, and external recipients' certificates must be installed. Use it like this: send salary or contract details with Do Not Forward so they can't be passed on.
23. Curb junk mail
Blocked senders and domains go straight to Junk Email, and safe senders never do. In new Outlook, blocking isn't supported for Gmail, Yahoo or iCloud accounts; use the provider's own settings for those.
- Select Settings > Mail > Junk email, picking the account first if you have several.
- Type an address under Blocked senders, or a whole domain under Blocked domains, and select Add.
- Add people you never want filtered to Safe senders.
- Select Save.
Junk Email is emptied automatically after 14 days and can't be recovered after that. The blocked and safe lists hold up to 10,000 entries each, so block a domain rather than chasing a spammer who rotates addresses. Use it like this: when two spam messages arrive from the same domain, block the domain once instead of each address.
24. Create contact groups to send bulk emails easily
New Outlook calls contact groups contact lists. A list puts many addresses behind one name, so typing that name in To addresses everyone on it.
- Select People in the side panel, or press Ctrl+4.
- Select the arrow next to New contact > New contact list, or press Ctrl+L in People.
- Enter a list name, add recipients by name or address, and add a description if you like.
- Select Create. Edit it later from Your contact lists with the Edit button.
Deleting a list never deletes the contacts in it. If the group also needs a shared inbox, calendar and files, create a Microsoft 365 group instead. Use it like this: a Project Falcon external list put in Bcc for announcements reaches everyone without exposing addresses or inviting reply-all.
25. Use Copilot in Outlook for email and meetings
Copilot drafts, summarizes and coaches emails inside new Outlook. Licence needed: a Microsoft 365 Copilot licence on a work or school account, or AI credits from a Microsoft 365 Personal or Family subscription, which then also cover connected Outlook.com, Gmail, Yahoo and iCloud accounts on the same device.
- Summarize: open a conversation and select Summarize (or Summary by Copilot) at the top. For an attached Word, PowerPoint or PDF file, select Summarize a file.
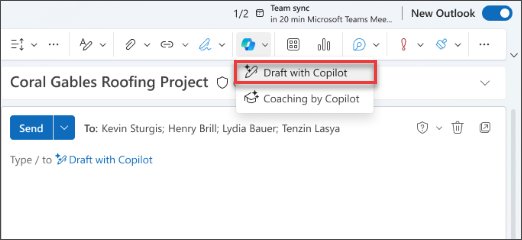
- Draft: select New mail, then the Copilot icon > Draft, type a prompt and select the generate arrow. Change the length or tone, then select Keep it.
- Coach: in a draft, select the Copilot icon and choose coaching for suggestions on tone, clarity and reader sentiment; Apply all suggestions accepts them.
- Meetings: open an email thread and select Schedule with Copilot to turn the discussion into an invitation, or open a meeting to use Prepare for your meeting.
- To switch it off, go to Settings > Copilot > Copilot control and turn off Turn on Copilot.
Draft with Copilot doesn't work in plain-text messages, so set Settings > Mail > Compose and reply to HTML. Copilot can't read S/MIME-encrypted mail, and chatting with Copilot needs a work or school account. Review everything it writes before you send.
Use it like this: write better emails with AI by giving Draft your rough bullet points and the outcome you want, then run Coach on any email that goes to a customer or your manager.
Calendar and meeting features in new Outlook
Tips 26 to 35 cover tasks, scheduling, sharing and the calendar itself. Most calendar limits come from the account, so this table saves a lot of searching.
| Calendar feature | Account or licence limit |
|---|---|
| Scheduling Assistant free/busy view (tip 28) | Work or school Microsoft 365 or Exchange account |
| Edit and delegate calendar sharing (tip 30) | People inside your organization only; delegates on your primary calendar only |
| Team calendar (tip 31) | A Microsoft 365 group |
| Microsoft Bookings (tip 34) | A Bookings licence, in plans such as Business Basic, Business Standard, Business Premium, E1, E3 and E5 |
| Show declined events (tip 35) | Work or school Microsoft 365 accounts only |
| Work hours and location | Work or school account with a qualifying Microsoft 365 subscription |
| Follow response (tip 35) | Shows as Follow only in new Outlook and Outlook on the web; elsewhere it reads Tentative |
| Meeting recap highlights (tip 29) | Access to intelligent meeting recap |
| Reminders while Outlook is closed (tip 33) | New Outlook for Windows only, not Outlook on the web |
26. How to use Microsoft To Do in Outlook
In new Outlook, tasks live in Microsoft To Do. Select To Do in the left navigation pane to see your lists and the smart lists: My Day, Important, Planned, Assigned to me and Flagged email.
- Select To Do, choose a list, select Add a task, type it and press Enter.
- Select the task to add a due date (Add due date), a reminder (Remind me), a repeat (Repeat), steps (+ Add step), a note, or a file up to 25 MB.
- Star a task to mark it important; starred tasks collect in Important.
- Turn emails into tasks: drag a message onto the To Do tab of My Day, or flag it so it lands in Flagged email.
- Add hashtags such as #work to task names, then search #work to see every match.
Use it like this: during triage, flag anything that takes more than two minutes, then plan the day from Flagged email rather than from the inbox. Adding tasks to your To-Do list this way is the core time management tip: decide once, then work from the list, and effective task management stops depending on your memory of the inbox.
27. My Day feature
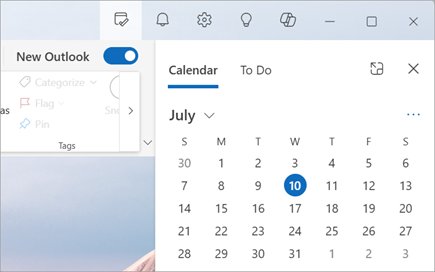
My Day is a pane you can open from Mail, Calendar or People, with today's events on a Calendar tab and your tasks on a To Do tab. It replaces classic Outlook's To-Do Bar, and it clears itself at midnight without deleting any tasks.
- Select My Day at the top right of the window.
- On the Calendar tab, select Switch views to swap agenda and day view or show more calendars, or select New event.
- Select Join Online on a Teams meeting to join without opening Calendar.
- On the To Do tab, select Add a task, mark tasks important, or drag them into order.
- To schedule time for yourself, open Calendar and drag a task from the To Do tab onto a free slot; it becomes a calendar event, like an appointment you booked with yourself.
Today's finished events drop off the agenda automatically. If your organization uses Viva Insights, its Book time to focus option can also block focus time on your calendar.
Use it like this: keep My Day open beside the inbox so your daily to-do list is displayed in the inbox view, then at 4 p.m. drag tomorrow's top two tasks onto tomorrow morning. Each date in the calendar then carries its own list, and emails turn into follow-up actions in your calendar.
28. Scheduling Assistant
The Scheduling Assistant shows everyone's free and busy time on one grid, which ends the does-Tuesday-work email chain. It needs a work or school Microsoft 365 or Exchange account, and its 2024 redesign added a combined availability bar.
- In Calendar, select New event (or press Ctrl+N) and add a title.
- Select Invite attendees, then open the Scheduling Assistant tab.
- Select Add required attendee or Add optional attendee and type names.
- Read the free/busy rows, or select one of the suggested meeting times.
- Turn on the Teams meeting toggle, add a room if your account offers one, then select Send.
To add someone later, open the meeting, add them, then select Send update > Only added/removed attendees so the rest aren't re-notified.
Use it like this: when you use the Outlook calendar to schedule meetings across time zones, add the second zone first (tip 32), then pick a suggested slot that sits inside both working days. It makes for easier scheduling than any poll.
29. Integration with Microsoft Teams
Teams is built into new Outlook, so no add-in is needed. Meeting links, presence, chat and meeting recaps all work from inside Outlook, which is where most collaboration starts anyway.
- In a new event, turn on the Teams meeting toggle to add a join link.
- Select Join Online in My Day or on the event to join.
- From any email, start a Teams chat with the sender, or a group chat with all recipients.
- Share an email, attachments included, to a Teams chat or channel with Share to Teams.
- After a Teams meeting, open the event to find the Meeting recap with the recording, transcript and shared files.
Recap highlights such as speaker counts, name mentions and suggested tasks appear only for people with intelligent meeting recap. Use it like this: instead of forwarding a customer email to five colleagues, share it to the team channel so the discussion stays in one place and enhance your collaboration capabilities without another reply-all.
30. Sharing calendars
Share Calendar lets people see your schedule or change it. Inside your organization you can grant edit or delegate rights; people outside can only view.
- In Calendar, on the Home tab, select Share Calendar and pick the calendar.
- Type a name or address; you add one person at a time.
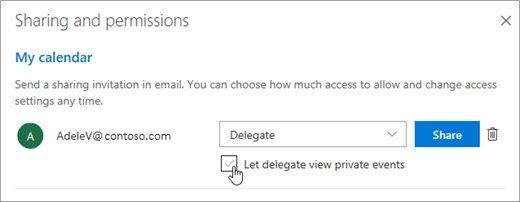
- Choose Can view when I'm busy, Can view titles and locations, Can view all details, Can edit or Delegate.
- For a delegate, choose who gets meeting requests: Delegate only, Delegate and send me a copy, or Both my delegate and me.
- Select Share. To stop sharing, return to Share Calendar and select Remove next to the person.
The limits of shared calendars: delegates apply only to your primary calendar, edit and delegate rights can't go outside your organization, and Private items show only their time unless you tick Let delegate view private events. To overcome those limits for a whole team, use a group calendar (tip 31).
Use it like this: share Can view titles and locations with your team, so they see At client site without seeing what the meeting is about.
31. How to create an Outlook team calendar
Every Microsoft 365 group has a shared calendar that any member can add to and edit, which makes it the working team calendar in new Outlook.
- Select Calendar, then under Groups in the folder list, select the group.
- Select a time slot and, in the top bar of the event window, pick the group.
- Add a title, location and end time, or select More options for the full form.
- Select Invite members if everyone should get the invitation, then select Save.
- Open the event and go to Attendees > Tracking to see who accepted, declined or hasn't answered.
Any member can edit or cancel an event on the group calendar. If only you should control it, create the event on your own calendar and invite the group instead.
Use it like this: a team calendar where everyone adds vacation days gives the whole group one place to check cover before booking leave.
32. Multiple time zones
Showing two or three time zones side by side stops the mental arithmetic before every cross-border meeting. You can also change your timezone label and have Outlook ask when you travel.
- Select Settings > Calendar > View.
- Under Time zones, set Display my calendar in time zone and type a Label.
- Select Add time zone, search for a city, add a label and tick Show in calendar.
- Use Move up or Move down to swap positions, then select Save.
- Tick When I travel across time zones, ask me if I want to update my time zone if you travel often.
The second time zone shows only in day and week views. Meetings are stored in UTC and shown in each attendee's local time, and when Windows changes time zone, new Outlook offers to restart and update.
Use it like this: label each zone with a person rather than a city, such as Priya Pune, so the column tells you who is awake.
33. Use calendar reminders
Reminders decide whether you arrive at a meeting prepared or two minutes late. New Outlook sets them per account, per event and per series, and can show them even when the app is closed.
- Set the default in Settings > Calendar > Events and invitations > Default reminder.
- Override one event: open it (select View series first for a series) and use the Reminder dropdown in Options; Don't remind me removes it.
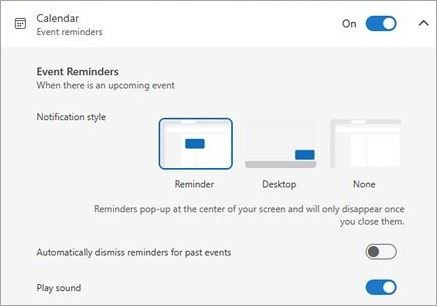
- Choose the reminder style in Settings > General > Notifications > Calendar; with the Reminder style you can turn on Automatically dismiss reminders for past events.
- For reminders while Outlook is closed, turn on Send notifications when Outlook is closed in Notifications, then in Windows 11 go to Apps > Installed apps > Outlook (new) > Advanced options > Let this app run in background > Always.
The reminders window can snooze or dismiss an event, or join its Teams meeting directly, and you can pick a custom sound for event reminders.
Use it like this: keep a short default for online meetings and set a longer reminder only on in-person events that need travel time.
34. Microsoft Bookings
Bookings gives you a booking page that shows your free time, so people pick a slot instead of trading emails. Personal Bookings, also called Bookings with me, is for one-to-one meetings and comes with 15-minute and 30-minute meeting types already published.
Licence needed: a Bookings licence, included in plans such as Microsoft 365 Business Basic, Business Standard, Business Premium, E1, E3 and E5. The person booking doesn't need any Microsoft account.
- In the left rail, select the Apps icon and search for Microsoft Bookings.
- Select Add, then pin the app to the left rail.
- Open Bookings and go to Personal booking page.
- Edit the default meeting types or add your own, and mark each one public or private.
- Copy your link and add it to your email signature (tip 17).
Bookings adds each appointment to your Outlook calendar automatically and can send reminder emails to both sides. Private meeting types can generate single-use links.
Use it like this: for quick bookings with customers, send a private meeting type's single-use link instead of three suggested times.
35. How to use new Outlook calendar
The improved calendar features in new Outlook include tools classic Outlook never had: a Follow response, saved views, filters and edits that change only future events.
- Switch views from the Home tab, or press Ctrl+Alt+1 (Day), Ctrl+Alt+2 (Work week), Alt+3 (three days) or Ctrl+Alt+4 (Month); Alt+Shift+Y jumps to today.
- Answer meetings you can't attend with Follow: your time shows as free, but you keep the chat, recording and transcript.
- On the View tab, select Calendar settings > Calendar > Events and invitations and turn on Show declined events on your calendar; then View > Filter > Hide declined events hides or shows them.
- Save calendar combinations as Saved views to flip between personal, team and project calendars without re-ticking boxes.
- When a recurring meeting changes, edit this and all following events, so past meetings keep their original details.
- Change the first day of the week in View > Calendar settings under Calendar appearance.
Organizers can also sort, search, copy or download the attendee list in the event's tracking pane, which helps with large meetings.
Use it like this: to maximize your day and stay organized, Follow every meeting where you only need the outcome, hide declined events, and keep a Saved view for each project. Those three calendar hacks get productive time back from the Outlook calendar without cancelling anything.
Personalization and settings in new Outlook
Tips 36 to 43 change how new Outlook looks, sounds and behaves. Some of them exist only in the Windows app, not in Outlook on the web.
| Setting | Where it works |
|---|---|
| Themes, dark mode, layout and shortcut style (tips 36 and 37) | New Outlook and Outlook on the web; settings changes carry across |
| Copilot themes (tip 36) | Microsoft Copilot (work) licence |
| Per-account notifications (tip 38) | New Outlook for Windows only |
| Narrator auto-read (tip 40) | New Outlook for Windows only |
| Offline access (tip 41) | New Outlook for Windows only |
| .pst files (tip 42) | New Outlook for Windows only; needs classic Outlook installed and a Microsoft 365 subscription; not on ARM |
| Web add-ins (tip 43) | Not for Gmail, Yahoo or iCloud accounts |
36. Personalize your Outlook
Personalization options are worth five minutes, because a layout that fits your screen saves a click on every message. The ribbon is customizable too.
| Change | Where in new Outlook |
|---|---|
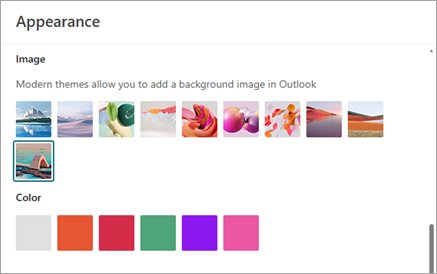
| Theme | Settings > General > Appearance > Modern themes |
| Dark mode | Settings > General > Appearance > Dark mode > Dark, Light or Use system settings |
| Light reading pane while in dark mode | View tab > Light Reading Pane |
| Reading pane position | Settings > Mail > Layout > Reading pane: Right, Bottom, Fill screen or Popout only |
| What opens after you delete or move a message | Same page: Open the next item, Open the previous item or Return to the message list |
| Sender or subject first in the list | Same page > Message list format |
| Ribbon size | Dropdown arrow at the right end of the ribbon: simplified or classic ribbon |
| Ribbon commands | Simplified ribbon > Customize |
| Swipe actions on a touch screen | Settings > Mail > Customize actions > Swipe: pick what a left and a right swipe do, such as archive, delete or flag |
| Folder colors and order | Folder icon colors per folder; View > Folder pane > Sort folders > Custom folder order |
| AI-generated theme | Appearance settings > Copilot themes (Copilot work licence) |
Use it like this: on a laptop, set the reading pane to Bottom so subject lines show in full, and switch to Popout only when you need the whole width for the message list. Customise your inbox and view it your way once, and the settings follow you to Outlook on the web, so you view messages your way everywhere.
37. Keyboard shortcuts
New Outlook has its own shortcut set, and you can switch it to the Outlook.com, Gmail or Yahoo Mail style, or turn shortcuts off, in Settings > General > Accessibility > Keyboard shortcuts, the same page Outlook on the web uses. Press ? at any time for the full list.
| Press | To do this |
|---|---|
| Ctrl+N | New message in Mail, new event in Calendar, new contact in People |
| Ctrl+R / Ctrl+Shift+R | Reply / Reply all |
| Ctrl+Enter | Send |
| Shift+Enter | Open the selected message in a new window |
| Ctrl+Q / Ctrl+U | Mark as read / unread |
| Insert | Flag, or mark a flag complete |
| Shift+Delete | Delete permanently |
| Ctrl+1 / Ctrl+2 / Ctrl+3 / Ctrl+4 | Mail / Calendar / Copilot / People |
| Ctrl+Y | Go to the folder pane, then type a letter to jump to a folder |
| Ctrl+C, Ctrl+V | Copy selected emails into another folder |
| Ctrl+K | Insert a hyperlink while writing |
| Ctrl+Shift+5 to Ctrl+Shift+9 | Run your Quick steps (tip 6) |
| Alt | Show key tips on the ribbon |
| ? | Show every shortcut |
Ctrl+N creates whatever fits the view you're in, so new meetings, appointments and contacts all start from one key in one window, without the New menu.
Use it like this: learn three shortcuts a week, starting with Ctrl+R, Ctrl+Enter and Insert, until triage needs no mouse at all.
38. Limit notifications
Every banner pulls you out of the task in front of you, so keep alerts for mail and events that matter. New Outlook lets you set notifications per type and per account.
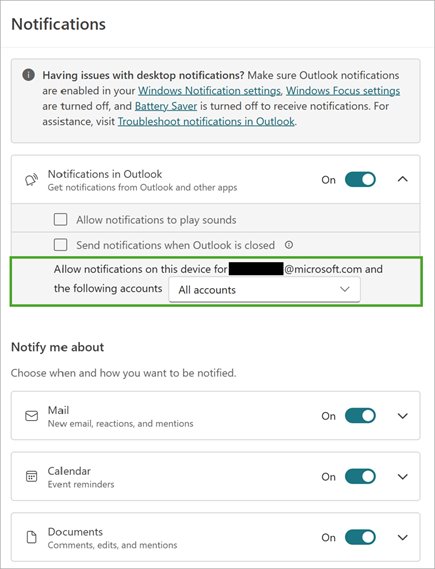
- Select View > View settings > General > Notifications.
- Under Notify me about, turn Mail, Calendar or Documents on or off.
- Expand a section to change its style and pick a custom sound under Play sound.
- With several accounts, expand the settings and switch notifications off for accounts that don't need them.
- Silence everything for a while with Windows Do not disturb or a Focus session.
How often should you check email in Outlook? Checking at set times works better than reacting to every banner: turn off notifications for new mail, open the inbox at fixed points in the day, and keep calendar reminders on. That single tip will improve productivity more than any other, and you can still set up notifications for when new mail arrives from one key sender by using a rule; with a work or school account, rules can notify you when they move a message.
Use it like this: switch off mail banners for a personal account added to your work PC, and keep them only for the account you're paid to answer.
39. Unified account management
New Outlook holds Outlook.com, Microsoft 365, Gmail, Yahoo, iCloud and other IMAP accounts in one window, which streamlines email and calendar in one app.
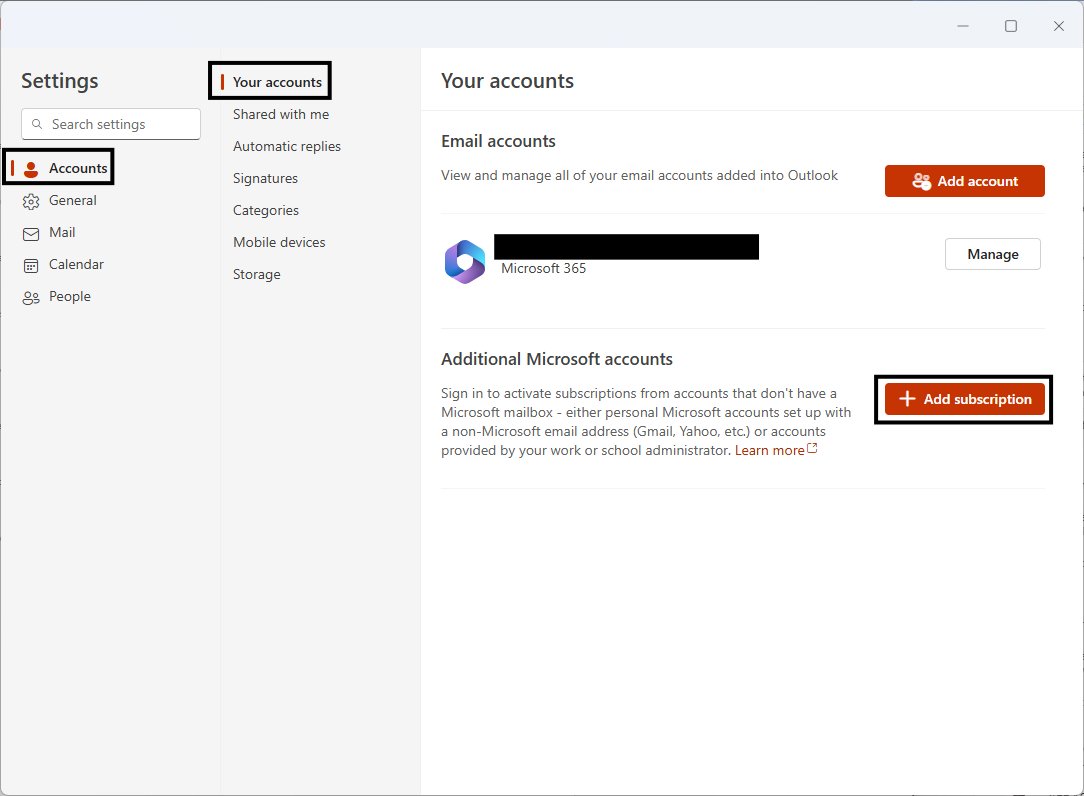
- Select View > View settings (or File > Account info) > Accounts > Your accounts.
- Select Add account, pick or type the address and select Continue; some providers, such as iCloud, need an app password.
- Select Manage next to an account > Set as primary account to choose the one Outlook opens with.
- Give each account a nickname, such as Work or Personal, in Settings so you can't send from the wrong one.
- Add folders, categories or people from any account to Favorites for one list across all of them.
Settings sync between new Outlook and Outlook on the web, and the first switch from classic Outlook offers Import Settings. Personal accounts can move emails between accounts; for work accounts an admin policy controls it.
Use it like this: with work and personal accounts side by side, unified search and shared Favorites mean one window for everything, but separate nicknames and notification settings keep the two apart.
40. Accessibility options
New Outlook includes accessibility tools that also make everyone faster, from read-aloud to keyboard-only navigation.
| You want to | Use this |
|---|---|
| Hear each message read aloud when you open it | Windows Narrator auto-read: press Ctrl+Windows+Enter (Windows app only) |
| Read long messages with less strain | Immersive Reader |
| Type less | Dictation |
| Work without the mouse | ? for shortcuts, Alt for key tips, arrow keys to move through the calendar grid in Day, Week and Work week views |
| Reduce glare | Dark mode, with Light Reading Pane if messages are hard to read (tip 36) |
| Make your own email accessible | Accessibility Checker before you send |
Use it like this: dictate long replies on days you're on the move, then let Narrator read them back before you send.
41. How to use new Outlook offline
Offline access is on by default. New Outlook keeps a local copy of mail, calendar and people, so you can read, search, draft, reply, archive, flag, snooze and move mail without a connection; new messages wait in the Outbox.
- Select Settings > General > Offline.
- Check that Enable offline email, calendar, and people is on.
- In Folders to save, pick Default, Default and favorites (the default) or Default, favorites, and recently used.
- In Days of email to save, choose 7, 30 (the default), 90 or 180 days.
- Select Save.
Still online-only: creating or changing calendar events (rolling out), the Other tab of Focused Inbox, shared folders, add-ins and the full global address list. Offline access is part of the Windows app, not Outlook on the web.
Use it like this: before a flight, add the project folders you need to Favorites, so the Default and favorites setting saves them to the laptop.
42. Backup Outlook
Your mailbox lives on the server, but a .pst export gives you a copy you control. New Outlook can export to and open .pst files, with conditions: classic Outlook must also be installed in the same 32-bit or 64-bit version, the account needs a Microsoft 365 subscription, and .pst files don't work on the ARM version.
- To export, select Settings > Files > Export > Get started, then pick the mailbox or folders in the wizard.
- To open a .pst, select Settings > Files > Outlook Data Files > Add file, choose the file and select Open.
- Drag messages from the .pst back into your mailbox to restore them.
- For a single message, right-click it > Save as > Save as MSG.
Copy the finished .pst to another drive or to cloud storage. Keep exports in one dated folder, so the newest backup is always obvious.
Use it like this: export before you remove an old account or change jobs, since removing an account deletes its offline copy from the device.
43. Integrate other apps
New Outlook runs web add-ins, not COM add-ins, and connects to other M365 applications directly, which is the enhanced email functionality classic users notice first. Add-ins don't work for Gmail, Yahoo or iCloud accounts.
- Select the Apps icon in the left rail to add apps such as Bookings, then pin the ones you use.
- Send an email to OneNote with Send to OneNote when it belongs in your notes.
- Share a local Word, Excel or PowerPoint file by email straight from those apps: new Outlook appears as a share target.
- Insert a Loop component so everyone edits the same list or table inside the email.
- Double-click any attachment to open it in its desktop app.
Classic Outlook's Notes module is only partly available in new Outlook, so create notes in OneNote or as task notes in To Do instead.
Use it like this: connect to Microsoft 365 apps for the work itself and keep Outlook for the conversation: a Loop checklist in the email replaces five what's-the-status replies.
Why can't I use the new Outlook
The Try the new Outlook toggle is missing
The account isn't supported yet, or an admin has blocked the toggle.
- Check the account type: Outlook.com, Hotmail, work or school Microsoft 365, Gmail, Yahoo, iCloud and IMAP accounts are supported; on-premises Exchange connects only through IMAP.
- On a work PC, ask your admin whether new Outlook is allowed.
- Install new Outlook from the Microsoft Store; it needs Windows 10 version 17763.0 or later.
What should I do if Outlook keeps closing or stops responding?
The app is stuck or its installation is damaged.
- Right-click Start, select Task Manager, select Microsoft Outlook and choose End task.
- Reopen new Outlook.
- If it keeps happening, open new Outlook in the Start menu list, expand it and select Uninstall.
- Reinstall it from the Microsoft Store with Get, then sign in again.
How do I check whether Outlook has a Microsoft 365 service issue?
Some failures come from the service or a known bug, not your PC.
- Open Microsoft's Fixes or workarounds for recent issues in new Outlook for Windows page and look for your symptom.
- In new Outlook, select Help > Support to contact support from inside the app.
- On a work account, ask your Microsoft 365 admin to check service health.
Rules, automatic replies or blocking don't work for Gmail or Yahoo
New Outlook doesn't support these features for third-party accounts.
- Sign in to the provider's own website.
- Create the filter, vacation responder or block there.
- Keep using new Outlook to read and send; the provider applies the setting on its servers.
New mail notifications don't appear
Windows or Teams settings can suppress Outlook banners.
- In Windows, open Settings > System > Notifications and make sure notifications are on and Do not disturb is off.
- In the app list, make sure Outlook notifications are turned on.
- Stop any Focus session and turn off Battery saver.
- Check that your Teams status isn't Do not disturb.
New Outlook for Windows FAQ
Can I use new Outlook on Windows 10?
Yes. New Outlook runs on Windows 10 version 17763.0 or later as well as Windows 11, and you install it from the Microsoft Store. Users of the old Windows Mail app on Windows 10 also see a Try the new Outlook toggle when their accounts are supported.
Can I use new Outlook without the cloud?
Not entirely. New Outlook is built on the same service as Outlook on the web, and accounts sync through Microsoft's cloud. Offline access keeps a local copy of mail, calendar and people, so you can keep working without a connection, but the app is designed to sync.
Does new Outlook use data files?
It can open and export Outlook Data Files (.pst) through Settings > Files, but only with classic Outlook also installed, a Microsoft 365 subscription and a non-ARM PC. Day to day, mail stays on the server, and the offline copy is managed in Settings > General > Offline.
How to use new Outlook instead of classic?
Turn on the Try the new Outlook toggle at the top right of classic Outlook. The first time, choose Import Settings to bring your settings across. You can switch back by turning the toggle off in new Outlook, and both versions can run side by side.
Why am I being forced to use new Outlook?
Microsoft is moving through three stages: opt-in, opt-out, where new Outlook is on by default but you can switch back, and cutover. Classic Outlook isn't discontinued yet; existing installations stay supported until at least 2029, and organizations get at least 12 months' notice before each change.
Why is new Outlook missing so many features?
New Outlook is rebuilt on web technology, so some classic features are deliberately not supported, including COM add-ins, VBA macros, custom forms and voting buttons. Others, such as Search Folders and .pst support, arrive in stages. Microsoft's feature comparison page lists the current status of each.
How to use new Outlook online?
Outlook on the web is the same app in a browser, with the same layout, ribbon and settings. Changes you make in new Outlook settings also apply on the web. Windows-only features, such as offline access, .pst files and Narrator auto-read, are the main differences.
How to be more productive at work with Outlook?
Process email in set sessions rather than all day: let Focused Inbox and Sweep thin the inbox, Pin or Snooze what needs to wait, turn requests into To Do tasks, and drag those tasks onto your calendar so the work has protected time.