To install and configure a failover cluster in Windows Server, add the Failover Clustering feature to every node, run the validation tests, create the cluster with a name and IP address, then set a quorum witness.
This guide covers Windows Server 2025, 2022, 2019 and 2016 with Failover Cluster Manager, PowerShell and Windows Admin Center, plus clustered roles, failover testing and the errors that stop cluster creation.
Install and configure Failover Cluster in Windows Server
PowerShell is the shortest route because the same commands run on every node. Sign in with a domain account that is a local administrator on each server, and open PowerShell as administrator.
- Join every server to the same Active Directory domain, on the same Windows Server version and in the same time zone as the domain controller.
- On each server, run
Install-WindowsFeature -Name Failover-Clustering -IncludeManagementToolsand restart if the output asks for it. - From one node, run
Test-Cluster -Node Server1, Server2and fix every failure listed in the validation report. - Create the cluster with
New-Cluster -Name MyCluster -Node Server1, Server2 -StaticAddress 192.168.1.12, using your own cluster name, node names and a free IP address. - Add a witness, for example a file share witness with
Set-ClusterQuorum -NodeAndFileShareMajority \\fileserver\fsw. - Open Server Manager, select Tools > Failover Cluster Manager, and check that the cluster name appears in the navigation tree with its nodes under Nodes.
The rest of this guide expands each step, with the graphical wizards for readers who prefer them.
Failover Cluster Manager vs PowerShell vs Windows Admin Center
All three tools create the same kind of cluster on Windows Server 2016 and later. They differ in where you run them and how much of the host networking they configure for you.
| Your situation | Use this tool | Why |
|---|---|---|
| You want a guided wizard on the server itself | Failover Cluster Manager | Validation hands the tested nodes straight to the Create Cluster Wizard |
| You build several clusters or script your builds | PowerShell (FailoverClusters module) | Install-WindowsFeature, Test-Cluster and New-Cluster run unchanged on every build |
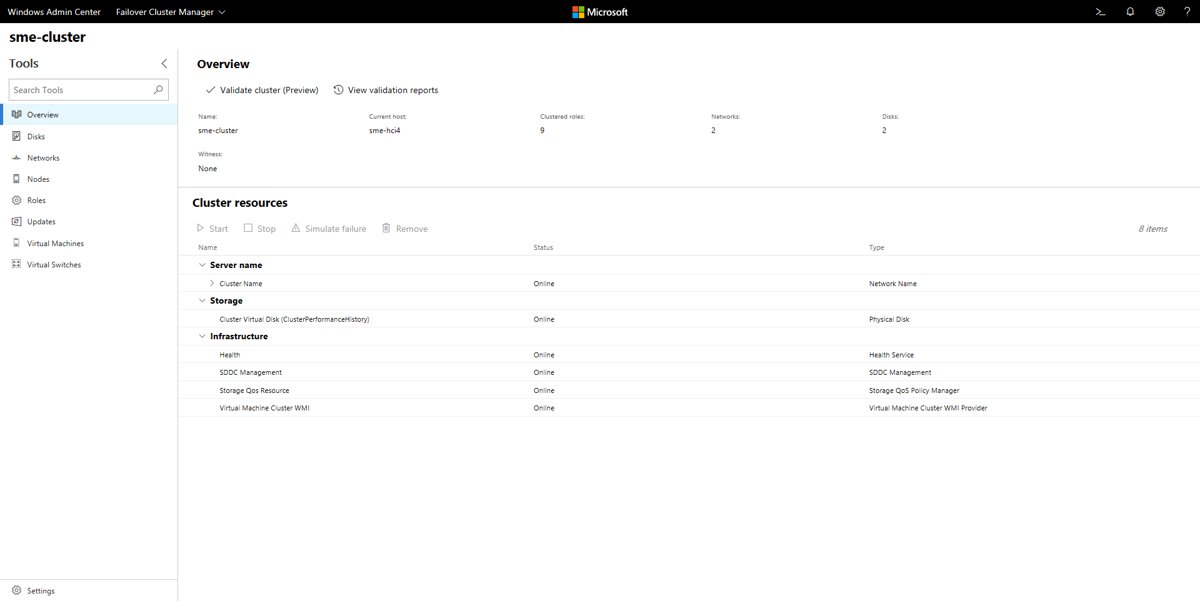
| You manage servers from a browser and want networking set up too | Windows Admin Center | Its wizard installs features, configures adapters and virtual switches, then validates and creates the cluster |
| You cannot create computer objects in Active Directory | PowerShell | An Active Directory-detached cluster is only available through PowerShell |
Windows Server failover cluster requirements
Microsoft supports a failover cluster only when the complete configuration passes every validation test and the hardware is certified for the Windows Server version on the nodes.
| Area | Requirement |
|---|---|
| Operating system | Every node runs the same version of Windows Server |
| Domain | Every node is joined to the same Active Directory domain and sits in the same time zone as the domain controller; no node hosts the domain controller |
| Account | A domain user with administrator rights on every node, plus the Create Computer objects permission on the OU or container that holds the nodes (or a prestaged cluster name object) |
| Servers | A matching set of computers with the same or similar components |
| Network | No single point of failure: several distinct networks, or teamed adapters with redundant switches and routers |
| iSCSI storage | Adapters dedicated to either network traffic or iSCSI, identical across nodes; Gigabit Ethernet or faster |
| SAS or Fibre Channel storage | Identical MPIO software, DSM software, HBAs, HBA drivers and HBA firmware on every node |
| Disks | Basic disks, not dynamic; NTFS recommended, MBR or GPT partition style; each LUN visible to one cluster only |
| Hyper-V clusters | 64-bit processor with Intel VT or AMD-V, and hardware DEP (Intel XD or AMD NX bit) enabled |
If the shared disks come from an iSCSI SAN, connect the iSCSI initiator on every node before you run validation.
Creating a dedicated OU for the cluster nodes keeps cluster computer objects away from unrelated Group Policy settings and accidental deletion.
How to install Failover Cluster Manager on Windows Server
Failover Cluster Manager is installed together with the Failover Clustering feature. Repeat these steps on every server that will become a node.
- Open the Start menu, type Server Manager, and open it.
- Select Manage in the top-right corner, then select Add Roles and Features.
- On Before You Begin, select Next.
- On Installation Type, select Role-based or feature-based installation, then select Next.
- On Server Selection, pick the local server or a remote server already added to Server Manager, then select Next.
- On Server Roles, select Next without choosing a role.
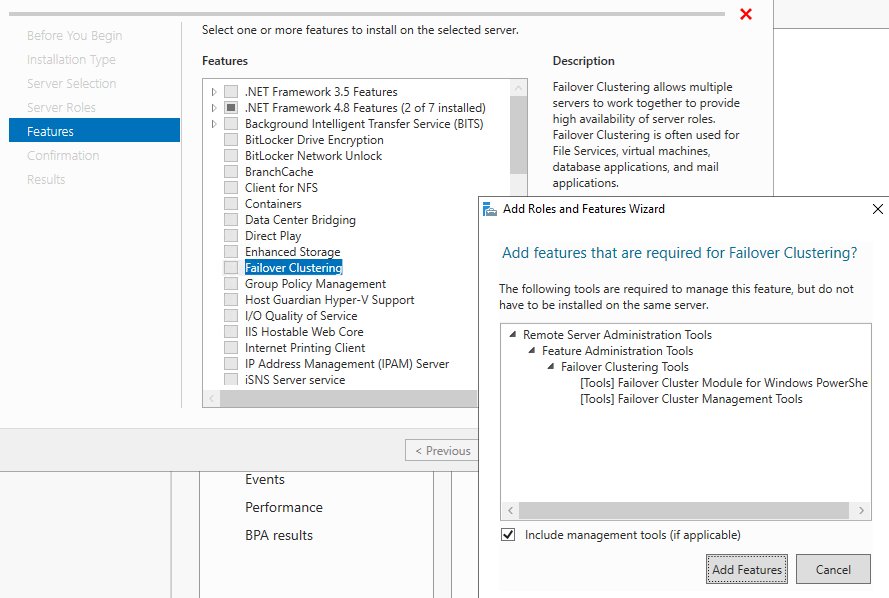
- On Features, select Failover Clustering, accept the prompt to add the management tools, then select Next.
- On Confirmation, select Install, and select Close when the installation finishes.
Apply the latest Windows updates to every node after the feature is installed, so all nodes validate on the same patch level.
Install Failover Cluster Manager on Windows 11
Failover Cluster Manager is part of the Remote Server Administration Tools (RSAT), which ship as Optional features in Windows 10 version 1809 and later. RSAT installs only on Pro and Enterprise editions, not Home.
- Open Start > Settings > System > Optional features.
- Open the add-a-feature panel and type Remote in the search box.
- Select RSAT: Failover Clustering Tools and install it.
- Open Failover Cluster Manager from the Start menu and connect to your cluster name.
The Failover Clustering tools include Failover Cluster Manager, the Failover Clusters PowerShell cmdlets and the Cluster-Aware Updating console. On Windows 11 Pro or Enterprise, the same panel can also install Server Manager for managing the nodes.
Run cluster validation tests in Failover Cluster Manager
Validation checks that the hardware and settings suit clustering before anything is created. You need at least two nodes to run every test; with one node, many of the critical storage tests are skipped.
- In Server Manager, select Tools > Failover Cluster Manager.
- Under Management, select Validate Configuration in the Actions pane.
- On Before You Begin, select Next.
- On Select Servers or a Cluster, type each server's NetBIOS name or FQDN in Enter name and select Add, separating several names with a comma or semicolon, then select Next.
- On Testing Options, select Run all tests (recommended), then select Next.
- On Confirmation, select Next and wait while the Validating page runs the tests.
- On Summary, select View Report if there are warnings or failures, or leave Create the cluster now using the validated nodes selected and select Finish.
A warning means that part of the cluster can still work but may not meet the recommended configuration. A failure has to be fixed before Microsoft supports the cluster.
How to create failover cluster in Failover Cluster Manager
If you chose to create the cluster straight from the validation summary, the Create Cluster Wizard opens with the tested nodes already added.
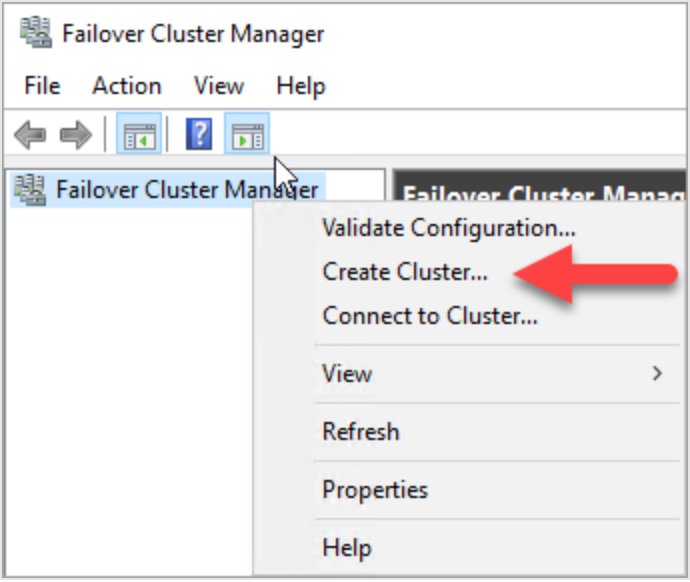
- In Failover Cluster Manager, under Management, select Create Cluster.
- On Before You Begin, select Next.
- On Select Servers, add each node by NetBIOS name or FQDN, then select Next. If you skipped validation, select Yes on Validation Warning to run it.
- On Access Point for Administering the Cluster, type the name in Cluster Name. To place the cluster object in a specific OU, type a distinguished name such as
CN=ClusterName,OU=Clusters,DC=Contoso,DC=com. - If no adapter uses DHCP, tick each network used for cluster management and type the cluster IP address in its Address field, then select Next.
- On Confirmation, clear Add all eligible storage to the cluster if you plan to add storage later, then select Next.
- On Summary, select View Report for any warnings, then select Finish.
The cluster name becomes the cluster name object (CNO) in Active Directory and is registered in DNS with the IP address you entered. On Windows Server 2019 and later, a cluster built in Azure uses a distributed network name by default, so it needs no dedicated cluster IP.
Create Windows failover cluster with PowerShell
Run this from an elevated PowerShell window on one node after Test-Cluster passes. It creates a cluster named MyCluster on Server1 and Server2 with a static IP address and adds all eligible storage.
New-Cluster -Name MyCluster -Node Server1, Server2 -StaticAddress 192.168.1.12-Name sets the cluster name object, -Node lists the servers to join, and -StaticAddress assigns the cluster IP address. Add -NoStorage to skip adding eligible disks, or pass a distinguished name such as CN=MyCluster,OU=Cluster,DC=Contoso,DC=com to -Name to create the object in a specific OU.
You should see: The command returns the new cluster name, and the cluster name appears in Failover Cluster Manager with both nodes listed under Nodes.
Test-Cluster writes its report to a log file in the current working directory. Run Test-Cluster -List to see every test name if you want to rerun one category with -Include, for example Test-Cluster -Node Server1, Server2 -Include "Storage".
Create Windows failover cluster in Windows Admin Center
You first need to install Windows Admin Center on a management PC or server that is not the domain controller and is joined to the same domain or a fully trusted one.
- Sign in to Windows Admin Center and, under All connections, select Add.
- In Add or create resources, under Server clusters, select Create new.
- Under Choose the cluster type, select Windows Server, then pick Cluster-aware roles and apps or Virtual machines as the workload type.
- Choose All servers in one site or Servers in two sites (for stretched cluster), then select Create.
- In Step 1: Get started, add the servers with a
domain\usernameaccount, select Install features, install updates if offered, and restart the servers when asked. - In Step 2: Networking, enable the adapters you want, pick at least one management adapter, choose a virtual switch option, then select Apply and test.
- In Step 3: Clustering, select Validate, review the warnings, then enter a unique cluster name and IP address and select Create cluster.
If creation fails, do not select Back: select Retry connectivity checks instead, because Back can reset the whole wizard.
Configure cluster quorum settings and the witness
Quorum is the minimum number of votes the cluster needs to keep running, which stops split portions of a cluster from running independently. Microsoft recommends always configuring a witness on Windows Server 2012 R2 and later; Dynamic Quorum then manages the witness vote.
| Witness type | Use it when | What it needs | PowerShell |
|---|---|---|---|
| File share witness | The cluster has no shared disk, or nodes sit in two sites with a third location for the share | An SMB 2 or later share with 5 MB free, dedicated to one cluster, never on DFS or replicated storage | Set-ClusterQuorum -NodeAndFileShareMajority \\fileserver\fsw |
| Cloud witness | Stretched multi-site clusters, clusters without shared storage such as SQL Server Always On, clusters in Azure or another cloud, small two-node branch clusters | An Azure Standard general-purpose v2 storage account and outbound HTTPS on port 443 from every node | Set-ClusterQuorum -CloudWitness -AccountName <name> -AccessKey <key> |
| Disk witness | Every node sees the same shared SAN disk | A clustered disk, formatted NTFS or ReFS, that holds a copy of the cluster configuration database | Set-ClusterQuorum -DiskWitness "Cluster Disk 7" |
A file share witness on a non-domain device, such as a NAS, needs a cluster running Windows Server 2019 or later. Run the Validate Quorum Configuration test after you change the quorum.
Configure a file share witness in Failover Cluster Manager
Create the share first and give the cluster name object Change and Read share permissions plus Modify NTFS permissions. Host it on a server in the same Active Directory forest, physically separate from the nodes.
- In Server Manager, select Tools > Failover Cluster Manager and select your cluster in the left pane.
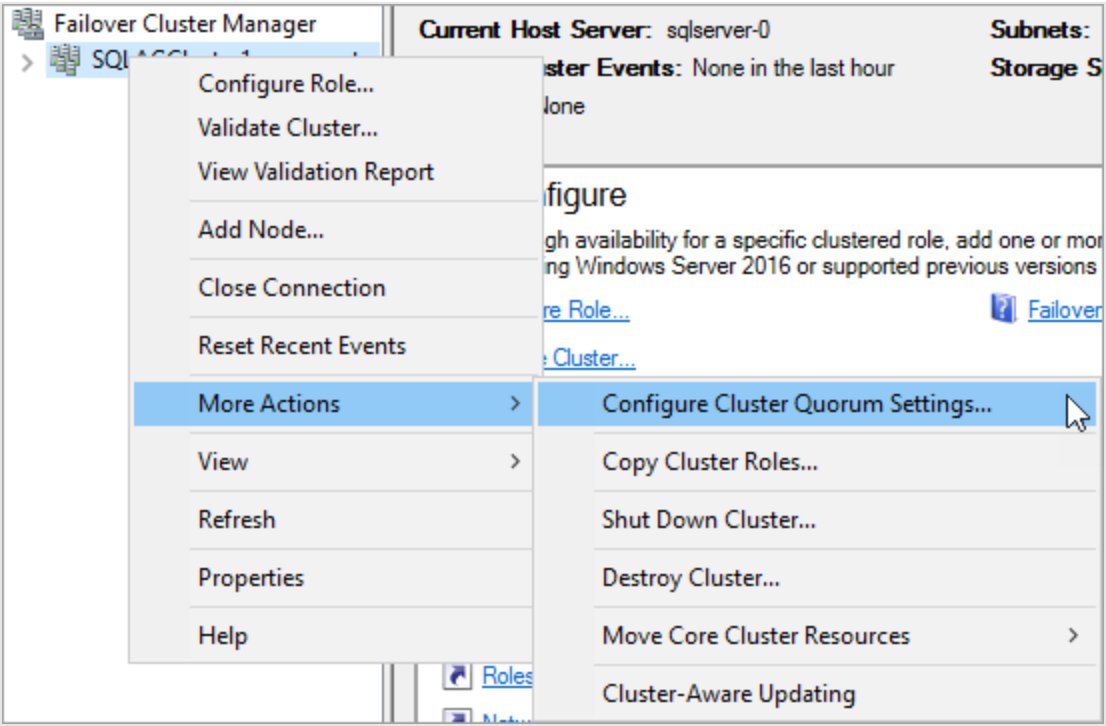
- In the Actions pane, select More Actions > Configure Cluster Quorum Settings, then select Next.
- On Select Quorum Configuration Option, select Select the quorum witness, then select Next.
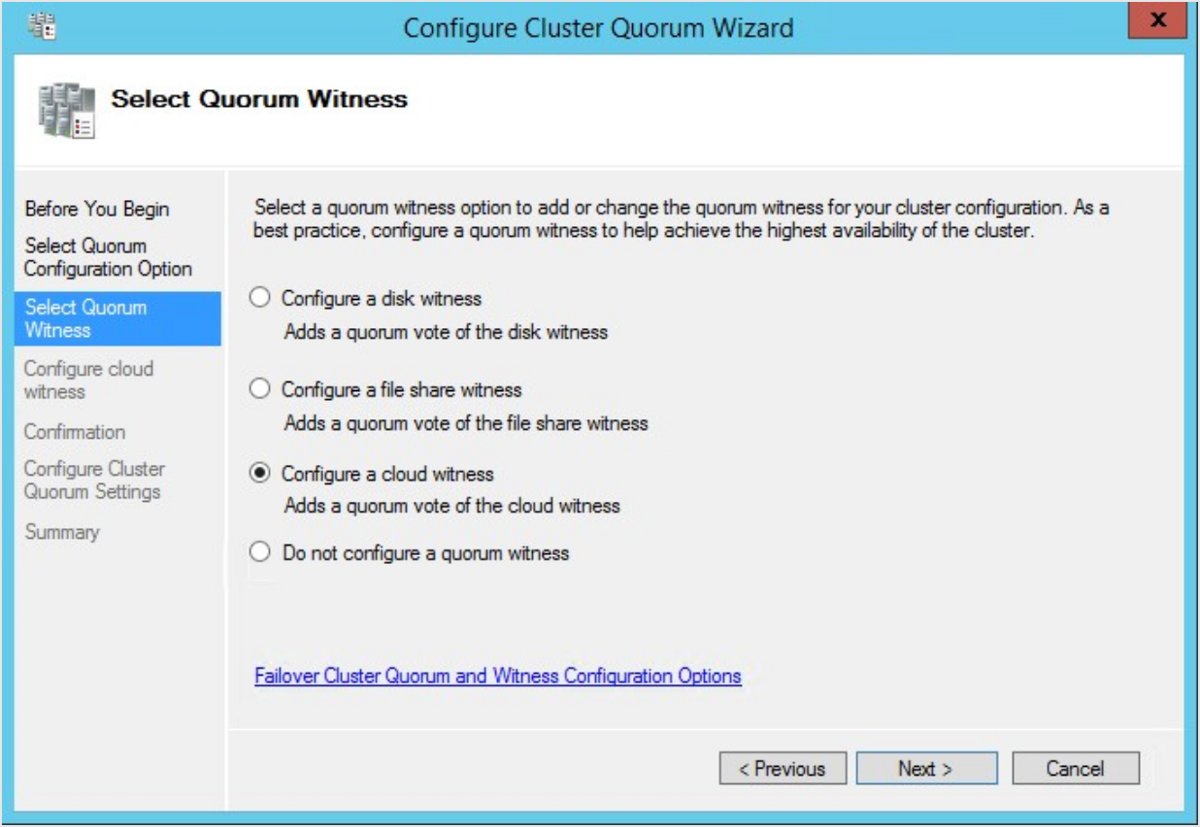
- On Select Quorum Witness, select Configure a file share witness, then select Next.
- On Configure File Share Witness, type the share path or select Browse to find it, then select Next.
- On Confirmation, select Next, then select Finish on Summary.
For a cloud witness, choose Configure a cloud witness at step 4 and enter the storage account name and its primary access key. The witness then appears under Cluster Core Resources in the middle pane.
Add Cluster Shared Volumes with PowerShell
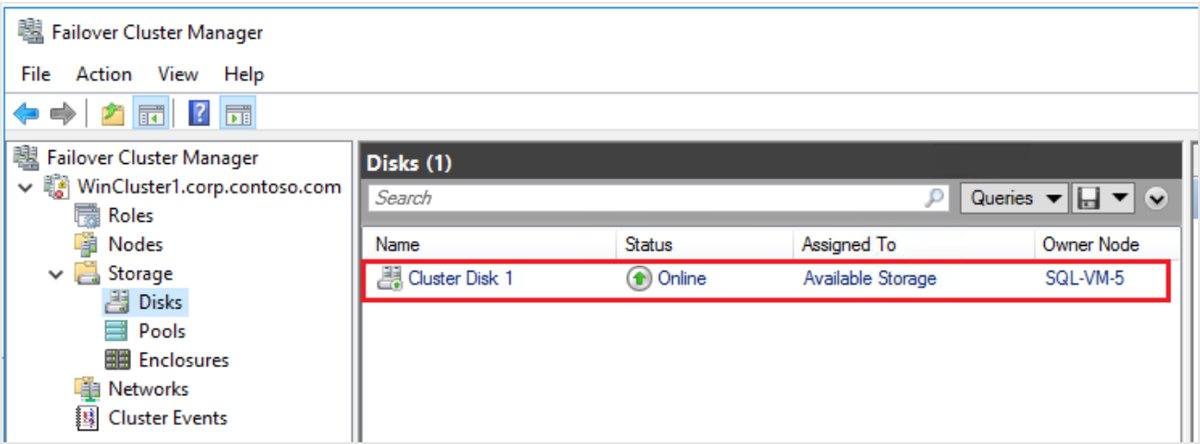
A Cluster Shared Volume (CSV) lets every node read and write the same disk at once, so clustered roles fail over without a change of drive ownership. The disk must already be in Available Storage.
Add-ClusterSharedVolume -Name "Cluster Disk 4"Moves the clustered disk named Cluster Disk 4 from Available Storage into Cluster Shared Volumes on the local cluster. Format SAN volumes with NTFS first so they use Direct I/O; format Storage Spaces Direct volumes with ReFS.
You should see: The volume appears as a numbered folder under C:\ClusterStorage on every node, and Get-ClusterSharedVolume lists it with its owner node.
Rename CSV folders before you install virtual machines or SQL Server on them, because a volume cannot be renamed while files on it are open.
Create clustered roles in Failover Cluster Manager
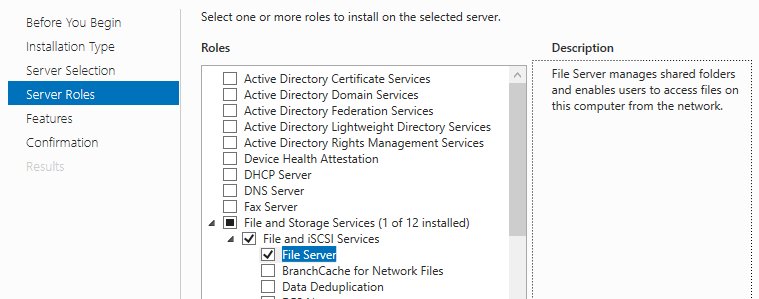
Install the server role or feature the clustered role depends on, on every node, before you start. A clustered file server, for example, needs the File Server role on all nodes.
- In Failover Cluster Manager, expand your cluster name in the left pane and select Roles.
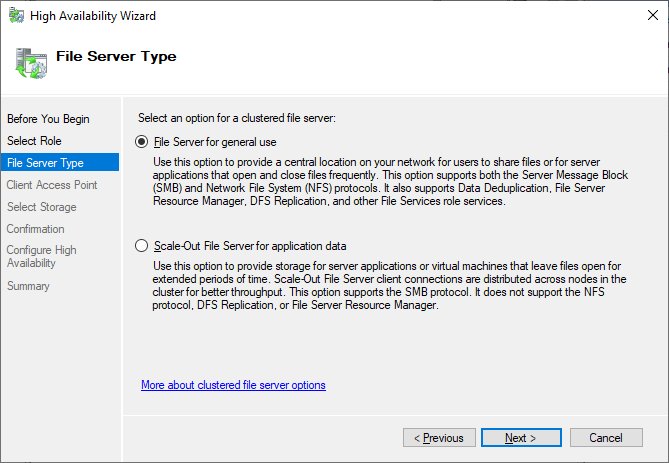
- Select the name of the role you want to add, such as File Server or Virtual Machine, and follow the wizard pages to the end.
- Back in Roles, check that the new role shows a status of Running and note its Owner Node.
Roles with a client access point create a virtual computer object (VCO) in the same OU as the cluster name object. In the default Computers container, a cluster can create up to 10 VCOs without extra permissions.
Failover clustering roles and the server role each one needs
| Clustered role | Install this on every node first |
|---|---|
| File Server | File Server role |
| Virtual Machine | Hyper-V role |
| Hyper-V Replica Broker | Hyper-V role |
| iSCSI Target Server | iSCSI Target Server (part of the File Server role) |
| iSNS Server | iSNS Server Service feature |
| Message Queuing | Message Queuing Services feature |
| WINS Server | WINS Server feature |
| Distributed Transaction Coordinator (DTC) | Nothing extra |
| Generic Application, Generic Script, Generic Service | Nothing extra; the application or service itself must be installed on each node |
How to test failover in a Windows failover cluster
A planned move proves the role can run on another node before a real failure forces it.
- In Failover Cluster Manager, select Nodes and check that every node is listed.
- Select Roles and check that your role shows Running.
- Right-click the role, point to Move, and select Select Node.
- In Move Clustered Role, pick another node and select OK.
- Check that the Owner Node column now shows the node you picked and the role returns to Running.
- In Server Manager, select All Servers and check that the cluster name is listed with a Manageability status of Online.
The cluster name can take a while to replicate in DNS, so an Offline status in Server Manager straight after creation is normal.
What is failover cluster in Windows
A failover cluster is a group of independent servers, called nodes, that work together to keep applications and services available. When a node fails, the remaining nodes take over its clustered roles; this is called failover.
| Term | What it means |
|---|---|
| Node | A Windows Server computer with the Failover Clustering feature that has joined the cluster |
| Clustered role | A workload the cluster keeps available, such as a file server or a Hyper-V virtual machine |
| Active-active | Every node runs workloads at the same time and shares the load |
| Active-passive | Some nodes stay on standby and take over only when an active node fails |
| Heartbeat | Signals the nodes exchange to detect a failed node and start failover |
| Quorum | The minimum number of votes needed for the cluster to keep running |
| Cluster name object (CNO) | The Active Directory computer account that represents the cluster name |
| Cluster Shared Volume (CSV) | A disk every node can read and write at the same time |
Windows failover cluster troubleshooting
"Failed to reach cluster through DNS" in Windows Admin Center
The new cluster name has not propagated through DNS yet.
- Select Retry connectivity checks; do not select Back.
- Wait and retry again; on large networks it can take several hours.
- If you have to start the wizard over, remove the half-built cluster with
Remove-Clusterfirst.
Create Cluster fails because the cluster name object cannot be created
The account creating the cluster lacks the Create Computer objects permission on the OU or container that holds the nodes.
- Ask a domain administrator to grant that permission, or to prestage the cluster name object.
- To prestage it, open Active Directory Users and Computers, right-click the OU, select New > Computer, and type the cluster name.
- Right-click the new computer account and select Disable Account, so cluster creation can confirm the name is not in use.
- On the account's Security tab, give the user who creates the cluster Full control.
- Run the Create Cluster Wizard again with exactly that name in Cluster Name.
Cluster validation report shows warnings or failures
Hardware, drivers, networks or storage differ between nodes, or a test could not reach a disk.
- Select View Report on the Summary page and read each failed or warned test.
- Fix failures first; Microsoft supports only clusters that pass every test.
- For a network warning about a single point of failure, add a second network or team the adapters.
- To test disks a running role is using, stop the role with
Stop-ClusterGroup, rerunTest-Cluster, then start the role again.
Cluster name not showing as Online in Server Manager
DNS registration and replication of the cluster name are still in progress.
- Wait a few minutes, then refresh All Servers in Server Manager.
- Check that the cluster name is listed under Failover Cluster Manager in the navigation tree.
- Expand the cluster and select Nodes, Storage or Networks to view its resources.
Failover Cluster Manager missing on Windows 11
RSAT is not installed, or the PC runs Home edition or Windows on Arm, where the Failover Clustering tools are not offered.
- Check that the PC runs Windows 11 Pro or Enterprise.
- Install RSAT: Failover Clustering Tools from Settings > System > Optional features.
- On Arm64 or Home devices, manage the cluster from a node or from Windows Admin Center instead.
For any other failure, run Get-ClusterLog -Destination . on a node to copy every node's cluster log to the current folder; without -Destination, the logs are written to C:\Windows\Cluster\Reports on each node.
Windows Server failover cluster FAQ
What is failover cluster in Windows?
A failover cluster is a group of Windows Server computers, called nodes, that keep clustered roles such as file servers or virtual machines available. When one node fails, another node takes over its roles automatically, and heartbeat signals between the nodes detect the failure.
How to install Windows failover cluster?
Install the Failover Clustering feature on every node, either from Server Manager under Manage > Add Roles and Features > Features, or with Install-WindowsFeature -Name Failover-Clustering -IncludeManagementTools in an elevated PowerShell window. Then validate the nodes and create the cluster.
How to install Failover Cluster Manager?
On Windows Server, Failover Cluster Manager installs with the Failover Clustering feature and its management tools. On Windows 10 or 11 Pro and Enterprise, install RSAT: Failover Clustering Tools from Settings > System > Optional features.
How to create failover cluster?
Open Failover Cluster Manager, select Create Cluster, add the validated nodes, enter a cluster name and IP address on Access Point for Administering the Cluster, and finish the wizard. In PowerShell, New-Cluster -Name MyCluster -Node Server1, Server2 -StaticAddress does the same.
How to setup Windows failover cluster step by step?
Join the nodes to one domain, install the Failover Clustering feature on each, run Validate Configuration or Test-Cluster, create the cluster, then configure a quorum witness and add Cluster Shared Volumes. Finish by creating a clustered role and moving it between nodes to test failover.
Can you install Failover Cluster Manager on Windows 11?
Yes, on Windows 11 Pro or Enterprise. Failover Cluster Manager is part of RSAT: Failover Clustering Tools in Optional features. It is not available on Home edition, and it is not among the RSAT tools offered on Arm64 devices.
How many nodes does a Windows failover cluster need?
A failover cluster needs at least two nodes to run every validation test, because many critical storage tests do not run with a single node. Small two-node clusters are common, especially with a cloud or file share witness.