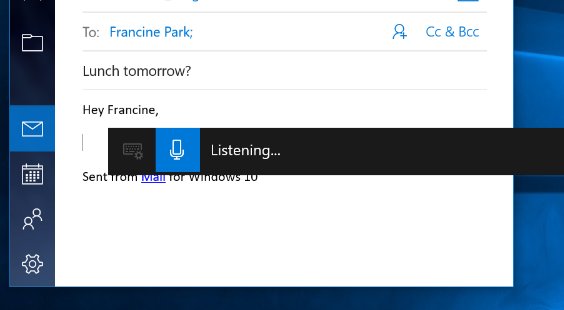
Click in any text box and press Windows key + H to start voice typing in Windows 11, or dictation in Windows 10, then speak once you see Listening….
This guide covers microphone setup, voice typing settings and commands, languages, Windows Speech Recognition, voice access, privacy settings and fixes for voice typing that will not work.
Set up and optimize voice typing & speech recognition in Windows 10/11
Voice typing needs an internet connection, a working microphone and a cursor in a text box. It uses online speech recognition powered by Azure Speech services.
- Click inside the text box where you want the words to go.
- Press Windows key + H, or tap the Microphone button on the touch keyboard.
- Wait for the Listening… alert, then speak normally.
- Say punctuation out loud, for example “comma” or “period”, unless automatic punctuation is on.
- Say Stop listening, or select the microphone button on the voice typing menu, to stop.
Press Windows key + Alt + H to move through the voice typing menu with the keyboard.
Voice typing vs voice access vs Windows Speech Recognition
Windows has three speech tools, and the right one depends on your Windows version and whether you only want to type or to control the whole PC.
| Your goal | Use this | Windows version | Start it with |
|---|---|---|---|
| Type text by speaking | Voice typing (called dictation in Windows 10) | Windows 11 and Windows 10 | Windows key + H |
| Control apps and type, without internet after setup | Voice access | Windows 11, version 22H2 and later | Settings > Accessibility > Speech |
| Control the PC by voice on Windows 10 | Windows Speech Recognition | Windows 10 and older Windows 11 | Windows key + Ctrl + S |
| Dictate in a language Windows 10 dictation lacks | Windows Speech Recognition | Windows 10 | Control Panel > Ease of Access > Speech Recognition |
Voice access replaced Windows Speech Recognition for Windows 11 22H2 and later versions in September 2024. Windows Speech Recognition remains available in older versions of Windows.
How to set up a microphone for voice typing in Windows
Recognition accuracy starts with the microphone. A headset or external microphone usually beats a built-in laptop mic in a noisy room, and a headset on a Windows 11 PC also works for voice access.
- Connect the microphone to the PC. For a Bluetooth microphone, select Add device under Input and follow the prompts.
- Select Start > Settings > System > Sound.
- Under Input, choose the microphone you want to use for speaking or recording.
- Select > next to the microphone to open its Properties page.
- Under Input settings, select Start test, speak normally, then select Stop test.
- Raise or lower the Input volume slider until your normal speaking voice registers clearly.
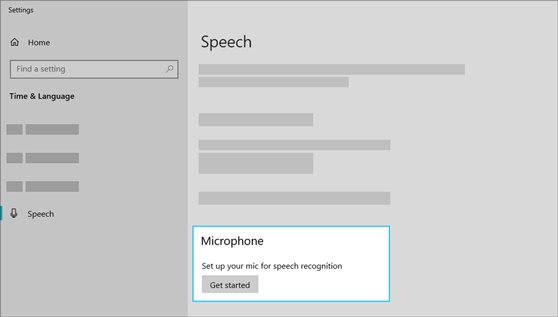
Windows Speech Recognition has its own microphone wizard: select Start > Settings > Time & Language > Speech, then select Get started under Microphone.
Voice typing settings in Windows 11: launcher, auto punctuation and profanity filter
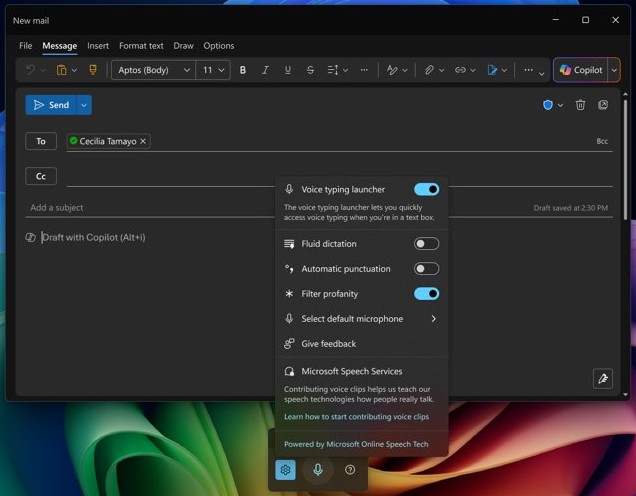
Windows 11 keeps every voice typing option behind the gear icon on the voice typing flyout, not in the Settings app.
- Click in a text box and press Windows key + H to open voice typing.
- Select the gear icon on the voice typing flyout.
- Turn on Voice typing launcher to get a quick voice typing button whenever you are in a text box.
- Turn on Automatic punctuation so voice typing inserts punctuation from the way you speak.
- Set Filter profanity to block or allow profanity in typed text.
- Choose the Default microphone if the PC has more than one input.
- Change Wait time before acting if you speak slowly and commands fire too early, or quickly and they lag.
Echo cancellation is built in: voice typing suppresses sound from your speakers, such as Narrator or app playback, so it does not type what the PC itself is playing.
How to use dictation in Windows 10
Windows 10 calls the same feature dictation and opens a dictation toolbar instead of the Windows 11 flyout. There is nothing to download, but the PC must be online.
- Select a text field in any app.
- Press Windows key + H to open the dictation toolbar, or tap the microphone button on the touch keyboard.
- Speak the text, saying punctuation such as “comma” and “period” out loud.
- Say commands such as Delete that, Select word or Clear selection to edit as you go.
- Say Stop dictation, or tap the microphone again, to finish.
Windows 10 dictation handles basic text, symbols, letters and numbers in a limited set of languages, and dictation commands work in US English only. For other languages, Microsoft points Windows 10 users to Windows Speech Recognition.
Voice typing commands in Windows 11
These are the US English commands. Microsoft's voice typing page lists the equivalents for every supported language.
| To do this | Say |
|---|---|
| Stop or pause voice typing | “Stop listening”, “Pause voice typing”, “Stop dictation” |
| Delete the last word or phrase | “Delete that”, “Erase that”, “Scratch that” |
| Select the last word or phrase | “Select that” |
| Undo the previous change | “Undo that”, “Revert” |
| Press Enter | “Press Enter” |
| Press Backspace | “Backspace”, “Press Backspace” |
| Press Tab | “Tab”, “Press Tab” |
| Insert a space | “Insert Space”, “Press Space” |
If a word or phrase is already selected, any of the “delete that” commands removes it.
Voice typing punctuation commands
| To insert | Say |
|---|---|
| . | “period” or “full stop” |
| , | “comma” |
| ? | “question mark” |
| ! | “exclamation mark” or “exclamation point” |
| : | “colon” |
| ; | “semicolon” |
| … | “ellipsis” or “dot dot dot” |
| ( ) | “open parentheses”, “close parentheses” |
| " " | “open quotes”, “close quotes” |
| – | “hyphen” |
| @ | “at sign” |
| New line | “new line” or “next line” |
| New paragraph | “new paragraph” |
| 's | “apostrophe-s” |
Turn on Automatic punctuation in voice typing settings if you would rather not say periods and commas at all.
How to add a voice typing language in Windows 11
Voice typing can use a different language from the one Windows displays. Windows 11 supports voice typing in more than 40 languages, including English (United States), English (United Kingdom), Spanish, French, German, Hindi and Japanese.
- Select Start > Settings > Time & language > Language & region.
- Next to Preferred languages, select Add a language.
- Search for the language, select it, then select Next.
- Select Next again, or pick optional language features; speech recognition is not required for voice typing.
- To dictate in that language, press Windows key + Spacebar or select the language switcher on the taskbar, then press Windows key + H.
Fluid dictation on Copilot+ PCs
| Question | Answer |
|---|---|
| What it does | Corrects grammar, punctuation and filler words while you speak |
| Where it runs | On-device small language models, for fast and private processing |
| Which PCs | Copilot+ PCs only, in all English locales |
| Is it on by default? | Yes, once the model download finishes; turn it off in voice typing settings |
| Why is the option dimmed? | The model is still downloading; check progress in Settings > Windows Update |
| How to undo a correction | Say “Revert” or “Undo that”, or press Ctrl + Z |
| Password fields | Turned off automatically in secure fields such as passwords and PINs |
How to set up Windows Speech Recognition in Windows 10
Windows Speech Recognition controls the PC and dictates text, and its training wizard teaches Windows your voice. Run the microphone check first.
- Select Start > Settings > Time & Language > Speech, and under Microphone select Get started to check the microphone.
- Type Windows Speech Recognition in the taskbar search box and select it.
- Select Next on the welcome page and follow the setup wizard to the end.
- Choose Start Tutorial to learn the commands, or Skip Tutorial to start using it.
- Press Windows key + Ctrl + S whenever you want to open Speech Recognition later.
To improve accuracy later, open Control Panel, select Ease of Access > Speech Recognition, and select Train your computer to better understand you. Run it again whenever recognition starts slipping.
Windows Speech Recognition commands
| To do this | Say |
|---|---|
| Turn listening on | “Start listening” |
| Turn listening off | “Stop listening” |
| Correct a word | “Correct *word*” |
| Delete the selected or last dictated text | “Delete that” |
| Select a word | “Select *word*” |
| Insert a line break | “New line” |
| Start a new paragraph | “New paragraph” |
| Number every item in the active window | “Show numbers” |
| Open an app | “Open *app name*”, for example “Open Paint” |
How to set up voice access in Windows 11
Voice access controls the PC and writes text by voice, and after the first setup it works without an internet connection. It needs Windows 11, version 22H2 or later.
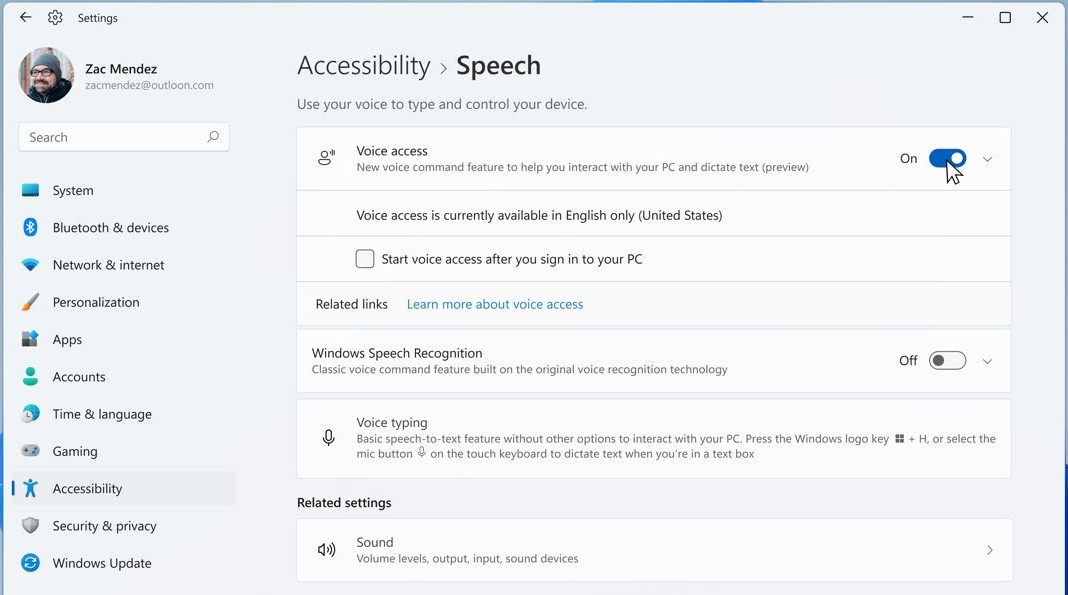
- Select Start > Settings > Accessibility > Speech.
- Turn on the Voice access switch.
- Choose your language on the welcome screen and select Agree and continue to download the language files.
- On the Setup microphone screen, confirm the default microphone.
- Select Continue for the short interactive guide, or exit and start talking.
- To start it with Windows, tick Start voice access before you sign in to your PC or Start voice access after you sign into your PC.
Voice access is available in English (US, UK, India, New Zealand, Canada, Australia), Spanish (Spain, Mexico), German, French (France, Canada), Simplified Chinese, Traditional Chinese (Taiwan), Japanese and Italian.
How to improve voice access speech recognition with Voice Isolation
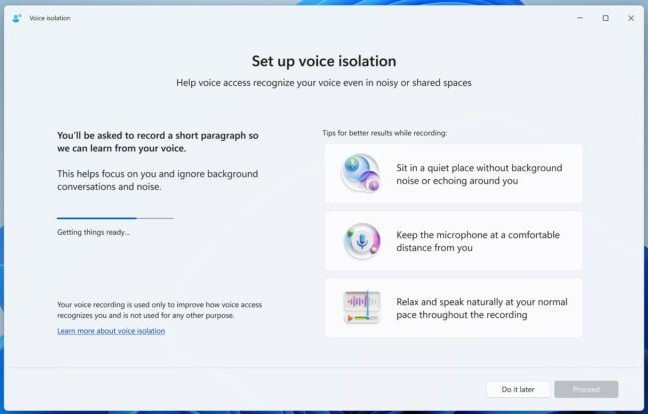
Voice access offers three filters: No filtering, Remove background noise only and Voice Isolation, which learns your voice and ignores other speakers. All of it runs on the device.
- Open the voice access settings menu on the Voice access bar at the top of the screen.
- Go to Improve speech recognition.
- Select Remove background noise only for a quick fix, or Voice Isolation for shared spaces.
- For Voice Isolation, select Proceed and let the small voice model download.
- Pick your microphone and read the paragraph aloud at your normal pace in a quiet room.
- Wait for the success message, then keep using voice access as usual.
If Voice Isolation slips later, open Improve speech recognition > Manage Voice Isolation and re-record your voice sample.
Online speech recognition and speech privacy settings in Windows 10 and 11
Voice typing depends on online speech recognition, which sends voice data to Microsoft only to create the transcription. Contributing voice clips to improve the service is optional.
| Setting | Windows 11 | Windows 10 |
|---|---|---|
| Online speech recognition | Settings > Privacy & security > Speech | Settings > Privacy > Speech |
| Microphone access | Settings > Privacy & security > Microphone | Settings > Privacy > Microphone |
| Desktop apps and the microphone | Let desktop apps access your microphone | Allow desktop apps to access your microphone |
| Voice clip contribution | Voice typing gear icon, then follow the contribution links | Help make online speech recognition better, on some versions |
| Custom word list | Privacy & security > Inking & typing personalization | Privacy > Inking & typing personalization |
Turning off online speech recognition stops voice typing, because it needs the online service. Work and school accounts can still use voice typing, but cannot share voice data.
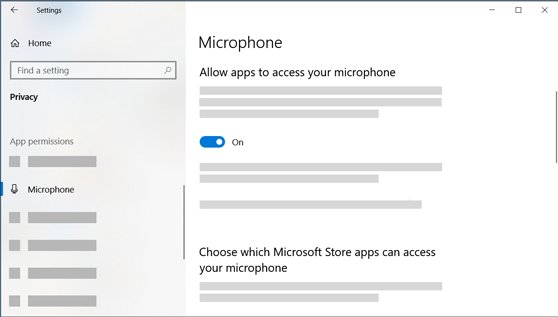
Voice typing not working in Windows 11 or 10
“Voice typing needs access to your microphone”
Microphone access is turned off in privacy settings.
- In Windows 11, select Start > Settings > Privacy & security > Microphone.
- Turn on Microphone access and Let apps access your microphone.
- In Windows 10, select Start > Settings > Privacy > Microphone and turn on Microphone access for this device.
- Press Windows key + H again.
“Voice typing isn't available in the current language”
The active input language does not support voice typing.
- Press Windows key + Spacebar and switch to a supported language.
- If none is installed, add one in Settings > Time & language > Language & region.
- Start voice typing again.
Text does not appear after speaking
The wrong microphone is selected, or its input level is too low.
- Select Start > Settings > System > Sound.
- Under Input, choose the microphone you are speaking into.
- Open its Properties page and raise the Input volume slider.
- Try a headset or external microphone if the built-in mic still fails.
Words are not entered correctly
Background noise or the wrong voice typing language.
- Move to a quieter location.
- Press Windows key + Spacebar and confirm the language you are speaking is selected.
- Switch to a headset or external microphone.
- On a Windows 10 PC using Speech Recognition, run Train your computer to better understand you again.
Windows key + H does nothing
Voice typing needs an internet connection and a cursor in a text box.
- Click inside a text field so the cursor blinks there.
- Check that the PC is online.
- Check that Online speech recognition is on in the speech privacy settings.
- Press Windows key + H again.
Windows voice typing and speech recognition FAQ
What is the shortcut for voice typing in Windows?
Press Windows key + H with the cursor in a text box. It opens voice typing in Windows 11 and dictation in Windows 10. On a touch screen, tap the microphone button on the touch keyboard instead.
Does Windows voice typing work offline?
No. Voice typing uses online speech recognition, so the PC must be connected to the internet. Voice access in Windows 11 works without internet once its language files have downloaded during the first setup.
Is Windows Speech Recognition still available in Windows 11?
Not on current versions. Voice access replaced Windows Speech Recognition for Windows 11 22H2 and later in September 2024. Windows Speech Recognition is still available on Windows 10 and older Windows 11 versions.
How do I turn on automatic punctuation in voice typing?
Press Windows key + H, select the gear icon on the voice typing flyout and turn on Automatic punctuation. Voice typing then adds punctuation from the way you speak, so you do not have to say “comma” or “period”.
How do I stop voice typing?
Say “Stop listening”, “Stop dictation” or “Pause voice typing”, or select the microphone button on the voice typing menu. In Windows 10, say “Stop dictation” or tap the microphone again.
Can I use voice typing in a different language than Windows?
Yes. Add the language in Settings > Time & language > Language & region, then switch to it with Windows key + Spacebar before you press Windows key + H. The optional speech recognition feature is not needed.
Is my voice sent to Microsoft when I use voice typing?
Yes, for transcription. Online speech recognition sends voice data to Microsoft only to provide the service, and Microsoft says it does not store or listen to recordings without permission. Contributing voice clips is optional.
How do I train Windows to recognize my voice better?
On Windows 10, open Control Panel > Ease of Access > Speech Recognition and select Train your computer to better understand you. On Windows 11 with voice access, set up Voice Isolation under Improve speech recognition.
What languages does voice access support?
Voice access supports English (US, UK, India, New Zealand, Canada, Australia), Spanish (Spain, Mexico), German, French (France, Canada), Simplified Chinese, Traditional Chinese (Taiwan), Japanese and Italian.
Does voice typing work with a work or school account?
Yes. Signing in with a work or school account still lets you use voice typing. The only difference is that sharing voice data to improve the service is not available on those accounts.