To insert a section break in Word, click where the new section should start, open the Layout tab, select Breaks, and choose Next Page, Continuous, Even Page or Odd Page.
This guide covers Word for Windows, Word for Mac and Word for the web, the four break types, how to see and change existing breaks, and how to delete them without wrecking your formatting.
Tutorial – Inserting a section break in Word
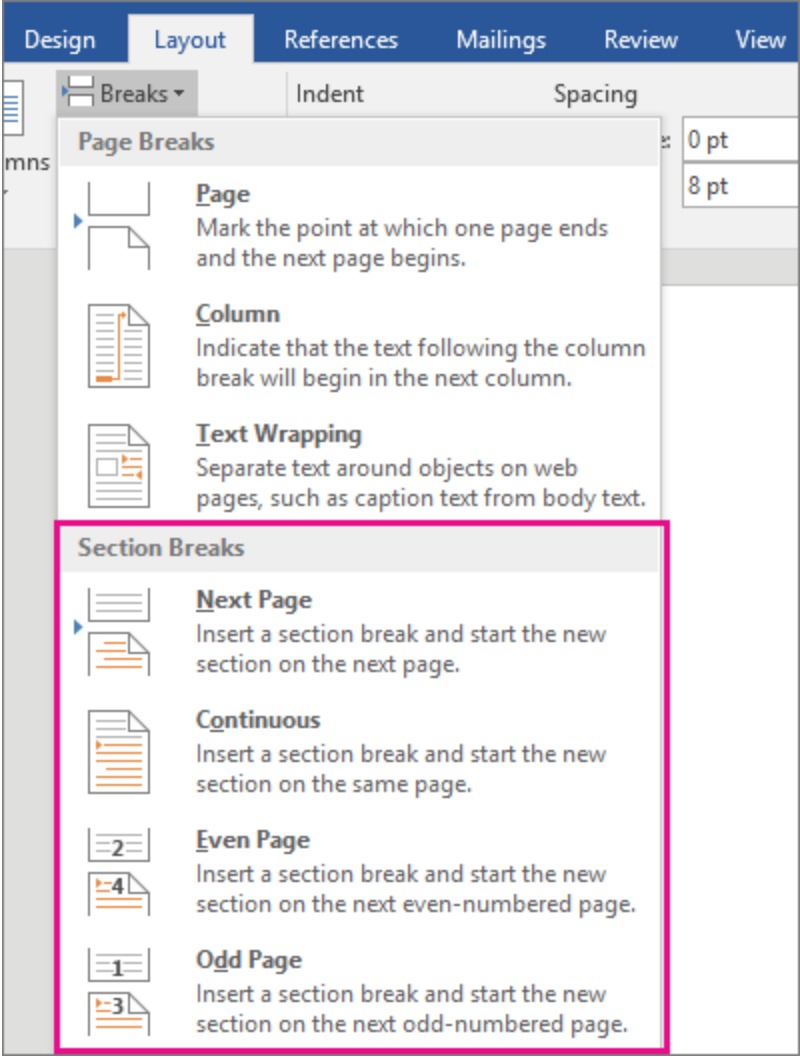
These steps work in Word for Microsoft 365, Word 2024 and earlier desktop versions on Windows. The break goes in at the cursor, so place it carefully first.
- Open your document in the Word desktop app.
- Click at the exact spot where the new section should begin, usually the start of a heading or paragraph.
- Select the Layout tab on the ribbon.
- Select Breaks in the Page Setup group.
- Under Section Breaks, choose Next Page, Continuous, Even Page or Odd Page.
- Apply the formatting you want, such as columns or a new orientation, just after the new break.
If the new formatting lands in the previous section instead, press Ctrl + Z, move the cursor to just after the section break, and apply it again.
What is a section break?
A section break divides a document into parts that can each carry their own page layout. Without one, layout settings apply to the whole document.
| Formatting a section can have | Typical use |
|---|---|
| Its own page orientation | One landscape page for a wide table inside a portrait report |
| Its own header or footer | Different chapter titles at the top of each chapter |
| Its own page numbering | Roman numerals for front matter, then 1, 2, 3 for the body |
| Its own number of columns | A two-column newsletter body under a one-column headline |
| Its own page borders | A border on the title page only |
Difference between section and page break
Both breaks can push text to a new page, but only a section break lets the layout change after it.
| Question | Page break | Section break |
|---|---|---|
| What it does | Ends the current page and moves the following text to the next page | Starts a new section that can have its own layout settings |
| Can the layout change after it? | No, the next page keeps the same orientation, margins, headers and columns | Yes, orientation, headers, footers, numbering, columns and borders can all differ |
| Must it start a new page? | Yes | No, a Continuous section break keeps the new section on the same page |
| Where to insert it on Windows | Insert > Page Break, or Ctrl + Enter | Layout > Breaks > a type under Section Breaks |
| Best for | Starting a heading or chapter on a fresh page | Changing formatting for part of a document |
Types of section breaks
Word offers four section break types. They differ only in where the new section begins.
| Section break type | Where the new section starts | Use it for |
|---|---|---|
| Next Page | At the top of the following page | New chapters, or a landscape page inside a portrait document |
| Continuous | On the same page, right after the break | Changing the number of columns without starting a new page |
| Even Page | On the next even-numbered page | Chapters that must always start on an even page |
| Odd Page | On the next odd-numbered page | Chapters that must always start on an odd page |
With an Even Page break at the end of page 3, the next section starts on page 4. With an Odd Page break at the same spot, it starts on page 5.
Types of page breaks
Page breaks control where text flows to the next page or column. None of them changes the layout of what follows.
| Page break type | How to insert it | What it does |
|---|---|---|
| Manual page break | Insert > Page Break, or Ctrl + Enter on Windows; Layout > Breaks > Page on Mac | Forces the following text onto the next page |
| Column break | Layout > Breaks > Column, or Ctrl + Shift + Enter on Windows | Moves the following text to the top of the next column |
| Automatic page break | Added by Word when a page fills up | Moves text that no longer fits onto the next page |
| Page break before setting | Home > Paragraph dialog launcher > Line and Page Breaks | Makes a paragraph always start on a new page |
| Keep with next and Keep lines together | Home > Paragraph dialog launcher > Line and Page Breaks | Stops Word from splitting a heading from its text, or a paragraph across pages |
Shift + Enter inserts a line break, which starts a new line inside the same paragraph. It is not a page or section break.
How to insert section breaks in a Word document
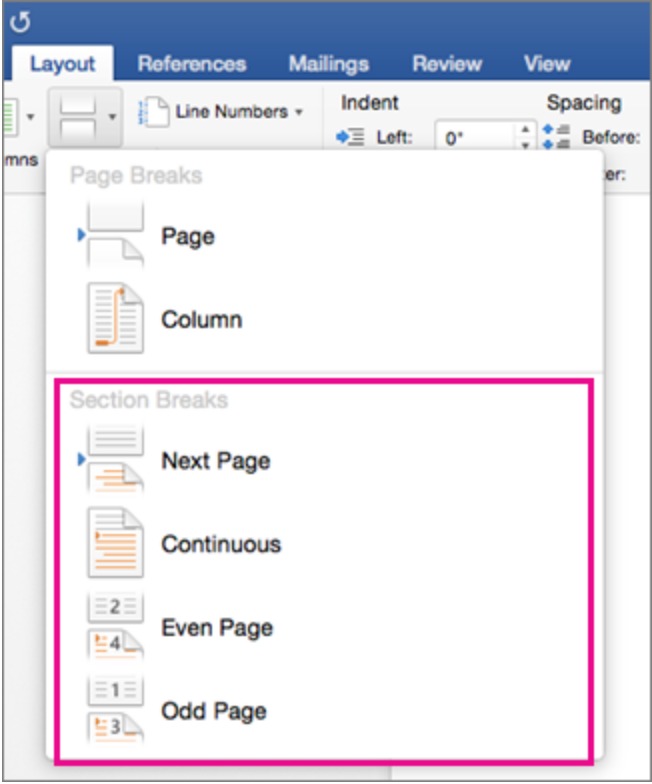
Word for Mac uses the same menu as Windows. Only the shortcut for showing formatting marks differs.
- Open the document in Word for Mac.
- Click where you want the new section to begin.
- Select the Layout tab.
- Select Breaks.
- Choose Next Page, Continuous, Even Page or Odd Page under the section break options.
- Press Command + 8 to show formatting marks and confirm the break sits where you wanted it.
Repeat the steps at each point where the layout should change. A document can hold as many sections as it needs.
How to insert a section break in Word online
Word for the web cannot add section breaks. It can add page breaks from Insert > Page Break, so use the desktop app for the section break itself.
- Open the document in Word for the web.
- Select Open in Word to open the same file in the Word desktop app.
- Click where the new section should start.
- Go to Layout > Breaks and choose the section break type.
- Save the document. It stays in the same OneDrive or SharePoint location you opened it from.
How to change a section break type in Word
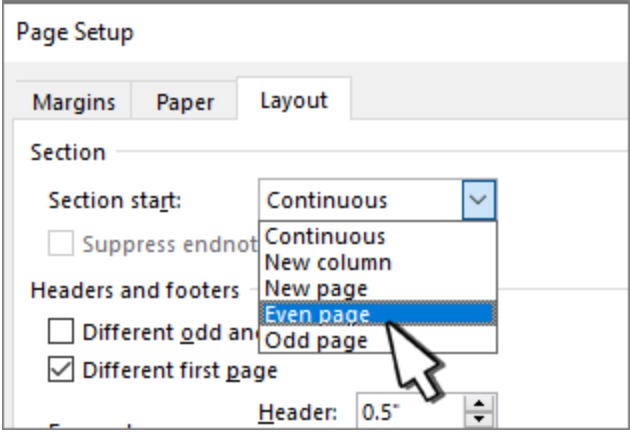
You do not need to delete a wrong section break. Change its type in place and the formatting of both sections stays intact.
- Click inside the section that follows the break you want to change.
- Go to the Layout tab.
- Select the small arrow in the bottom-right corner of the Page Setup group.
- Select the Layout tab in the Page Setup dialog.
- Choose a new type from the Section start drop-down list.
- Select OK.
How to use section breaks for different headers and footers in Word
Every new section starts with its header and footer linked to the previous section. Break that link to give the section its own content.
- Click at the start of the page where the new header or footer should begin.
- Go to Layout > Breaks and choose Next Page.
- Double-click the header or footer on the first page of the new section.
- Select Link to Previous to turn it off. Do this for the header and the footer separately if both should differ.
- Type the new header or footer text, or choose a style.
- Select Close Header and Footer, or press Esc.
The same section setup lets you start page numbers from a specific page, such as page 3 after a cover and contents page.
How to make one page landscape in Word with section breaks
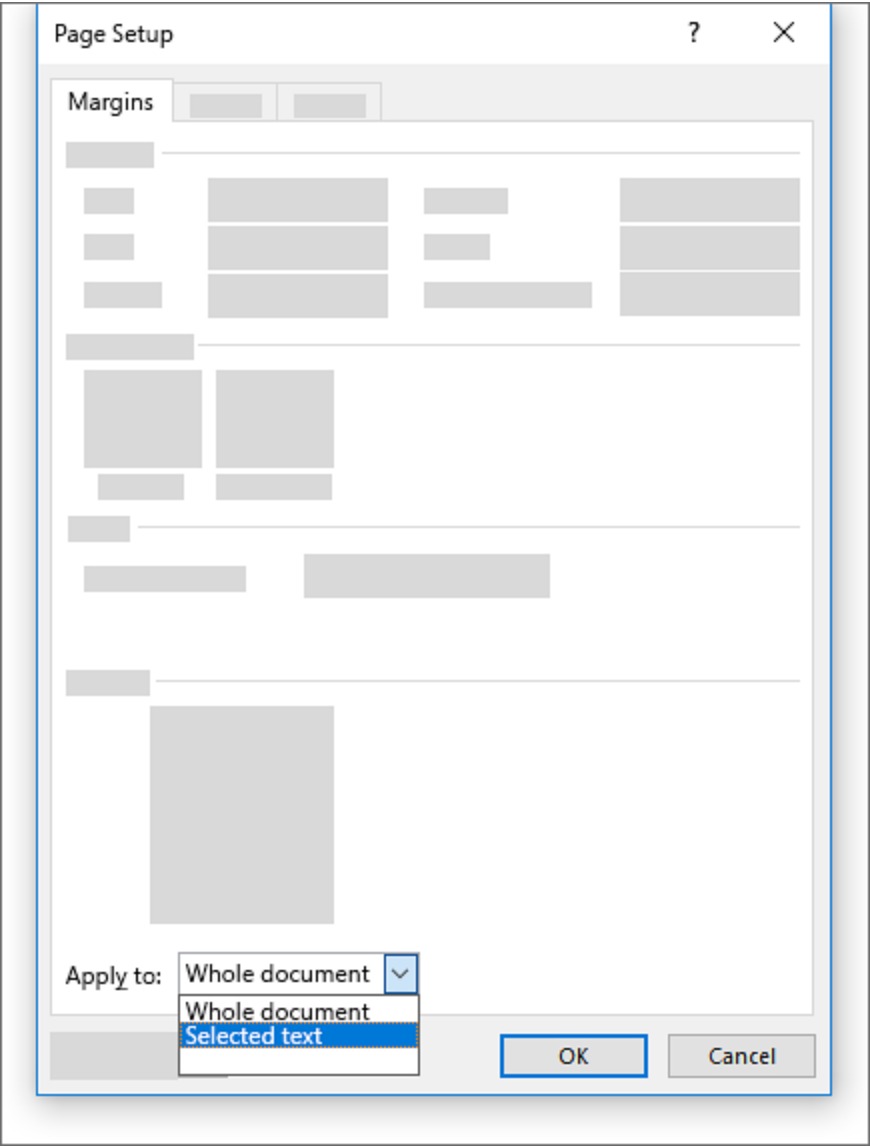
Orientation is a section setting, so a single landscape page needs a section of its own. The Page Setup dialog can apply landscape to just the selected text.
- Select the content that should sit on the landscape page, such as a wide table.
- Go to the Layout tab and open the Page Setup dialog with the small arrow in the group's corner.
- Select Landscape under Orientation.
- In the Apply to box, choose Selected text.
- Select OK.
- Press Ctrl + Shift + 8 to show formatting marks and check the breaks before and after the landscape page.
To do it by hand, insert a Next Page section break before and after the content, click between them, and choose Layout > Orientation > Landscape.
How to view existing section breaks
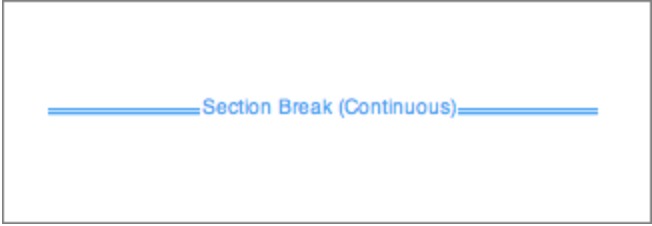
Section breaks are invisible in normal editing. Turning on formatting marks shows where each section break begins and ends.
- Go to Home and select Show/Hide ¶.
- Or press Ctrl + Shift + 8 on Windows or Command + 8 on a Mac.
- Scroll through the document and check that each break sits where the layout should change.
- For a cleaner list of breaks, go to View > Draft, where breaks are easier to spot.
- Select Show/Hide ¶ again to hide the marks when you finish.
How to delete section and page breaks
Deleting section breaks in the middle of a document can cause formatting problems. Changing the break to Continuous is often the safer fix.
- Press Ctrl + Shift + 8 on Windows or Command + 8 on a Mac to show formatting marks.
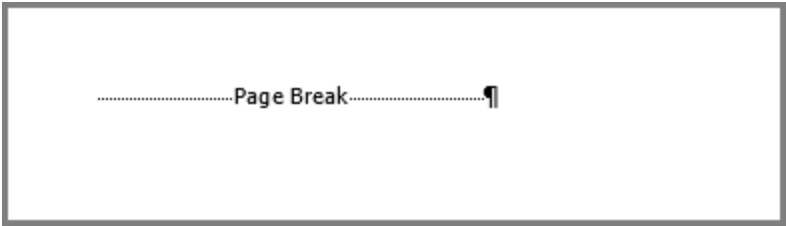
- To remove a manual page break, select the Page Break mark and press Delete.
- To remove a section break, select the Section Break mark and press Delete.
- If the section break only adds a blank page at the end, put the cursor directly before it and press Delete.
- If the layout changes after a deletion, press Ctrl + Z and change the break to Continuous from Layout > Breaks instead.
Long documents with many breaks are faster to clean up if you remove all section breaks at once. For stray manual breaks, remove page breaks in Word with the same formatting marks turned on.
Tips for inserting a section break in Word
| Tip | Why it helps |
|---|---|
| Turn on Show/Hide ¶ before you insert a break | You can see exactly where the break lands and which section the cursor is in |
| Use Continuous for column changes | It changes the column count without forcing a new page |
| Use Next Page for chapters and landscape pages | The new layout starts cleanly at the top of a page |
| Apply new formatting just after the break | Formatting set before the break belongs to the previous section |
| Turn off Link to Previous for each new header and footer | Otherwise the new section keeps the old header and footer |
| Change the break type instead of deleting it | Deleting a break can merge two sections and change their layout |
| Use Odd Page or Even Page for book-style chapters | Each chapter then always starts on an odd or an even page |
Why can't I insert a section break in Word?
No section break options in Word for the web
Word for the web can add page breaks but not section breaks.
- Select Open in Word to open the file in the desktop app.
- Insert the break from Layout > Breaks.
- Save the file and reopen it in the browser if you prefer.
The new formatting changed the wrong section
The cursor was still before the break when you applied the change.
- Press Ctrl + Z on Windows or Command + Z on a Mac to undo the change.
- Turn on Show/Hide ¶ and click just after the section break.
- Apply the formatting again.
A blank page appears after the section break
A Next Page, Odd Page or Even Page break at the end of the document, or an Odd/Even break that skips a page.
- Show formatting marks with Ctrl + Shift + 8.
- For a break at the very end, put the cursor directly before it and press Delete.
- For a break mid-document, change its type to Continuous in Page Setup > Layout > Section start.
Headers or page numbers did not change in the new section
The new section's header or footer is still linked to the previous one.
- Double-click the header or footer in the new section.
- Select Link to Previous to turn it off.
- Edit the header, footer or page numbers for that section.
Frequently asked questions about section breaks in Word
How do I insert a section break in Word 365?
In Word for Microsoft 365, click where the new section should start, go to Layout > Breaks, and choose Next Page, Continuous, Even Page or Odd Page. The menu is the same in Word 2024 and on a Mac.
Can I insert a section break in Word online?
No. Word for the web can add page breaks but not section breaks. Select Open in Word, add the section break in the desktop app, and save. The file stays in the same OneDrive or SharePoint location.
How do I insert a continuous section break?
Click where the new section should begin, go to Layout > Breaks, and select Continuous. The new section starts on the same page, which makes it the right choice for switching from one column to two columns mid-page.
Why can't I insert a section break?
The usual reason is that the document is open in Word for the web, which cannot add section breaks. Open it in the Word desktop app with Open in Word, then use Layout > Breaks.
What is a section break used for?
A section break lets part of a document use different page formatting. Common uses are a single landscape page, separate headers and footers per chapter, restarted page numbers, and a change in the number of columns.
Do section breaks affect headers and footers?
Yes. Each section can have its own header and footer, but a new section starts linked to the previous one. Double-click the new header or footer and turn off Link to Previous to make it different.
What happens if I insert the wrong type of section break?
Change it rather than deleting it. Click in the section after the break, open the Page Setup dialog from the Layout tab, select its Layout tab, choose a new Section start type, and select OK.
Can I see where section breaks are in my document?
Yes. Select Show/Hide on the Home tab, or press Ctrl + Shift + 8 on Windows or Command + 8 on a Mac. Each section break then shows where it begins and ends in the text.
How do I insert a section break for a landscape page in Word?
Select the content, open Page Setup from the Layout tab, choose Landscape, and set Apply to to Selected text. Or insert a Next Page section break before and after the content and set that section to Landscape.