Sharing My Card from Contacts sends a contact card with the fields you allow: on iPhone you pick them after tapping Share Contact, and on a Mac the card goes as a vCard (.vcf) with every field unless you set up a private me card.
This guide covers what each part of My Card does when you share it, how to share your card on iPhone, with NameDrop, on Mac and from iCloud.com, and how to keep notes, photos, pronouns and your location out.
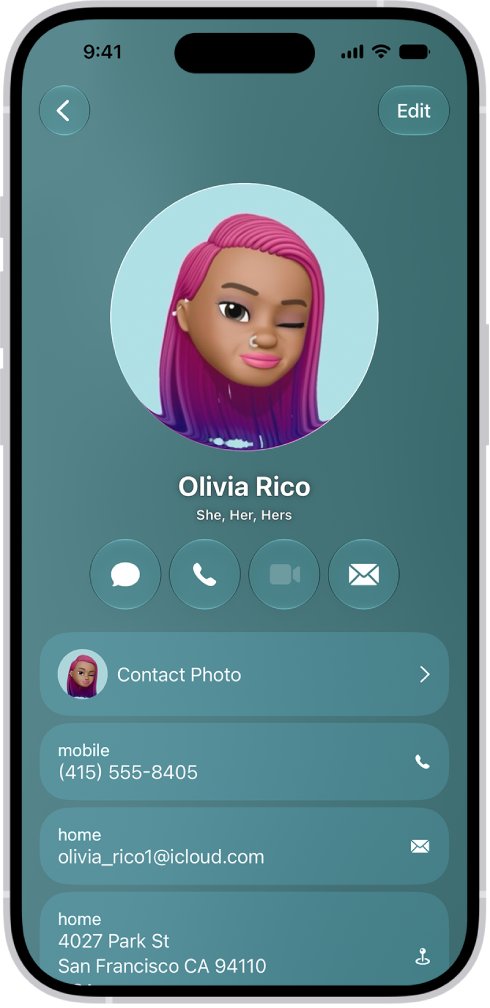
What information My Card shares from Contacts on iPhone
My Card holds your name, phone numbers, email, addresses, birthday, photo and Contact Poster. Sharing it sends only what you select, and some details travel by other features.
| Information on My Card | Sent when you tap Share Contact? | How to control it |
|---|---|---|
| Name, phone numbers, email addresses and addresses | Only the fields you select | Choose the fields after you tap Share Contact |
| Birthday and any other details you added | Only if you select them | The same field list |
| Pronouns | No, not by default | Left out unless you include them; another person's pronouns are never shared |
| Name, contact photo and Contact Poster | Sent by Name & Photo Sharing when you call or message someone | Choose Contacts Only or Always Ask, or turn it off |
| Your live location | No, it is not a contact field | Shared only through Share My Location in Find My |
On a Mac, notes and photos go out with a shared card when Export notes in vCards and Export photos in vCards are selected in Contacts settings.
How to share my contact card on iPhone
The Contacts app shares My Card the same way it shares any contact, with a field list so you decide what goes out each time.
- Open the Contacts app on your iPhone.
- Tap My Card at the top of the contacts list.
- Tap Share Contact.
- Select the fields you want to include and deselect the rest.
- Tap the share button, then choose a sharing option, such as Messages or Mail.
- Send the message or email. The other person taps the .vcf attachment to add your card to their contacts.
The same steps share anyone else's card: tap their contact instead of My Card. Their pronouns are never included.
How to share a business card electronically from iPhone
iPhone has no separate business card, but My Card works as one when you share only your work details.
- Open Contacts, tap My Card, then tap Edit.
- Add your work phone number and work email, then tap the label to the left of each one and select Work.
- Tap Add Address, enter your office address and label it Work.
- Save your changes.
- Tap Share Contact and select only your name and the work fields.
- Send the card with Mail or Messages, or hold your iPhone near the other person's to use NameDrop.
Your personal fields stay on the card for your own use, and you choose again every time you share.
How to share contact info with NameDrop on iPhone
NameDrop swaps contact cards when you hold two iPhones, or an iPhone and a supported Apple Watch, close together. It sends new contact information only and cannot update a contact the other person already has.
- Hold the display of your iPhone a few centimeters from the top of the other person's iPhone or Apple Watch.
- Keep the devices together until NameDrop appears on both screens.
- Choose to share your contact card and receive theirs, or to only receive theirs.
- To change what you send, tap the button on your contact card, select the fields to include, then tap Save.
- To cancel, move the devices apart or lock your iPhone before the transfer completes.
NameDrop remembers your selection, so the same fields are chosen the next time. It works with Apple Watch Ultra models, Apple Watch Series 7 and later, and Apple Watch SE (2nd generation) or later.
Name & Photo Sharing vs Share Contact vs NameDrop on iPhone
Four iPhone features share something about you. Only two of them send your contact details as a card.
| Feature | What it shares | When it shares | How you control it |
|---|---|---|---|
| Share Contact in Contacts | The fields you select from My Card | Only when you send the card with Messages, Mail or another app | Pick the fields each time |
| NameDrop | The fields you selected for NameDrop | When you hold your iPhone near another iPhone or Apple Watch and choose to share | Tap the button on your card to change the fields; the choice is remembered |
| Name & Photo Sharing | Your name, contact photo and Contact Poster | Automatically when you call or message someone | Contacts Only, Always Ask, or off |
| Share My Location in Find My | Your live location | For as long as you choose when you start sharing | Find My > People or Me |
How to share My Card from Contacts on Mac
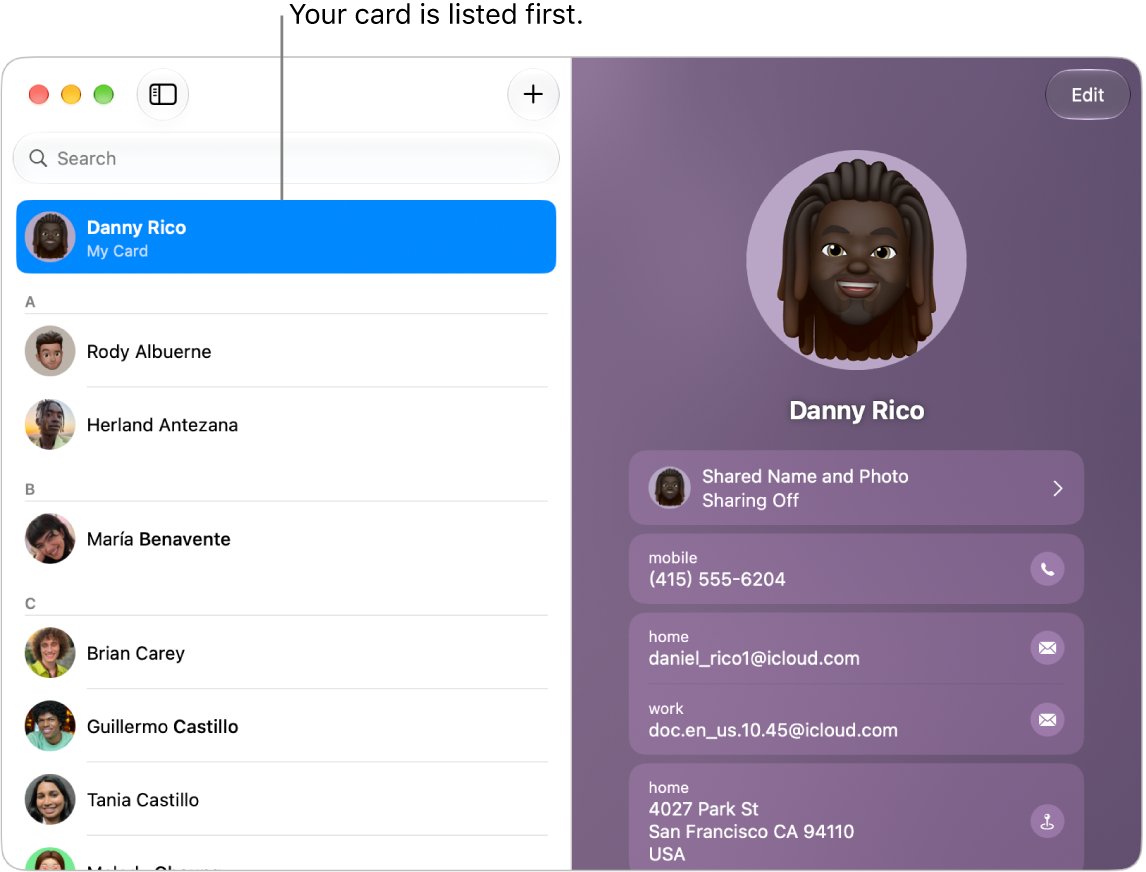
Contacts on Mac sends your card as a vCard file (.vcf). Unless you make your card private, it gives you no field list when you share.
- Open the Contacts app on your Mac.
- Choose Card > Go to My Card, or select My Card at the top of the contacts list.
- Click Share Contact. You may need to scroll down to see it.
- Choose a share option, such as Mail, Messages or AirDrop.
The same button shares another person's card: select their card instead of yours.
How to make a private me card in Contacts on Mac
A private me card lets you tick the fields that go out when you share or export your card from the Mac.
- In Contacts on your Mac, choose Contacts > Settings, then click vCard.
- Select Enable private me card.
- Select your card in the contacts list, then click Edit at the top of the window.
- Select the Share checkbox along the right edge of the card for each field you want to include.
- Click Done.
Fields without a tick stay on your Mac but are left out when you share or export your card.
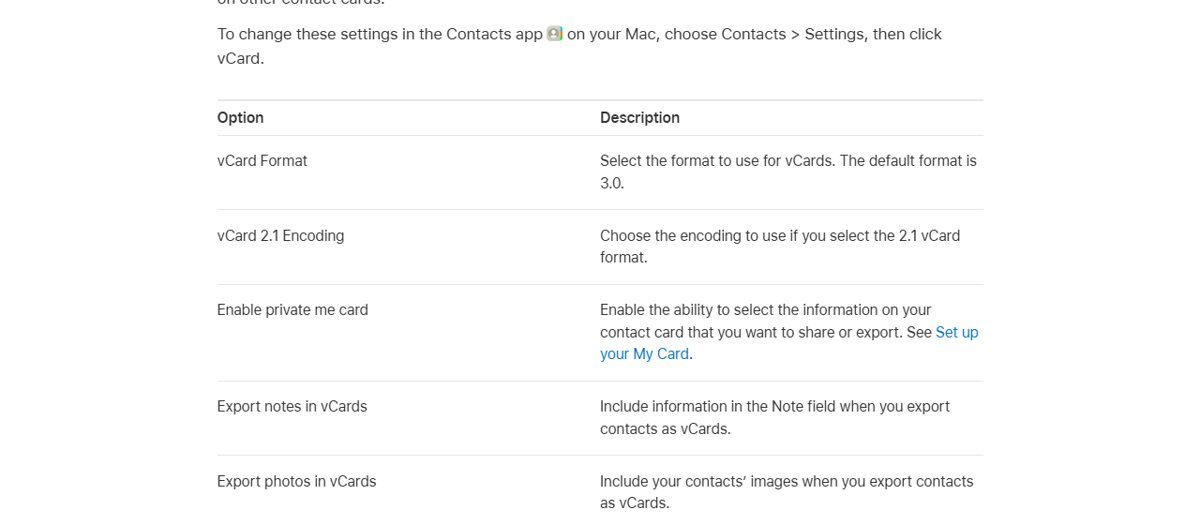
Contacts vCard settings on Mac: export notes and photos
Choose Contacts > Settings and click vCard to see these options. They apply to your own card and to every other card you share or export from the Mac.
| Setting | What it does | Note |
|---|---|---|
| vCard Format | Sets the vCard version used for shared and exported cards | The default is 3.0 |
| vCard 2.1 Encoding | Sets the text encoding for vCard 2.1 | Only applies when you choose the 2.1 format |
| Enable private me card | Lets you choose which fields on your card are shared or exported | Turns on the Share checkboxes on your card |
| Export notes in vCards | Includes the Note field in shared and exported cards | Deselect it to keep notes private |
| Export photos in vCards | Includes contact pictures in shared and exported cards | Deselect it to send cards without pictures |
How to share a vCard from iCloud.com
iCloud.com exports any contact, including your own card, as a vCard you can attach to an email from any computer.
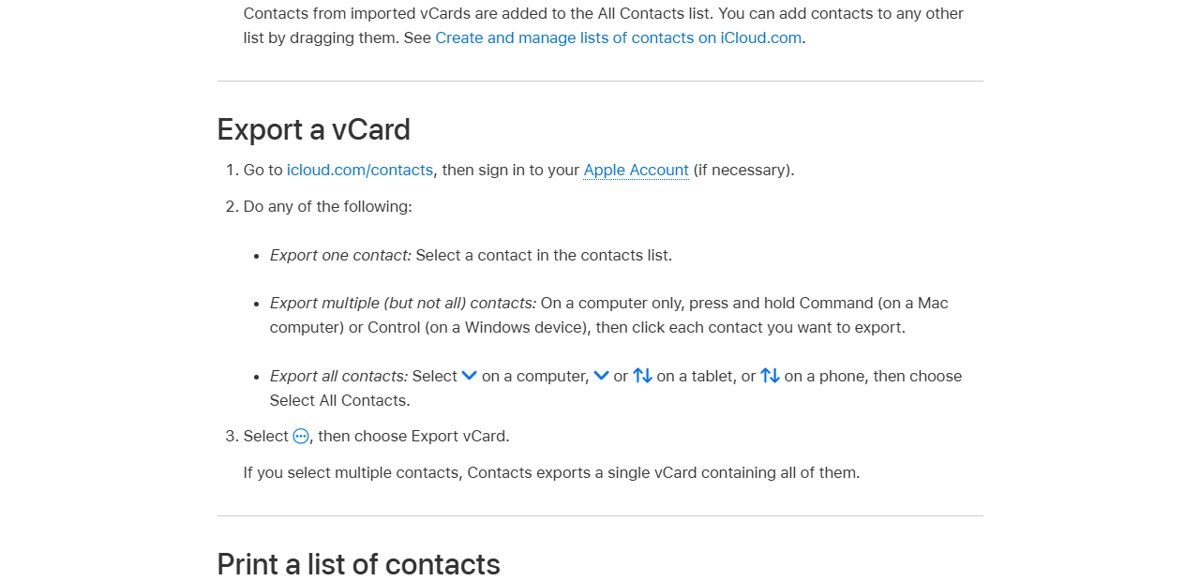
- Go to icloud.com/contacts and sign in to your Apple Account.
- Select your own contact in the contacts list.
- Select the options button, then choose Export vCard.
- Attach the saved .vcf file to an email or message and send it.
To export all your iCloud contacts at once, choose Select All Contacts before Export vCard; the result is a single vCard holding all of them. Someone on a PC can open the VCF file in Windows 11.
How to preview a contact card (.vcf) before you share it
Send the card to yourself first to see exactly what the other person will get.
- Share My Card to your own email address with Mail, using the same fields you plan to send.
- Open the email on your iPhone.
- Tap the .vcf attachment to open the card.
- Check every field shown: name, numbers, email, address and anything else you selected.
- Close the card without saving it, then edit My Card or change your field selection if something is wrong.
How to turn off NameDrop and Name & Photo Sharing on iPhone
NameDrop and Name & Photo Sharing are the two features that can share details without the Share Contact button. Turn either one off, or make it ask first.
- To turn off NameDrop, go to Settings > General > AirDrop, then turn off Bring Devices Together.
- To change name and photo sharing, open Contacts, tap My Card, tap Edit, then tap your contact photo.
- Turn off Name & Photo Sharing, or keep it on and choose Always Ask to approve each share.
- To hide your location from everyone, open Find My, tap Me, then turn off Share My Location.
Turning off Bring Devices Together also turns off the other features that start when you hold devices together.
Where is share my location on iPhone
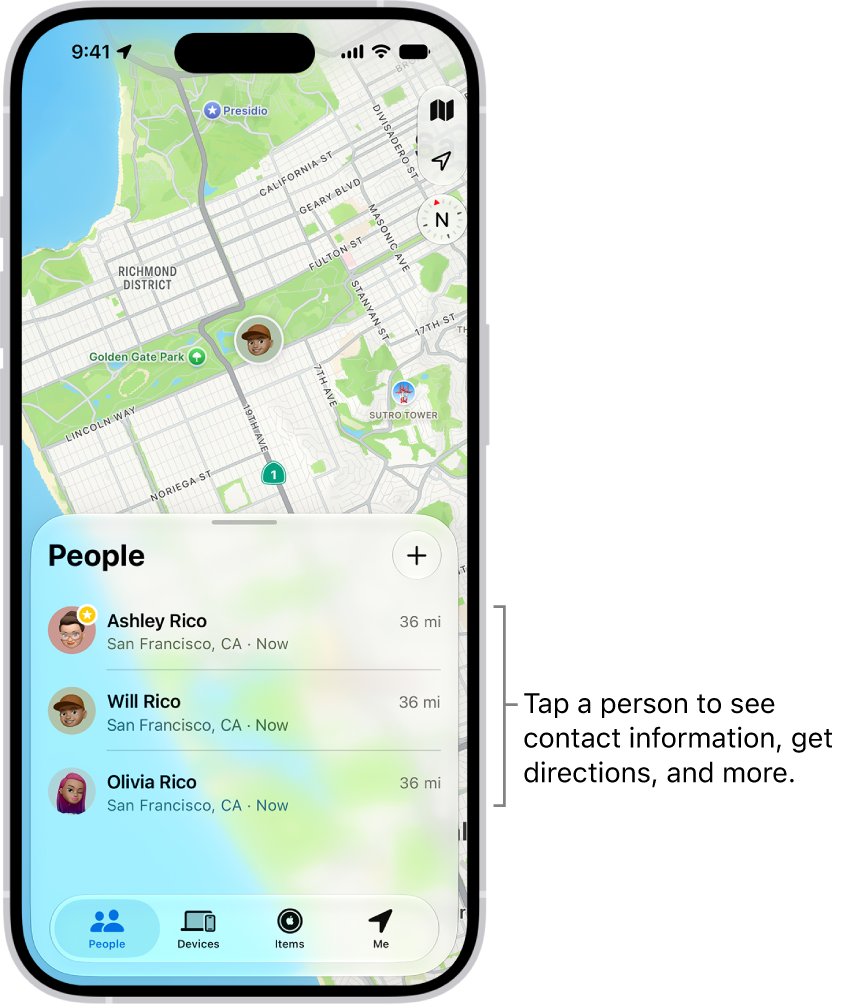
Your live location is not a field on My Card, so sharing your card never shares where you are. Location sharing on iPhone lives in the Find My app.
- Open the Find My app on your iPhone.
- Tap Me, then turn on Share My Location.
- Tap People, tap the add button, then choose Share My Location.
- Enter a friend's name in the With field, or select a contact.
- Send the request, then choose how long you want to share your location.
The same settings are in Settings > [your name] > Find My. If friends still cannot see you, turn on Settings > Privacy & Security > Location Services > Find My.
My Card not showing or NameDrop not working on iPhone
My Card is missing from the top of Contacts
No contact is set as yours, so there is nothing to share as My Card.
- In Contacts, tap the add button and enter your details.
- Return to the contact list, touch and hold your contact, then tap Make this My Card.
- On a Mac, select your card and choose Card > Make This My Card; with Contacts on in iCloud, your other devices use the same card.
NameDrop does not appear when the phones are close
Bring Devices Together is off, or the other device is not supported.
- Go to Settings > General > AirDrop and turn on Bring Devices Together on both iPhones.
- Hold the display of your iPhone a few centimeters from the top of the other device until NameDrop shows on both screens.
- For a watch, use Apple Watch Ultra, Series 7 or later, or SE (2nd generation) or later.
NameDrop will not update a contact the other person already has
NameDrop only sends new contact information, not updates to an existing contact.
- Open Contacts, tap My Card, then tap Share Contact.
- Send the card with Messages or Mail.
- Ask the other person to tap the .vcf attachment to open your updated card.
A card shared from a Mac includes notes or a photo
Export notes in vCards or Export photos in vCards is selected in Contacts settings.
- Choose Contacts > Settings, then click vCard.
- Deselect Export notes in vCards and Export photos in vCards.
- Share the card again.
Contact card sharing FAQ
How do I share my contact card on iPhone?
Open Contacts, tap My Card at the top, then tap Share Contact. Choose the fields you want to include, tap the share button and pick Messages, Mail or another app. The other person taps the .vcf attachment to save your details.
How do I share a vCard?
On iPhone, use Share Contact in Contacts and send it with Messages or Mail. On a Mac, select the card and click Share Contact. On any computer, select the contact at icloud.com/contacts and choose Export vCard, then attach the .vcf file to an email.
How do I share a business card electronically?
Add your work phone, work email and office address to My Card with Work labels. Then tap Share Contact and select only your name and the work fields before sending. NameDrop also works if the other person has a nearby iPhone or Apple Watch.
Does sharing my contact card share my pronouns?
Not by default. When you share your contact information through Contacts or NameDrop, your pronouns are left out unless you include them. When you share another person's contact card, their pronouns are never shared.
Does sharing My Card share my notes?
On a Mac, notes are included when Export notes in vCards is selected in Contacts > Settings > vCard; deselect it to keep them private. On iPhone, Share Contact shows a field list, so send only the fields you select.
Does NameDrop share my phone number and email?
NameDrop shares the fields you select on your contact card, and it remembers that choice for next time. Tap the button on your card when NameDrop appears, select the phone numbers and email addresses to include, then tap Save.
Where is Share My Location on iPhone?
Open the Find My app, tap Me and turn on Share My Location. To share with one person, tap People, tap the add button, choose Share My Location and pick a contact. Sharing My Card never sends your live location.
How do I allow sharing of my name and photo?
Open Contacts, tap My Card, tap Edit, then tap your contact photo. Turn on Name & Photo Sharing and choose Contacts Only to share automatically with people in your contacts, or Always Ask to approve each share.
Can I share someone else's contact card?
Yes. Open the person's card in Contacts, tap Share Contact, choose the fields and send it with Messages or Mail. Their pronouns are never included. If you are transferring contacts to a new phone, exporting the whole list is faster than sharing cards one by one.