To see connected devices in Windows 11, select Start > Settings > Bluetooth & devices > Devices, which lists your paired and plugged-in mice, keyboards, audio devices and other accessories.
This guide covers that page plus Device Manager, Bluetooth, USB, printers and scanners, network devices, System Information, PowerShell, Command Prompt, Disk Management and the Windows Security device page.
Method 1: See connected devices using the Settings app
The Settings app is the quickest view of the accessories a person actually plugs in or pairs.
- Select Start, then select Settings.
- Select Bluetooth & devices in the left pane.
- Select Devices to open the full list of connected and paired devices.
- Select a device to see its options, such as removing it.
- Under Related settings, select More Bluetooth settings if you need the classic Bluetooth Settings window.
If More Bluetooth settings is missing, the PC may have no Bluetooth adapter, or its driver is not installed.
What are connected devices in Windows 11?
A connected device is any piece of hardware Windows has detected, from a USB mouse to an internal disk. Each tool below shows a different slice of that list.
| Tool | What it shows | Best for |
|---|---|---|
| Settings > Bluetooth & devices | Paired and plugged-in accessories | Everyday checks on mice, headsets and keyboards |
| Device Manager | Every hardware device and driver, grouped by type | Spotting devices with errors or missing drivers |
| Printers & scanners | Installed printers and scanners | Print and scan devices |
| File Explorer > Network | Computers and devices sharing on the local network | Shared PCs and network printers |
| System Information (msinfo32) | A full report of hardware and components | Saving a hardware report to a file |
| PowerShell and pnputil | Plug and Play devices as text you can filter | Quick filtered lists, scripts and remote support |
| Disk Management | Every disk and its online or offline status | Drives that do not show in File Explorer |
Method 2: View all connected hardware in Device Manager
Device Manager lists the devices installed in the computer, grouped into categories such as Bluetooth, Disk drives, Keyboards and Mice and other pointing devices.
- Right-click the Start button, then select Device Manager.
- Expand a category to see the devices in it.
- Look for a yellow exclamation point next to any device, which marks a problem.
- Right-click a device and select Properties to read its status on the General tab.
- Select View > Show hidden devices to include devices hidden by default.
Hidden devices include printers and other classes Device Manager does not show by default, plus non-present devices that were removed but still have registry entries.
Using Device Manager to see hardware devices
Device Manager shows each device's type, status, manufacturer, properties and driver, and it flags problems on the list itself.
| What to look at | What it tells you | Use it when |
|---|---|---|
| Yellow exclamation point next to a device | The device has an installation or driver problem | A device is connected but does not work |
| Properties > General tab | The device status and any error message | Reading why a device has stopped |
| Properties > Driver tab | The driver installed for the device | Checking a driver version or updating it |
| Properties > Details and Events tabs | Hardware IDs and recent installation events | Tracing when and how a device was installed |
| View > Show hidden devices | Hidden classes and non-present devices | Looking for a device that was unplugged or is hidden |
You can also open Device Manager from File Explorer: right-click This PC, select Manage, then select Device Manager.
Method 3: See Bluetooth connected devices
Bluetooth devices connect automatically when Bluetooth is on and they are in range, so the list shows which ones are connected right now.
- Select Start > Settings > Bluetooth & devices.
- Make sure Bluetooth is switched On.
- Read the device cards at the top of the page for connection status.
- Select Devices to see every paired Bluetooth device.
- From the taskbar, open quick settings and select the Manage Bluetooth devices chevron on the Bluetooth tile for a faster view.
A device that is paired but not listed as connected is out of range or switched off. The same steps apply when you connect AirPods to a Windows PC and want to confirm they are paired.
Viewing Bluetooth devices
Bluetooth shows up in three places, and each answers a different question.
| Where | What it tells you |
|---|---|
| Settings > Bluetooth & devices > Devices | Every paired Bluetooth device and whether it is connected |
| Quick settings Bluetooth tile | Nearby and paired devices, with one-click connect |
| Device Manager > Bluetooth | The Bluetooth adapter and the drivers for paired devices |
If a new device does not appear while pairing, the Bluetooth devices discovery setting may need to be set to Advanced.
Method 4: View connected USB devices
Windows has no single USB page in Settings, so Device Manager is the place to see what is on each USB port.
- Right-click Start and select Device Manager.
- Expand Universal Serial Bus controllers to see the USB controllers and hubs.
- Expand Disk drives, Keyboards and Mice and other pointing devices for the USB devices themselves.
- Plug the USB device in and watch for it to appear in its category.
- For a list you can filter, run
Get-PnpDevice -PresentOnly -Class USBin PowerShell for controllers and hubs, or-Class USBDevicefor USB devices that fit no other class.
USB storage, keyboards and mice are listed under their own device type, not under the USB controllers.
Method 5: See connected printers and scanners
- Select Start > Settings > Bluetooth & devices.
- Select Printers & scanners.
- Review the list of installed printers and scanners.
- Select a printer or scanner to open its queue, properties and preferences.
- Select Add device next to Add a printer or scanner if the device is missing.
Scanners that are built into a printer usually appear as the same device. If one is missing, connect a scanner to Windows 11 from this page.
Method 6: View connected network devices
File Explorer's Network folder shows other computers and devices that share files or printers on the same network.
- Open File Explorer and select Network in the left pane.
- If a Network discovery is turned off banner appears, select it.
- Select Turn on network discovery and file sharing.
- Wait for the computers and media devices on your network to appear.
- Open Start > Settings, search Manage advanced sharing settings, and confirm Network discovery is on under Private networks if the list stays empty.
Set a home Wi-Fi network to Private first. Network discovery shows only devices that share something, so a phone or smart TV on the same Wi-Fi may not appear here.
See every IP address your PC has talked to with arp
The ARP cache lists the IP and physical (MAC) addresses of devices on the local network that the PC has recently contacted.
arp -aDisplays the current ARP entries for each network interface, pairing each IP address with its physical address.
You should see: A table per interface with Internet Address, Physical Address and Type columns.
The cache only holds devices your PC has talked to recently, so it is not a full list of everything on your Wi-Fi. For that, check your router's connected devices page.
Method 7: Use System Information to see connected hardware
System Information (Msinfo32.exe) shows a full view of your hardware, system components and software environment.
- Type msinfo32 in the search box on the taskbar.
- Right-click System Information and select Run as administrator.
- Browse the categories in the left pane to see your hardware and system components.
- To save a full report, open Command Prompt as administrator.
- Run
msinfo32 /report C:\TEMP\TEST.TXTto write the report to a text file, changing the path to a folder you use.
Run it as administrator, because without admin rights it can show some drivers as stopped when they are not. It cannot show hardware information in Safe Mode.
Method 8: View connected devices using PowerShell
Get-PnpDevice on its own lists every device Plug and Play knows about, present or not. The -PresentOnly switch limits it to devices connected now.
Get-PnpDevice -PresentOnlyLists every Plug and Play device that is currently present, with its Status, Class, FriendlyName and InstanceId. Add -Class USB, -Class Bluetooth, -Class DiskDrive or -Class Mouse to narrow it to one type.
You should see: A table of devices with OK in the Status column for each working device.
Run Get-PnpDevice -PresentOnly -Status ERROR,DEGRADED,UNKNOWN to list only connected devices that report a problem.
Method 9: Check connected devices with Command Prompt
PnPUtil is built into Windows. Open Command Prompt with Run as administrator before you use it.
pnputil /enum-devices /connectedEnumerates the devices on the system and filters the list to connected devices. Add /class followed by a class name, such as /class Bluetooth, to show one device type, or /problem to show only devices with problems.
You should see: A block per device showing its Instance ID, Device Description, Class Name, Manufacturer Name and Status.
Run pnputil /scan-devices first if you have just plugged something in and it is not listed. The /enum-devices command needs Windows 10, version 1903 or later, so every Windows 11 PC has it.
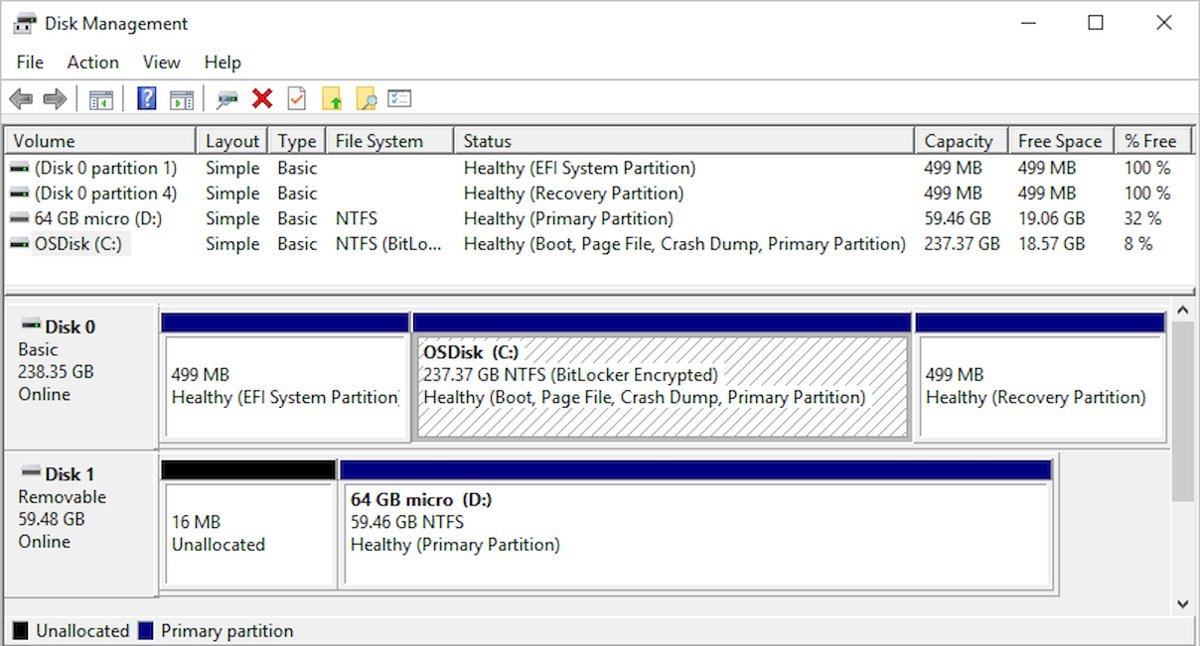
Method 10: See connected storage devices in Disk Management
Disk Management shows every disk, including new or offline drives that have no letter in File Explorer.
- Type Computer Management in the search box on the taskbar and open it.
- Select Storage > Disk Management.
- Read the list of disks and the volumes on each.
- Check whether each disk shows as online or offline.
- Right-click an offline disk name and select the action to bring it online.
Windows brings newly discovered disks online with read and write access by default, so an offline disk usually needs your attention.
Using Windows Security and device security features
The Device security page in the Windows Security app reports on the security hardware built into your PC rather than plug-in accessories.
| Device security area | What it shows |
|---|---|
| Core isolation | Features such as Memory integrity that protect core Windows processes by isolating them in memory |
| Security processor | Details of the Trusted Platform Module (TPM) |
| Secure boot | Whether Secure Boot is enabled |
| Hardware security capability | An assessment of your device's hardware security features |
Open it from Start by searching Windows Security, then select Device security. The TPM shown here is also what device encryption in Windows 11 relies on.
Connected device not showing in Windows 11
A plugged-in device is not in Device Manager
Windows has not rescanned for the new hardware.
- Open Command Prompt as administrator.
- Run
pnputil /scan-devices. - Run
pnputil /enum-devices /connectedand look for the device.
More Bluetooth settings is missing
The PC has no Bluetooth adapter, or the adapter driver is not installed.
- Open Device Manager and expand Bluetooth.
- If there is no adapter, add a USB Bluetooth adapter.
- If the adapter has a warning icon, update its driver.
Network shows no other computers
Network discovery is off or the network is set to Public.
- Set the Wi-Fi or Ethernet network to Private.
- Turn on Network discovery and File and printer sharing in Manage advanced sharing settings.
- Make sure every PC is on the same router.
A new drive does not appear in File Explorer
The disk is offline or has no volume yet.
- Open Computer Management > Storage > Disk Management.
- Right-click the disk name and bring it online.
- Initialize it and create a volume if it is brand new.
Connected devices in Windows 11: frequently asked questions
How do I see all connected devices in Windows 11?
Open Start > Settings > Bluetooth & devices > Devices for accessories. For every piece of hardware, right-click Start and open Device Manager, or run Get-PnpDevice -PresentOnly in PowerShell.
Where can I view USB devices in Windows 11?
Open Device Manager and expand Universal Serial Bus controllers for the USB controllers and hubs, then check each device type for the USB devices. In PowerShell, Get-PnpDevice -PresentOnly -Class USB lists the USB controllers and hubs.
How can I check if Windows 11 recognizes a newly connected device?
Look for it in Device Manager under its device type. From an elevated Command Prompt, run pnputil /scan-devices and then pnputil /enum-devices /connected to confirm it is listed.
Can I see connected devices using PowerShell?
Yes. Get-PnpDevice -PresentOnly lists the Plug and Play devices connected now, and the -Class parameter narrows the list, for example -Class Bluetooth or -Class DiskDrive.
How do I see which Bluetooth devices are connected?
Open Settings > Bluetooth & devices. The device cards at the top and the Devices page show each paired device and whether it is connected right now.
Can Windows 11 show every device on my Wi-Fi network?
Not fully. File Explorer's Network folder shows devices that share files or media, and arp -a lists devices the PC has contacted recently. Your router's admin page is the complete list.
What does Show hidden devices do in Device Manager?
It adds devices Device Manager hides by default, such as printers and devices that were removed but still have registry entries. Select View > Show hidden devices to turn it on.
Where do I see connected printers in Windows 11?
Open Start > Settings > Bluetooth & devices > Printers & scanners. Every installed printer and scanner is listed there, and selecting one opens its queue and settings.
Summary and best practices
Use Settings > Bluetooth & devices for a quick check, Device Manager when something is missing or shows a warning, and Get-PnpDevice or pnputil when you need a filtered list you can copy or save. Settings only shows user-facing accessories, while Device Manager and the command-line tools list every Plug and Play device with its status, so they catch the problems Settings hides.