To increase a virtual machine disk size in VMware, power off the VM, open its settings, select the hard disk, set a larger size, then extend the partition inside the guest operating system.
This guide covers VMware Workstation Pro, the vSphere Client, ESXi command-line tools, and the partition steps for Windows and Linux guests, plus fixes when the expand option is greyed out.
Increase the size of VM disk (VMDK) in VMware
In VMware Workstation Pro, the Expand utility grows the VMDK file. It does not touch the partitions or file systems inside it, so the guest step later in this guide is still required.
- Shut down the guest operating system and power off the virtual machine.
- Delete every snapshot of the virtual machine, because a disk with snapshots cannot be expanded.
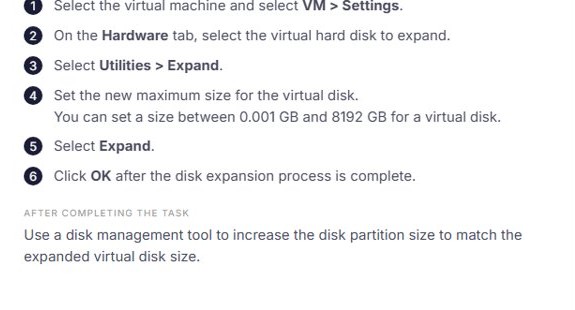
- Select the virtual machine in the library, then select VM > Settings.
- On the Hardware tab, select the virtual hard disk you want to expand.
- Select Utilities > Expand.
- Enter the new maximum disk size. Workstation Pro accepts a size between 0.001 GB and 8192 GB.
- Select Expand, then select OK when the process completes.
- Power on the virtual machine and extend the partition in the guest operating system.
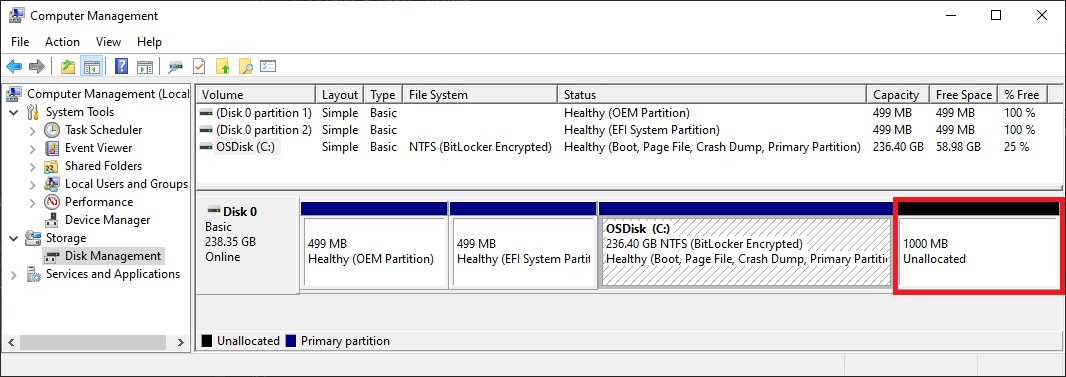
The added space shows up in the guest as unallocated space at the end of the disk until you extend a partition into it.
VMware disk expand options for Workstation, ESXi and vSphere
| Your setup | Use this | Why |
|---|---|---|
| VMware Workstation Pro or Player on a PC | VM > Settings > Utilities > Expand | Built into the disk settings, no command line needed |
| Workstation, scripting or no GUI access | vmware-vdiskmanager -x |
Resizes the VMDK from a command prompt in the install folder |
| ESXi host or vCenter Server | vSphere Client or ESXi host client Edit Settings | Supports hot extend on PVSCSI disks from vSphere 7.0 and NVMe disks from vSphere 8.0.1 |
| Clustered (shared) disks on ESXi | vmkfstools -X in the ESXi shell |
VMware states clustered disks cannot be expanded through the vSphere Client |
| You cannot expand the existing disk | Add a second virtual hard disk | VMware lists this as the alternative to expanding |
Requirements to expand a VMware virtual disk
| Requirement | Details |
|---|---|
| No snapshots | Remove every snapshot first. If Disk File in Edit Settings reads like VM-000001.vmdk, the VM is running on snapshot disks and the VMDK cannot be extended. |
| Powered off (most cases) | Workstation needs the VM powered off. On vSphere the VM must be off except for PVSCSI hot extend (vSphere 7.0 and later) and NVMe hot extend (vSphere 8.0.1 and later). |
| Not a linked clone | In Workstation the VM cannot be a linked clone or the parent of one. "Clone of:" or "Snapshot: Snapshot for" on the summary page shows it is. |
| Disk not mapped or mounted | Workstation cannot expand a virtual disk while it is mapped or mounted on the host. |
| vSphere privileges | Modify device settings, Extend virtual disk and Allocate space on the datastore. |
| SCSI controller on vSphere | IDE disks cannot be expanded in the vSphere Client. |
| Backup | VMware recommends a valid backup of the VM before resizing any disk. |
Increase VM disk size in the vSphere Client or ESXi host client
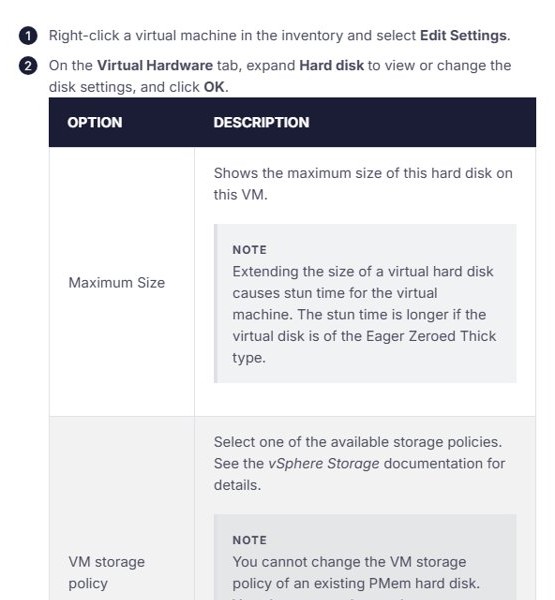
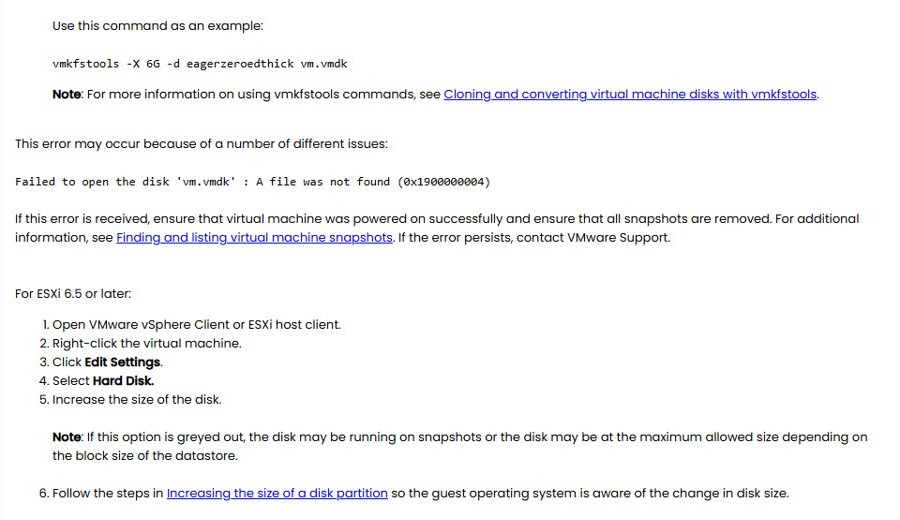
The same Edit Settings dialog works in vCenter's vSphere Client and in the ESXi host client on a standalone host.
- Delete or consolidate the VM's snapshots, then power off the VM unless the disk is on a PVSCSI or NVMe controller that supports hot extend.
- Right-click the virtual machine in the inventory and select Edit Settings.
- On the Virtual Hardware tab, find Hard disk 1 (or the disk you want to grow).
- Type the new size in the size box next to the disk and keep the unit as GB.
- Check Maximum Size under the expanded disk entry to confirm the datastore has room.
- Select OK to apply the change.
- Extend the partition inside the guest operating system.
Extending a disk briefly stuns the VM, and VMware notes the stun time is longer for Eager Zeroed Thick disks. Large disks over 2 TB need a VMFS5 or later, NFS or vSAN datastore, and the maximum is 62 TB.
Expand a VMDK with vmware-vdiskmanager in Workstation
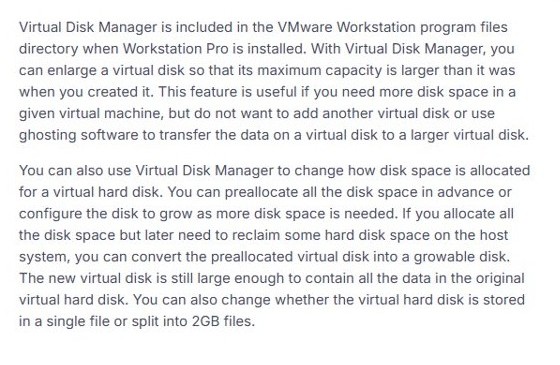
Virtual Disk Manager (vmware-vdiskmanager.exe) ships in the VMware Workstation program files folder. Open a command prompt, change to that folder, power off the VM and remove its snapshots first.
vmware-vdiskmanager -x 100Gb "D:\VMs\Windows 11\Windows 11.vmdk"-x expands the virtual disk to the size you give. Replace 100Gb with the size you want (Kb and Mb units also work) and the path with the full path to your VMDK.
You should see: The tool reports that the disk was expanded. The guest still needs its partition extended before the space is usable.
Extend a VMDK with vmkfstools on ESXi
Use this route for clustered disks, which VMware says cannot be expanded through the vSphere Client. Run it in the ESXi shell from the VM's datastore folder.
vmkfstools -X 6G -d eagerzeroedthick vm.vmdk-X extends the virtual disk to the size value (6G in VMware's example) and -d eagerzeroedthick keeps the format clustered disks need. Use the descriptor file name, not the file ending in -flat or -s0.
You should see: The command returns without an error and Edit Settings shows the new disk size.
Extend a partition in a Windows virtual machine
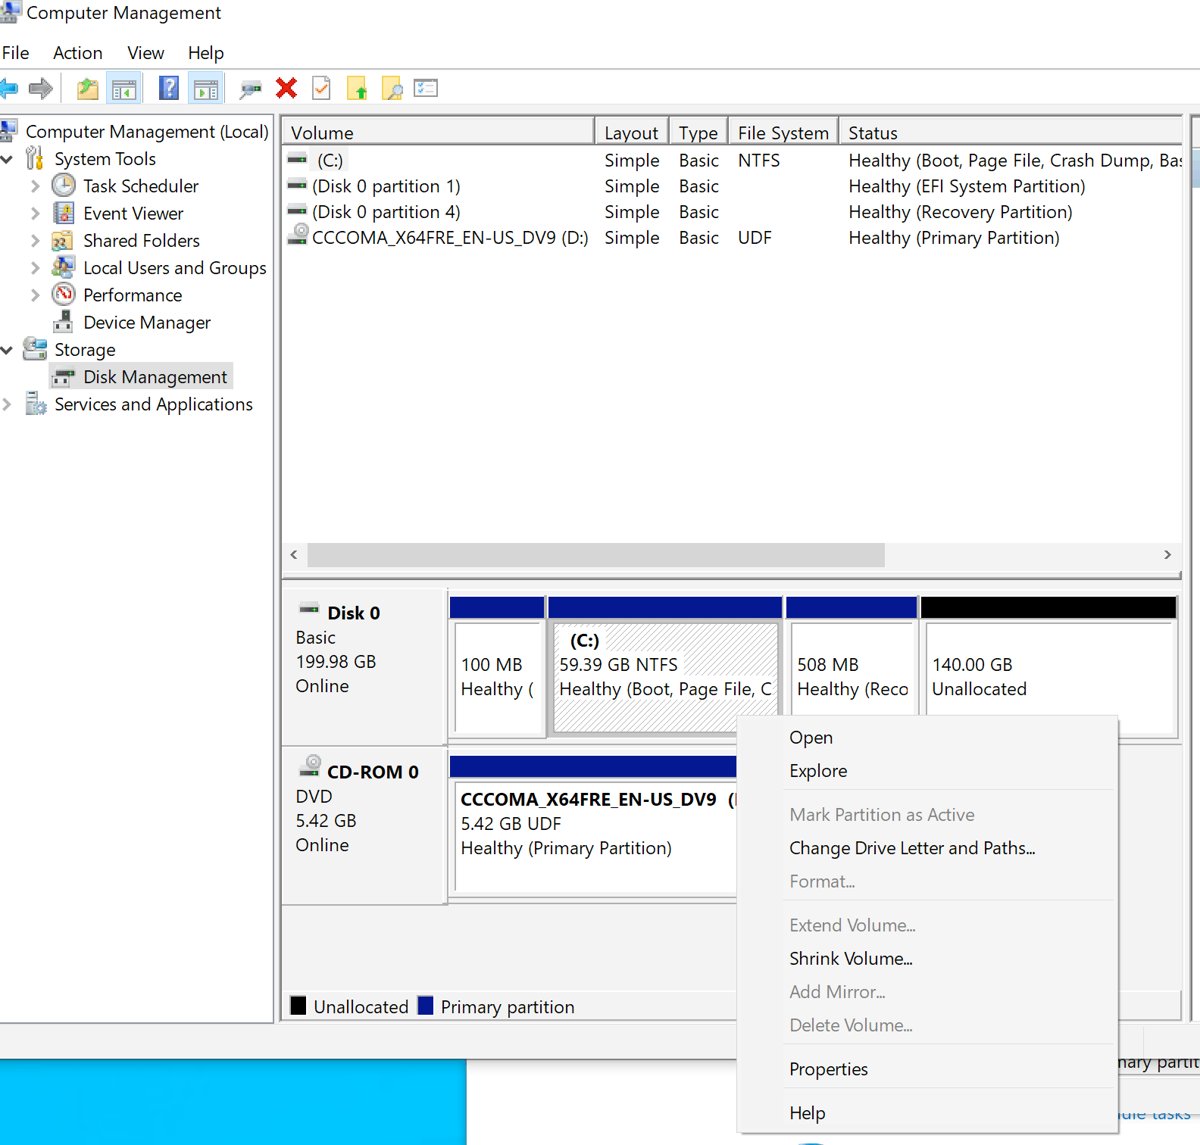
Disk Management can extend a volume only into unallocated space that sits immediately after it on the same disk, and only on NTFS or ReFS volumes.
- Sign in to the Windows guest with an administrator account.
- Right-click Start and select Disk Management.
- Select Action > Rescan Disks so Windows reads the new disk size without a restart.
- Right-click the volume next to the Unallocated space, usually C:, and select Extend Volume.
- Select Next in the Extend Volume Wizard.
- Leave the amount at Maximum available, or enter a smaller amount, then select Next.
- Select Finish.
Extend the C drive in a VMware Windows VM with PowerShell
Open Windows PowerShell as administrator in the guest. Change C to the drive letter you want to grow.
$size = (Get-PartitionSupportedSize -DriveLetter C)
Resize-Partition -DriveLetter C -Size $size.SizeMax
Get-PartitionSupportedSize reads the largest size the partition can reach, and Resize-Partition grows it to that maximum.
You should see: The command returns no error, and Get-Volume -DriveLetter C shows the larger size.
DiskPart works too: run diskpart, then list volume, select volume <number> and extend. Without a size= value, extend uses all contiguous free space, and NTFS grows with the partition.
How to extend partition in Linux virtual machine?
Check the layout with lsblk first. The steps below assume the root file system is partition 1 on /dev/sda; adjust the device and number to match your VM.
- Restart the Linux VM after expanding the VMDK, or rescan the disk, so the kernel sees the larger
/dev/sda. - Run
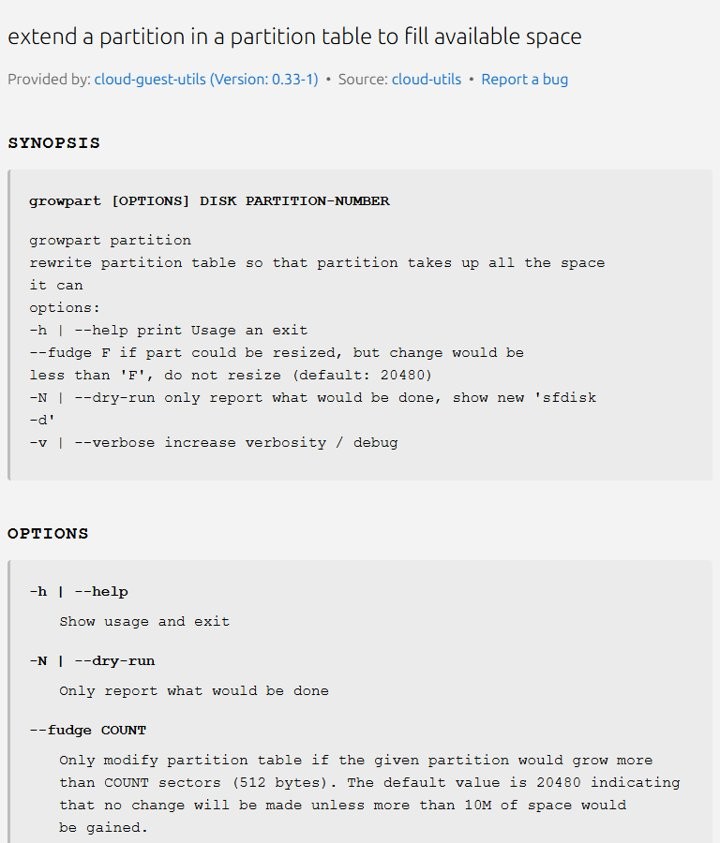
sudo growpart /dev/sda 1to grow partition 1 into the free space at the end of the disk. Add-Nfirst for a dry run. - If the partition is an LVM physical volume, run
sudo pvresize /dev/sda1, thensudo lvextend -l +100%FREE -r <vg>/<lv>to grow the logical volume and its file system together. - For an ext4 partition without LVM, run
sudo resize2fs /dev/sda1. With no size given, it fills the partition and works on a mounted file system. - For an XFS file system without LVM, run
sudo xfs_growfs -d /. XFS must be mounted to grow. - Run
df -hto confirm the file system shows the new size.
growpart exits with code 1 when there is no free space to claim, which usually means the VMDK expand did not apply or the kernel has not reread the disk.
Check the new VMware disk size in the guest OS
- In Workstation, open VM > Settings and confirm the hard disk shows the new Maximum size. In vSphere, open Edit Settings and check the disk size.
- In a Windows guest, open Disk Management and confirm no Unallocated block remains after the volume you extended.
- Open File Explorer > This PC and check the drive's total size.
- In a Linux guest, run
lsblkto see the disk and partition size, thendf -hto confirm the file system matches.
VMware expand disk greyed out and other resize errors
Expand or the disk size box is greyed out
The VM has snapshots, is powered on, is a linked clone, or uses an IDE disk on vSphere.
- Delete all snapshots and wait for consolidation to finish.
- Power off the VM unless its controller supports hot extend.
- In vSphere, check the controller type; IDE disks cannot be expanded in the vSphere Client.
- Check Maximum Size to confirm the datastore has enough free space.
Extend Volume is greyed out in Windows
Another partition sits between the volume and the unallocated space, or the volume is not NTFS or ReFS.
- Open Disk Management as administrator and select Action > Rescan Disks.
- Confirm the Unallocated block is directly to the right of the volume.
- If another volume is in between, create a new volume in the unallocated space instead of extending.
- For a disk over 2 TB, make sure it uses the GPT partition style.
Windows shows the old size after DiskPart reports success
The system page file is on the volume being extended.
- Move the page file to another partition in the guest.
- Restart the guest, then run the extend again.
"Failed to open the disk … A file was not found (0x1900000004)"
The VM did not power on cleanly or still has snapshot files.
- Confirm the VM powered on successfully before the resize.
- Remove all snapshots and run the expand again.
- If the error persists, contact VMware support through Broadcom.
Linux still shows the old size after growpart
The file system was not grown after the partition, or the LVM physical volume was not resized.
- Run
lsblkto see whether the partition or the file system is still small. - Run
pvresizeandlvextend -rfor LVM, orresize2fsorxfs_growfsfor plain partitions. - Run
df -hagain.
VMware virtual disk resize FAQ
Can I increase a VMware disk size without losing data?
Yes. Expanding a VMDK does not change the data, partitions or file systems inside it. Extending an NTFS partition in Windows also keeps its data. VMware still recommends a backup before you resize.
Why is the new space not showing in my virtual machine?
The expand only enlarges the virtual disk file. The guest sees the extra capacity as unallocated space until you extend a partition into it with Disk Management, PowerShell, growpart or LVM tools.
Can I expand a VMware disk with snapshots?
No. VMware requires all snapshots to be removed before a virtual disk can be expanded, in both Workstation and vSphere. Delete or consolidate the snapshots, then expand the disk.
Can I increase a VMDK while the VM is running?
On vSphere, yes for PVSCSI disks from vSphere 7.0 and NVMe disks from vSphere 8.0.1. Other controllers, and VMware Workstation Pro, need the virtual machine powered off.
What is the maximum virtual disk size in VMware?
VMware Workstation Pro accepts a virtual disk size up to 8192 GB. On vSphere, large capacity virtual disks can reach 62 TB on VMFS5 or later, NFS or vSAN datastores.
Can I shrink a VMware virtual disk?
The Expand utility only grows a disk. To reclaim host space instead, Virtual Disk Manager can convert a preallocated disk into a growable one that is still large enough for all its data.
Should I expand the disk or add a new one?
Expand the disk when the system drive needs space. Add a second virtual hard disk when snapshots or linked clones block the expand, or when you want data kept on a separate drive.