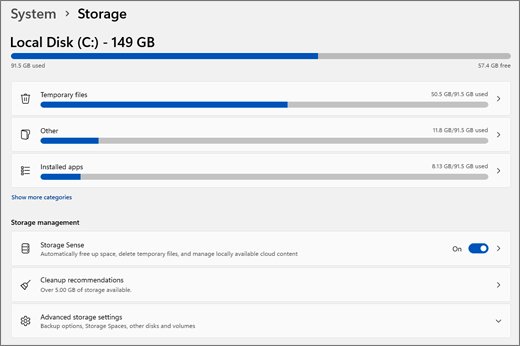
To view storage on Windows 11, open Settings > System > Storage; the top of the page shows how much of drive C: is used and which categories take the space.
This guide covers nine ways to check disk space, from File Explorer to PowerShell, plus how much space to keep free and what to do when the drive looks full for no reason.
Quick Answer: The Fastest Way to Check Storage in Windows 11
- Press Windows + I to open Settings.
- Select System, then Storage.
- Read the bar at the top: it shows used and free space on the drive that holds Windows.
- Check the category list below it, such as Installed apps, Temporary files and System & reserved, to see what is using the space.
Best Method for Different Situations
| You want to | Use this | Why |
|---|---|---|
| See free space on C: and what uses it | Settings > System > Storage | Breaks usage into categories in one view |
| Check every drive at a glance | File Explorer > This PC | Shows a usage bar under each drive |
| See storage on an external or second drive | Advanced storage settings > Storage used on other drives | Gives the same category breakdown for other drives |
| Know whether a drive is an SSD or HDD | Advanced storage settings > Disks & volumes | Lists disk type, capacity and usage |
| See partitions and unallocated space | Disk Management | Shows every partition, including EFI and Recovery |
| Get exact numbers for a script or report | PowerShell Get-Volume |
Prints size and free space for every volume |
| Find which folder is huge | Sysinternals Disk Usage (du) | Totals folder sizes from Microsoft's own tool |
| Free space without thinking about it | Storage Sense | Removes temporary files on a schedule |
Method 1: View Storage Using Windows 11 Settings
The Storage page goes deeper than the summary bar. It also reaches other drives and the disk details.
- Open Settings > System > Storage.
- Select Show more categories to see every category, including System & reserved.
- Select any category, such as Installed apps or Temporary files, to see what sits inside it.
- Expand Advanced storage settings.
- Select Storage used on other drives, then pick a drive to see its own breakdown of documents, pictures, videos and more.
- Select Disks & volumes to see each disk's type (SSD or HDD), capacity and current usage.
Method 2: Check Disk Space in File Explorer
- Press Windows + E to open File Explorer.
- Select This PC in the left pane.
- Look under Devices and drives: each drive shows a bar and a line such as "120 GB free of 475 GB".
- For exact figures, right-click the drive and select Properties.
- Read Used space, Free space and Capacity on the General tab.
Method 3: Use Storage Recommendations to Find Files You Can Remove
Cleanup recommendations scan for files Windows considers safe to remove, such as previous Windows installations, large or unused files, and apps you rarely open. It is the Settings replacement for the old Disk Cleanup tool.
- Open Settings > System > Storage.
- Select Cleanup recommendations.
- Expand each group, such as temporary files, large or unused files, and unused apps.
- Tick only the items you are sure you no longer need.
- Select Clean up for that group.
Method 4: Turn On Storage Sense for Automatic Cleanup
Storage Sense deletes temporary files and old Recycle Bin items on the system drive. Downloads and cloud files stay untouched unless you change its settings.
- Open Settings > System > Storage.
- Set Storage Sense to On.
- Select Storage Sense to open its settings.
- Under Run Storage Sense, choose how often it runs.
- Set Delete files in my recycle bin if they have been there for over to the age you want.
- Set the Downloads folder rule only if you never keep files there long term.
Method 5: Sort Installed Apps by Size
- Open Settings > Apps > Installed apps.
- Use the sort menu above the list to order apps by size, largest first.
- Check the size shown next to each app.
- To remove an app you no longer use, select More (the three dots) next to it, then Uninstall.
- If an app cannot be uninstalled here, remove it from Control Panel > Programs and Features.
Method 6: Use Disk Management to View Drives and Partitions
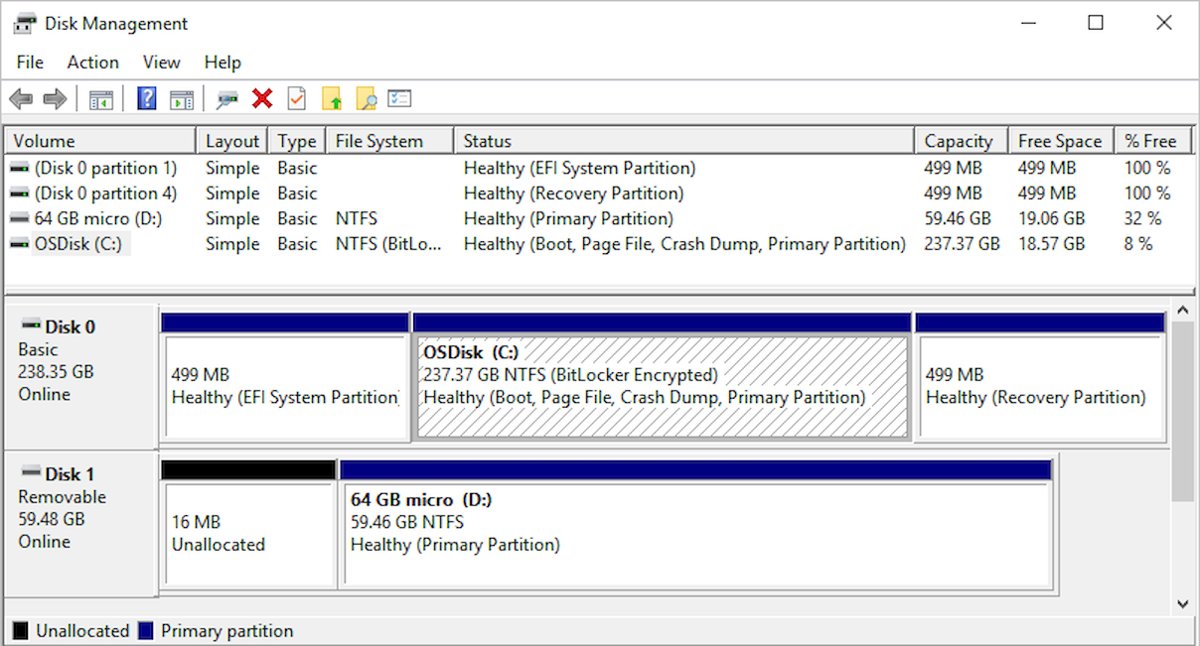
Disk Management shows every drive and partition, including hidden ones that File Explorer does not list.
- Right-click Start and select Disk Management, or press Windows + R, type
diskmgmt.mscand press Enter. - Read the top pane for each volume's capacity and free space.
- Check the bottom pane for the layout of each disk: Disk 0 usually holds Local Disk (C:), an EFI System partition and a Recovery partition.
- Look for space marked Unallocated, which is part of a disk not assigned to any drive.
- Leave the EFI System and Recovery partitions alone, even if they show as 100 percent free.
Method 7: Check Storage with Task Manager
Task Manager shows how busy each disk is rather than how full it is. Use it when the PC is slow and you suspect the drive.
- Press Ctrl + Shift + Esc to open Task Manager.
- Select More details if it opens in the compact view.
- Open the Performance tab.
- Select a disk in the left column to see its activity graph and details.
- For free space figures, switch to Settings or File Explorer; Task Manager is for disk load.
Method 8: Use Command Prompt or PowerShell
PowerShell lists every volume with its size and remaining space in one line per drive. Command Prompt has an equivalent for a single drive.
Get-VolumeRun it in PowerShell or Windows Terminal. It lists each volume with its drive letter, file system, health status, SizeRemaining and Size. In an administrator Command Prompt, fsutil volume diskfree c: reports free and total bytes for drive C:, and Get-PhysicalDisk in PowerShell lists the physical disks with their size and health.
You should see: You see one row per volume, with C: showing its free space in the SizeRemaining column.
Method 9: Find What Is Taking Up Space with a Disk Analyzer
Windows has no built-in folder-size map, but Microsoft's Sysinternals suite includes Disk Usage (du), a command-line analyzer that totals folder sizes. Get it from learn.microsoft.com/sysinternals only.
- Download Disk Usage from the Sysinternals page on Microsoft Learn and extract it to a folder such as C:\Tools.
- Open Command Prompt in that folder.
- Run
du -l 1 C:\Users\YourNameto list the size of each folder one level down. - Repeat on the biggest folder to drill down until you find the files.
- Add
-cto save the output as CSV if you want to sort it in Excel.
How Much Free Space Should You Keep on Windows 11?
Microsoft does not set one fixed number, but it does publish how much space updates need. Keep at least enough free for the next feature update.
| Task | Free space Microsoft lists |
|---|---|
| Monthly quality update | Typically 2-3 GB or more |
| Feature update | Typically 6-11 GB or more |
| Windows 11 feature update, optimised for least offline time | About 20 GB |
| Windows 11 feature update, optimised for least disk space | 5.5 GB to 13.75 GB or more |
| Update using an external drive | At least 10 GB free on the external drive |
Windows also keeps reserved storage for updates and caches. You can see it under Show more categories > System & reserved.
How to Free Up Space After Checking Storage
- Run Cleanup recommendations first; it targets the safest wins.
- In Settings > System > Storage, select Temporary files, tick Previous Windows Installation(s) if listed, and select Remove files.
- Uninstall large apps you no longer use from Installed apps.
- Remove unused languages in Settings > Time & language > Language & region and unused features in Settings > Apps > Optional features.
- Move videos and photos to another drive, then set new content to save there under Where new content is saved.
- Turn on Storage Sense so temporary files do not build up again.
Why Windows Shows Different Storage Numbers
The capacity on the box, in File Explorer and in Settings rarely match exactly. Each gap has a normal cause.
| What you notice | Why it happens |
|---|---|
| A 512 GB drive shows about 475 GB | Drive makers count 1 GB as 1,000,000,000 bytes; Windows counts in units of 1,073,741,824 bytes |
| C: is smaller than the whole disk | The EFI System and Recovery partitions sit on the same disk |
| Settings shows space used by System & reserved | Windows reserves storage for updates, caches and temporary files |
| The WinSxS folder looks enormous | Many files in it are hard links also counted elsewhere, so File Explorer overstates its size |
| Free space jumps after an update | Windows keeps rollback files for about 10 days, then they can be removed |
| OneDrive folders look full but the disk is not | Online-only files show in the folder without taking local space |
Troubleshooting: Storage Looks Full but You Cannot Find the Files
System & reserved takes a large share of the drive
Windows reserves part of the drive for updates, caches and temporary files, and system files such as the page file count here too.
- Open Settings > System > Storage > Show more categories > System & reserved to see the split.
- Leave the page file and reserved storage in place; Windows manages them.
- Free space elsewhere instead, starting with Cleanup recommendations.
The Windows folder keeps growing after updates
Superseded components stay in the component store until cleanup runs.
- Never delete files from C:\Windows\WinSxS by hand; it can stop Windows booting.
- Open an administrator Command Prompt.
- Run
Dism.exe /online /Cleanup-Image /StartComponentCleanupto remove superseded components.
Temporary files and the Recycle Bin hold gigabytes
Nothing is clearing them automatically.
- Open Settings > System > Storage > Temporary files.
- Tick the items you want gone and select Remove files.
- Turn on Storage Sense to repeat this on a schedule.
Free space is still missing after cleanup
Large files are buried in a folder you rarely open.
- Run Disk Usage with
du -l 1on C:\Users and then on the largest folder. - Check Storage used on other drives in case the files sit on a second drive you assumed was C:.
- Open Disk Management to check for unallocated space you could add to a drive.
Frequently Asked Questions
How do I check storage on Windows 11?
Open Settings > System > Storage. The bar at the top shows used and free space on the Windows drive, and the category list below it shows what is using the space, such as apps and temporary files.
How do I see storage on my PC in Windows 11?
Press Windows + E and select This PC. Each drive under Devices and drives shows a bar and its free space. Right-click a drive and select Properties for exact used, free and capacity figures.
How do I check if my storage is SSD or HDD in Windows 11?
Open Settings > System > Storage > Advanced storage settings > Disks & volumes. Each disk lists its type, such as SSD or HDD, alongside its capacity and current usage.
How do I view storage devices on Windows 11?
Use Disks & volumes under Advanced storage settings in Settings, or open Disk Management by right-clicking Start. Both list every internal and external disk connected to the PC.
How do I check laptop storage in Windows 11?
The steps are the same as on a desktop: Settings > System > Storage shows the internal drive. Most laptops have one drive, so the C: figure is the whole storage minus the small recovery partitions.
What is Storage Sense in Windows 11?
Storage Sense is a built-in tool that frees space automatically by deleting temporary files and old Recycle Bin items on the system drive. Turn it on in Settings > System > Storage and choose how often it runs.
How do I check system storage in Windows 11?
In Settings > System > Storage, select Show more categories, then System & reserved. It shows the space Windows itself uses, including the reserved storage it keeps for updates, caches and temporary files.
How do I access storage settings on Windows 11?
Press Windows + I, select System, then Storage. You can also right-click Start, select Settings, and follow the same path.
How do I check storage with a command in Windows 11?
Open PowerShell and run Get-Volume to list every volume with its size and remaining space. In an administrator Command Prompt, fsutil volume diskfree c: gives the same information for drive C:.