To download and install a language pack in Windows 11, open Settings > Time & language > Language & region, select Add a language, pick the language, keep Language pack ticked and select Install; Windows 10 uses the same flow under Time & Language > Language.
This guide covers the Settings route on both versions, optional language features, offline and DISM installs for IT admins, PowerShell, removing packs, and fixes for downloads that fail.
How to Download and Install a Language Pack in Windows 11
Windows downloads the pack from Windows Update, so the PC needs an internet connection. Settings handles the download, the install and the optional extras in one window.
- Select Start > Settings > Time & language > Language & region.
- Select Add a language next to Preferred languages.
- Type the language name in the search box, pick the exact variant, such as Português (Brasil) or Português (Portugal), and select Next.
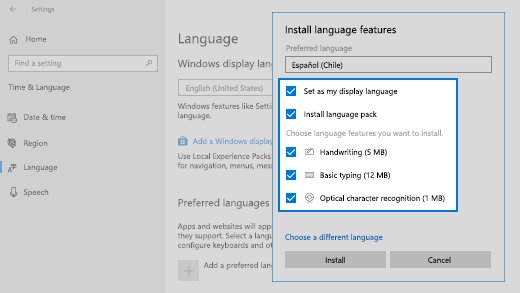
- In Install language features, keep Language pack ticked and tick any optional features you want, such as speech or handwriting.
- Clear Set as my Windows display language if you only want the pack installed, not switched on.
- Select Install and leave the window open until the language shows under Preferred languages without a progress bar.
To switch the whole interface to the new language afterwards, follow the short guide to change display language preferences in Windows 11 and 10.
How to Download and Install a Language Pack in Windows 10
Windows 10 names the page Language and labels the checkbox Install language pack. Microsoft ended Windows 10 support on October 14, 2025, but the language download still works. If you plan to move on, see how to download Windows 11.
- Sign in with an administrator account.
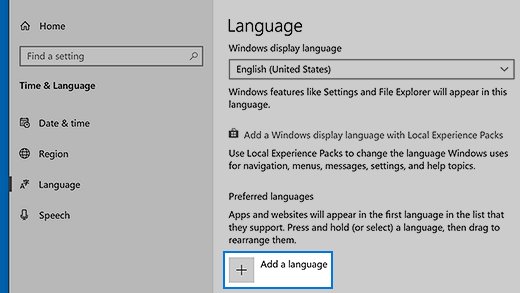
- Select Start > Settings > Time & Language > Language.
- Under Preferred languages, select Add a language.
- Choose the language and select Next.
- Keep Install language pack ticked, pick any optional features, and select Install.
- Wait until the download finishes and the language appears under Preferred languages, then close Settings.
Which install route fits your situation?
| Your situation | Use this | Why |
|---|---|---|
| One PC with internet access | Add a language in Settings | Downloads the pack and features from Windows Update with no commands |
| Several Windows 11 PCs or a login script | Install-Language in PowerShell |
One line installs the pack and its features, repeatably |
| You need only spell check, OCR, speech or handwriting | Dism /Online /Add-Capability |
Adds individual language features without a full display pack |
| PCs without internet, or a WSUS network that lacks language content | DISM with /Source pointing at the Languages and Optional Features ISO |
Installs from local files instead of Windows Update |
| Building a deployment image | Dism /Image /Add-Package on a mounted image |
Every PC deployed from the image starts with the language |
What Is a Windows Language Pack?
A language pack is the localization package for Windows itself: the text of dialog boxes, menus and help. Everything else a language needs arrives as separate language features, so one language can be partly installed.
| Component | What it adds | How it is delivered |
|---|---|---|
| Language pack | Translated Windows interface text | .cab file for 43 languages, installable from Settings or DISM |
| Language interface pack (LIP) / Local Experience Pack (LXP) | A partial translation on top of a base language | .appx from Settings for most LIP languages; five (ca-ES, eu-ES, gl-ES, id-ID, vi-VN) also ship as .cab |
| Basic typing | Spell checking, text prediction, word breaking and hyphenation | Feature on Demand; must be added before the other features |
| Fonts | Script fonts some languages need, such as Thai or Devanagari | Feature on Demand |
| Optical character recognition (OCR) | Reads text in images | Feature on Demand |
| Handwriting | Pen input recognition | Feature on Demand |
| Text-to-speech and speech recognition | Narrator voices and voice input | Features on Demand; speech needs Basic and text-to-speech first |
Before You Start: Check Your Windows Edition and Requirements
Most failed installs trace back to one of these checks. Run through them before downloading anything.
| Requirement | How to check | If it fails |
|---|---|---|
| Not a Single Language edition | Settings > System > About > Windows specifications > Edition | Home Single Language and Home Country Specific cannot add display languages |
| Internet access to Windows Update | Open any website, then Settings > Windows Update | Fix the connection, proxy or firewall, or use the offline DISM route |
| The right account | Sign in with an account that has administrator rights | Windows 10 needs an administrator; Windows 11 also lets standard users add languages unless IT blocks it |
| Windows fully updated | Settings > Windows Update > Check for updates | Install pending updates and restart before adding the language |
| Free disk space | Settings > System > Storage | Each language and its features take space and add time to updates |
How to Install Language Packs Offline or in a Business Environment
Microsoft does not offer standalone language pack downloads to home users. IT pros get them on the Languages and Optional Features ISO from the Volume Licensing site, and OEMs from the OEM site or Device Partner Center. The pack must match the installed Windows version exactly.
- Copy the Languages and Optional Features ISO for your Windows version to the PC or a network share.
- Double-click the ISO in File Explorer to mount it; note the drive letter, for example F:.
- Open Command Prompt as administrator.
- Add the language pack:
Dism /Online /Add-Package /PackagePath:"F:\LanguagesAndOptionalFeatures\Microsoft-Windows-Client-Language-Pack_x64_es-es.cab". - Add its features from the same ISO without contacting Windows Update:
Dism /Online /Add-Capability /CapabilityName:Language.Basic~~~es-ES~0.0.1.0 /Source:F:\LanguagesAndOptionalFeatures /LimitAccess. - Reinstall the latest cumulative update for that Windows version. Microsoft warns that skipping it after adding a language pack can cause errors, and Windows Update will not offer it again.
- Restart the PC.
For a deployment image, mount it with Dism /Mount-Image, use /Image:"C:\mount\windows" in place of /Online, then save it with Dism /Commit-Image /MountDir:"C:\mount\windows".
IT can stop users downloading languages themselves with the RestrictLanguagePacksAndFeaturesInstall policy under Control Panel > Regional and Language Options.
Install language capabilities with DISM
Language features are capabilities with names like Language.Basic~~~fr-FR~0.0.1.0. Swap fr-FR for your language tag and Basic for Handwriting, OCR, TextToSpeech or Speech. Add Basic first, and text-to-speech before speech.
Dism /Online /Add-Capability /CapabilityName:Language.Basic~~~fr-FR~0.0.1.0 /CapabilityName:Language.OCR~~~fr-FR~0.0.1.0 /CapabilityName:Language.TextToSpeech~~~fr-FR~0.0.1.0 /CapabilityName:Language.Speech~~~fr-FR~0.0.1.0Run it from an administrator Command Prompt. Without /Source, DISM checks any Group Policy source first, then Windows Update. Add /Source:<path> to use local files and /LimitAccess to stop it contacting Windows Update or WSUS.
You should see: DISM ends with "The operation completed successfully." Running Dism /Online /Get-CapabilityInfo /CapabilityName:Language.Basic~~~fr-FR~0.0.1.0 then shows State : Installed.
Install a language pack with PowerShell on Windows 11
The LanguagePackManagement module does the same job as Add a language. Microsoft documents it for Windows 11 and Windows Server 2025. Open PowerShell as administrator.
Install-Language fr-FRDownloads and installs the French (France) language pack and its language features from Windows Update. Add -ExcludeFeatures to install only the pack, or -CopyToSettings to also make it the system display language and regional format after the next sign-in or restart.
You should see: Get-InstalledLanguage lists fr-FR with its installed components.
How to Set the Language for the Welcome Screen and New User Accounts
Installing a pack and switching to it affects only your account. The sign-in screen and accounts created later keep the old language until you copy your settings to them.
- Sign in with an administrator account that already uses the new language.
- Open Control Panel > Clock and Region > Region.
- Select the Administrative tab, then Copy settings….
- Tick Welcome screen and system accounts and New user accounts, then select OK.
- Restart the PC.
- On Windows 11, the PowerShell equivalent is
Copy-UserInternationalSettingsToSystem -WelcomeScreen $True -NewUser $True.
How to check which language packs are installed
- Open Settings > Time & language > Language & region and read the Preferred languages list.
- Select … next to a language and choose Language options; the Language features list shows which parts are installed.
- Open the Windows display language drop-down; a language appears there only if its language pack is installed.
- In PowerShell on Windows 11, run
Get-InstalledLanguageto list every language and its components. - On either version, run
Dism /Online /Get-Capabilitiesin an administrator Command Prompt and look forLanguage.entries marked Installed.
Why some Windows text may remain in the old language
| What you see | Reason | What to do |
|---|---|---|
| Menus stay partly in English after installing a smaller language | The language is a LIP; untranslated strings fall back to its base language, such as English (United States) | Expected; use a full language pack if your language has one |
| Basque shows Spanish text, Belarusian shows Russian | Those LIPs use Spanish (Spain) and Russian (Russia) as the base | Expected for that LIP |
| Odd text appears after a monthly update | The Local Experience Pack has not updated yet | Stay online and let the Microsoft Store update the pack |
| The sign-in screen is still in the old language | Display language is set per account | Use Copy settings… as shown above |
| An app ignores the new language | Apps carry their own translations | Change the language inside the app |
How to Add a Keyboard Layout Without Changing the Display Language
A keyboard layout does not need a language pack. Add only the keyboard when you type in another language but want Windows to stay as it is.
- Open Settings > Time & language > Language & region.
- Select … next to a language and choose Language options. If the language is not listed, add it with Add a language and clear Language pack and Set as my Windows display language first.
- Under Keyboards, select Add a keyboard and pick the layout.
- On Windows 10, open Time & Language > Language, select the language, choose Options, then Add a keyboard.
- Switch between layouts with Windows logo key + Spacebar.
How to Change Region and Format Settings
Dates, times, numbers and currency follow the regional format, not the language pack. Set it separately if they still look wrong.
- Open Settings > Time & language > Language & region.
- Find Regional format under the Region heading.
- Pick the format you want, or Recommended to follow the display language.
- Reopen apps such as Excel or Outlook so they pick up the new format.
How to Remove a Language Pack
Windows will not remove the current display language. Switch to another display language and sign out first. You can add a removed language back later with Add a language.
- Open Settings > Time & language > Language & region.
- Select … next to the language and choose Remove, then confirm.
- On Windows 10, select the language under Preferred languages and select Remove.
- On Windows 11 PowerShell, run
Uninstall-Language fr-FRto remove the language and all its components. - To remove a single feature, run
Dism /Online /Remove-Capability /CapabilityName:Language.Speech~~~fr-FR~0.0.1.0. - Leave the PC running for a while; a background cleanup task removes the unused pack files.
Troubleshooting: Language Pack Will Not Download or Install
Language pack not downloading, or stuck on the progress bar
The pack comes from Windows Update, so a blocked connection or pending updates stall it.
- Check the internet connection and any proxy or firewall that blocks Windows Update.
- Open Settings > Windows Update, install pending updates, and restart.
- Retry Add a language, or run
Install-Languagein an administrator PowerShell window to see the error text.
Windows cannot install the language on a work or school PC
The PC gets updates from WSUS, which often lacks language content, or IT blocks language installs by policy.
- Ask IT whether RestrictLanguagePacksAndFeaturesInstall is set.
- If you manage the PC, open Edit group policy and go to Computer Configuration > Administrative Templates > System.
- Enable Specify settings for optional component installation and component repair and tick Contact Windows Update directly to download repair content instead of Windows Server Update Services (WSUS).
- Run
gpupdate /forcefrom an elevated command prompt, then retry. - On offline networks, install from the ISO with DISM
/Sourceand/LimitAccessinstead.
Settings says your license supports only one display language
The PC runs Home Single Language or Home Country Specific.
- Confirm the edition under Settings > System > About > Windows specifications.
- Add keyboards and a regional format, which still work, instead of a second display language.
The language installed but is missing from the Windows display language menu
Only basic typing or a keyboard was added, or the language has no display pack.
- Open Language options and check whether Language pack is listed as installed.
- Remove the language and add it again with Language pack ticked.
- If Language pack is never offered for that language, Windows has no display translation for it; only typing features exist.
DISM reports an error adding a .cab language pack offline
The pack does not match the installed Windows version.
- Check the version with Settings > System > About.
- Use the Languages and Optional Features ISO that matches that exact version.
- Reinstall the latest cumulative update after the pack installs.
Best Practices for Setting Up Multiple Languages
| Practice | Why it matters |
|---|---|
| Install only the languages people on the PC actually use | Each language takes disk space and slows updating and servicing |
| Pick only the optional features you need | Speech, handwriting and OCR are separate downloads you can add later from Language options |
| Order Preferred languages deliberately | Apps and the Microsoft Store use the first supported language in the list |
| Copy settings to the Welcome screen on shared PCs | Otherwise new accounts and the sign-in screen keep the original language |
| Match language packs to the Windows version on offline installs | A pack from another version will not install |
| Do not rely on multiple languages surviving a cross-language upgrade | Upgrades keep only the system default UI language |
FAQ: Common Questions About Windows Language Packs
How do I install languages in Windows 11?
Open Settings > Time & language > Language & region, select Add a language, choose the language, keep Language pack ticked and select Install. Windows downloads it from Windows Update. Tick Set as my Windows display language only if you want to switch right away.
How do I install a language pack in Windows 10?
Open Settings > Time & Language > Language, select Add a language under Preferred languages, pick the language, keep Install language pack ticked and select Install. You need an administrator account and an internet connection.
How do I install a Windows language pack manually?
Mount the Languages and Optional Features ISO for your Windows version and run Dism /Online /Add-Package with the path to the language pack .cab file, then add features with Dism /Online /Add-Capability. Microsoft supplies the ISO to Volume Licensing customers and OEMs, not to home users.
How do I check which languages are installed in Windows?
Open Settings > Time & language > Language & region and read the Preferred languages list. Languages with a display pack also appear in the Windows display language menu. On Windows 11, Get-InstalledLanguage in PowerShell lists every installed language and component.
Can you change the Windows language after install?
Yes. Add the language pack from Settings, then choose it from the Windows display language menu and sign out and back in. The only exception is Home Single Language and Home Country Specific, which allow one display language.
Can you add languages to Windows Home Single Language?
No. Microsoft states that languages cannot be added to Home Single Language or Home Country Specific editions, and Settings reports that the license supports only one display language. Keyboard layouts and regional formats still work on those editions.
How do I install a language in Word?
Word keeps its own language list. In Word, open File > Options > Language, add the language under Office display language or authoring languages, and select Set as Preferred. A Windows language pack does not change Office by itself.
Do I need a language pack just to type in another language?
No. A keyboard layout works without the display pack. Add the language with Language pack cleared, or add a keyboard under Language options, then switch layouts with Windows logo key + Spacebar.
The Bottom Line
On a single PC, use Add a language in Settings with Language pack ticked and only the features you need; use Install-Language or DISM with the Languages and Optional Features ISO when you manage many PCs or have no internet access. Settings pulls the matching pack from Windows Update automatically, while the command-line routes give admins repeatable, offline installs that Settings cannot do.

![How to Install/Add Microsoft Print to PDF Printer on Windows 11/10 [Tutorial]](https://techdows.com/wp-content/uploads/2026/09/Turn-Windows-features-on-or-off-dialog-with-a-scrollable-checkbox-list-600x338.jpg)