Open Task Manager, sort by the Disk column and act on the process at the top — that ends most 100% disk usage on Windows 10 and Windows 11.
The 18 fixes below run from that one-minute check through the search indexer, SysMain, storage drivers, virtual memory and a full reset.
1. Check Task Manager
Windows reports 100% disk usage when the drive is busy every moment it is sampled, not when the drive is full. One process is almost always responsible.
- Press Ctrl + Shift + Esc to open Task Manager.
- Open the Processes tab and select the Disk column header to sort by disk activity.
- Read the name at the top of the list and note how many MB/s it is writing.
- Leave the list sorted for a minute. A process that stays at the top is the cause; one that spikes and drops is normal.
- To stop it now, open the Details tab, right-click the process and select End task.
Ending a task is a test, not a fix. The matching section below turns the cause off properly.
Match the process at the top to the fix that stops it
Task Manager names the culprit. This table sends you straight to the fix for it instead of down the whole list.
| Top of the Disk column | Go to | Why |
|---|---|---|
| SearchIndexer.exe or SearchHost.exe | Fixes 2 and 17 | The search index is being built or rebuilt |
| Service Host: SysMain | Fix 3 | Application launch prefetching is reading files ahead |
| Service Host: Delivery Optimization or Windows Update | Fixes 5 and 11 | An update is downloading, unpacking or uploading |
| Antimalware Service Executable | Fix 15 | A scheduled scan is running |
| System, with no app above it | Fixes 4, 10 and 12 | A storage driver, the paging file or a failing disk |
| A browser, OneDrive or Dropbox | Fix 16 and the troubleshooting section | Cache writes or a large sync batch |
| Nothing stays above 1 MB/s | Fixes 7, 8 and 12 | The drive itself cannot keep up |
Understanding the 100% Disk Usage Problem
The percentage in Task Manager is active time, not throughput. A slow mechanical drive can sit at 100% while moving only a few MB/s.
| What you see | What it means | When it is normal |
|---|---|---|
| 100% for a few minutes after sign-in | Startup apps, indexing and update checks all begin at once | Yes, if it settles within 10 minutes |
| 100% with 1-5 MB/s throughput | A mechanical drive is saturated by random reads | Only on a 5400 RPM laptop drive |
| 100% with 100+ MB/s throughput | A real transfer, backup or update is running | Yes, while the job lasts |
| 100% with the queue length above 1 | Requests are stacking up faster than the drive clears them | No |
| 100% right after a feature update | Windows is reindexing and cleaning up the old installation | Yes, for a few hours |
Microsoft's own indexing guidance notes that the indexer stops when the disk is already busy, so a stuck index and a busy disk feed each other.
2. Disable Windows Search
The Windows Search service is named wsearch. Stopping it is the quickest way to prove the indexer is the cause.
- Type
cmdin the search box on the taskbar and select Run as administrator. - Run
net stop wsearchto stop the indexer immediately. - Switch back to Task Manager and watch the Disk column for a minute.
- If the figure drops, keep the service off while you work through fix 17: run
sc config wsearch start=disabled. - To restore search, run
sc config wsearch start=delayed-autoand thennet start wsearch.
Start menu and File Explorer searches get slower with the service stopped, so treat this as a diagnostic rather than a permanent setting.
3. Disable Superfetch (SysMain)
SysMain is the service behind SuperFetch. Its application launch prefetching reads files from the drive before you ask for them, which shows up as steady background disk activity.
- Type
powershellin the search box on the taskbar and select Run as administrator. - Run
Get-MMAgentto see which memory management features are on. - Run
Disable-MMAgent -ApplicationLaunchPrefetchingto turn off prefetching. - Restart the PC and watch the Disk column again for five minutes.
- If nothing improved, undo it with
Enable-MMAgent -ApplicationLaunchPrefetching.
Apps you open often may take a little longer to start once prefetching is off. That is the trade.
4. Update Disk Drivers
A storage controller running a generic driver is a common reason the System process sits at the top of the Disk column.
- Right-click Start and select Device Manager.
- Expand Disk drives, then expand Storage controllers and IDE ATA/ATAPI controllers.
- Right-click your drive or controller and select Update driver.
- Select Search automatically for updated driver software.
- Select Close when it finishes, then repeat for the other storage entries.
- Restart the PC.
If Device Manager finds nothing, get the driver from your PC or drive maker's own support site. Never use a third-party driver updater.
5. Run Windows Update
A half-finished update keeps retrying in the background, and each retry hammers the disk. Letting it finish clears that loop.
- Select Start > Settings > Windows Update > Check for updates.
- Install everything offered and restart when prompted.
- Run Check for updates again after the restart.
- Repeat until the page reports the PC is up to date with nothing pending.
- Leave the PC on and plugged in for 20 minutes afterwards so post-update cleanup can finish.
6. Check for Malware
Constant disk writes with no named owner are worth a full scan, which reaches every mounted fixed, removable and network drive.
- Open Windows Security from the Start menu.
- Select Virus & threat protection.
- Select Scan options under the Quick scan button.
- Select Full scan and start it.
- Leave the PC running until the scan reports a result.
A full scan begins with a quick scan and then reads every mounted drive, so it can take hours and will itself push disk usage high while it runs.
7. Optimize Hard Drive
Windows defragments mechanical drives and sends TRIM commands to SSDs. Both jobs are reached from the same tool.
- Type
defragin the search box on the taskbar and open Defragment and Optimize Drives. - Select the drive that is showing 100% usage.
- Select Analyze to see whether it needs work.
- Select Optimize to run the job.
- Under Scheduled optimization, select Change settings and set the frequency to weekly.
Run this when the PC is otherwise idle. Optimization itself is disk-heavy.
8. Upgrade to SSD
On a mechanical drive, 100% active time at 2 MB/s is the hardware telling you it is out of headroom. No setting recovers that.
| Drive in the PC now | What 100% usage means there | Worth upgrading? |
|---|---|---|
| 5400 RPM laptop hard drive | Random reads from indexing and updates saturate it daily | Yes — this is the single biggest change available |
| 7200 RPM desktop hard drive | Saturates under updates, scans and large syncs | Yes, if the spikes last more than a few minutes |
| SATA SSD | Usually a specific process, not the drive | No — work through fixes 2 to 17 first |
| NVMe SSD | Almost always a process or a driver problem | No — check fix 4 and fix 12 |
| Hard drive holding the paging file only | The paging file is being hit on every low-memory moment | Move the paging file instead — see fix 10 |
Check your PC maker's support page for the drive form factor and interface before buying anything.
9. Disable Background Apps
Store apps that refresh in the background write to the disk on their own schedule. Setting the noisy ones to Never stops that.
- Select Start > Settings > Apps > Installed apps.
- Find the app that appeared in the Disk column, select the … button next to it and choose Advanced options.
- Under Let this app run in the background, select Never.
- Repeat for every app you do not need live notifications from.
- On a laptop, open Settings > System > Power & battery > Battery usage to see which apps are busiest, then select More options > Manage background activity for each one.
Leave at least one app set to Always if you rely on notifications and app updates arriving on their own.
10. Check Virtual Memory Settings
A paging file that is too small or fixed at the wrong size forces constant writes. Handing the size back to Windows is the fix in almost every case.
- Type
control panelin the search box on the taskbar and select Control Panel. - Select System and Security > System > Advanced system settings.
- On the Advanced tab, under Performance, select Settings > Advanced.
- Under Virtual memory, select Change and make sure Automatically manage paging file sizes for all drives is selected.
- Select OK, then select Apply.
- Restart the PC.
If the PC has both an SSD and a hard drive, keep the paging file on the SSD. The system commit limit has to stay above peak usage or apps freeze.
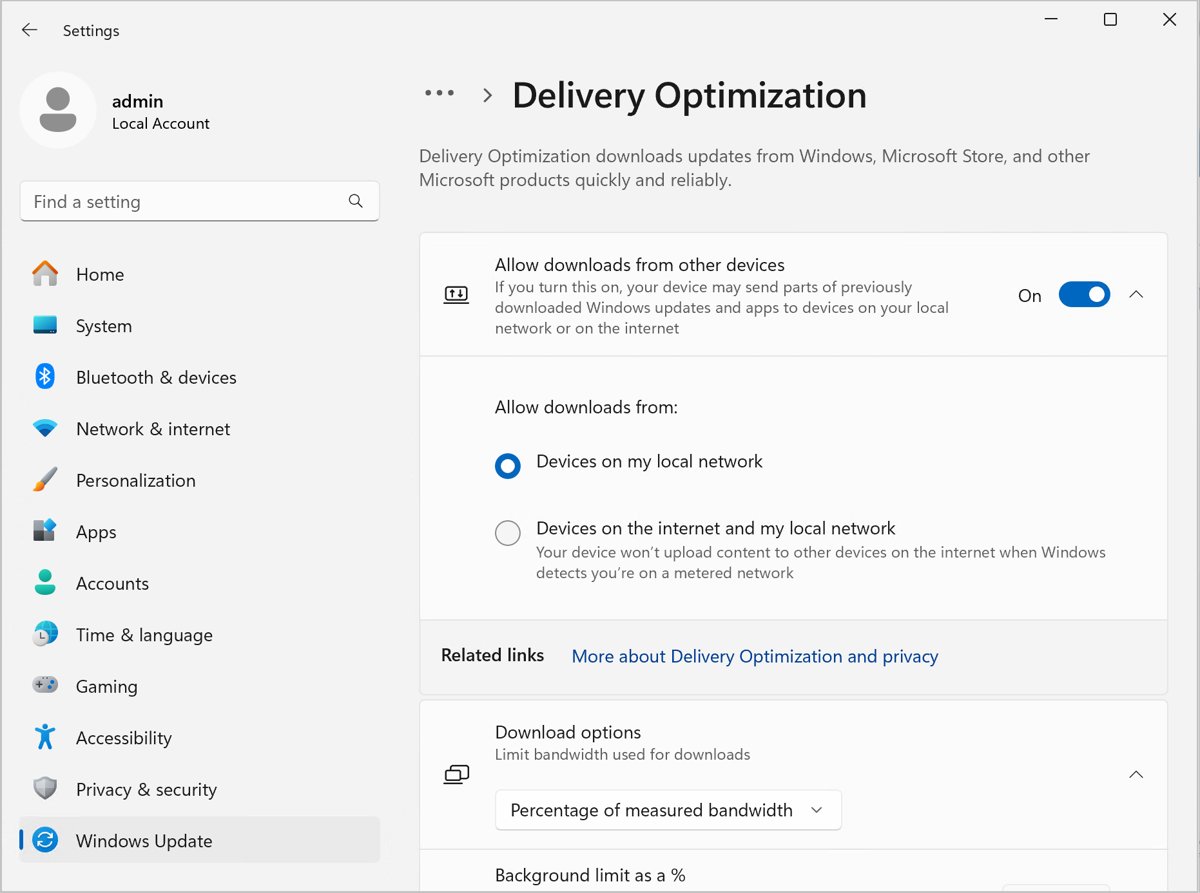
11. Disable Windows Update Delivery Optimization
Delivery Optimization downloads update parts from other devices and can upload them back out. Both directions cache to your disk.
- Select Start > Settings > Windows Update > Advanced options > Delivery Optimization. On Windows 10, go to Settings > Update & security > Delivery Optimization.
- Turn off Allow downloads from other devices. On Windows 10 the switch reads Allow downloads from other PCs.
- If you want to keep peer downloads on the LAN, leave it on and select Devices on my local network instead.
- Select Advanced options and set Absolute bandwidth or Percentage of measured bandwidth limits for downloads.
- Open Activity monitor to confirm the upload figure stops climbing.
12. Check Disk for Errors
A drive with bad sectors retries every failed read, and those retries register as sustained 100% activity. chkdsk has an online mode that does not need a restart.
chkdsk C: /scan/scan runs an online scan on an NTFS volume, so the drive stays in use while it works. Add /perf to finish faster at the cost of slowing everything else, or run chkdsk C: /spotfix afterwards to repair what the scan queued. chkdsk C: /f locks the volume and will offer to run at the next restart instead.
You should see: The scan completes and reports no problems found. If it lists errors, run chkdsk C: /spotfix, and if it finds bad sectors, back your files up before doing anything else.
Run chkdsk C: /r only when you can leave the PC alone. On a large drive with millions of files it can take hours.
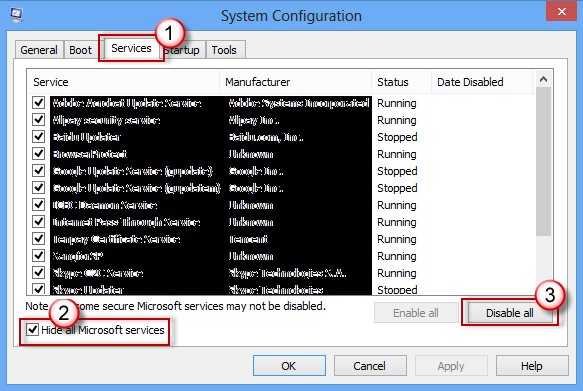
13. Perform a Clean Boot
A clean boot starts Windows with only essential drivers and startup programs, which isolates a third-party service that is writing constantly.
- Sign in as an administrator, select Search, type
msconfigand open System Configuration. - On the Services tab, select Hide all Microsoft services, then select Disable all and select Apply.
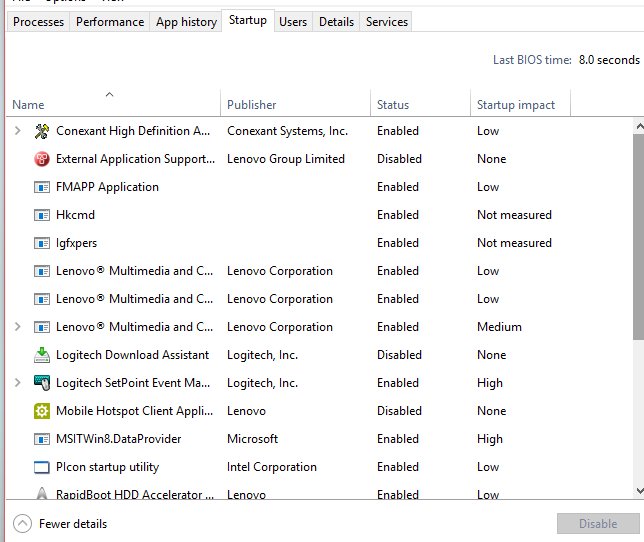
- On the Startup tab, select Open Task Manager.
- On the Startup apps tab, select each enabled item and select Disable, keeping a note of what you turned off.
- Close Task Manager, select OK on the Startup tab and restart.
- Check the Disk column. If it is quiet, re-enable half the services at a time and restart until the offender appears.
- To return to normal, open System Configuration, select Normal Startup on the General tab, re-enable the services and startup items, then restart.
The PC loses some functionality while in a clean boot environment, so do this when you are not working.
14. Change Power Options
Power mode decides how much background work Windows allows. Limiting it cuts the disk activity that has no deadline.
- Select Start > Settings > System > Power & battery.
- Open Power mode.
- Select Best Power Efficiency to reduce background activity on battery and on mains power.
- Close Settings and watch the Disk column for five minutes.
- If foreground work now feels slow, move the setting back one step and retest.
This helps most on laptops, where background tasks and indexing are already competing with a slower drive.
15. Schedule antivirus scans instead of turning protection off
Antimalware Service Executable at the top of the Disk column means a scan is running, not that anything is wrong. Moving the scan to a time you are not at the PC solves it without leaving the machine unprotected, even temporarily.
Techdows covers this process in detail in How to Fix 'Antimalware Service Executable' High Memory, CPU, or Disk Usage in Windows 11.
- Type
Task Schedulerin the search box on the taskbar and open it. - Expand Task Scheduler Library > Microsoft > Windows, then select the Windows Defender folder.
- Double-click Windows Defender Scheduled Scan in the centre pane.
- Open the Triggers tab and select New.
- Set a frequency and start time for when the PC is on but unused, then select OK.
- Prefer a quick scan for the recurring schedule and run a full scan only by hand.
Microsoft does not recommend scheduling full scans because of the time and resources they take. Do not disable real-time protection to stop the disk activity.
16. Clear Cache
Temporary files, delivery caches and old update files leave the drive with no free room to work in. Windows has a built-in clean-up for all of them.
Windows 11 moved this work from the old Disk Cleanup tool into Storage settings, as covered in Windows 11 Update replaces Disk Cleanup with Storage usage.
- Select Start > Settings > System > Storage.
- Select Temporary files, tick the categories you want gone and remove them.
- Turn on Storage Sense so the clean-up repeats on its own.
- Select Advanced storage settings > Storage used on other drives to clear any other drive.
- Clear your browser cache separately from the browser's own settings.
If the clean-up stalls, see Fix Disk Cleanup stuck on Windows Update Cleanup in Windows 10.
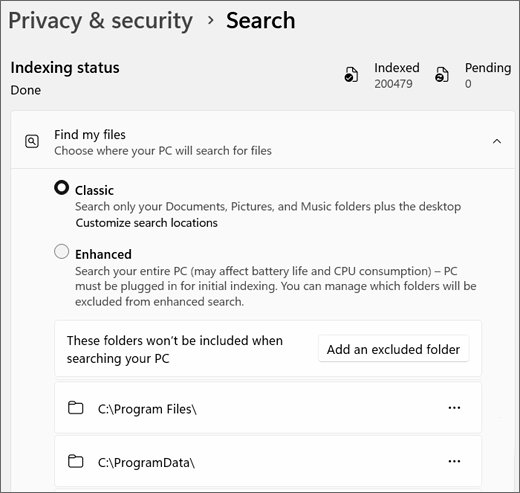
17. Adjust Indexing Options
Indexing performance falls away past roughly 400,000 items, and the indexer can handle at most a million. Cutting what it watches is the durable version of fix 2.
- Select Start > Settings > Privacy & security > Searching Windows and read the Indexed figure. On Windows 10, go to Settings > Search > Searching Windows and read Indexed Items.
- Select Classic if the mode is set to Enhanced. Classic covers Documents, Pictures, Music and the desktop; Enhanced covers the whole PC.
- Select Add an excluded folder and exclude anything with huge numbers of files, such as source code trees, game libraries and virtual machine folders.
- For finer control, select Advanced indexing options (Advanced Search Indexer Settings on Windows 10), then in Indexing Options select Modify and deselect locations.
- Select Advanced > Rebuild to apply the changes, then leave the PC on for up to 24 hours while the index is rebuilt.
The status line reads Indexing complete when the rebuild has finished. Expect heavy disk use until then.
18. Reset Windows
A reset reinstalls Windows and clears a corrupted service configuration that nothing above has reached. Back your files up first.
- Select Start > Settings > System > Recovery, then select Reset PC. On Windows 10, go to Settings > Update & Security > Recovery and select Get started under Reset this PC.
- Select Keep my files to leave your documents in place.
- Choose Cloud download to pull a fresh copy of Windows, or Local reinstall to rebuild from what is already on the drive.
- Confirm the list of apps that will be removed and start the reset.
- Keep the PC plugged in until it finishes and reaches the desktop.
- Install drivers from your PC maker's support site before anything else.
Choose Cloud download if the disk errors in fix 12 suggest the existing files may be damaged.
How to check the disk is actually quiet again
Restart before testing. Several of the fixes above only take effect on a fresh boot.
- Restart, sign in and then leave the PC untouched for ten minutes.
- Press Ctrl + Shift + Esc and open the Performance tab.
- Select your disk and read Active time. It should sit below 10% while idle.
- Check Average response time. A figure that stays in the hundreds of milliseconds points at the drive itself.
- Open Settings > Privacy & security > Searching Windows and confirm the status reads Indexing complete.
- Open Processes, sort by Disk again and confirm nothing holds the top spot for more than a few seconds.
Fix 100% disk usage when it keeps coming back
Disk usage goes back to 100% after every restart
Startup apps, the indexer and a pending update all begin at sign-in and compete for the same drive.
- Open Task Manager and select the Startup apps tab.
- Select each item you do not need at sign-in and select Disable.
- Run Check for updates and let any pending update finish completely.
- Check the indexer status at Settings > Privacy & security > Searching Windows. If it never reaches Indexing complete, work through fix 17.
- Restart and time how long the disk stays busy. Under ten minutes is normal.
Disk sits at 100% but no app shows a high figure
The work belongs to a service hosted inside System or Service Host, which the Processes tab groups out of sight.
- In Task Manager, open the Processes tab and expand every Service Host group by selecting the arrow beside it.
- Note the service name shown under the expanded group.
- Match that name in the table near the top of this page and go to the fix it points to.
- If System stays on top with no service under it, run fix 4 for drivers and fix 12 for disk errors.
- Check Average response time on the Performance tab. Hundreds of milliseconds at low throughput means the hardware, not a process.
100% disk usage on Windows 11 with an SSD
An SSD rarely saturates, so this is normally a storage driver, a stalled index rebuild or a failing drive.
- Run fix 4 and update both the disk and the storage controller drivers.
- Run
chkdsk C: /scanfrom an administrator Command Prompt. - Open Defragment and Optimize Drives and select Optimize so the SSD is trimmed.
- Check the indexer status and rebuild the index if it is stuck, as in fix 17.
- If active time stays high with throughput under 10 MB/s, check the drive's health with your drive maker's own tool.
Firefox, Dropbox or another single app drives the disk to 100%
A large cache or a sync backlog is being written in one long burst.
- Confirm the app is the one at the top of the Disk column.
- Pause syncing in the app, or quit the browser, and watch whether the figure drops.
- Clear that app's cache from its own settings, not from a third-party cleaner.
- Let a sync backlog finish once, overnight if needed, rather than stopping it repeatedly.
- For Microsoft Edge specifically, see What is msedge.exe? Is it Safe? How do I fix high Disk or CPU usage?.
What to know before you turn these services off
Turn services off one at a time and write down what you changed. Stopping the Windows Search service breaks Start menu and File Explorer search until it is restarted, disabling prefetching slows app launches, and switching Delivery Optimization off means updates download only from Microsoft's servers. Microsoft's own indexing guidance warns that "Optimize your PC" applications disable the Windows Search service, which is one reason those tools are best avoided.
Frequently Asked Questions
Why does disk usage go to 100%?
The drive is busy during every sample Windows takes. On a mechanical drive that happens at only a few MB/s, so indexing, a Windows update and a virus scan running together are enough to saturate it.
How do I stop 100% disk usage right now?
Open Task Manager with Ctrl + Shift + Esc, sort by the Disk column, then end the process at the top from the Details tab. That buys time while you apply the matching fix from this page.
Is 100% disk usage harmful to the drive?
No. Sustained activity does not damage a drive on its own. It does point at a problem worth fixing, and if chkdsk reports bad sectors, the drive itself is failing and needs replacing.
How to fix 100% disk usage on Windows 11?
The same fixes apply. Start with Task Manager, then check the indexer at Settings > Privacy & security > Searching Windows, update the storage driver in Device Manager, and turn Delivery Optimization off in Windows Update advanced options.
Why am I getting 100% disk usage after a Windows update?
Windows reindexes files and cleans up the previous installation after a feature update. That work is disk-heavy and can run for several hours. Leave the PC on and plugged in until it settles.
Does disabling Windows Search fix 100% disk usage permanently?
Only while the service stays stopped, and Start menu search stops working. Excluding large folders and rebuilding the index, as in fix 17, keeps search working and holds disk usage down for good.
How do I reduce 100% disk usage on a laptop with a hard drive?
Exclude large folders from indexing, set Power mode to Best Power Efficiency, turn background apps to Never and let Windows manage the paging file. An SSD is the only change that removes the ceiling entirely.
Should I disable SysMain on an SSD?
There is little to gain. Prefetching reads ahead to hide mechanical seek time, which an SSD does not have. Try Disable-MMAgent -ApplicationLaunchPrefetching, and if nothing improves, turn it back on.
Can 100% disk usage be caused by malware?
It can. Run a full scan from Windows Security, which begins with a quick scan and then reads every mounted fixed, removable and network drive. Expect it to take hours on a large drive.
What is a normal disk usage percentage in Task Manager?
Below 10% active time on an idle PC, with brief spikes when you open apps. Anything that stays pinned at 100% for more than ten minutes while you are doing nothing needs one of the fixes above.
Will resetting Windows fix 100% disk usage?
It fixes a corrupted service or driver configuration that nothing else reached. It does not help if the drive is mechanical and simply too slow, or if chkdsk found bad sectors.
Why is my disk at 100% when nothing is running?
Background work still runs: indexing, Delivery Optimization uploads, scheduled scans and Storage Sense. Expand the Service Host groups on the Processes tab to see which one owns the activity.
Conclusion
Read the Disk column first, then apply only the fix that matches the process you found. Four causes account for most cases: the search indexer, SysMain prefetching, a pending Windows update and a mechanical drive that has run out of headroom. The first three are settings, the fourth is hardware, and Task Manager tells you which one you have in under a minute.