To PXE boot a Windows 10 PC, turn on network boot in its UEFI or BIOS settings, connect it by Ethernet to a network with a PXE server, then pick the network or PXE entry from the one-time boot menu.
This guide covers how PXE works, what the server side needs, setting up Windows Deployment Services, booting the client, automation, and fixes for the usual errors.
How to PXE Boot Windows 10 for Beginners
These steps assume a PXE server, such as Windows Deployment Services, already answers on your network. If not, set one up first with the server sections below.
- Connect the PC to the network with an Ethernet cable.
- Restart the PC and open its UEFI or BIOS setup. On Dell computers, press F2 repeatedly as soon as it starts.
- Turn on the network boot option, such as Enable UEFI Network Stack on Dell Latitude models, then save and exit.
- Restart and open the one-time boot menu. On Dell computers, tap F12 several times until the One Time Boot menu appears.
- Select the network or PXE entry, such as the onboard NIC over IPv4.
- Press F12 if the screen asks you to press it for network boot.
- Wait for Windows PE to load from the server, then follow Windows Setup to install Windows 10.
Understanding PXE booting
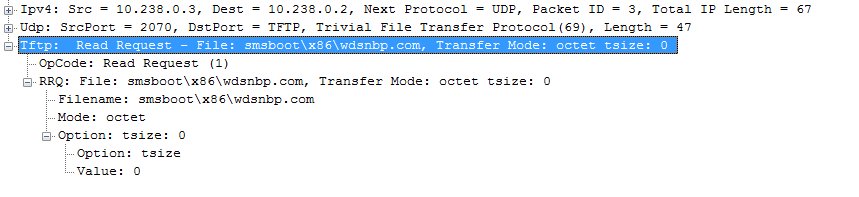
PXE (Preboot Execution Environment) is an Intel standard built into network card firmware. It lets a PC download a small boot program from the network instead of starting from its own drive.
| Stage | What happens |
|---|---|
| 1. DHCP discover | After POST, the firmware broadcasts a DHCPDISCOVER to get an IP address |
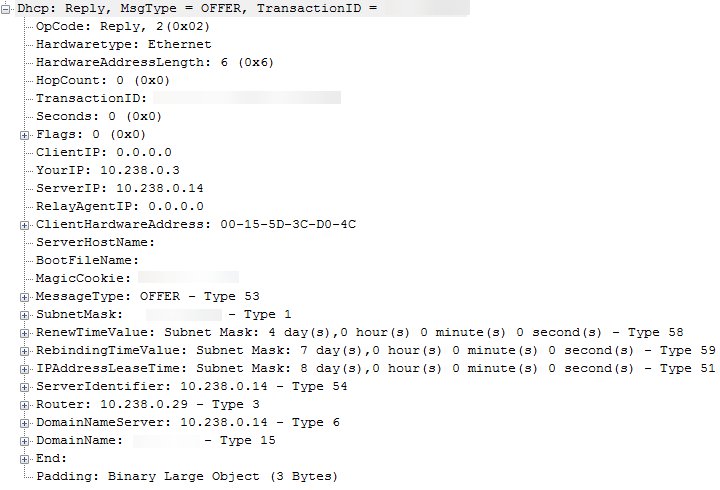
| 2. DHCP offer | The DHCP server offers an address; the PXE server separately supplies the boot file name |
| 3. TFTP download | The client downloads the network boot program, such as wdsnbp.com on BIOS or wdsmgfw.efi on UEFI |
| 4. Boot files | The boot program fetches bootmgr, boot.sdi and the Windows PE boot image over TFTP |
| 5. Windows PE | A RAM disk is built from the boot image and the PC boots from it |
| 6. Setup | Windows Setup or a deployment task sequence installs Windows 10 from the server |
Boot programs are firmware specific. pxeboot.com waits for F12, while pxeboot.n12 starts network boot without the key press.
Prerequisites for PXE booting Windows 10
| Requirement | Details |
|---|---|
| A PXE server | Windows Deployment Services (WDS) is a role in Windows Server. Windows 10 itself has no built-in PXE server role |
| A DHCP server | Clients need an IP address before they can find the PXE server |
| Same subnet, or IP helpers | PXE requests are broadcasts. If the client, DHCP and WDS are on different subnets or VLANs, the router needs IP helpers |
| Open ports | DHCP (UDP 67 and 68), TFTP (UDP 69) and BINL (UDP 4011) between client, DHCP server and PXE server |
| Windows 10 images | boot.wim and install.wim from the sources folder of Windows 10 installation media |
| A supported server version | Windows Server 2016 or 2019 for Windows 10 with installation-media boot.wim. Windows Server 2022 shows a deprecation notice; Windows Server 2025 does not support it |
| A PXE-capable client | An onboard or USB network adapter with network boot turned on in firmware |
Step-by-step: setting up a PXE boot environment for Windows 10
These steps use WDS on Windows Server with PowerShell and wdsutil. Run each command in an elevated PowerShell window; Windows Terminal opens one with Run as administrator.
- Install the WDS role with its management tools:
Install-WindowsFeature -Name WDS -IncludeManagementTools. - Initialize the server and create the remote install folder:
wdsutil /Initialize-Server /remInst:D:\RemoteInstall. Add/Authorizeonly if DHCP rogue detection is on. - Copy
boot.wimandinstall.wimfrom the Windows 10 mediasourcesfolder to a local folder such asC:\Images. - Add the boot image:
wdsutil /Add-Image /ImageFile:"C:\Images\boot.wim" /ImageType:Boot. - Add the install image to an image group:
wdsutil /Add-Image /ImageFile:"C:\Images\install.wim" /ImageType:Install /ImageGroup:Windows10. - If DHCP runs on the same server as WDS, set DHCP option 60 only. Do not set options 66 or 67.
- If clients sit on another subnet, configure IP helpers on the router to forward PXE broadcasts to the DHCP and WDS servers.
Check the WDS images from the command line
wdsutil /Get-AllImages /Show:All/Get-AllImages lists every image on the WDS server, and /Show:All includes boot images, install images and their image groups. Add /Detailed for full image metadata.
You should see: The output lists your Windows 10 boot image and the install image inside the Windows10 image group.
How to boot Windows 10 via PXE on client machines
Firmware labels differ by maker. Dell's Latitude settings below show the pattern; look for the same words on other brands.
- Open the firmware setup with F2 on a Dell, or the maker's setup key.
- On Latitude 7×10 and 7×00 models, select General > Advanced Boot Options > Enable UEFI Network Stack. On Latitude 7×20 and 7×30 models, set Enable UEFI Network Stack to Enabled under Connection.
- For a USB or Thunderbolt Ethernet adapter, turn on Enable USB Boot Support and Thunderbolt boot support.
- On Latitude 7×10 and 7×00 models, set Fastboot to Thorough under Post Behavior.
- Select Apply Changes or save, and restart.
- Tap F12 to open the One Time Boot menu and select the network boot entry.
- Press F12 again if the WDS prompt asks for it.
Choosing the network entry from the one-time menu leaves the normal boot order alone, so the PC starts from its own drive again on the next restart.
Automating Windows 10 deployment with PXE
A plain WDS setup still asks questions in Windows Setup. These options remove the clicks.
| Option | What it automates | Note |
|---|---|---|
| Unattend file on the install image | Windows Setup answers, via wdsutil /Add-Image ... /UnattendFile:<path> |
Since the April 2026 release, WDS no longer supports hands-free deployment by default; follow Microsoft's CVE-2026-0386 hardening guidance first |
| Microsoft Deployment Toolkit (MDT) | Task sequences with a custom boot image | Uses its own boot image, so the boot.wim deprecation does not affect it |
| Microsoft Configuration Manager | Full operating system deployment from PXE-enabled distribution points | Microsoft's recommended replacement for WDS |
Benefits and limitations
| Benefit or limitation | Details |
|---|---|
| Benefit: no USB media | Every PC on the network can start Setup from one server |
| Benefit: one image for many PCs | Update the image on the server once instead of on each USB stick |
| Limitation: Windows 11 is blocked | Windows 11 workflows that use boot.wim from installation media are not supported in WDS |
| Limitation: WDS is being retired | WDS, including its PXE function, is deprecated beginning with the Windows Server release after Windows Server 2025 |
| Limitation: network design | Broadcasts stop at the subnet, so routed networks need IP helpers |
How to check PXE boot worked
- Watch the client screen after selecting network boot. It should show an IP address from DHCP and then a prompt or a download.
- Confirm the Windows PE loading screen appears and Windows Setup starts.
- On the server, run
wdsutil /Get-AllImages /Show:Allto confirm the boot and install images are listed. - After installation, open Settings > System > About on the client and confirm the Windows 10 edition and version.
Troubleshooting common PXE boot issues
Windows 10 shows "Start PXE over IPv4" and does not boot
The PC tried network boot first and no PXE server answered, or the internal drive is missing from the boot order.
- Open the firmware setup with F2 on a Dell, or your maker's key.
- Move Windows Boot Manager or the internal drive above the network entry in the boot sequence.
- Save and restart.
- If the drive is not listed at all, check it is detected in the firmware.
The computer keeps trying to PXE boot
Network boot sits first in the permanent boot order.
- Open the firmware setup.
- Put the internal drive first in the boot sequence.
- Use the F12 one-time menu whenever you want a network boot.
PXE boot is not working: no response from the server
The client, DHCP server and WDS server are on different subnets with no IP helpers, or ports are blocked.
- Put the client on the same subnet as the DHCP and WDS servers to test.
- Configure IP helpers on the router for routed subnets.
- Open UDP 67, 68, 69 and 4011 between client, DHCP server and WDS server.
- Confirm the WDS service is running on the server.
PXE gets further with DHCP options but then fails
DHCP options 66 and 67 send clients down the wrong path; Microsoft does not recommend them.
- Remove options 60, 66 and 67 at both the server and scope level.
- Use IP helpers instead.
- If DHCP and WDS share one server, set option 60 only.
"A media driver your computer needs is missing" on Windows Server 2025
Using installation-media boot.wim on WDS running on Windows Server 2025 is not supported.
- Use Windows Server 2016 or 2019 for Windows 10
boot.wimdeployments. - Or move to a custom boot image with MDT or Configuration Manager.
Frequently asked questions
What is PXE boot in Windows 10?
PXE boot starts a Windows 10 PC from a network server instead of its own drive. The network card's firmware gets an address from DHCP, downloads a boot program by TFTP, then loads Windows PE to install or repair Windows.
How do I PXE boot Windows 10?
Turn on network boot in the UEFI or BIOS setup, connect Ethernet, restart, open the one-time boot menu and select the network entry. On a Dell, F2 opens setup and F12 opens the One Time Boot menu.
How do I set up a PXE boot server on Windows 10?
Windows 10 has no built-in PXE server role. Windows Deployment Services runs on Windows Server; install it with Install-WindowsFeature -Name WDS -IncludeManagementTools, initialise it with wdsutil /Initialize-Server, then add images.
How do I enable PXE boot?
Enable the network stack in your firmware setup. On many Dell Latitude models, the setting is Enable UEFI Network Stack, under Advanced Boot Options or Connection depending on the model.
How do I boot from a PXE server?
Restart the PC, open the one-time boot menu, choose the network or PXE IPv4 entry, and press F12 if WDS asks. The client then downloads its boot image from the server.
How do I configure PXE boot on the network?
Keep client, DHCP and WDS on the same subnet, or set IP helpers on the router. Leave DHCP options 66 and 67 unset, and set option 60 only when DHCP and WDS share a server.
Can I PXE boot Windows 11 with WDS?
Not with boot.wim from installation media; Microsoft blocks that workflow for Windows 11. WDS can still PXE boot a custom boot image from MDT or Configuration Manager.
Why does my computer try to PXE boot?
Network boot sits above the internal drive in the firmware boot order, or the drive was not detected. Put Windows Boot Manager or the drive first and save.
Additional resources
- WDS boot.wim support — Which Windows and Windows Server versions still work with WDS
- PXE boot in Configuration Manager — The PXE conversation step by step, with boot file names
- Troubleshoot PXE boot issues — IP helpers and DHCP option guidance
- wdsutil add-image — Full syntax for boot and install images
Final thoughts
For a small Windows 10 lab, WDS on Windows Server 2016 or 2019 with the media's boot.wim is the simplest PXE setup; for anything long-term, plan on Configuration Manager or MDT. Microsoft has blocked the boot.wim route for Windows 11 and Windows Server 2025 and is deprecating WDS after Windows Server 2025.