To insert a watermark in Word, open the Design tab, select Watermark and pick a preset such as DRAFT, CONFIDENTIAL or DO NOT COPY.
The steps below cover Word for Microsoft 365, Word 2024, 2021, 2019 and 2016 on Windows and Mac, including custom text, logos, single-page watermarks and removal.
How to add a watermark in Word
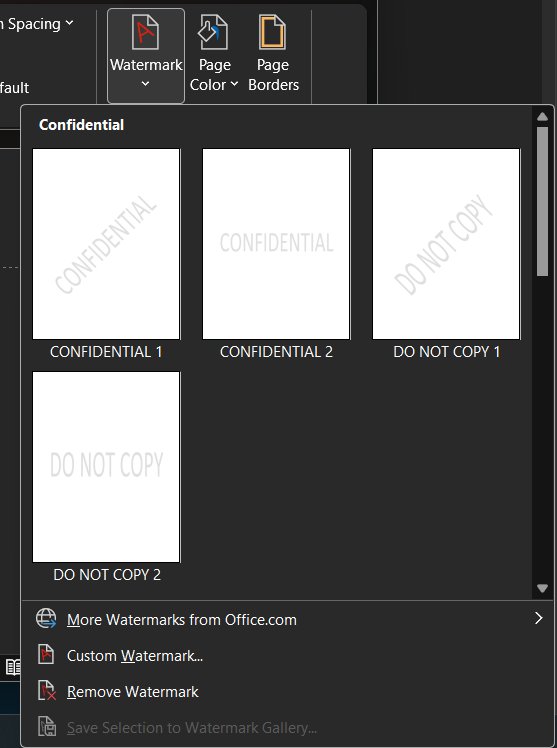
A preset watermark is the quickest option. Word places it behind the text on every page of the document.
- Open your document in the Word desktop app.
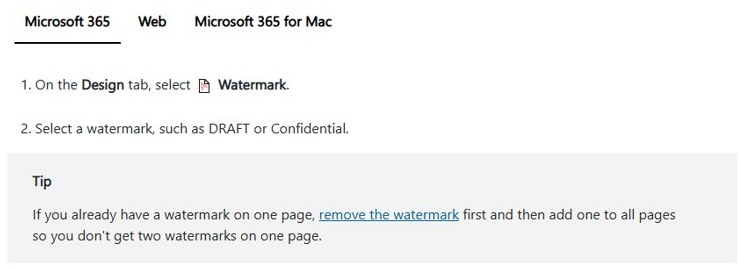
- Select the Design tab on the ribbon.
- In the Page Background group, select Watermark.
- Choose a preset such as DRAFT, CONFIDENTIAL or DO NOT COPY from the gallery.
- Scroll through the document to see the watermark on each page.
If the page already has a watermark, remove it first. Adding a second one can leave two watermarks on the same page.
How to add a watermark in Word on Mac
Word for Mac uses a dialog box instead of a preset gallery. The same box handles text and picture watermarks.
- Open the Design tab and select Watermark.
- In the Insert Watermark box, select Text.
- Type your own text, or choose one from the list, such as DRAFT.
- Set the font, layout, size, colors and orientation.
- Select OK.
- If the watermark does not appear, select View > Print Layout.
How to make a custom text watermark
Use a custom text watermark when none of the presets fits, for example a client name or "INTERNAL ONLY".
- Select the Design tab.
- Select Watermark > Custom Watermark.
- Choose Text watermark.
- Type your wording in the Text box.
- Set the font, size, color and orientation you want.
- Select OK to apply it to every page.
How to add a logo or picture watermark
A company logo is a common picture watermark. Keep the washout on so the image stays faint behind the text.
- Select the Design tab, then Watermark in the Page Background group.
- Select Custom Watermark, then choose Picture Watermark.
- Select Select Picture.
- Pick an image from your computer, or search Bing images.
- Select the picture and choose Insert.
- Leave Scale on Auto and keep Washout checked, then select OK.
On a Mac, open Design > Watermark, select Picture in the Insert Watermark box, then Select Picture and browse to the image.
How to put a watermark on all pages in Word
A watermark added from the Design tab already appears on all pages. Use this route when only some pages show it or you want to replace an old one.
- Remove any existing watermark first with Design > Watermark > Remove Watermark.
- Select Design > Watermark again.
- Choose a picture or text watermark.
- For a picture, select the image and set the scale and washout.
- For text, set the text, font, size, color and orientation.
- Select OK.
How to put a watermark on just one page
Word inserts a single-page watermark as a text box at the cursor position, so it stays on that page only.
- Click on the page where you want the watermark.
- Select the Design tab, then Watermark.
- Right-click the watermark you want in the gallery.
- Choose Insert at Current Document Position.
- Drag the text box if you want it somewhere else on that page.
To use your own text on one page, save it to the gallery first (see the reuse steps below), then right-click it in the gallery.
How to move or fade a watermark
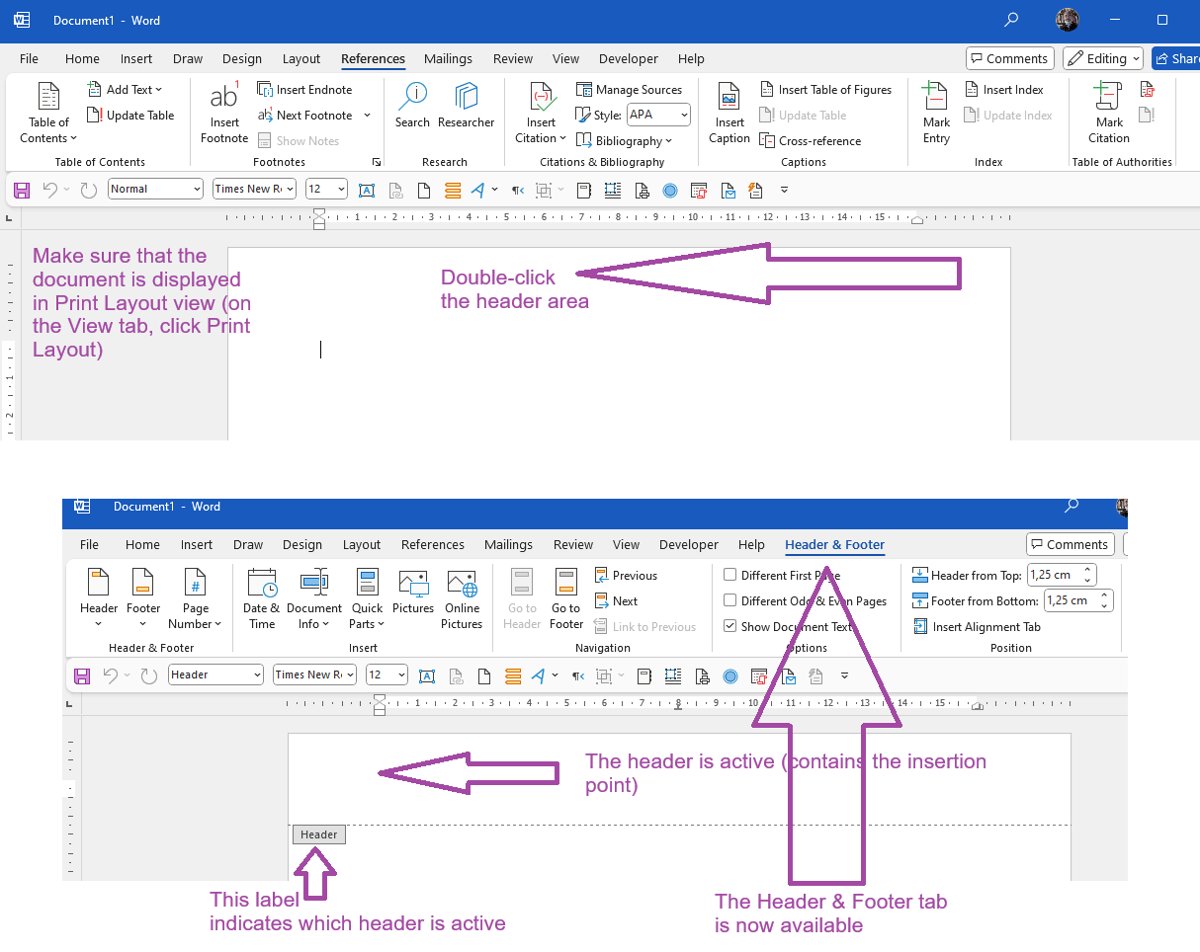
A watermark lives in the header, even though it shows in the middle of the page. Open the header first, or Word will not let you select it.
| What you want | Steps in Word for Windows | Steps in Word for Mac |
|---|---|---|
| Move the watermark | Double-click near the top of the page to open the header, point at the watermark until a four-headed arrow appears, click it and drag it | Double-click the header area, click the watermark and drag it |
| Fade a picture watermark | Open the header, select the watermark, open Format under Picture Tools and try Recolor, Brightness or Contrast | Open the header, double-click the watermark to open Format Picture, select the Picture tab and try Picture Transparency or Picture Corrections |
| Fade a text watermark | Open the header, select the watermark, open Format under WordArt Tools, select Shape Fill, then More Fill Colors and raise Transparency | Replace it from Design > Watermark > Text and change Font Color or Transparency |
Watermarks are centered by default, but you can drag them anywhere on the page.
How to reuse a custom watermark
Saving a watermark to the gallery lets you add it to any document later in one click.
| Step | Action |
|---|---|
| 1 | Double-click near the top of the page to open the header |
| 2 | Point at the watermark until the four-headed arrow appears, then click it |
| 3 | On the Design tab, in the Page Background group, select Watermark |
| 4 | Select Save Selection to Watermark gallery |
| 5 | Name the watermark and select OK |
| 6 | In any document, open Design > Watermark and pick it under General |
How to remove a watermark
Remove Watermark clears the watermark from every page in one step.
- Select the Design tab.
- Select Watermark.
- Choose Remove Watermark on Windows, or No watermark in the Insert Watermark box on a Mac.
- If the watermark is still there, double-click near the top of the page to open the header.
- Point at the watermark until the four-way arrow appears, select it and press Delete.
- Repeat for any other watermarks left in the document.

Can you add a watermark in Word for the web?
No. Word for the web shows existing watermarks but cannot insert or change them. Microsoft states that adding a watermark is not currently possible in Word for the web. Select Editing at the top of the ribbon, then Open in Desktop App, add the watermark there and save; it stays with the file when you reopen it online.
Word watermark not showing or not removing
The watermark does not appear on the page
The document is open in a view that hides header content.
- Select the View tab.
- Choose Print Layout.
- Check the page again; this view also shows how the printed watermark will look.
Remove Watermark does not get rid of it
The watermark was added as an object in the header or inserted on a single page.
- Double-click near the top of the page to open the header.
- Point at the watermark until the four-way arrow appears and select it.
- Press Delete, then repeat on any other page that still shows one.
Two watermarks show on the same page
A new watermark was added while the old one was still in place.
- Select Design > Watermark > Remove Watermark.
- Delete any leftovers from the header as shown above.
- Add the watermark you want again from Design > Watermark.
The Watermark button is missing in the browser
Word for the web cannot add watermarks.
- Select Editing at the top of the ribbon.
- Choose Open in Desktop App.
- Add the watermark from Design > Watermark and save the file.

Word watermark FAQ
Will the watermark print?
Yes. A watermark added from the Design tab prints with the document. Switch to View > Print Layout before printing, because that view shows how the watermark will look on the printed page.
Where is the Watermark button in Word?
The Watermark button is on the Design tab, in the Page Background group. Select it to open the preset gallery, Custom Watermark, Save Selection to Watermark gallery and Remove Watermark.
Can I use my company logo as a watermark?
Yes. Select Design > Watermark > Custom Watermark > Picture Watermark > Select Picture, choose the logo file and select Insert. Keep Washout checked so the logo stays faint behind the text.
Why can't I select the watermark in Word?
A watermark sits in the document header, so it cannot be clicked from the body text. Double-click near the top of the page to open the header, then point at the watermark until a four-headed arrow appears.
How do I make a watermark lighter in Word?
For a picture watermark, keep Washout checked or use Recolor, Brightness or Contrast on the Picture Tools Format tab. For a text watermark, select Shape Fill > More Fill Colors and raise Transparency.
Which versions of Word support watermarks?
Watermarks work in Word for Microsoft 365 on Windows and Mac, Word 2024, Word 2021, Word 2019 and Word 2016. Word for the web can display existing watermarks but cannot add or edit them.
Can I add a watermark to only one page in Word?
Yes. Click on the page, open Design > Watermark, right-click the watermark you want and choose Insert at Current Document Position. Word adds it to that page only, as a text box.
What else can I add to a Word document?
Besides a watermark, you can insert a signature in Word, start page numbers from a specific page or split text into columns. All three, like watermarks, are set from the ribbon in the desktop app.