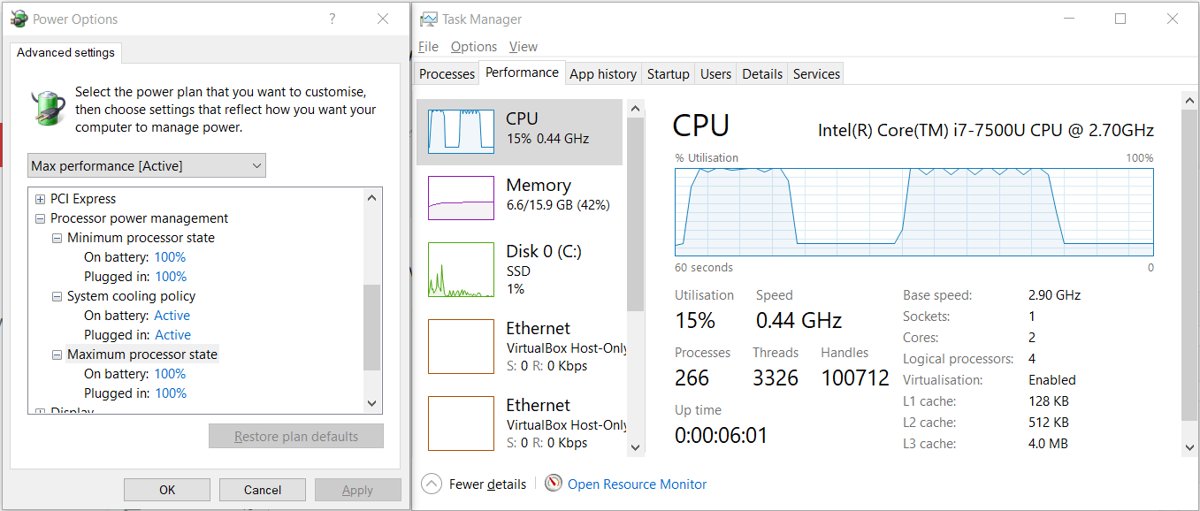
Change system cooling policy in Windows 11 and 10 from Control Panel > Power Options > Change plan settings > Change advanced power settings > Processor power management > System cooling policy, then pick Active or Passive.
This guide covers that route, the powercfg command for the same change, which option to choose, and what to do when the setting is missing.
How to Change System Cooling Policy in Power Options
The setting belongs to your power plan, so the steps are the same in Windows 11 and Windows 10. You set a separate value for battery and for mains power.
- Select Start, type
Control Panel, and open it. - Select System and Security > Power Options.
- Select Change plan settings next to the plan marked as active.
- Select Change advanced power settings.
- Expand Processor power management, then expand System cooling policy.
- Set On battery and Plugged in to Active or Passive.
- Select Apply, then OK.
The change applies at once, with no restart. It only affects the plan you edited, so switching plans later can bring back a different cooling value.
Active vs Passive Cooling: Which Option Should You Choose?
Both options protect the hardware. They differ in what Windows tries first when the processor gets hot.
| Your situation | Choose | Why |
|---|---|---|
| You want full processor speed during games, compiles or video exports | Active | Windows raises fan speed first and slows the processor only if the fan cannot keep up |
| You want a quiet PC for office work, calls or recording | Passive | Windows slows the processor first, so the fan spins up less often |
| The laptop runs on battery most of the day | Passive for On battery | A slower processor draws less power, and the fan runs less |
| The laptop is docked or plugged in | Active for Plugged in | Power draw matters less on mains, so speed comes first |
| The PC feels sluggish and the fan is quiet | Active | Passive may be throttling the processor before the fan is used |
| The fan is loud even under light work | Passive, then check vents and dust | Passive delays the fan; blocked airflow makes any policy noisier |
Understanding System Cooling Policy
System cooling policy is a processor power setting inside each Windows power plan. It decides the order of the two ways Windows can cool the processor: faster fans or lower processor speed.
| Option | What Windows does first | What it does next if still hot | Trade-off |
|---|---|---|---|
| Active | Increases fan speed | Slows the processor | Keeps performance, adds fan noise and some power draw |
| Passive | Slows the processor by throttling its frequency | Increases fan speed | Quieter and lighter on the battery, lower speed under heavy load |
Neither option switches cooling off. Both still use fans and throttling; only the order changes. PC firmware can also manage fans on its own, so the policy is a request that some machines partly override.
Prerequisites for Changing System Cooling Policy
Check these before you start. Most failed changes trace back to one of them.
| Requirement | Why it matters | How to check |
|---|---|---|
| A PC that exposes the setting | Many Modern Standby laptops show a reduced list of advanced settings, and some manufacturers hide this one | Open Change advanced power settings and look for Processor power management > System cooling policy |
| Know which plan is active | The value is stored per plan, so editing an inactive plan changes nothing now | Run powercfg /getactivescheme or look for the selected plan in Power Options |
| An administrator account if the plan is locked | Work or school PCs can restrict power plan changes | If settings are greyed out, ask the device administrator |
| Fans and vents in working order | A policy cannot fix a stopped fan or blocked airflow | Listen for the fan under load and check the vents for dust |
How to Access Power Options
Power Options sits in Control Panel on both versions. The Settings app shows the power mode, but not the advanced plan settings.
- Select Start, type
Control Panel, and press Enter. - Select System and Security.
- Select Power Options to see your power plans.
- In Windows 11, Settings > System > Power & battery holds the Power mode list, which is separate from the cooling policy.
Selecting a Power Plan
Each plan keeps its own cooling value. Pick the plan you actually use before you edit it.
- Open Control Panel > System and Security > Power Options.
- Under the plan list, select Balanced for most PCs. High performance and Power saver appear on some PCs.
- Confirm the selected plan is the one you will edit.
- Select Change plan settings next to it, then Change advanced power settings to reach System cooling policy.
- If Power mode in Settings stops responding after the switch, return to Balanced, which the power mode control needs.
High performance keeps the processor at its top performance state, and Microsoft notes its thermal output may be significant. Pair it with Active cooling rather than Passive.
Modifying Cooling Policy from the Command Line
Use powercfg when the Control Panel route is slow, when you manage several PCs, or when the list in Power Options does not show the setting.
First run powercfg /query scheme_current sub_processor. Find System cooling policy in the output, copy the GUID printed with it, and note the index number listed for Active and for Passive.
powercfg /query scheme_current sub_processor
powercfg /setacvalueindex scheme_current sub_processor <setting GUID> <index>
powercfg /setdcvalueindex scheme_current sub_processor <setting GUID> <index>
powercfg /setactive scheme_current
/query lists every processor setting in the active plan with its GUID and allowed values. /setacvalueindex sets the Plugged in value and /setdcvalueindex sets the On battery value. scheme_current targets the active plan and sub_processor the processor subgroup. Replace <setting GUID> and <index> with the values from your own /query output. /setactive scheme_current reloads the plan so the new value takes effect.
You should see: The set commands return to the prompt with no message. Run the /query line again and the current AC and DC index values for System cooling policy show the index you chose.
Leave out the /setactive line and the value is saved but not applied. No restart is needed once it runs.
Best Settings for Laptops, Desktops, and Battery Life
Use this table to set both values at once. Laptops take two values; a desktop without a battery only needs the plugged-in one.
| Device and use | On battery | Plugged in | Reason |
|---|---|---|---|
| Everyday laptop | Passive | Active | Saves battery and noise away from the charger, keeps speed on the desk |
| Gaming or workstation laptop | Passive | Active | Heavy loads mostly run plugged in, where fan cooling keeps frame rates and render times steady |
| Thin laptop that gets hot on the lap | Active | Active | Fans move heat out sooner, before the chassis warms up |
| Desktop tower | Not shown | Active | Desktops have room for airflow and no battery to protect |
| Home theatre or recording PC | Not shown | Passive | Fan noise matters more than peak processor speed |
How to check the new cooling policy is in effect
Two checks confirm that Windows stored the value and that it applies to the plan in use.
- Run
powercfg /getactiveschemeand confirm it names the plan you edited. - Run
powercfg /query scheme_current sub_processorand find System cooling policy. - Check that its current AC and DC index values match the index for the option you picked.
- Reopen Change advanced power settings and read the value under System cooling policy.
- Run a heavy task for a few minutes. With Active, the fan should rise sooner; with Passive, the processor speed in Task Manager should drop sooner.
Monitoring Your System’s Temperature
Check heat and throttling before and after the change, so you know whether the new policy helped. Windows itself does not add a temperature readout to Power Options.
| Where to look | What it shows | Best for |
|---|---|---|
| Task Manager > Performance > CPU | Current processor speed and utilization | Spotting throttling: speed falls while utilization stays high |
| BIOS or UEFI hardware monitor | Processor temperature and fan speed, where the firmware offers it | A baseline reading with Windows not loaded |
| PC or motherboard maker's utility | Temperatures, fan curves and thermal modes from the manufacturer | Laptops whose firmware controls the fans |
powercfg /energy |
A 60-second report of energy-efficiency problems, saved as an HTML file | Finding drivers or processes that keep the processor busy |
Get any monitoring or fan utility from the PC or board manufacturer's own support site.
How to Restore the Missing System Cooling Policy Setting
When System cooling policy is not showing, the cause is usually the sleep model, a hidden flag, or the plan in use. Work through the symptom that matches.
Can't find System cooling policy under Processor power management
The setting is hidden by default on many PCs; Microsoft marks some power settings as hidden, and manufacturers can hide others.
- Run
powercfg /query scheme_current sub_processorin Command Prompt or Terminal. - Search the output for System cooling policy.
- If it appears, change it with the
powercfg /setacvalueindexand/setdcvalueindexcommands shown above, then runpowercfg /setactive scheme_current. - If it does not appear, check the next two symptoms.
Processor power management shows few options or is missing entirely
Microsoft documents that Modern Standby PCs show a reduced list of advanced power settings.
- Run
powercfg /availablesleepstates. - Look for an S0 Low Power Idle standby state in the list of available states.
- If it is listed, the PC uses Modern Standby, and the firmware manages much of the cooling.
- Use the manufacturer's thermal or performance mode in its own app or in BIOS instead.
- Do not try to switch the sleep model in BIOS; Microsoft states that change needs a full Windows reinstall.
The setting appears in one plan but not after switching plans
A manufacturer's custom plan may not include every processor setting.
- Run
powercfg /listto see every plan and its GUID. - Run
powercfg /setactivefollowed by the GUID of Balanced or another plan. - Reopen Change advanced power settings and look for System cooling policy again.
Troubleshooting Common Issues
These are the problems that follow a change most often.
The cooling policy setting is not saving
A different plan is active, the change was made without Apply, or the command skipped /setactive.
- Run
powercfg /getactiveschemeand edit that plan. - In Change advanced power settings, select Apply before OK.
- After
powercfgset commands, runpowercfg /setactive scheme_current. - On a work or school PC, ask the administrator whether power plans are managed centrally.
The setting is greyed out
A policy from your organization or the manufacturer locks the plan.
- Sign in with an administrator account and reopen Power Options.
- Switch to Balanced and check whether the setting unlocks there.
- If it stays locked on a managed PC, the administrator has to change it.
No difference after switching between Active and Passive
The firmware controls fans directly, or the processor never gets hot enough to trigger either response.
- Run a heavy task for several minutes and watch the fan and processor speed.
- Check the BIOS or manufacturer app for a thermal or fan mode that overrides Windows.
- Set that mode to match the policy you chose.
Troubleshooting Fan Noise, Heat, and Performance Issues
Match the symptom, then change one thing at a time so you can tell what helped.
Increased fan noise after changing the setting
Active spins the fans up before it slows the processor.
- Set System cooling policy to Passive for the power source you use most.
- Close apps that keep the processor busy in the background, found in Task Manager's Processes tab.
- Clean dust from the vents and keep a laptop on a hard, flat surface.
Performance drops or apps stutter under load
Passive throttles the processor before it raises fan speed.
- Set Plugged in to Active.
- Check that Power mode in Settings is not on Best power efficiency.
- Watch the processor speed in Task Manager during the task to confirm the drop has stopped.
The laptop runs hot with either setting
Airflow or fan hardware limits cooling, whatever the policy says.
- Set both values to Active so fans respond first.
- Clear the vents and avoid soft surfaces that block the intake.
- Install BIOS and driver updates from the PC maker's support site.
- If the fan never spins up, contact the manufacturer for a hardware check.
Best Practices for System Cooling Management
The cooling policy is one part of heat control. These habits keep it working as intended.
- Set On battery and Plugged in separately instead of copying one value to both.
- Change the value in the plan you actually use, and recheck it after switching plans.
- Keep vents clear and clean dust out of desktop filters on a regular schedule.
- Install firmware and chipset updates from the PC maker, since firmware can manage fans independently.
- Note your original values before changing them, so you can set them back from the same dialog.
Frequently Asked Questions
How do I change system cooling policy?
Open Control Panel > System and Security > Power Options > Change plan settings > Change advanced power settings. Expand Processor power management > System cooling policy, choose Active or Passive for each power source, then select Apply.
How do I enable system cooling policy?
The policy is always active; you only choose between Active and Passive. If the option is hidden, run powercfg /query scheme_current sub_processor to check whether the PC still has the setting, then change it with powercfg /setacvalueindex and /setdcvalueindex.
How do I add system cooling policy to Power Options?
It appears automatically where the PC exposes it. Many Modern Standby laptops show a reduced list of advanced settings, so it may be missing. Check with powercfg /availablesleepstates, and use the manufacturer's thermal mode when the PC reports an S0 Low Power Idle standby state.
Why can't I find system cooling policy?
The setting is hidden by default on many PCs, removed from the reduced list on Modern Standby systems, or missing from a manufacturer's custom plan. Run powercfg /query scheme_current sub_processor to see whether it exists, and switch to Balanced to rule out the plan.
Is there a command to change system cooling policy?
Yes. Run powercfg /setacvalueindex scheme_current sub_processor with the setting GUID and index from powercfg /query, repeat with /setdcvalueindex for battery, then run powercfg /setactive scheme_current to apply the change.
Is system cooling policy the same in Windows 10 and Windows 11?
Yes. Both versions keep it in Power Options under Processor power management, with the same Active and Passive choices. The powercfg commands are also identical on both versions.
Does system cooling policy only affect the processor?
It governs how the processor is cooled. Passive slows the processor before raising fan speed, and Active raises fan speed before slowing the processor. Graphics cards and other parts follow their own drivers and firmware.
Should I change system cooling policy in the registry?
No. Use Power Options or powercfg, which Microsoft documents for changing power plan settings. Both apply the change safely to the plan and can be reversed from the same dialog or command.
Bottom Line
Set Plugged in to Active and On battery to Passive on a laptop, and use Active on a desktop unless fan noise bothers you. Active keeps the processor at full speed by using the fans first, which suits mains power. Passive saves noise and battery by slowing the processor first, which suits unplugged work.