Download the Google USB Driver ZIP from developer.android.com (or install it from Android Studio's SDK Manager), then point Device Manager's Update driver wizard at the extracted usb_driver folder.
This guide covers both download routes, the Windows 11 and Windows 10 install steps, the phone settings adb needs, how to test the connection, and fixes when Windows still does not see the device.
How to download the Google USB Driver for Windows 11
The ZIP route works without Android Studio and takes about two minutes.
- Open developer.android.com/studio/run/win-usb in your browser.
- Select Download the Google USB Driver ZIP file.
- Read the Android SDK license terms, tick I have read and agree with the above terms and conditions, and select Download the Google USB driver.
- Extract the downloaded ZIP and note the
usb_driverfolder that containsandroid_winusb.inf. - Connect the phone by USB, right-click Start, and select Device Manager.
- Right-click the phone under Portable Devices or Other devices, select Update driver, then Browse my computer for drivers.
- Select Browse…, pick the extracted
usb_driverfolder, select OK, then Next, and select Close when Windows finishes.
1. Understanding the Google USB Driver
The Google USB Driver is the Windows driver that lets the Android Debug Bridge (adb) talk to Google-made phones and tablets over a USB cable.
It is not a charging or file-transfer driver, and it is only for Google devices.
| Question | Answer |
|---|---|
| What is the Google USB Driver? | A Windows driver package (android_winusb.inf plus its files) that Google publishes for adb debugging |
| Why is it needed? | Without it, Windows lists the phone as an unknown or generic device and adb cannot reach it over USB |
| Which devices does it cover? | Google devices such as Pixel and the older Nexus line |
| What about Samsung, Motorola or Xiaomi phones? | Those brands publish their own Windows USB drivers; use the manufacturer's driver instead |
| Do Mac, Linux or ChromeOS need it? | No. macOS and ChromeOS need no extra configuration, and on Ubuntu Linux each adb user joins the plugdev group instead |
| Is it free? | Yes. It downloads free after you accept the Android SDK license terms |
2. Prerequisites for installing Google USB Driver
| Requirement | Why it matters | Where to get it |
|---|---|---|
| A Windows 11 or Windows 10 PC | The driver is Windows-only; Device Manager does the install | Built into Windows |
| An administrator account | You need to run Device Manager as admin to install or roll back a driver | Sign in with an admin account |
| A Google phone or tablet | Other brands need their OEM driver | Pixel or Nexus device |
| A USB data cable | Charge-only cables never show the phone to Windows | The cable that came with the phone, or another data cable |
| USB debugging turned on | adb only connects when Developer options and USB debugging are on | Phone Settings (section 5) |
| adb (SDK Platform-Tools) | You need adb to test the connection | Android Studio, or the standalone Platform-Tools ZIP |
If you only want adb and fastboot without Android Studio, get the Android SDK Platform Tools for Windows before you start testing.
3. Downloading the Google USB Driver
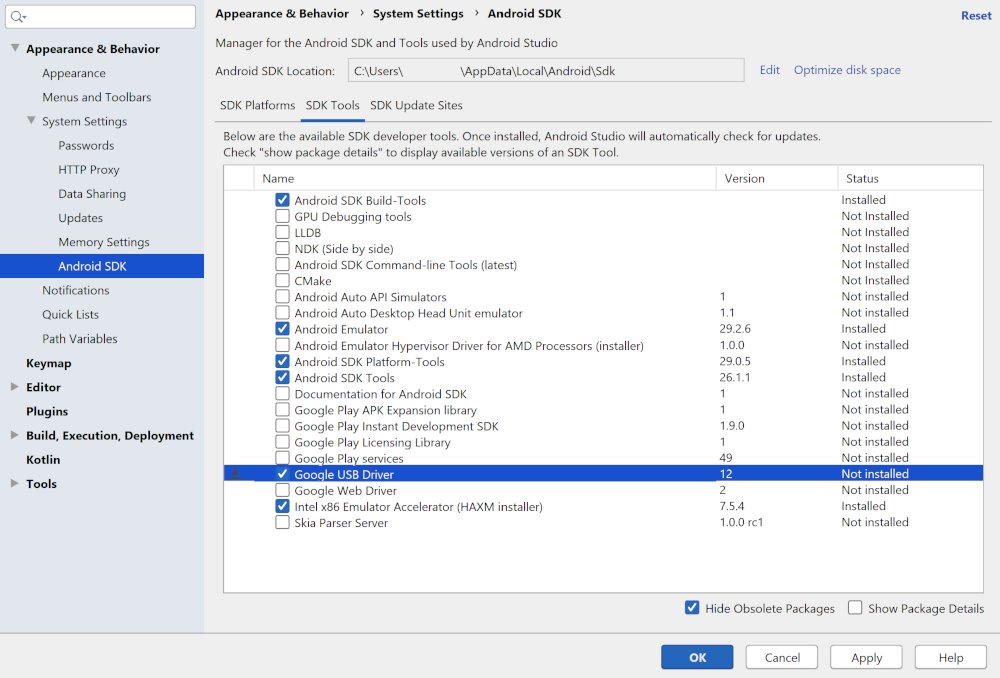
Google offers two downloads: the standalone ZIP shown above, and a package inside Android Studio's SDK Manager.
The SDK Manager route is better if you already have Android Studio installed, because it tells you when the installed driver is out of date.
- Open Android Studio and select Tools > SDK Manager.
- Select the SDK Tools tab.
- Tick Google USB Driver and select OK.
- Accept the license prompt and let the package install.
- Note the Android SDK Location at the top of SDK Manager; the driver lands in
android_sdk\extras\google\usb_driver\under that folder.
Both routes give you the same folder with android_winusb.inf in it. That folder is what Windows asks for in the next section.
4. Installing Google USB Driver on Windows 11/10
Windows does not run an installer for this driver. You point Device Manager at the folder and it installs the driver manually from the INF file.
- Connect the Android device to a USB port on the PC.
- Right-click Start and select Device Manager.
- Expand Portable Devices or Other devices, whichever shows the phone.
- Right-click the phone's name and select Update driver.
- Select Browse my computer for drivers, then Browse….
- Open the
usb_driverfolder (from the ZIP, orandroid_sdk\extras\google\usb_driver\) and select OK. - Select Next to install, then Close.
To upgrade a driver that is already installed, expand Android Phone, right-click Android Composite ADB Interface, select Update driver, and point it at the new folder.
If Windows says The best drivers for your device are already installed, the version on the PC is already current.
5. Configuring your Android device for connectivity
The driver only matters once the phone allows debugging. Turn on Developer options first, then USB debugging.
- On a Pixel, open Settings > About phone and find Build number.
- Tap Build number seven times until you see You are now a developer!
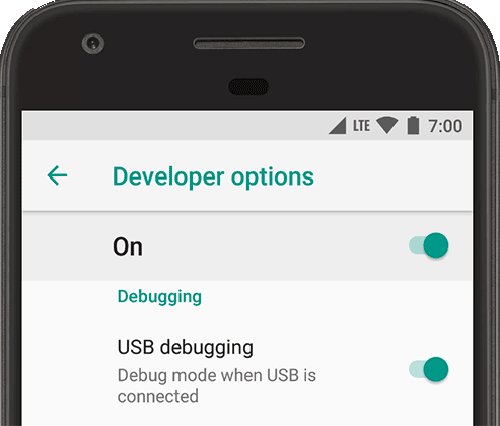
- Go back and open Settings > System > Developer options (on Android 9 and later it may sit under System > Advanced).
- Make sure the switch at the top of Developer options is on.
- Turn on USB debugging.
- Plug the phone into the PC, unlock it, and accept the prompt that asks you to trust this computer's RSA key.
On Android 8.0 and 8.1 the path is Settings > System > Developer Options > USB debugging; on Android 7.1 and earlier it is Settings > Developer Options > USB debugging.
6. Testing the connection
Open Command Prompt or Terminal in the platform-tools folder (inside the Android SDK folder, or the extracted Platform-Tools ZIP) and list the attached devices.
adb devices -lStarts the adb server if it is not running and lists every device it can reach, with its serial number, state and, thanks to -l, the model name.
You should see: Your phone appears under List of devices attached with the state device. The state offline means it is attached but not responding, and an empty list means adb sees nothing.
In Device Manager, the phone should now sit under Android Phone as Android Composite ADB Interface instead of under Other devices with a warning icon.
Android Studio users can also select Tools > Troubleshoot Device Connections to run the Connection Assistant.
7. Troubleshooting common issues
Device not recognized or shows as unknown
A charge-only or faulty cable, USB debugging switched off, or no driver assigned yet.
- Try a second USB data cable, then a different USB port on the PC.
- Confirm USB debugging is still on in Developer options.
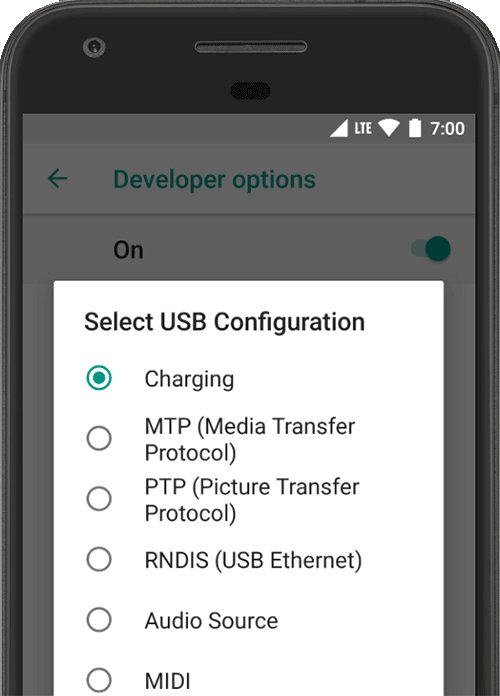
- On the phone, open Developer options > Select USB Configuration and switch it from charging to the file transfer (MTP) option.
- Run the Device Manager steps in section 4 again and point the wizard at the
usb_driverfolder. - If another Android device connects but this one does not, the problem is the phone; contact the manufacturer's support.
Driver signature enforcement preventing installation
A copy of android_winusb.inf that someone edited, for example to add a non-Google phone, triggers Windows security warnings.
- Delete the edited folder.
- Download a fresh copy of the ZIP from developer.android.com, or reinstall it from SDK Manager.
- Install from the unmodified folder.
- For a Samsung, Motorola, Xiaomi or other non-Google phone, install that manufacturer's own USB driver instead of editing Google's INF.
Conflicting drivers
An older Android driver or a generic driver is still attached to the phone.
- In Device Manager, right-click the phone and select Uninstall device, then Uninstall.
- Restart Windows.
- Reconnect the phone and install the Google driver again from section 4.
- If the problem started right after a driver update, open the device's Properties > Driver tab and select Roll Back Driver instead.
ADB still not recognizing device
The RSA prompt was not accepted, the adb server is stuck, or the Platform-Tools copy is old.
- Unlock the phone and accept the RSA key prompt for this computer.
- Run
adb kill-server, thenadb start-server, thenadb devicesagain. - Download the latest SDK Platform-Tools if adb is outdated.
- In Android Studio, use Restart ADB server on the last page of the Connection Assistant.
8. Additional tips and best practices
| Tip | Why |
|---|---|
| Install the driver through SDK Manager if you use Android Studio | SDK Manager flags an out-of-date driver, so you never run an old copy by accident |
Leave android_winusb.inf and the other driver files unedited |
Edits cause security warnings, and changes to other files can break the install |
| Download drivers only from Google or the phone maker | Microsoft warns against drivers from any site other than the manufacturer's official one |
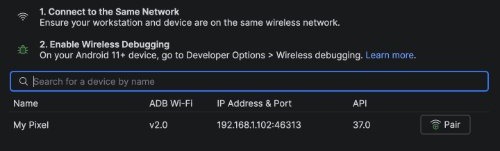
| Use Wireless debugging on Android 11 or later | adb over Wi-Fi skips USB driver installation entirely; on Android 16 it sits at Settings > System > Developer options > Wireless debugging |
| Keep Platform-Tools current | adb and fastboot are backward compatible, so the latest release works with older phones |
Android USB driver for Samsung, Motorola and other phones
The Google USB Driver is for Google devices only. Every other brand ships its own Windows driver, installed with the same Device Manager steps.
| Phone brand | Driver to use | Official source |
|---|---|---|
| Google Pixel, Nexus | Google USB Driver | developer.android.com/studio/run/win-usb |
| Samsung Galaxy | Samsung Android USB Driver for Windows | developer.samsung.com |
| Motorola | Motorola USB driver | Motorola's support portal |
| Lenovo | Lenovo USB driver | support.lenovo.com |
| Xiaomi, Asus, Sony, LG and others | The maker's own USB driver | The support section of the maker's website |
How to uninstall the Google USB Driver in Windows 11
- Connect the phone, right-click Start, and select Device Manager.
- Expand Android Phone.
- Right-click Android Composite ADB Interface and select Uninstall device.
- Select Uninstall to confirm.
- Restart the PC so Windows unloads the driver.
To go back to the previous driver instead, open the device's Properties, select the Driver tab, and select Roll Back Driver.
Google USB Driver FAQ
What is the Google USB Driver?
The Google USB Driver is a Windows driver package from Google that lets adb, the Android Debug Bridge, communicate with Google devices such as Pixel phones over USB. It is needed for app debugging, sideloading and other adb commands on Windows, not for charging or copying photos.
Why is the Google USB Driver needed?
Windows does not ship a driver that exposes the Android debugging interface on Google devices. Without the Google USB Driver, the phone shows up as an unknown device in Device Manager and adb devices returns an empty list, even when USB debugging is on.
Does the Google USB Driver work with Samsung phones?
No. The Google USB Driver covers Google devices only. Samsung publishes its own Android USB Driver for Windows on developer.samsung.com, and other brands such as Motorola, Lenovo and Xiaomi offer their own drivers through their support sites.
Can I install the Google USB Driver without Android Studio?
Yes. Download the standalone ZIP from developer.android.com, extract it, and install it with Device Manager's Update driver wizard. Pair it with the standalone SDK Platform-Tools download to get adb without installing Android Studio.
Where does SDK Manager save the Google USB Driver?
SDK Manager saves the driver in the extras\google\usb_driver folder inside your Android SDK location. The SDK location is shown at the top of the SDK Manager window in Android Studio, and that folder is the one you select in Device Manager.
Do I need the Google USB Driver on a Mac or Linux?
No. macOS and ChromeOS connect to Android devices for adb with no extra driver. On Ubuntu Linux, each adb user must be in the plugdev group instead. The Google USB Driver is a Windows-only package.
Is the Google USB Driver free?
Yes. Google provides the Google USB Driver at no cost. The download page asks you to accept the Android Software Development Kit License Agreement before the ZIP link appears, and the SDK Manager route shows the same license prompt.