Press Win + R, type certmgr.msc and press Enter to open Certificate Manager for your own user account in Windows 11 and Windows 10.
This guide covers what certmgr.msc shows, how it differs from certlm.msc and the MMC snap-in, and how to import, export and check certificates from the console, PowerShell and the command line.
Manage certificates using Certificate Manager or certmgr.msc
Certmgr.msc is the Certificates console for the current user, and it opens without admin rights on Windows 11 and Windows 10.
- Press Win + R to open the Run box.
- Type
certmgr.mscand press Enter. - In the left pane, under Certificates – Current User, expand the store you want, such as Personal or Trusted Root Certification Authorities.
- Select the Certificates folder inside that store to list its certificates in the right pane.
- Double-click a certificate to read its details, or right-click it and open All Tasks to import, export or delete.
Typing Manage user certificates in the Start menu search box opens the same console.
Certmgr.msc vs certlm.msc vs MMC: which certificate tool to use
| Your situation | Use this | Why |
|---|---|---|
| Check or manage your own certificates (email, VPN client, browser login) | certmgr.msc | Opens the Current User store and needs no admin rights |
| Install a certificate every user and service on the PC must trust | certlm.msc | Opens the Local Computer store, which is global to all users |
| Manage a service account's store or both stores in one window | MMC with the Certificates snap-in | Lets you pick My user account, Service account or Computer account and save the console |
| Script the same import or export on many PCs | PowerShell PKI cmdlets | Import-Certificate and Export-PfxCertificate run without the wizard |
| Dump, add or delete store entries from Command Prompt | certutil | Built into Windows, with -user for the user store |
| Developer workflows that already use the Windows SDK | certmgr.exe | A separate command-line tool installed with the Windows SDK, not with Windows |
What is certmgr.msc in Windows?
Certmgr.msc is a saved Microsoft Management Console file that loads the Certificates snap-in pointed at the current user's certificate store.
| Question | Answer |
|---|---|
| What it opens | The Certificates – Current User store for the signed-in account |
| What you can do there | View, import, export and delete certificates in each store folder |
| Where the data lives | The registry under HKEY_CURRENT_USER\Software\Microsoft\SystemCertificates |
| Admin rights | Not needed for your own store; a standard user can manage only their own certificates |
| Machine-wide twin | certlm.msc, which opens Certificates – Local Computer |
| Not to be confused with | certmgr.exe, a command-line tool from the Windows SDK |
How to open Certificate Manager in Windows 11 or Windows 10
Every route below opens the same console. Pick the one that matches where your hands already are.
| Route | What to do | Opens |
|---|---|---|
| Run box | Press Win + R, type certmgr.msc, press Enter |
Current User store |
| Start menu search | Type Manage user certificates and select the result | Current User store |
| Command Prompt, PowerShell or Windows Terminal | Type certmgr.msc and press Enter |
Current User store |
| Run box, machine store | Press Win + R, type certlm.msc, press Enter |
Local Computer store |
| MMC console | Press Win + R, type mmc, then add the Certificates snap-in |
The store you choose |
Certificate Manager is one of several consoles you can launch by name, alongside Windows Services with services.msc and the Computer Management console.
Open the computer-wide certificate store
Certificates that Windows services, IIS, Remote Desktop or every user account must trust belong in the Local Computer store, which certlm.msc opens.
- Sign in with an account that is a member of the local Administrators group.
- Press Win + R, type
certlm.mscand press Enter. - Select Yes if User Account Control asks for permission.
- Under Certificates – Local Computer in the left pane, expand the store you need, such as Personal or Intermediate Certification Authorities.
- Select the Certificates folder to list the machine certificates.
Add the Certificates snap-in manually in MMC
Build your own console when you need a service account's store, or the user and computer stores side by side.
- Press Win + R, type
mmcand press Enter. - On the File menu, select Add/Remove Snap-in.
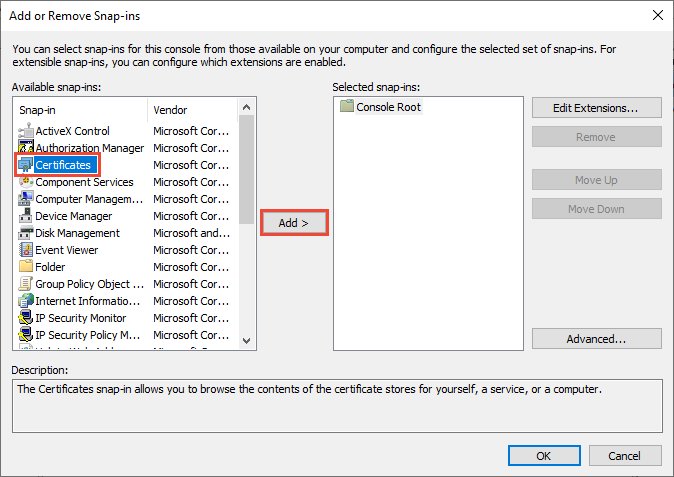
- In the Available snap-ins list, choose Certificates, then select Add.
- In the Certificates snap-in window, select My user account, Service account or Computer account, then select Next or Finish.
- For Computer account, leave Local computer selected in the Select Computer window and select Finish.
- Select OK in the Add or Remove Snap-ins window.
- Optional: on the File menu, select Save As to keep the console as an .msc file for later.
Repeat steps 3 and 4 to add a second Certificates snap-in for another account type in the same console. A standard user can add only My user account.
Important certificate store locations
The console shows friendly folder names. PowerShell, the certutil command-line tool and the registry use short store names, so the table maps one to the other.
| Console folder | Store name | PowerShell path | What goes there |
|---|---|---|---|
| Personal | My | Cert:\CurrentUser\My or Cert:\LocalMachine\My | Certificates you own, usually with a private key |
| Trusted Root Certification Authorities | Root | Cert:\CurrentUser\Root or Cert:\LocalMachine\Root | Root CA certificates Windows trusts |
| Intermediate Certification Authorities | CA | Cert:\CurrentUser\CA or Cert:\LocalMachine\CA | Issuing CA certificates that link a certificate to its root |
| Current User registry location | – | – | HKEY_CURRENT_USER\Software\Microsoft\SystemCertificates |
| Local Computer registry location | – | – | HKEY_LOCAL_MACHINE\Software\Microsoft\SystemCertificates |
| Group Policy machine stores | – | – | HKEY_LOCAL_MACHINE\Software\Policies\Microsoft\SystemCertificates |
Run Get-ChildItem Cert:\ in PowerShell to list every valid store location on your PC.
Import a certificate with certmgr.msc
Import into the store that matches the certificate's job. A root CA file goes in Trusted Root Certification Authorities; your own .pfx goes in Personal.
- Open
certmgr.msc(orcertlm.mscfor the whole PC). - Right-click the target store, such as Personal, point to All Tasks, and select Import.
- On the Welcome to the Certificate Import Wizard page, select Next.
- On the File to Import page, select Browse, pick the certificate file and select Next.
- If the file is password protected, type the password on the Password page and select Next.
- On the Certificate Store page, keep Place all certificates in the following store selected and confirm the store name, then select Next.
- Select Finish, then OK on the confirmation.
Double-clicking a .cer file and choosing Install Certificate starts the same Certificate Import Wizard.
Import certificates with PowerShell
The PKI module's Import-Certificate cmdlet handles .cer, .p7b and .sst files. Use an elevated PowerShell window for any Cert:\LocalMachine path.
Import-Certificate -FilePath 'C:\Certs\RootCA.cer' -CertStoreLocation Cert:\LocalMachine\RootImports the certificate in RootCA.cer into the machine's Trusted Root Certification Authorities store. Change the path to Cert:\CurrentUser\Root for your account only. A file with several certificates must be in .sst format, otherwise only the first one is imported.
You should see: PowerShell prints the imported certificate's Thumbprint and Subject.
For a .pfx file with a private key, run Import-PfxCertificate -FilePath 'C:\Certs\mycert.pfx' -CertStoreLocation Cert:\CurrentUser\My -Password (Get-Credential).Password and type the PFX password when prompted.
Add -Exportable to Import-PfxCertificate if you will need to export the private key later. Without it, the key cannot be exported.
Export a certificate from Certificate Manager
Export without the private key to share a public certificate. Export with the private key only to back up or move your own certificate, and protect that file with a password.
- Open
certmgr.mscand select the Certificates folder of the store that holds the certificate. - Right-click the certificate, select All Tasks, then Export to start the Certificate Export Wizard.
- Select Next, then choose No, do not export the private key or Yes, export the private key.
- On the Export File Format page, pick the format: Base-64 encoded X.509 (.CER) for a public certificate, or the PFX format with Include all certificates in the certification path if possible for a backup.
- If you export the private key, set a password on the Security page and select Next.
- On the File to Export page, select Browse, name the file and select Next.
- Select Finish and wait for The export was successful.
PowerShell does the same job: Export-Certificate -Cert $cert -FilePath C:\Certs\user.cer writes a public .cer file, and Export-PfxCertificate -Cert $cert -FilePath C:\Certs\backup.pfx -Password $pwd writes a protected PFX.
Using the command-line certmgr.exe
Certmgr.exe is a separate command-line tool installed with the Windows 10 SDK, not part of Windows itself. Run it from the Visual Studio Developer Command Prompt or Developer PowerShell.
Typing certmgr in a normal prompt usually opens the certmgr.msc snap-in instead, because the Windows System folder comes first in the Path variable. Call certmgr.exe by its full path under the Windows Kits folder if that happens.
certmgr /add /c testcert.cer /s my/add adds an item, /c says it is a certificate, and /s my targets the system store named my (Personal). Add /r localMachine to target the computer store instead of the default current user store.
You should see: The certificate appears under Personal > Certificates in certmgr.msc. Run certmgr /v /s my to list the store with verbose output.
Other documented forms: certmgr /c /add TrustedCert.cer /s root adds a trusted root, certmgr /put /c /s my newFile saves a chosen certificate to a file, and certmgr /del removes entries.
Check a certificate imported into the right store
- Open
certmgr.msc(orcertlm.msc) and select the Certificates folder of the store you imported into. - Confirm the certificate is listed with the expected subject name, issuer and expiration date.
- Double-click it and check that Windows reports the certificate as valid and trusted.
- In PowerShell, run
Get-ChildItem Cert:\CurrentUser\My(or the store you used) and check the Thumbprint and Subject. - In Command Prompt, run
certutil -user -store Myfor your store, orcertutil -store Myfrom an elevated prompt for the machine store.
Common certmgr.msc problems
The certificate you installed is missing from certmgr.msc
It went into the Local Computer store, which certmgr.msc does not show, or the wizard picked a different store.
- Open
certlm.mscand look in the same store folder there. - If it is in the wrong store, export it and import it again with Place all certificates in the following store and the correct store selected.
- Delete the copy from the wrong store once the new one is in place.
You cannot add Computer account or change the Local Computer store
A standard user can manage only certificates for their own account.
- Sign in with an administrator account, or ask your administrator.
- Open
certlm.mscand accept the User Account Control prompt. - Run PowerShell as administrator for any Cert:\LocalMachine command.
Yes, export the private key is unavailable in the Export wizard
The private key was imported or created as non-exportable.
- Check whether you still have the original .pfx file and its password.
- Re-import that .pfx with
Import-PfxCertificateand the-Exportableswitch. - If no original file exists, request a new certificate from the issuer; a non-exportable key cannot be pulled out of the store.
Typing certmgr opens the console instead of certmgr.exe
The Windows System folder is earlier in the Path variable than the Windows SDK folder.
- Open the Visual Studio Developer Command Prompt.
- Call certmgr.exe by its full path under
%ProgramFiles(x86)%\Windows Kits\10\bin\and the SDK version folder. - Or use
certutilor the PowerShell PKI cmdlets, which ship with Windows.
Only the first certificate in a file is imported by PowerShell
Import-Certificate imports multiple certificates only from an .sst file.
- Export the certificates as a Microsoft Serialized Certificate Store (.SST) file, or with
Export-Certificate -Type SST. - Run
Import-Certificateagain against the .sst file.
A website or app says the certificate chain is not trusted
An intermediate CA certificate is missing from the store the app uses.
- Open
certlm.mscfor server apps such as IIS, orcertmgr.mscfor your own apps. - Right-click Intermediate Certification Authorities, select All Tasks > Import, and import the issuing CA certificate.
- Reload the site or app and confirm the trust warning is gone.
Certificate trust and automatic root updates
Windows keeps its trusted and untrusted root lists current through the Microsoft Root Certificate Program. A component called the CTL Updater downloads updated certificate trust lists from Windows Update every day.
| Item | What it means for you |
|---|---|
| Trusted CTL | The list of root certificates Windows trusts; it feeds the Trusted Root Certification Authorities store |
| Untrusted CTL | Certificates publicly known to be fraudulent, which Windows refuses to trust |
| Download source | ctldl.windowsupdate.com, used by default by the CTL Updater |
| Turning it off | Possible through Group Policy (DisableRootAutoUpdate), but Microsoft does not recommend it |
| Offline networks | Admins can run certutil -syncWithWU to mirror the lists to a share and redirect clients to it |
| Check the last sync | Run certutil -verifyCTL AuthRoot and certutil -verifyCTL Disallowed |
Because Windows refreshes the trusted list on its own, import a root certificate by hand only for a private or company CA.
Certificate Manager quick command reference
| Task | Command | Notes |
|---|---|---|
| Open your user certificates | certmgr.msc | No admin rights needed |
| Open computer certificates | certlm.msc | Admin rights needed to change stores |
| Open a blank console to add the snap-in | mmc | File > Add/Remove Snap-in > Certificates |
| List a PowerShell store | Get-ChildItem Cert:\CurrentUser\My | Shows Thumbprint and Subject |
| Import a .cer into machine roots | Import-Certificate -FilePath file.cer -CertStoreLocation Cert:\LocalMachine\Root | Elevated PowerShell |
| Import a .pfx | Import-PfxCertificate -FilePath file.pfx -CertStoreLocation Cert:\CurrentUser\My | Add -Password and -Exportable as needed |
| Export a public certificate | Export-Certificate -Cert $cert -FilePath file.cer | No private key |
| Export with private key | Export-PfxCertificate -Cert $cert -FilePath file.pfx -Password $pwd | Key must be exportable |
| Dump your Personal store | certutil -user -store My | Drop -user for the machine store |
| Add a file to a store | certutil -addstore Root file.cer | Machine store; elevated prompt |
| Delete from a store | certutil -delstore My CertId | CertId can be a serial number or hash |
| Save Windows Update roots to a file | certutil -generateSSTFromWU WURoots.sst | Open the .sst to browse the roots |
Certmgr.msc and Certificate Manager FAQ
What does certmgr.msc do?
Certmgr.msc opens the Certificates console for the signed-in user in Windows 11 and Windows 10. From it you can view, import, export and delete the certificates in your Personal, Trusted Root Certification Authorities and other user stores without admin rights.
What is the difference between certlm.msc and certmgr.msc?
Certmgr.msc opens the Current User store, which belongs only to your account. Certlm.msc opens the Local Computer store, which applies to every user and service on the PC and needs administrator rights to change.
Where is Certificate Manager in Windows 11?
Open Certificate Manager in Windows 11 by typing Manage user certificates in Start search, or by pressing Win + R, typing certmgr.msc and pressing Enter.
What is the Certificate Manager command in Windows 11?
The command is certmgr.msc for your user certificates and certlm.msc for the computer's certificates. Both run from the Run box, Command Prompt, PowerShell or Windows Terminal.
What is stored in the Personal folder of certmgr.msc?
The Personal folder, store name My, holds certificates issued to you, usually with a matching private key. Examples include client authentication, VPN and email signing certificates. In PowerShell it maps to Cert:\CurrentUser\My.
Is certmgr.msc the same as certmgr.exe?
No. Certmgr.msc is the Certificates snap-in built into Windows. Certmgr.exe is a command-line Certificate Manager tool installed with the Windows SDK, and running it with no options opens the certmgr.msc snap-in.
Do I need admin rights to use Certificate Manager?
Not for your own certificates. Certmgr.msc works as a standard user. Changing the Local Computer store through certlm.msc, MMC Computer account or Cert:\LocalMachine requires membership in the Administrators group.
Can I manage certificates on Windows 11 with PowerShell instead?
Yes. The built-in PKI module provides Import-Certificate, Import-PfxCertificate, Export-Certificate and Export-PfxCertificate, and Get-ChildItem lists any store through the Cert: drive.
Bottom line: certmgr.msc or certlm.msc?
Use certmgr.msc for anything tied to your own account and certlm.msc for certificates that services or every user must trust; switch to PowerShell when you repeat the task. Most certificate problems come from importing into the wrong store, and choosing the console by scope removes that mistake. The PKI cmdlets then make the same import repeatable across PCs without clicking through the wizard.