To make a Facebook event, open Events in the left menu, click + Create new event, enter the name, date and time, choose who can see it and click Create event.
This guide covers every step on a computer, the same job in the Facebook app, private and Page events, and what to do when an option is missing or locked.
How to make a Facebook event
These are the shortest steps for an in-person event on a computer. The numbered steps further down explain each choice.
- From your Feed, click Events in the left menu. Click See more first if you do not see it.
- Click + Create new event.
- Enter the Event name and the start date and time.
- Click Is it in person or virtual? and select In person.
- Click Who can see it? and select who can see and join the event.
- Add the location, description and cover photo, then click Create event.
Check the privacy choice before you click Create event. Facebook does not let you change it afterwards.
Why use Facebook Events?
An event page gives you one place for the details, the guest list and any updates. It suits a birthday as well as a public class or sale.
| What you need | What the event page does |
|---|---|
| Reach people quickly | Invite up to 500 people yourself, by name, email address or phone number |
| Know who is coming | Guests respond, and you can read the guest list from the event |
| Keep details in one place | Location, description, cover photo and date all sit on the event page |
| Plan with others | Co-hosts can invite people and edit the event details |
| Remind guests | Guests can add the event to a calendar with an .ics file |
Guests do not always need an account. On some events you can invite people by email or SMS, and they can respond through a link. Anyone curious can also view Facebook without an account when an event is public.
Step 1: Log into your Facebook account
Events belong to the profile or Page you are using when you create them, so check that first.
- Go to facebook.com or open the Facebook app, and log in.
- Select your profile picture in the upper-right corner to see which profile you are using.
- Select See all profiles and choose your Page if the Page should host the event.
If you want events kept apart from your main profile, you can make a new Facebook account. If you are locked out, recover your Facebook account first.
Step 2: Locate the ‘Create event’ feature
The button sits in the Events area on both the website and the app, but the path differs.
| Where you are | Path to the create screen |
|---|---|
| Facebook on a computer | Feed > Events in the left menu (See more if hidden) > + Create new event |
| Facebook mobile app | Menu in the top right > Events > + Create at the top |
| A Facebook group | Group page > Write something… > Add to your post > Create event |
Step 3: Choose the type of event
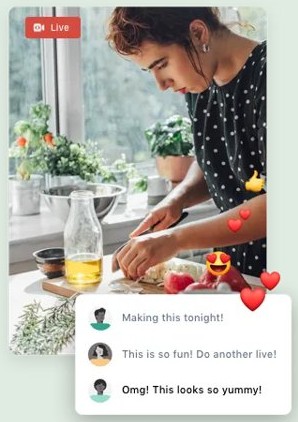
Click Is it in person or virtual? on the create screen. For a virtual event, Facebook then asks how it will run.
| Event type | Choose it when | What guests need from you |
|---|---|---|
| In person | Guests meet at a physical place | A location or address |
| Virtual: Facebook Live | You expect more than 50 guests and will broadcast on Facebook | The start time |
| Virtual: External link | The event happens somewhere off Facebook | The link and joining details in the description |
| Virtual: Other | None of the other formats fits | Clear instructions on how to take part |
You can change between online and in-person later with Edit, so this choice is not permanent.
Step 4: Enter basic event details
Keep the name specific, because people decide from the name, date and cover photo.
- Type the Event name.
- Set the start date and time.
- Click Repeat event if this is a recurring event.
- Search for or type the location or address for an in-person event.
- Add the event information under What are the details?
Hosts can edit the name and description later. Facebook says the date and time can be changed up to a couple of days before the event, so set them carefully.
Step 5: Set up additional details (optional but recommended)
None of these block you from publishing, but each one reduces the questions guests send you.
| Detail | How to add it | Worth knowing |
|---|---|---|
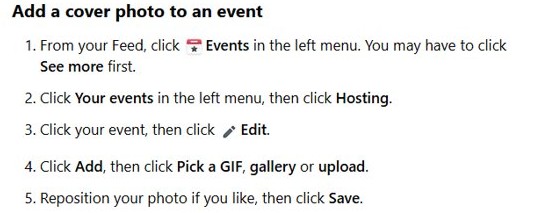
| Cover photo | Click Add, then pick a GIF, a photo from your gallery or an upload | You can adjust the position, but not the size once it is added |
| Co-hosts | Click Add co-hosts and type a friend's name | Only Facebook friends can be added; a Page can add another Page |
| Show guest list | Set it in the event settings | Available for private, friends and public events |
| Photos or videos | After publishing, click Add a post > Photo/video | Guests see these on the event page |
A flyer works well as the cover photo, as long as the date and place are also in the event details where people can read and search them.
Step 6: Choose the event’s visibility and posting preferences
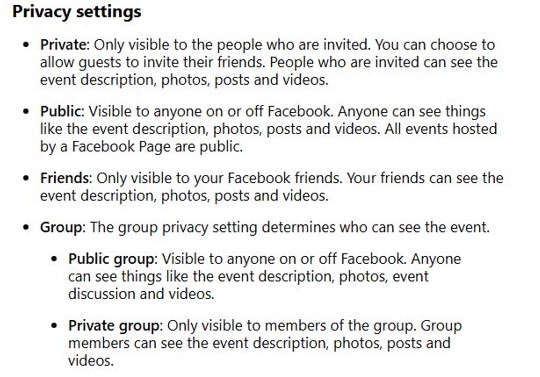
Click Who can see it? This is the one decision you cannot undo, so match it to the audience you want.
| Setting | Who sees the event | Settings you get |
|---|---|---|
| Private | Only people who are invited | Co-hosts, Show guest list |
| Public | Anyone, on or off Facebook | Co-hosts, Show guest list, Only hosts can post, Posts must be approved by host |
| Friends | Only your Facebook friends | Co-hosts, Show guest list |
| Group | Follows the group: anyone for a public group, members only for a private one | Co-hosts |
Events hosted by a Facebook Page are always public, so this menu does not apply to them.
Step 7: Review and publish your event
Facebook publishes the event as soon as you click the button, so check it first.
- Check that the date, time and location are correct.
- Reread Who can see it?, since the setting locks when you publish.
- For a private event, decide whether guests can invite their friends, since this setting also locks.
- Click Create event, or tap Create in the app.
- Open the event page and check how the cover photo and description look.
Step 8: Promote your Facebook event
Direct invitations are the strongest route. Each person can send up to 500 invitations per event, and Facebook can lower that for a short time if many go unanswered.
- Open your event from Events and click Invite below the cover photo.
- Search by name, email address or phone number, and click each friend you want to invite. Use the left-menu filters for groups, locations and past events.
- Select Invite with email or Invite with SMS for people without accounts, where the option appears.
- Click Send Invitations.
- Add co-hosts if you need more invitations on a private event, because each can send their own.
- For a public event, copy the event's address from your browser and post it wherever your audience already is.
Inviting people off Facebook has limits. They can respond through the link, but they can also unsubscribe or block further invitations from you.
Step 9: Engage with your attendees
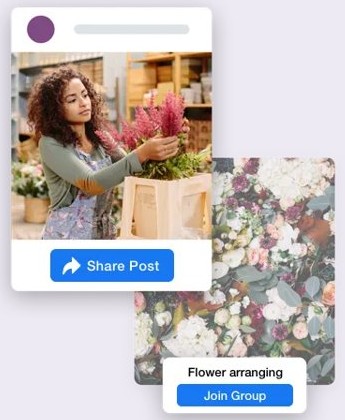
Once the event is live, hosts have two main channels for reaching guests: posts on the event and direct messages.
- Open Events > Your events > Hosting, and select your event.
- Click Add a post to share an update, and choose Photo/video to attach pictures.
- On a private event, scroll to Guest list and click Message next to a guest to contact them directly.
- On a large public event, post in the event discussion, because messaging the guest list may not be available above a certain size.
- Remind guests that they can use Options > Add to calendar on a computer to save the date.
Step 10: Manage your event
Open Events > Your events > Hosting, select the event and click Edit. Make your changes and click Save. In the app, tap Menu first and follow the same labels.
| You want to change | Can you? | How |
|---|---|---|
| Name, description or cover photo | Yes | Edit, then Save |
| Date and time | Yes, up to a couple of days before | Edit, then Save |
| In-person location | Yes, until the start time | Edit > Add location |
| Online format or event type | Yes | Edit, then Save |
| Guest list visibility or co-hosts | Yes | Edit, then Save |
| Remove a guest | Yes | Guest list > See all > Options > Remove |
| Privacy or Guests can invite friends | No | Cancel the event and create it again |
People are not told when you remove them from a guest list. A guest who removes themselves cannot be added back.
How to create a Facebook event in the app
The app has fewer screens than the website, but the same rule applies to privacy.
- Open the Facebook app and tap the Menu icon in the top right.
- Tap Events, then + Create at the top.
- Tap Privacy and choose who can see and join the event.
- Enter the event details.
- Tap Create.
How to make a Facebook event private
Set this while you create the event. A private event shows its description, photos, posts and videos to invited people only.
- From your Feed, click Events in the left menu.
- Click + Create new event, then select In person or Virtual.
- Add the event details.
- Click Who can see it? and select Private.
- Decide whether guests can invite friends. Those guests can invite people you may not know.
- Finish the prompts and click Create event.
How to make a private Facebook event public
You cannot switch an existing event from private to public, or from public to private. The only route is to replace it.
- Note the existing event's details, photos and the people you invited.
- Create a new event and select Public under Who can see it?
- Invite the same guests to the new event.
- Post in the old event to send people to the new one.
- Open the old event, click Options > Cancel event, choose Cancel event and click Confirm.
Cancel rather than delete if guests still need your redirect post, because people can still post in a cancelled event.
How to make a Facebook event on a business page
Switch into the Page first, or the event is created under your personal profile. All events hosted by a Page are public.
- Select your profile picture in the upper-right corner.
- Select See all profiles, then choose your Page.
- From your Feed, select Events in the left menu.
- Select + Create new event.
- Enter an Event name, set the date and time, and choose In person or Virtual.
- Add information under What are the details? and select Create event.
Facebook's paid event option is limited to Page accounts, and ticket cost cannot be edited after the event is created.
How to make a Facebook post an event in a group
In a group, the event starts from the same box you use to write a post, so there is no separate screen to find.
- Go to facebook.com/groups and select your group.
- Click Write something…, then Add to your post, and select Create event.
- Enter your event details.
- Select Invite all members of [group name] to invite everyone. In a private group, you can invite only friends who are also in the group.
- Click Create event.
How to make a Facebook event shareable
Whether people outside your invite list can reach the event depends on the privacy setting you chose when you created it.
| Event setting | Can it spread beyond your invites? | Best way to share it |
|---|---|---|
| Public | Yes, anyone on or off Facebook can see it | Send the event's address anywhere |
| Private with guests allowed to invite | Yes, through guests' invitations | Ask guests to invite their friends |
| Private without that option | No | Send more invitations yourself or add co-hosts |
| Friends | Only to your Facebook friends | Invite the friends you want directly |
| Group | Follows the group's privacy | Invite group members from the event |
Where to find your Facebook events after publishing
Every event you host is listed in one place. Open it to confirm it went live with the right details.
- From your Feed, click Events in the left menu.
- Click Your events, then Hosting.
- Select your event and check its date, location and cover photo.
- Scroll to Guest list and click See all to view your guests.
How to delete or cancel a Facebook event
Deleting removes everything and cannot be restored. Cancelling keeps the event, stops you from making changes, and still lets people post in it.
- From your Feed, click Events and go to your event page.
- Click Options and select Cancel event. In the app, tap Menu > Events > Your events > Hosting, select the event, scroll down and tap Cancel event.
- Select Cancel event or Delete event.
- Click Confirm.
Invitees who have not declined or removed themselves are notified when you delete an event. If you delete by accident, you have to create a new event.
Tips for making a Facebook event
Small choices made during setup decide how many people respond.
| Tip | Why it helps |
|---|---|
| Decide privacy before anything else | It is the one setting you cannot edit later |
| Put the real date and time in the first draft | Date changes are limited as the event gets close |
| Pick the cover photo carefully | Guests see it on the event, and you cannot resize it after adding it |
| Add a co-host for a big event | Each can send invitations, and that raises your reach on a private event |
| Write joining instructions in the description | Virtual events using External link or Other depend on them |
Additional tips for successful Facebook event planning
These matter most once the event is live and the guest list starts to grow.
| When | What to do |
|---|---|
| Right after publishing | Send your first invitations, keeping the 500-per-person limit in mind |
| When a public event gets busy | Turn on Posts must be approved by host or Only hosts can post to control the discussion |
| As the date approaches | Post an update to the event, then add the event to your own calendar |
| If plans change | Edit the location up to the start time, and post a note so guests see it |
| If the event cannot go ahead | Choose Cancel event so guests can still see and post in it |
Troubleshooting common issues
You cannot make a Facebook event private or public after creating it
Facebook locks the privacy setting when the event is created.
- Create a new event with the setting you want.
- Invite your guests to the new event, then cancel the old one with Options > Cancel event.
The option to create an event is missing in a group
Group admins may not allow this type of post.
- Click Write something… and check Add to your post for Create event.
- Ask a group admin to allow it, or to post the event for you.
You cannot invite more people to your Facebook event
Each person can send up to 500 invitations per event, and the limit can drop for a short time if many go unanswered.
- Wait a while before you send more, since a reduced limit lasts a short time.
- Add a co-host on a private event, who can send their own invitations.
- Look for Invite with email or Invite with SMS if the people have no account, since this option is not available on all events.
A guest cannot be added back to your event
Someone who removed themselves from an event cannot be added back by you.
- Send the guest the event's address if the event is public, so they can open it and respond themselves.
- Use a different channel to give them the details if the event is private.
You cannot change the event date
Facebook says date and time can be changed up to a couple of days before the event.
- Open Events > Your events > Hosting, select the event and click Edit.
- If the change will not save, create a new event with the new date, and cancel the old one.
Facebook event FAQ
How do Facebook events work?
A Facebook event is a page for a planned occasion, with its own details and guest list. Hosts create it and invite people, guests respond, and hosts can edit details and post updates until the event happens.
How can I edit my event after creating it?
Open Events, click Your events, then Hosting. Select the event, click Edit, make your changes and click Save. You can change the name, date, location, description and cover photo, but not the privacy setting.
Can I make my event private?
Yes, if you choose Private under Who can see it? while creating the event. You cannot change an existing public event to private, so cancel it and create a new private event if the setting is already wrong.
How to make a Facebook event public?
Select Public under Who can see it? when you create the event. Public events are visible to anyone on or off Facebook, and all events hosted by a Page are public. An existing private event cannot be switched.
How do I delete an event?
Go to your event page, click Options, select Cancel event, then choose Delete event and click Confirm. Deleting is permanent and cannot be restored. Invitees who have not declined are notified about the deletion.
How can I invite more people after the event is created?
Open the event and click Invite below the cover photo, then search by name, email address or phone number and click Send Invitations. Each person can send up to 500 invitations per event.
Can guests invite others to a private event?
Yes, if you allow it when you create the event. Those guests can invite people you may not know, including people who do not use Facebook or Messenger. This setting cannot be edited after the event is created.
How to make a Facebook event page?
Creating an event produces its own page automatically. From your Feed, open Events, click + Create new event, add the details and click Create event. The event's page then holds the guest list, posts and photos.
How to do an event on Facebook from a phone?
Open the Facebook app, tap Menu in the top right, tap Events, then + Create at the top. Tap Privacy to choose who can see and join, enter the event details, then tap Create.
How to make a Facebook event cover photo?
Open the event from Your events, click Edit, then click Add and pick a GIF, a gallery photo or an upload. Adjust its position and save. The size cannot be edited once the cover photo is added.