To test a microphone on Windows 10, open Start > Settings > System > Sound, speak normally, and watch the Test your microphone line move under Input.
This guide also covers the Sound Control Panel, app permissions, speech recognition, playback and online tests, Windows 11, and the fixes to try when the line stays flat.
How to test microphone on Windows 10
This check needs no extra software and works the same for a built-in, USB or headset microphone.
- Connect the microphone to your PC if it is not built in.
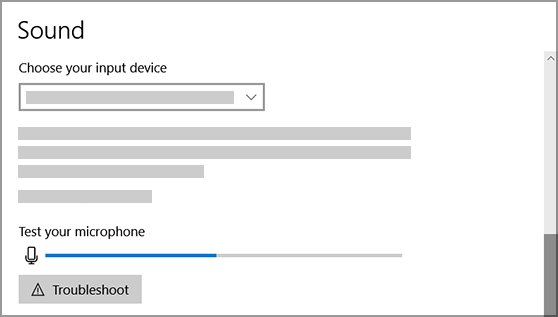
- Select Start > Settings > System > Sound.
- Under Input, pick your microphone in Choose your input device.
- Speak normally and watch Test your microphone.
A line moving from left to right means Windows is picking up sound. A flat line means it is not, so work through the fixes further down this page.
1. Windows 10 sound settings
The same Sound page holds the controls that decide what the test shows. Check these when the line moves weakly or the wrong device responds.
| What you want to check | Where to find it | What to do |
|---|---|---|
| Which microphone Windows is listening to | Input > Choose your input device | Select the microphone you are speaking into |
| Whether the microphone is switched off in Windows | Input > Device Properties | Clear the Disable check box |
| Whether the microphone is loud enough | Device Properties > Levels tab | Move the Microphone and Microphone Boost sliders, then select OK |
| Whether the change helped | Input > Test your microphone | Speak again and compare how far the line travels |
You can adjust the rest of your sound and microphone settings from this page too, including the output device for your speakers.
2. Sound Control Panel
This older dialog lists your recording devices on one tab. Use it when you want to reach the Levels sliders directly or set a default device for calls.
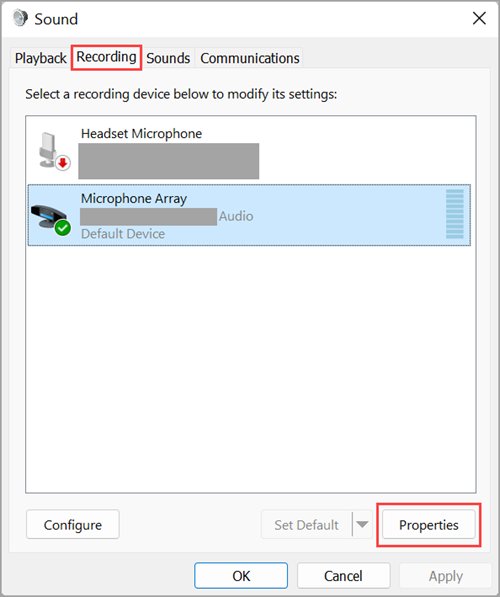
- Select Start > Settings > System > Sound, then select Sound control panel.
- Select the Recording tab.
- Select your microphone, then select Properties.
- Open the Levels tab and adjust the Microphone slider.
- Adjust Microphone Boost too, if your device shows that slider.
- Select OK, then speak while watching Test your microphone in Sound settings.
You can also open this dialog from Control Panel > Hardware and Sound > Sound. Microsoft suggests Microphone at 50 and Microphone Boost at +24.0 dB as a starting point on Surface devices.
For calling apps, select the microphone on the Recording tab and choose Set Default Communication Device.
3. Which apps can use your microphone?
A microphone can pass the Settings test and still be silent in an app, because Windows controls app access separately.
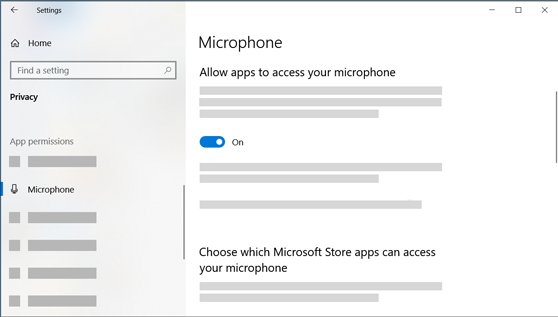
- Select Start > Settings > Privacy > Microphone.
- Under Allow access to the microphone on this device, select Change and turn Microphone access for this device on.
- Turn on Allow apps to access your microphone.
- Under Choose which Microsoft Store apps can access your microphone, turn on the app you want to use.
- Turn on Allow desktop apps to access your microphone for programs installed outside the Microsoft Store.
The list under the desktop apps switch shows the programs Windows has detected using the microphone. A microphone icon also appears in the taskbar notification area while an app is using it.
4. Equalizer APO with Peace GUI
Equalizer APO is a third-party audio tool, and Peace is a separate interface for it. Microsoft makes neither one, and neither is required to test a microphone.
An audio processing object, or APO, applies software-based signal processing to a Windows audio stream. That makes this pair a tool for shaping sound, while the built-in tools below answer most test questions.
| Your question | Use this | Why |
|---|---|---|
| Does the microphone pick up sound? | Test your microphone in Sound settings | Built into Windows 10, with nothing to install |
| What do I sound like? | Make a test call in Microsoft Teams | Records a short message and plays it back |
| Why is my voice so quiet? | Levels tab in the Sound Control Panel | Holds the volume and boost sliders |
| Can I change the tone of the microphone? | Equalizer APO with Peace GUI | Equalizing is the job this pair exists for |
Follow the developer's own instructions for installation and supported Windows versions, because those details change between releases.
5. Speech recognition
Windows 10 speech tools include a microphone setup that walks you through a guided check, which suits anyone who plans to dictate.
- Select Start > Settings > Time & Language > Speech.
- Under Microphone, select Get started and follow the prompts.
- Search the taskbar for Windows Speech Recognition and open it.
- If the voice training welcome dialog does not appear, open Control Panel > Ease of Access > Speech Recognition > Train your computer to understand you better.
- Complete the setup prompts to finish training speech recognition.
Voice access replaced Windows Speech Recognition on Windows 11 22H2 and later in September 2024, so this route fits Windows 10 and older versions.
Test your microphone configuration
The Settings line proves Windows hears sound, but it does not tell you how you sound. A Microsoft Teams test call records your voice and plays it back through your chosen devices.
- Open the Teams desktop app.
- Select Settings and more > Settings.
- Select Devices.
- Under Audio settings, pick your microphone in the Microphone list.
- Select Make a test call.
- Follow the prompts from Test Call Bot and record a short message.
- Listen to the playback, then read the summary and change your device settings if needed.
Teams deletes the recording right after the call. The test call is available only in English and does not exist in Teams for web.
Microphone test Windows 10 online
A browser test shows whether a website can reach your microphone, which the Settings line cannot tell you. If you searched for a Google test of your microphone on Windows 10, Google Meet is the route to use.
| Online tool | How to run the test | What a working microphone shows |
|---|---|---|
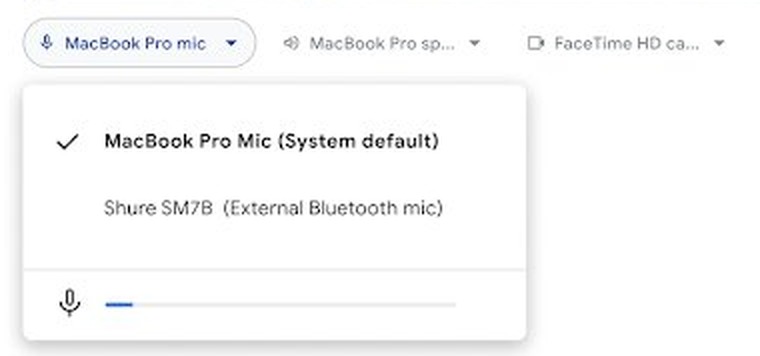
| Google Meet | Go to meet.google.com and select a meeting. In the preview tile, select More options > Settings > Audio, click Microphone and speak | The mic bar moves |
| Zoom | Go to zoom.us/test and join the test meeting | The test meeting checks your internet and device settings |
If the Settings line moves but a browser test stays silent, check Allow desktop apps to access your microphone in the privacy settings.
How to test microphone Windows 11
Windows 11 uses the same Sound page, but the test sits on the microphone's own Properties page and plays your voice back.
- Select Start > Settings > System > Sound.
- Under Input, select your microphone, then select the > arrow next to it to open Properties.
- Under Input settings, select Start test and speak normally.
- Select Stop test, then select Play to hear the recording.
- Move the Input volume slider if the recording is too quiet or too loud.
For a longer sample, the Sound Recorder app starts recording when you press Ctrl + R. Windows 11 can also set a preferred microphone for different apps.
Test microphone Windows 10 laptop
The test is identical on a laptop. What changes is the check to make first, because each type of microphone fails in its own way.
| Microphone type | Check this first | Then |
|---|---|---|
| Built-in laptop microphone | Look for it in Choose your input device, where it may appear as Microphone Array | Select it, speak and watch the line |
| Webcam with a built-in microphone | Start > Settings > Privacy > Camera, with camera access turned on | Select the webcam microphone under Input |
| USB microphone or headset | The Mute button on the headset and the cable connection | Try a different USB port if it does not appear |
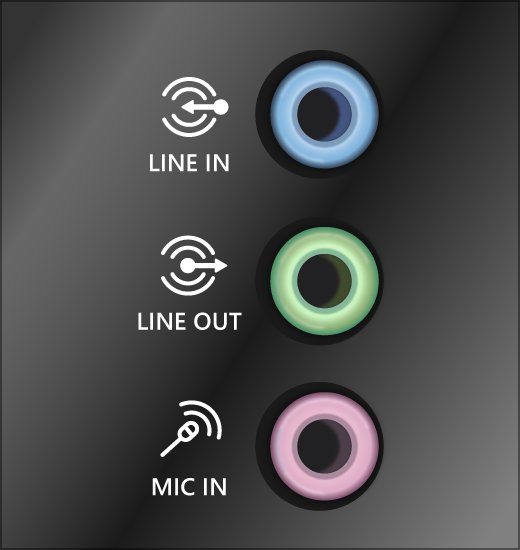
| Microphone with an audio plug | The correct jack, which is pink or labeled microphone on some systems | Select it under Input and speak |
| Bluetooth headset | That it is paired and connected | Select it under Input and speak |
Tips for testing your microphone on Windows 10
A test only tells you something if you run it under the same conditions as the real call or recording.
| Tip | Why it matters |
|---|---|
| Speak at your normal volume and position | Shouting into the microphone hides a level that is too low for a call |
| Check the headset Mute button first | A muted headset looks exactly like a dead microphone |
| Test one input at a time | A second microphone can be the one Windows is listening to |
| Test again in the app you plan to use | Apps such as Teams have their own Microphone list, separate from Windows |
| Change one slider at a time | You can tell which change raised the level or added noise |
| Listen for echo on a test call | You can fix mic echo once playback confirms the problem |
Microphone test Windows 10 not working
The Test your microphone line does not move
The microphone is muted, poorly connected, disabled or not the selected input.
- Check whether the Mute button on your headset is active.
- Confirm the microphone or headset is connected properly, and pair a Bluetooth device again if needed.
- Open Start > Settings > System > Sound and pick the microphone in Choose your input device.
- Select Device Properties and make sure the Disable check box is clear.
- Speak again and watch Test your microphone.
Windows 10 does not detect the microphone
The audio driver is missing or damaged.
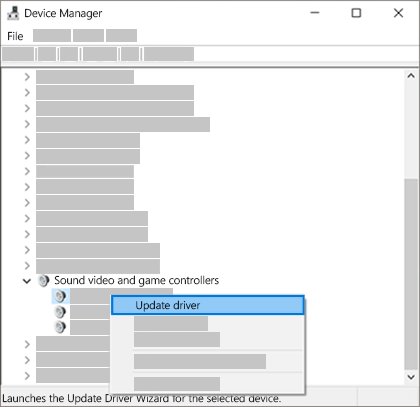
- Right-click Start and select Device Manager.
- Expand Sound, video and game controllers.
- Right-click the audio device, select Uninstall device, tick Delete the driver software for this device, then select Uninstall.
- Restart your PC.
- If Windows does not reinstall the device, right-click Sound, video and game controllers and select Scan for hardware changes.
- Right-click the audio driver and select Update driver.
The microphone works in Settings but not in an app
Windows privacy settings are blocking the app.
- Select Start > Settings > Privacy > Microphone.
- Turn on Allow apps to access your microphone.
- Turn on the app in the Microsoft Store list, or turn on Allow desktop apps to access your microphone.
- Reopen the app and pick the microphone in its own audio settings.
The microphone test shows a very low level
The microphone is badly positioned or its level is set too low.
- Confirm the microphone or headset is positioned correctly.
- Open Start > Settings > System > Sound and select Device Properties under Input.
- On the Levels tab, raise Microphone and Microphone Boost, then select OK.
- Speak while watching Test your microphone.
The microphone test still fails after those checks
Windows can look for a recording problem automatically.
- Select Settings > Update & Security > Troubleshoot.
- Select Additional troubleshooters.
- Select Recording Audio and run the troubleshooter.
If the device still does not appear, try these fixes for an undetected microphone.
Windows 10 microphone test FAQ
How do I check my microphone in Windows 10?
Open Start > Settings > System > Sound, pick the microphone under Input, and speak normally. If the Test your microphone line moves from left to right, Windows is picking up sound from that device.
How do I test the microphone on my computer in Windows 10?
Use the Test your microphone line in Sound settings first, because it needs no extra software. To hear your own voice, make a test call in the Microsoft Teams desktop app, which records a short message and plays it back.
Why isn't my microphone working on Windows 10?
The usual causes are a muted headset, a loose connection, the wrong input device, a disabled device, blocked app permissions or a faulty driver. Check them in that order, starting with the headset button and the Input list in Sound settings.
How do I fix low microphone volume?
Open Sound settings, select Device Properties under Input, and raise the Microphone and Microphone Boost sliders on the Levels tab. Not every device shows Microphone Boost. Check the microphone's position as well, then speak while watching the test line.
Can I use any microphone with Windows 10?
Windows 10 lists connected microphones under Input, whether they use USB, an audio jack or Bluetooth. If yours does not appear, check the connection, pair it again if it is Bluetooth, and then update or reinstall the audio driver in Device Manager.
How do I stop background noise on my microphone?
Turn on Noise suppression in Teams under Settings > Devices, or Noise cancellation in Google Meet under Settings > Audio on supported plans. Microphone Boost raises the strength of the signal, so lower it if a high setting makes the noise worse.
Is there a quick way to access sound settings?
Yes. Select Start > Settings > System > Sound to reach the Input section directly. Right-clicking the Speakers icon on the taskbar also opens volume options such as Open Volume mixer, which helps you check that nothing is muted.