To connect to a network printer in Windows 11, open Settings > Bluetooth & devices > Printers & scanners, select Add device, and select Add device next to the printer when it appears.
If the printer is not found, this guide shows how to connect through a shared printer path, the printer's IP address, Control Panel, Command Prompt and PowerShell on Windows 11 and Windows 10.
Use Add printers & scanners
This is the fastest route for any printer that is on and connected to the same network as the PC. Windows finds it, installs a driver and adds it in one pass.
- Turn the printer on and confirm it is connected to the same network as the PC.
- On Windows 11, open Start > Settings > Bluetooth & devices > Printers & scanners.
- Select Add device next to Add a printer or scanner and wait while Windows searches.
- Select Add device next to your printer when it appears in the list.
- On Windows 10, open Settings > Devices > Printers & scanners, select Add a printer or scanner, choose the printer, and select Add device.
- Wait for the status to change to Ready or Idle.
If the printer still needs to join Wi-Fi first, connect the wireless printer to your network from its control panel, then repeat these steps.
Turn on network discovery and file and printer sharing
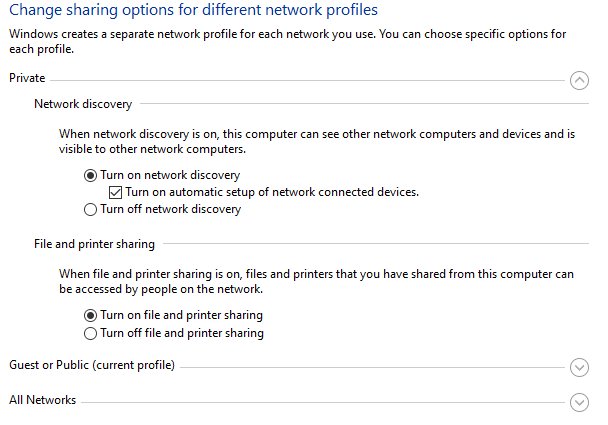
Windows can only see shared printers and other PCs when both of these settings are on, on both the host PC and the PC you are connecting from.
- Open Start > Settings > Network & internet > Advanced network settings.
- Select Advanced sharing settings.
- Turn on Network discovery for the network profile you use.
- Turn on File and printer sharing.
- Save the change if Windows shows a save button.
- Make sure both PCs are on the same local network, not one on a guest network.
Share a printer on the network from the host PC
A printer plugged into one PC by USB becomes a network printer once that PC shares it. Do this on the host PC before connecting from other PCs.
- On the host PC, open Settings > Bluetooth & devices > Printers & scanners.
- Select the printer you want to share.
- Select Printer properties.
- Open the Sharing tab and tick Share this printer.
- Check the Share name and write it down with the host PC's name.
- Select Apply, then OK.
The host PC must stay on and awake for others to print to a printer shared this way.
Connect to a network printer through a network share
Use the host PC name and the printer share name when Windows does not list a shared printer on its own. The path format is \\ComputerName\PrinterShareName.
- Open Settings > Bluetooth & devices > Printers & scanners and select Add device.
- Select Add manually next to The printer that I want isn't listed.
- Choose Select a shared printer by name.
- Type the path, for example
\\OFFICE-PC\HPLaserJet, and select Next. - Enter the host PC's username and password if Windows asks for them.
- Allow the driver install if prompted, then select Next and Finish.
You can also open File Explorer, type \\ComputerName in the address bar and press Enter. Right-click the shared printer in the window that opens and select Connect.
Connect to network printer via IP address
Adding a printer by IP address works when Windows cannot discover it, or when the printer sits on a different subnet. Print the printer's network configuration page to get the address, or find the printer on your network from Windows.
- Open Printers & scanners, select Add device, then Add manually.
- Choose Add a printer using an IP address or hostname and select Next.
- For a Mopria-certified printer, set Device type to IPP Device; for others, pick the device type your printer maker lists.
- Type the printer's IP address in Hostname or IP address and select Next.
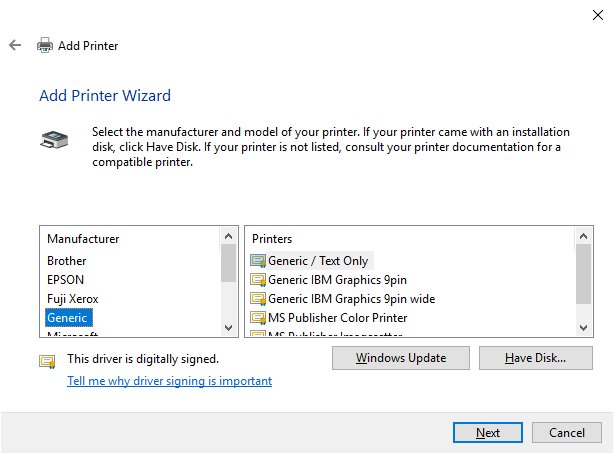
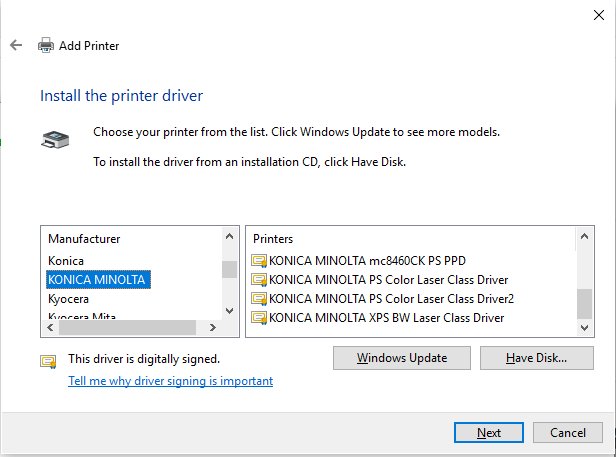
- Pick the manufacturer and model when Windows asks for a driver, or select Have Disk for a maker's .inf file.
- Name the printer, choose whether to share it, and select Next.
- Select Print a test page, then Finish.
Reserve the printer's IP address in your router so the connection keeps working after the router restarts.
Connect to network printer via Control Panel
Control Panel opens the same Add Printer wizard that the Settings app uses for manual installs. It suits people used to Windows 10 and older versions.
- Select Start, type
Control Panel, and press Enter. - Under Hardware and Sound, select View devices and printers.
- Select Add a printer at the top of the window.
- If the printer is not listed, select The printer that I want isn't listed.
- Choose Select a shared printer by name or Add a printer using an IP address or hostname, then select Next.
- Enter the share path or IP address and finish the wizard.
- If Control Panel opens the Printers & scanners page instead, use the Settings steps above.
Connect to a network printer via PowerShell
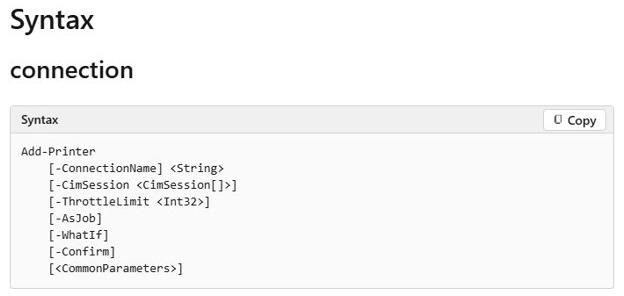
The Add-Printer cmdlet connects to a shared printer in one line, which helps when you set up several PCs. Open PowerShell from Start; connecting to a share does not need an elevated window on most PCs.
Add-Printer -ConnectionName \\printServer\printerNameAdds a connection to the shared printer printerName on the computer or print server printServer for the signed-in user. Replace both names with your own.
You should see: The command returns to the prompt with no error, and the printer appears in Printers & scanners and in the output of Get-Printer.
To add a printer by IP address instead, run PowerShell as administrator, create a TCP port with Add-PrinterPort -Name "IP_192.168.1.50" -PrinterHostAddress "192.168.1.50", then add the printer with Add-Printer -Name "Office printer" -DriverName "<installed driver name>" -PortName "IP_192.168.1.50". Run Get-PrinterDriver to see the exact driver names already installed.
Add a network printer from Command Prompt with printui
The printui command connects to a remote network printer from Command Prompt or a script. It also adds a connection for every user of a PC.
- Select Start, type
cmd, and open Command Prompt. - Type
rundll32 printui.dll,PrintUIEntry /in /n\\ComputerName\PrinterShareNameand press Enter to connect for the current user. - To add the connection for every user of the PC, open Command Prompt as administrator and run
rundll32 printui.dll,PrintUIEntry /ga /n\\ComputerName\PrinterShareName. It applies when each user next signs in. - To remove a network printer connection, run
rundll32 printui.dll,PrintUIEntry /dn /n\\ComputerName\PrinterShareName.
Shared printer path vs IP address in Windows
| Your situation | Connect this way | Why |
|---|---|---|
| Printer appears when Windows searches | Add Printers & Scanners | One click, driver installed automatically |
| USB printer shared from another PC | Network share path | The host PC handles the printer; you only need its name |
| Printer has its own network port or Wi-Fi | IP address | No host PC needs to stay on |
| Printer is on another subnet or not discovered | IP address | Discovery does not cross subnets, a direct address does |
| Setting up many PCs | PowerShell or printui | One line per PC, easy to script |
Print a test page to a network printer
- Open Settings > Bluetooth & devices > Printers & scanners and select the printer.
- Check that its status reads Idle or Ready, not Offline.
- Select Print a test page (on some versions, open Printer properties and select Print Test Page).
- Collect the page from the printer and confirm the printer name and port on it match the one you added.
Any other ways to connect to a network printer?
| Other route | Where to find it | Best for |
|---|---|---|
| Bluetooth, wireless or network discoverable printer | Add manually > Add a Bluetooth, wireless or network discoverable printer | Printers that advertise themselves but did not show in the first search |
| Older printer finder | Add manually > My printer is a little older. Help me find it. | Older network printers |
| Local printer or network printer with manual settings | Add manually > Add a local printer or network printer with manual settings | Choosing an existing port and driver yourself |
| Printer maker's app or installer | The manufacturer's support site | Scan and fax features as well as printing |
| Print server or work network | Ask IT for the server path, or run Add-Printer -ConnectionName |
Office printers managed centrally |
Network printer not showing up or not connecting in Windows
Windows cannot find the shared printer
The printer is not shared, or network discovery is off on one of the PCs.
- On the host PC, confirm Share this printer is ticked under Printer properties > Sharing.
- Turn on Network discovery and File and printer sharing on both PCs.
- Add the printer manually with Select a shared printer by name.
\\ComputerName does not open in File Explorer
The PCs are on different networks or the host name does not resolve.
- Connect both PCs to the same local network.
- Try the host PC's IP address instead, for example
\\192.168.1.20. - If that also fails, reset network settings on the PC that cannot connect.
Windows asks for a username and password
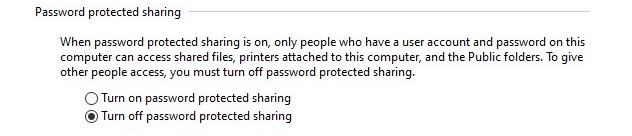
The host PC only allows signed-in accounts to use its shared printer.
- Enter the username and password of an account on the host PC.
- Or sign in with the same Microsoft account or local account name on both PCs.
The network printer shows Offline after it worked before
The printer's IP address changed, or the host PC is asleep or off.
- Print the printer's network configuration page and compare its IP address with the port in Printer properties > Ports.
- Remove the printer and add it again by its new IP address.
- Reserve the IP address in the router, and keep the host PC awake for shared printers.
Windows says you need permission or a driver could not be installed
Installing the printer's driver needs administrator rights, or the host has no matching driver.
- Sign in with an administrator account, or ask your IT team to install the printer.
- Install the maker's driver on your PC first, then connect to the share again.
- If the queue is stuck afterwards, restart the print spooler.
Network printer connection FAQ
What is the path format for a shared network printer?
Use \\ComputerName\PrinterShareName, where ComputerName is the PC the printer is attached to and PrinterShareName is the name on its Sharing tab. Type it in Select a shared printer by name or in File Explorer.
How do I add a network printer by IP address in Windows 11?
Open Printers & scanners, select Add device, then Add manually, and choose Add a printer using an IP address or hostname. Choose the device type (IPP Device for Mopria-certified printers), type the IP address in Hostname or IP address, and finish the wizard.
Do the PC and the printer need to be on the same network?
Yes, for discovery and shared printers. Both must be on the same local network, and a guest network or separate extender network usually blocks discovery. A printer added by IP address can work across subnets if the network routes between them.
Does the host PC need to stay on for a shared printer?
Yes. A printer shared from a PC prints through that PC, so jobs fail while it is off or asleep. A printer with its own network connection, added by IP address, does not depend on any other PC.
What is the PowerShell command to connect to a network printer?
Run Add-Printer -ConnectionName \\printServer\printerName, replacing the names with your print server or host PC and the printer share name. Use Add-PrinterPort and Add-Printer with -PortName for a printer addressed by IP.
How do I add a network printer for all users on a PC?
Run rundll32 printui.dll,PrintUIEntry /ga /n\\ComputerName\PrinterShareName from an administrator Command Prompt. The per-computer connection is applied to each user the next time they sign in.
Why does Windows ask for a password when I connect to a shared printer?
The host PC requires a valid account before it lets another PC use its printer. Enter the username and password of an account on the host PC, or use the same account on both PCs.