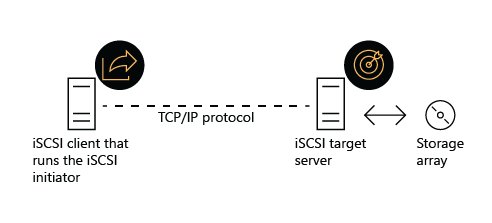
Install the iSCSI Target Server role service on the storage server, create an iSCSI virtual disk and map it to a target, then connect to that target from the iSCSI Initiator on the client server over TCP port 3260.
This guide covers both ends with PowerShell and the built-in tools, bringing the new disk online, adding Multipath I/O for redundancy, and fixing the connection problems Microsoft documents.
Configure iSCSI target and initiator with PowerShell
Run these from an elevated PowerShell window. Replace the server names, path and IQN with your own; the initiator IQN comes from Get-InitiatorPort on the client.
- On the storage server, run
Install-WindowsFeature FS-iSCSITarget-Server. - Create the LUN:
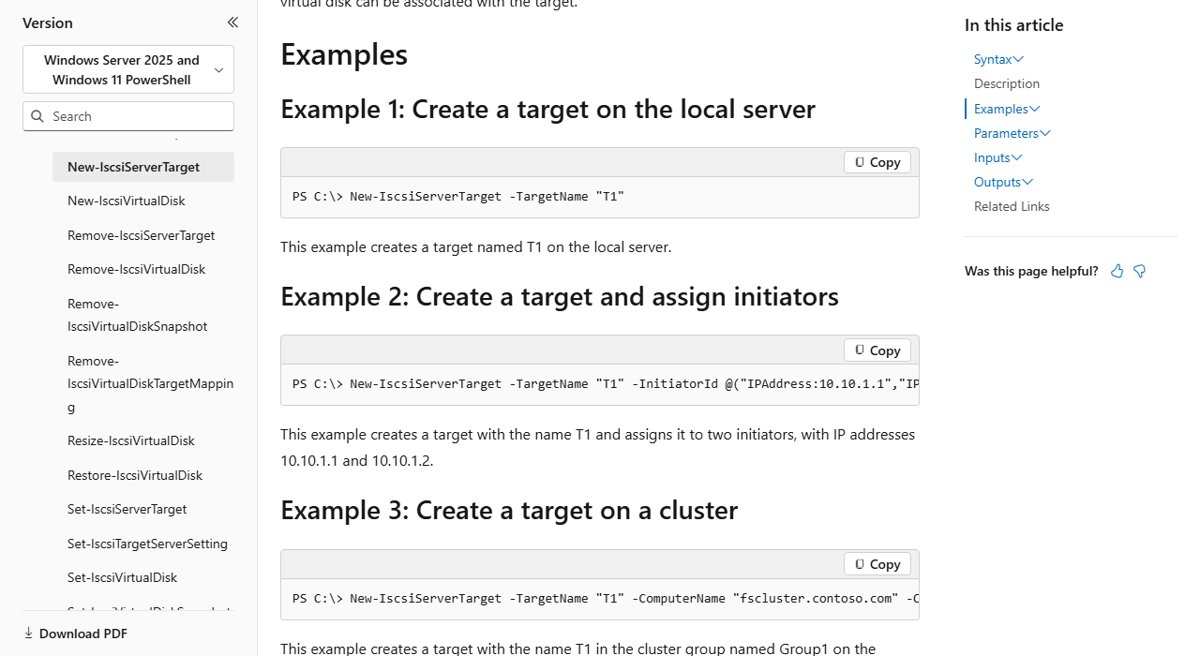
New-IscsiVirtualDisk -Path E:\iSCSIVirtualHardDisk\1.vhdx -Size 100GB. - Create a target that only your client may use:
New-IscsiServerTarget -TargetName SQLTarget -InitiatorIds 'IQN:iqn.1991-05.com.microsoft:sql1.contoso.com'. - Map the disk to the target:
Add-IscsiVirtualDiskTargetMapping -TargetName SQLTarget -Path E:\iSCSIVirtualHardDisk\1.vhdx. - On the client server, start the initiator service:
Start-Service msiscsiandSet-Service msiscsi -StartupType Automatic. - Add the storage server as a portal:
New-IscsiTargetPortal -TargetPortalAddress iSCSIServer1. - Run
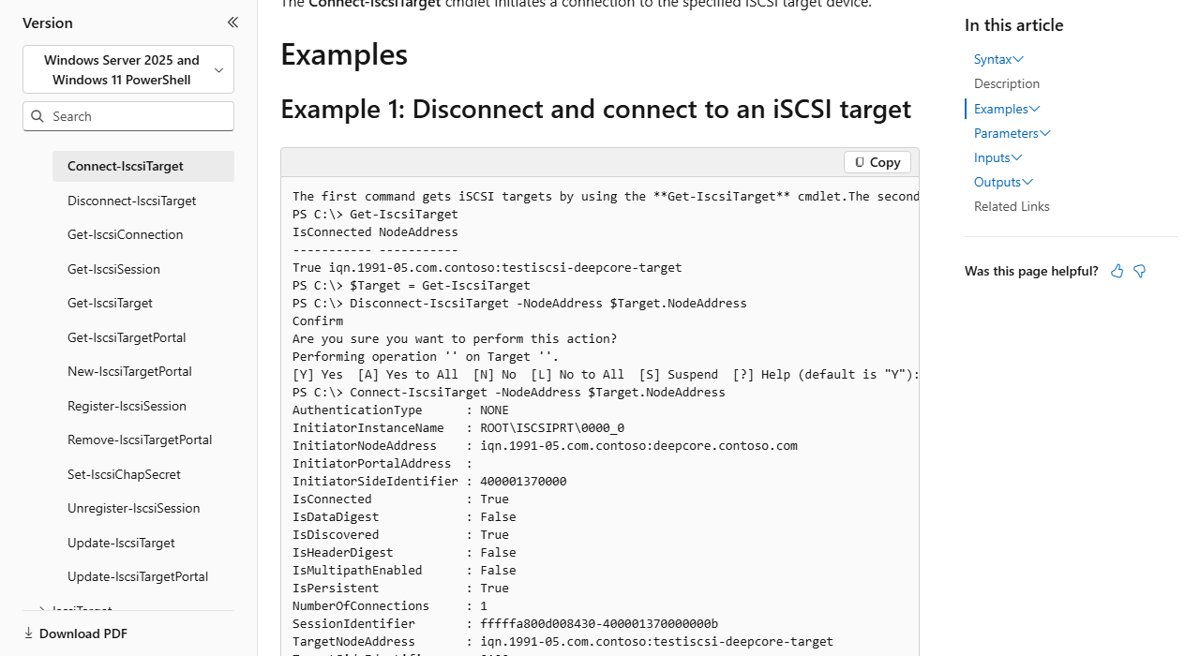
Get-IscsiTarget, copy the target's NodeAddress, then runConnect-IscsiTarget -NodeAddress <NodeAddress> -IsPersistent $true.
The new disk now appears on the client as a raw local disk. Initialise and format it before use (see the disk section below).
iSCSI target, initiator and IQN explained
| Component | What it is on Windows Server | Where you configure it |
|---|---|---|
| iSCSI target | The storage end. iSCSI Target Server is a role service of File and Storage Services | Server Manager, Windows Admin Center or the IscsiTarget PowerShell module |
| iSCSI virtual disk (LUN) | A VHD or VHDX file presented as a block disk; VHDX supports up to 64 TB | New-IscsiVirtualDisk on the target server |
| iSCSI initiator | The client end, built into every supported Windows version (service name msiscsi) | iSCSI Initiator app or the iSCSI PowerShell module |
| IQN | iSCSI Qualified Name that identifies each initiator and target, such as iqn.1991-05.com.microsoft:sql1.contoso.com | Initiator: Configuration tab or Get-InitiatorPort |
| Target portal | The IP address or DNS name and port the initiator discovers targets on (TCP 3260 by default) | New-IscsiTargetPortal or the Discovery tab |
| iSNS | Optional discovery database where initiators and targets register | iSNS role service |
iSCSI requirements on Windows Server
| Item | Requirement or limit | Why it matters |
|---|---|---|
| Network port | TCP 3260 open between initiator and target | Default iSCSI port; discovery and sessions fail without it |
| Network speed | At least 1 Gbps, ideally a dedicated network or QoS | Storage traffic competes with client traffic otherwise |
| Target scale | Up to 256 targets and 512 virtual disks per server | Plan LUN layout before you create targets |
| Virtual disk file | Must use the .vhdx extension; not on a network, compressed, sparse or transacted folder | New-IscsiVirtualDisk refuses other locations |
| Access control | Initiator IDs by IQN, DNS name, IP address, IPv6 address or MAC address | Only listed initiators can log in to the target |
| Authentication | CHAP and reverse CHAP supported | Adds a shared secret on top of initiator IDs |
| High availability | Shared Fibre Channel, SAS or Storage Spaces Direct storage with a clustered target role | A single target server is a single point of failure |
Install and configure an iSCSI target on Windows Server
Do this on the server that holds the disks. The target role service can be added from Server Manager, Windows Admin Center or PowerShell; PowerShell is shown because it scripts cleanly.
- Open Windows PowerShell as administrator on the storage server.
- Run
Install-WindowsFeature FS-iSCSITarget-Serverto add the iSCSI Target Server role service. - Prepare a data volume for the VHDX files, for example drive E: formatted with NTFS or ReFS.
- Create the virtual disk with
New-IscsiVirtualDisk -Path E:\iSCSIVirtualHardDisk\1.vhdx -Size 100GB(add-UseFixedfor a fixed-size disk). - Create the target and restrict it to your initiator:
New-IscsiServerTarget -TargetName SQLTarget -InitiatorIds 'IQN:iqn.1991-05.com.microsoft:sql1.contoso.com'. - To allow a client by address instead, use
-InitiatorIds @('IPAddress:10.10.1.1','IPAddress:10.10.1.2'). - Assign the disk to the target with
Add-IscsiVirtualDiskTargetMapping -TargetName SQLTarget -Path E:\iSCSIVirtualHardDisk\1.vhdx -Lun 0. - Confirm Windows Firewall on the target allows inbound TCP 3260 from the initiator's network.
Every LUN number on one target must be unique. All virtual disks mapped to the same target are visible to any initiator that connects to it.
New-IscsiVirtualDisk fixed, dynamic and differencing VHDX
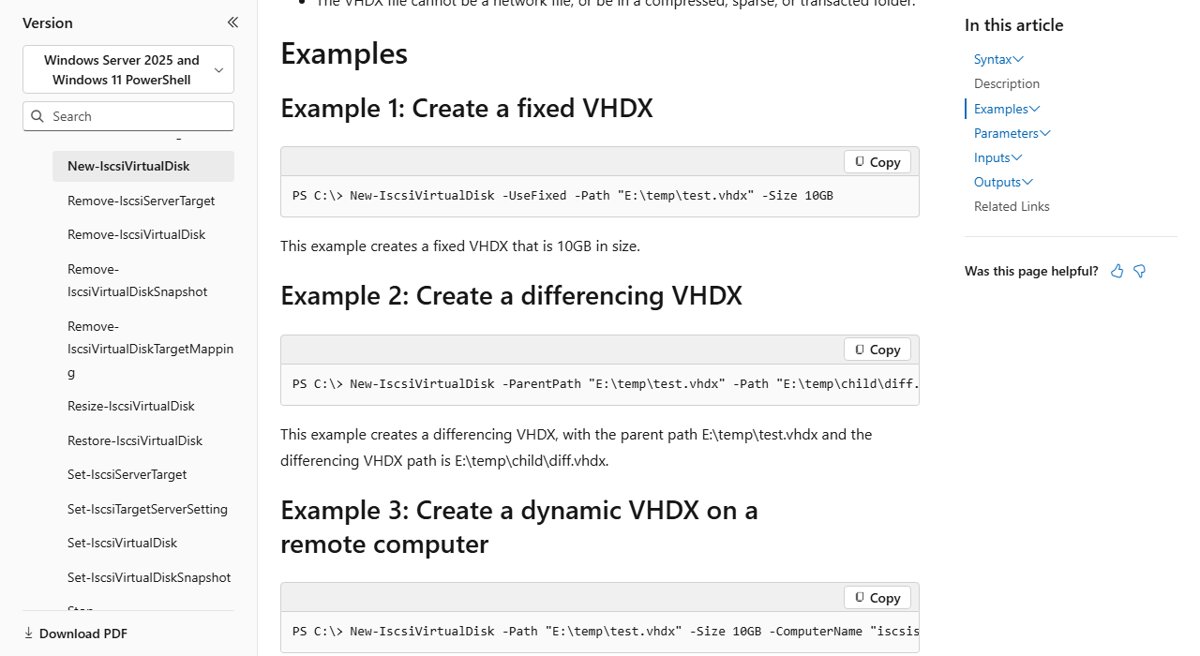
The disk type is set when you create the VHDX. Fixed disks allocate all space up front; dynamic disks grow as data is written; differencing disks store changes against a parent image, which suits diskless boot of identical servers.
New-IscsiVirtualDisk -UseFixed -Path "E:\iSCSI\data01.vhdx" -Size 100GBCreates a fixed-size 100 GB VHDX. Drop -UseFixed for a dynamic disk, or use -ParentPath "E:\iSCSI\base.vhdx" -Path "E:\iSCSI\child\diff.vhdx" for a differencing disk. If the file already exists the command fails; import it with Import-IscsiVirtualDisk instead.
You should see: PowerShell returns the new virtual disk object with its Path and Size, and the .vhdx file appears in the folder.
Configure the iSCSI initiator on Windows Server
Do this on the server that will use the storage. The initiator is already part of Windows; only its service needs starting.
- Open Windows PowerShell as administrator on the client server.
- Run
Start-Service msiscsi, thenSet-Service msiscsi -StartupType Automaticso the service survives restarts. - Run
Get-InitiatorPortand note the NodeAddress; this is the IQN to add to the target's initiator list. - Add the target server as a discovery portal:
New-IscsiTargetPortal -TargetPortalAddress iSCSIServer1(port 3260 is used unless you add-TargetPortalPortNumber). - Run
Get-IscsiTargetand confirm your target is listed with IsConnected set to False. - Connect and make it persistent across restarts:
Connect-IscsiTarget -NodeAddress <target IQN> -IsPersistent $true. - For CHAP, add
-AuthenticationType ONEWAYCHAP -ChapUsername <name> -ChapSecret <secret>to the connect command.
You can review the same settings in the iSCSI Initiator app: the Discovery tab lists portals, Favorite Targets lists persistent connections, and the Configuration tab shows the initiator name.
Initialize and format the iSCSI disk on the initiator
A newly connected LUN arrives raw. Find it by bus type so you do not touch a local disk by mistake.
- List the iSCSI disks:
Get-Disk | Where-Object -FilterScript {$_.BusType -Eq "iSCSI"}. - Note the disk Number of the new LUN; its partition style shows as RAW.
- Initialise it as GPT:
Initialize-Disk -Number 3(replace 3 with your disk number). - Create a partition with a drive letter:
New-Partition -DiskNumber 3 -UseMaximumSize -AssignDriveLetter. - Format it:
Format-Volume -DriveLetter T -FileSystem NTFS, using the letter Windows assigned. - Open File Explorer and confirm the new volume is writable.
Enable multipathing (MPIO) with the iSCSI initiator on Windows Server
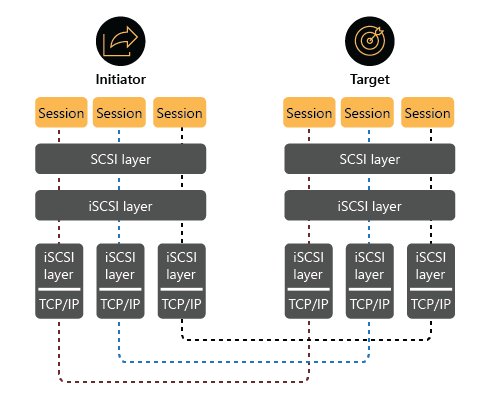
MPIO opens several iSCSI sessions to the same target over different network paths and presents them as one disk, so a failed adapter or switch does not drop the volume. Give each path its own network adapter on the initiator.
- On the initiator, run
Install-WindowsFeature Multipath-IO, then restart if Windows asks. - Let the Microsoft DSM claim iSCSI disks:
Enable-MSDSMAutomaticClaim -BusType iSCSI. - Set the default load-balancing policy to round robin:
Set-MSDSMGlobalDefaultLoadBalancePolicy -Policy RR. - Disconnect any single-path session to the target with
Disconnect-IscsiTarget -NodeAddress <target IQN>. - Connect path one:
Connect-IscsiTarget -NodeAddress <target IQN> -TargetPortalAddress 10.10.1.10 -InitiatorPortalAddress 10.10.1.21 -IsMultipathEnabled $true -IsPersistent $true. - Connect path two from the second adapter: repeat the command with
-TargetPortalAddress 10.10.2.10 -InitiatorPortalAddress 10.10.2.21. - Open MPIO (type
mpiocplin the search bar) and select Discover Multi-Paths to review the claimed device IDs.
Multiple Connections per Session (MCS) is the alternative to MPIO, but it needs explicit support on the target device. MPIO works with the Windows iSCSI Target Server and most SANs through the built-in Microsoft DSM.
Check iSCSI sessions and MPIO paths
- Run
Get-IscsiTargeton the initiator; IsConnected should read True. - Run
Get-IscsiSessionandGet-IscsiConnection; with MPIO you should see one session per path. - Run
Get-MSDSMAutomaticClaimSettingsand confirm iSCSI is set to claim automatically. - At a command prompt, run
mpclaim -s -dto list disks owned by the Microsoft DSM and their load-balance policy. - Run
Get-Disk | Where-Object -FilterScript {$_.BusType -Eq "iSCSI"}and confirm the disk is Online and shows once, not once per path.
iSCSI initiator cannot connect or disks disconnect
iSCSI disks disconnect or are "surprise removed" (Event ID 157)
Network instability, MPIO misconfiguration, mismatched MTU or jumbo frame settings, or adapters not ready when the iSCSI service starts.
- Run
Get-NetAdapterandGet-NetAdapterStatisticsto check link state and errors. - Make MTU and jumbo frame settings match end to end on adapters, switches and the target.
- Run
Get-IscsiSessionandGet-IscsiConnectionto see which paths are down. - Re-create the persistent connection with
Connect-IscsiTarget -NodeAddress <target> -TargetPortalAddress <IP> -TargetPortalPortNumber 3260 -IsPersistent $true. - Update network adapter and storage drivers and firmware to vendor-supported versions.
Favorite target does not log in after a restart
The initiator name was changed after the favorite target entry was created, so the entry still uses the old IQN.
- Open iSCSI Initiator and select Favorite Targets.
- Select the stale entry and select Remove.
- Reconnect the target so a new favorite is created with the current initiator name.
- Make sure the target's access list contains the current IQN.
Wrong or old target IP addresses in the initiator
Outdated discovery portals or sessions from an earlier configuration.
- In iSCSI Initiator, select Discovery, then Refresh.
- Select any portal that is wrong or unused and select Remove.
- Clear stale sessions with
Get-IscsiSession | Remove-IscsiSession, then reconnect.
MPIO shows only one path
Both sessions use the same network adapter, or the second session was not opened with multipath enabled.
- Assign each iSCSI connection to a different initiator adapter with
-InitiatorPortalAddress. - Rebuild the connections with
-IsMultipathEnabled $true. - Run
mpclaim -s -dagain to confirm both paths.
The iSCSI disk stays offline after connecting
The storage area network (SAN) policy keeps new shared disks offline.
- Open Command Prompt as administrator and run
diskpart. - At the DISKPART prompt, run
san policy=OnlineAll. - Reconnect the target or bring the disk online in Disk Management.
Windows Server iSCSI target and initiator FAQ
What port does iSCSI use on Windows Server?
iSCSI uses TCP port 3260 by default. Allow it through the firewall between initiator and target, and add -TargetPortalPortNumber to New-IscsiTargetPortal only if your target listens on a different port.
How do I find the iSCSI initiator IQN on Windows Server?
Run Get-InitiatorPort in PowerShell and read the NodeAddress column, or open the iSCSI Initiator app and check the Configuration tab. The default form is iqn.1991-05.com.microsoft: followed by the computer's FQDN.
Is the iSCSI initiator installed by default on Windows Server?
Yes. Every supported version of Windows includes the iSCSI initiator. You only need to start the msiscsi service and set it to start automatically before connecting to a target.
What is the PowerShell feature name for iSCSI Target Server?
The role service name is FS-iSCSITarget-Server. Install it with Install-WindowsFeature FS-iSCSITarget-Server on the server that will host the iSCSI virtual disks.
How large can an iSCSI virtual disk be on Windows Server?
iSCSI Target Server stores LUNs as VHD or VHDX files, and VHDX supports up to 64 TB. One server supports up to 256 iSCSI targets and 512 virtual disks.
Should I use MPIO or MCS for iSCSI redundancy?
Use MPIO in most cases. It opens separate sessions over different paths and works with the built-in Microsoft DSM, while Multiple Connections per Session needs explicit support on the iSCSI target device.
Can non-Windows initiators connect to a Windows iSCSI target?
Yes. iSCSI Target Server supports non-Microsoft iSCSI initiators, so Linux hosts and hypervisors can use Windows Server as block storage. Add their IQN or IP address to the target's initiator list.
How do I make an iSCSI connection survive a restart?
Add -IsPersistent $true to Connect-IscsiTarget. The session then reconnects automatically after each restart, and the iSCSI Initiator app lists it under Favorite Targets.