To set up an IKEv2 VPN in Windows 11, open Settings > Network & internet > VPN > Add VPN, choose Windows (built-in), enter the server address, set VPN type to IKEv2 and select Save.
This guide covers the same steps on Windows 10, the certificate the client needs, a PowerShell method with stronger IPsec settings, and fixes for errors 13801, 13806, 809 and 0x800B0109.
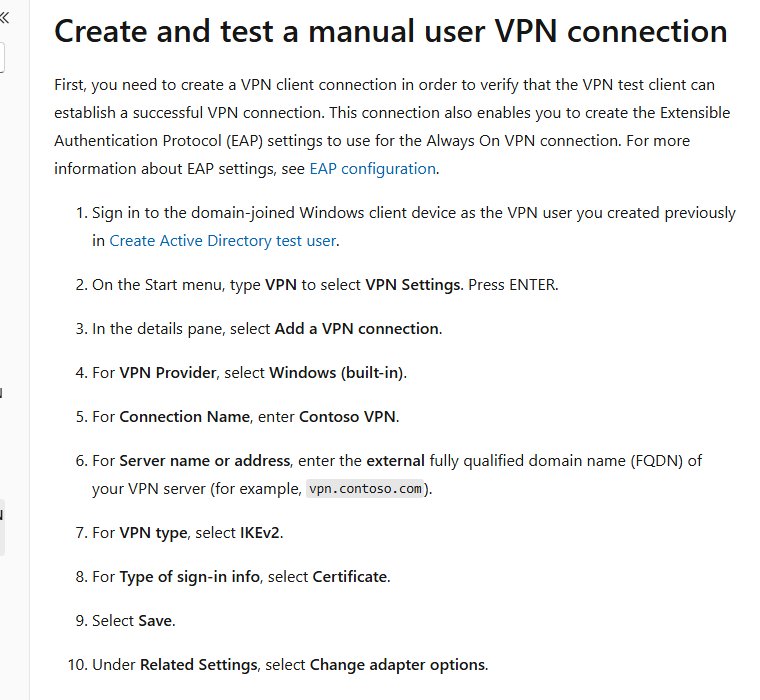
Set up a VPN connection with Windows 10/11 built-in client (IKEv2)
Get the server address and your sign-in details from the VPN administrator or provider first. IKEv2 servers usually also need their root certificate on your PC, covered in the next section.
- Select Start > Settings > Network & internet > VPN.
- Select Add VPN.
- Set VPN provider to Windows (built-in).
- Type a Connection name you will recognise, such as Office VPN.
- Enter the server's host name or IP address in Server name or address.
- Set VPN type to IKEv2.
- Choose the Type of sign-in info your server uses, such as User name and password or Certificate, and fill in the details.
- Select Save, then select Connect next to the new VPN.
When the connection works, its name shows Connected underneath it in Settings > Network & internet > VPN.
IKEv2 vs SSTP vs L2TP vs PPTP in the Windows VPN client
| VPN type in Windows | Use it when | Notes |
|---|---|---|
| IKEv2 | The server supports IKEv2, which most current IPsec VPN servers do | Uses UDP ports 500 and 4500; supports certificate and EAP sign-in |
| SSTP | UDP 500 and 4500 are blocked but the server offers SSTP | Included in the Automatic attempts; cannot be configured through MDM |
| L2TP/IPsec with certificate or pre-shared key | An older server only offers L2TP | Pre-shared key setups need the key from the administrator |
| PPTP | Avoid unless nothing else is offered | Oldest protocol in the list |
| Automatic | You do not know which protocol the server uses | Windows tries each built-in protocol from most to least secure |
| Third-party VPN app | Your company or provider supplies its own client | Vendor apps such as Cisco Secure Client or Check Point plug into Windows separately |
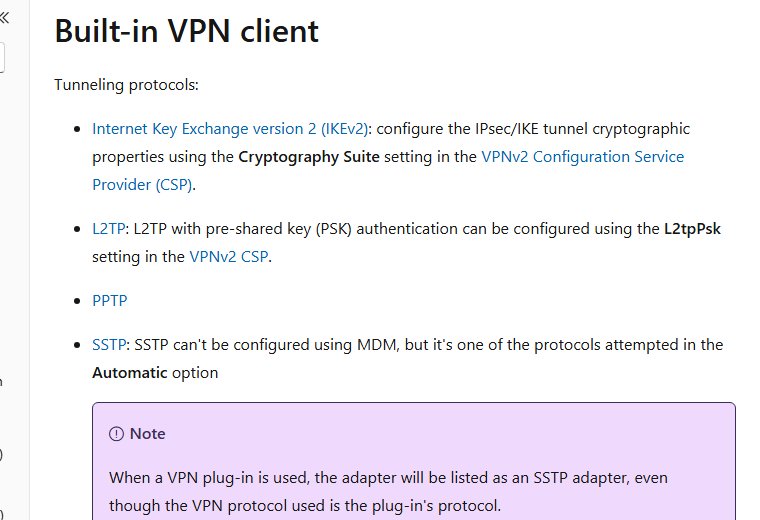
What you need for an IKEv2 VPN on Windows
| Item | Why Windows needs it | Where to get it |
|---|---|---|
| Server name or address | The client connects to this FQDN or IP | VPN administrator or provider |
| Root CA certificate (.cer) | Windows must trust the server certificate's issuer, or the tunnel fails with 13801 or 0x800B0109 | VPN administrator; skip if a public CA issued the server certificate |
| Exact server name on the certificate | The address you type must match the certificate subject | Use the FQDN the administrator gives, not a raw IP, when the certificate names an FQDN |
| Sign-in details | User name and password, certificate or smart card | Your account on the VPN server |
| Open UDP 500 and 4500 | IKE negotiation runs on these ports | Your network or firewall administrator |
| Administrator rights | Needed to import a certificate into the computer store or create an all-users profile | An administrator account on the PC |
Import the VPN server root certificate on Windows
Skip this if a public certificate authority issued the server's certificate. For a self-signed or private CA, the root certificate must be in the local computer's Trusted Root Certification Authorities store.
- Copy the root CA file, for example ca.cer, to your PC.
- Right-click Start and select Terminal (Admin) or Windows PowerShell (Admin).
- Run
Import-Certificate -FilePath "C:\Users\<you>\Downloads\ca.cer" -CertStoreLocation Cert:\LocalMachine\Root, using your own file path. - Confirm the output lists the certificate's thumbprint and subject.
- Close the window and connect to the VPN again.
Importing into Cert:\CurrentUser\Root instead puts the certificate in your user store only. Use the local machine store for IKEv2.
Add an IKEv2 VPN connection in Windows 10
- Select Start > Settings > Network & Internet > VPN.
- Select Add a VPN connection.
- Set VPN provider to Windows (built-in).
- Enter the Connection name and Server name or address.
- Set VPN type to IKEv2 and choose the Type of sign-in info.
- Select Save.
- Select the Network icon on the taskbar, select the VPN and select Connect.
Windows 10 reached end of support on October 14, 2025. The built-in VPN client still works on it, but the PC no longer gets security updates without Extended Security Updates.
Create an IKEv2 VPN with PowerShell Add-VpnConnection
PowerShell sets options the Settings page does not show, such as split tunneling and an all-users profile. Run PowerShell as administrator when you add -AllUserConnection.
Add-VpnConnection -Name "Office VPN" -ServerAddress "vpn.example.com" -TunnelType Ikev2 -AuthenticationMethod Eap -EncryptionLevel Required -RememberCredential -PassThruCreates an IKEv2 profile named Office VPN for vpn.example.com that signs in with EAP and requires encryption. -RememberCredential caches the credentials after the first successful connection. Add -SplitTunneling to send only company traffic through the tunnel, or -AllUserConnection to make the profile available to every user. Use -AuthenticationMethod MachineCertificate when the server expects a computer certificate.
You should see: PowerShell prints the profile with TunnelType : Ikev2 and ConnectionStatus : Disconnected. The VPN then appears in Settings, ready to connect.
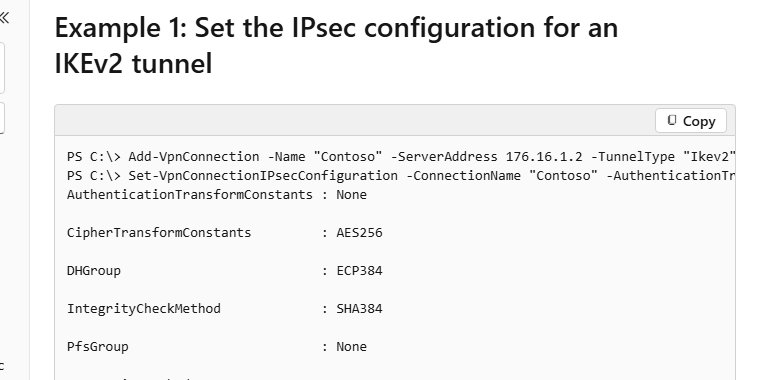
Change IKEv2 encryption settings with Set-VpnConnectionIPsecConfiguration
Some IKEv2 servers reject the Windows default cipher proposal. Match the client to the server's policy with this cmdlet, which applies only to IKEv2 and L2TP connections.
- Ask the VPN administrator which encryption, integrity and Diffie-Hellman group the server accepts.
- Open PowerShell as administrator.
- Run
Set-VpnConnectionIPsecConfiguration -ConnectionName "Office VPN" -AuthenticationTransformConstants GCMAES256 -CipherTransformConstants None -EncryptionMethod AES256 -IntegrityCheckMethod SHA384 -PfsGroup None -DHGroup ECP384 -PassThru -Force. - Replace the values with the server's policy if it differs. Accepted DH groups include Group14, ECP256, ECP384 and Group24.
- Connect again from Settings > Network & internet > VPN.
- To return to the Windows defaults, run
Set-VpnConnectionIPsecConfiguration -ConnectionName "Office VPN" -RevertToDefault -Force.
Connect to the VPN from Windows 11 quick settings
- Select the Network, Volume or Battery icon on the taskbar to open quick settings.
- Select the VPN tile.
- With one VPN profile, turn the VPN quick setting on.
- With several profiles, select Manage VPN connections, choose the VPN and select Connect.
- Enter your user name and password or other sign-in info if asked.
To change the server or sign-in type later, open Settings > Network & internet > VPN, select the connection, select Advanced options and then Edit.
Confirm the Windows VPN is connected over IKEv2
- Open Settings > Network & internet > VPN and confirm Connected appears under the connection name.
- On Windows 11, look for the shield on the network icon in the taskbar.
- Open PowerShell and run
Get-VpnConnection -Name "Office VPN". - Confirm TunnelType shows Ikev2 and ConnectionStatus shows Connected.
- Open a resource that is only reachable through the VPN, such as an internal site, to confirm traffic flows.
Fix IKEv2 VPN errors 13801, 13806, 809 and 0x800B0109
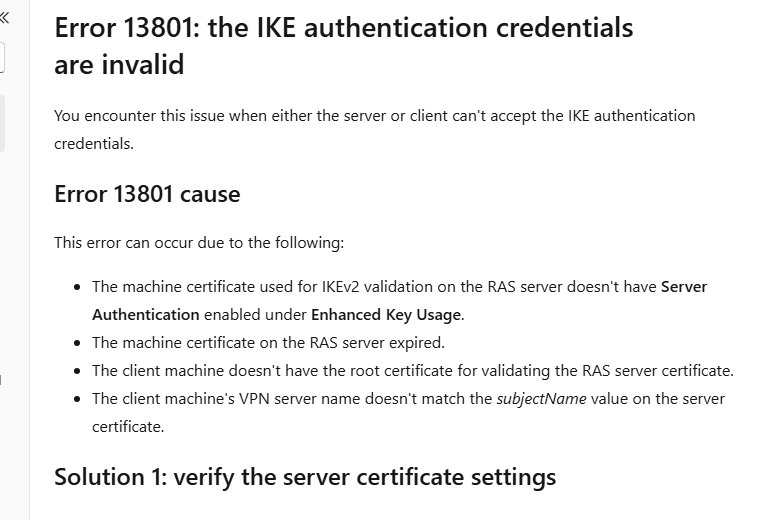
Error 13801: the IKE authentication credentials are invalid
Windows does not trust the server certificate, or the server name does not match it.
- Import the server's root CA into
Cert:\LocalMachine\Rootas shown above. - Change Server name or address to the exact FQDN on the server certificate.
- Ask the administrator to confirm the server certificate is still valid and lists Server Authentication under Enhanced Key Usage.
Error 0x800B0109: a certificate chain processed but terminated in an untrusted root certificate
The root CA is missing from the computer's Trusted Root Certification Authorities store.
- Get the root CA certificate from the VPN administrator.
- Import it with
Import-CertificateintoCert:\LocalMachine\Root. - Connect again.
Error 13806: IKE can't find a valid machine certificate
The profile uses machine certificate sign-in, but the PC or server lacks the required certificate.
- Ask the administrator to issue a computer certificate for your PC.
- Confirm the certificate is installed in the computer's personal store and the root CA in Trusted Root Certification Authorities.
- Retry the connection.
Error 809: can't establish a connection between the PC and the VPN server
A firewall, router or NAT device blocks UDP 500 or 4500.
- Try a different network, such as USB tethering from your phone, to rule out the local network.
- Ask the network administrator to allow UDP 500 and 4500 to the VPN server.
- If the server also offers SSTP, set VPN type to SSTP for networks that block those ports.
Error 812: the server's authentication method does not match the profile
The sign-in method in the profile does not match what the server requires.
- Ask the administrator which authentication method the server expects.
- Change Type of sign-in info under Advanced options > Edit, or recreate the profile with the matching
-AuthenticationMethod.
Error 800: the remote connection couldn't connect
With VPN type set to Automatic, every protocol failed.
- Set VPN type to IKEv2 instead of Automatic.
- Check the server address and that UDP 500 and 4500 are open.
- Open Event Viewer > Windows Logs > Application and read the RasClient events for the error code.
Remove a VPN connection in Windows 11 and 10
- Disconnect the VPN from quick settings or Settings > Network & internet > VPN.
- Open PowerShell. Use an elevated window if the profile was created for all users.
- Run
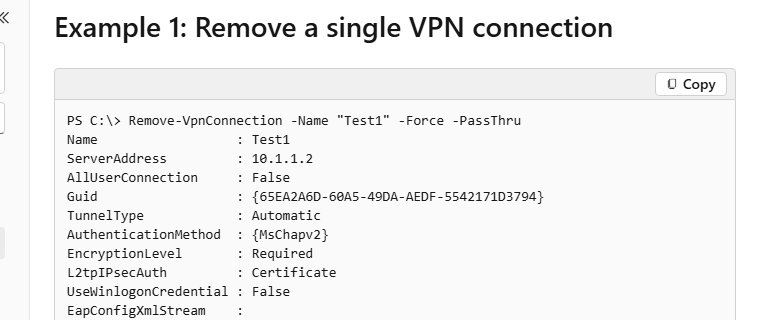
Remove-VpnConnection -Name "Office VPN" -Force. - Add
-AllUserConnectionto the command for a profile created with that switch. - Confirm the connection no longer appears in Settings > Network & internet > VPN.
Windows built-in IKEv2 VPN client FAQ
Does Windows 11 have a built-in VPN client?
Yes. Windows 11 and Windows 10 include a VPN client that supports IKEv2, SSTP, L2TP/IPsec and PPTP. It connects to a VPN server you already have access to; it is not a VPN service on its own.
Is the Windows built-in VPN free?
The client is free and part of Windows. You still need a VPN server to connect to, from your workplace, your own router or a VPN provider that publishes IKEv2 server details. For browsing only, Microsoft Edge's built-in VPN is a separate option.
Which VPN type should I choose in Windows?
Choose IKEv2 when the server supports it. Use SSTP when a network blocks UDP ports 500 and 4500. Choose Automatic only if you do not know the protocol, because Windows then tries each one in turn.
Does IKEv2 on Windows need a certificate?
Usually yes. The server proves its identity with a certificate, and Windows must trust the issuing root CA. If a private CA issued it, import the root certificate into the local computer's Trusted Root Certification Authorities store.
What ports does IKEv2 use?
IKEv2 negotiation uses UDP ports 500 and 4500. Both must be open on every firewall between your PC and the VPN server.
How do I enable split tunneling for a Windows VPN?
Create the profile with PowerShell and add -SplitTunneling to Add-VpnConnection. Only traffic for the company network then uses the tunnel, and other internet traffic goes out directly.
Can I set up an IKEv2 VPN for all users on a PC?
Yes. Run Add-VpnConnection with -AllUserConnection in an elevated PowerShell window. The profile goes into the global phone book, so every account on the PC can use it.