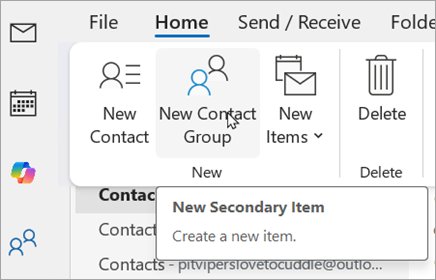
In classic Outlook for Windows, select People, select New Contact Group on the ribbon, name it, select Add Members, then select Save & Close.
The feature has a different name in every Outlook, so this guide covers contact groups, contact lists on the web and Mac, Microsoft 365 distribution lists and Microsoft 365 Groups.
The fastest way to create an email group in Outlook
These steps are for classic Outlook for Windows, where the feature is called a contact group.
Every other Outlook app calls it something else. The next two sections sort out which one you have.
- Select People in classic Outlook.
- Select New Contact Group from the ribbon.
- Enter a name for the group, then select Add Members.
- Select Save & Close.
The group name now works in the To box of any new message.
Email group vs distribution list vs Microsoft 365 Group: what's the difference?
Three different objects answer to the words "email group" in Outlook. They are not interchangeable.
| Object | What it is | Who creates it | What it gives you |
|---|---|---|---|
| Contact group (classic Outlook) | A collection of email addresses saved in your own Contacts folder | You, in Outlook | One name you can type in To, Cc or Bcc |
| Contact list (new Outlook, web, Mac) | The same thing under the current name; Microsoft renamed contact groups to contact lists in new Outlook | You, in Outlook | One name in the recipient boxes, synced with your mailbox |
| Distribution list (also called a distribution group) | An organisation-wide list with its own email address, held in Exchange Online | A Microsoft 365 admin | A shared address anyone in the company can send to |
| Microsoft 365 Group | A collaboration space, not a contact list | You or an admin, in Outlook | A shared inbox, a shared calendar and a group email address such as [email protected] |
A Microsoft 365 Group created with a work or school account also opens up shared files on OneDrive, chats in Microsoft Teams and tasks in Planner.
A personal Microsoft account gets the shared inbox and calendar, but no SharePoint, OneNote or Planner resources.
Which Outlook app are you using?
Match your app to the row below, then jump to that section.
| Your situation | Use this | Why |
|---|---|---|
| Classic Outlook for Windows | Contact group | New Contact Group sits on the ribbon of the People page |
| New Outlook for Windows | Contact list | There is no New Contact Group command; lists are built from Add to list |
| Outlook on the web or Outlook.com | Contact list | Created from the arrow next to New contact on the People page |
| Outlook for Mac | Contact list, also called a distribution group | Created from the New Contact button inside a Contacts folder |
| A company-wide address such as [email protected] | Distribution list | Only an admin can create one, in the Microsoft 365 admin center |
| A team that needs a shared inbox, calendar and files | Microsoft 365 Group | A contact list carries addresses only, with nothing shared |
How to create a contact group in classic Outlook for Windows
Classic Outlook is the desktop app that still shows New Contact Group. Use these steps for the full route, including sending the first message.
- Open classic Outlook and select People.
- Select New Contact Group from the ribbon.
- Type a name for the group. Pick something you will recognise in the To box, such as Weekly Project Update.
- Select Add Members, then pick the people you want in the group.
- Select Save & Close.
- Create a new email message and type the group name in the To field. Classic Outlook shows matches from the address book as you type.
- Enter a subject, then select Send.
If the name does not appear, select the To button to open the Select Names dialog, type a few characters of the group name and select Go. Contact groups are shown in bold.
How to edit or delete a contact group in classic Outlook
Membership changes never need a new group. Edit the one you have.
- Select People in classic Outlook.
- Double-click the contact group you want to change.
- Select Add Members or Remove Member on the ribbon.
- Select Save & Close to keep the change.
- To rename the group, open it and type a new name in the Name box before selecting Save & Close.
- To delete the group, right-click it in People and select Delete, or select it and choose Delete from the ribbon.
Deleting a contact group removes the grouping only. The individual contacts stay in your Contacts folder.
How to create a contact list in Outlook on the web
Outlook on the web and Outlook.com build the list from the People page, not from a ribbon command called New Contact Group.
- Sign in to Outlook on the web.
- Select the People icon in the navigation pane.
- Under Your contacts, select the folder you want the list saved in. Skip this step if you have no folders.
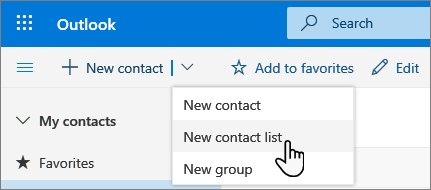
- Select the arrow next to New contact, then select New contact list.
- Enter a name for the list, then add names or email addresses.
- Select Create.
A contact list holds email addresses only, so a contact with no address cannot be added.
To change the list later, select Your contact lists, select the list, select Edit, then select Save.
How to create a contact list in the new Outlook for Windows
New Outlook starts from a contact rather than from an empty list. Contact lists here are what classic Outlook calls contact groups.
- Open new Outlook and select People on the side panel.
- Select the contact you want in the new list.
- Select Add to list, either by right-clicking the contact or from the ribbon.
- Select New contact list.
- Name the list, then select Save.
To change a list, select All contact lists, right-click the list and select Edit. Rename it, add contacts or add a Description, then select Save.
To remove a list, select All contact lists, select Delete, then select Delete again. The contacts themselves are not deleted.
How to create an email group in Outlook for Mac
Outlook for Mac calls the feature a contact list and also refers to it as a distribution group.
- Select the People button on the side navigation bar.
- Select the Contacts folder under the account where the list should live.
- Hover over the New Contact button and select New Contact List.
- Type the name of the new contact list.
- Under Add members, type an email address and select Add. Repeat for each person.
- Select Save.
Syncing contact lists from the server works with Microsoft 365 and Outlook.com accounts only.
Support for legacy Outlook for Mac ends in October 2026, and continued support depends on your Microsoft 365, Office or Outlook licence.
How to create a company distribution list in Microsoft 365
A distribution list has its own address and is visible to the whole organisation. Creating one needs admin permissions.
Setting up an Outlook mailbox first? Start with how to create an Outlook email account.
- Sign in to the Microsoft 365 admin center.
- In the left navigation bar, select … Show all, then expand Teams and groups.
- Select Active teams and groups, then select Distribution list.
- Select + Add a distribution list.
- On the Set up the basics page, enter a name and description, then select Next.
- On the Assign owners page, select + Assign owners, pick the owners, select Add, then select Next.
- On the Add members page, select + Add members, pick the members, select Add, then select Next.
- On the Edit settings page, enter the group email address. Select Allow people outside of my organization to send email to this Distribution group if outside senders need access, then select Next.
- On the Review and finish adding group page, check the details and select Create group.
To add people later, open the list, select the Members tab, select View all and manage members, select + Add members, then select Add.
Create the same distribution list in the Exchange admin center
The Exchange admin center reaches the same object and exposes more delivery settings.
- Open the Exchange admin center and select Recipients > Groups > Distribution list.
- Select Add a group to start the group creation wizard.
- On the Choose a group type page, select Distribution, then select Next.
- Work through the remaining pages of the wizard.
- On the Review and finish adding group page, check the details, select Create group, then select Close.
To change an existing list, select it in the same view and use the General, Members and Settings tabs, then select Save.
Key settings for distribution lists
These four settings decide who sees the list and who can write to it.
| Setting | Where it lives | What it does |
|---|---|---|
| Hide this group from the global address list | Exchange admin center, Settings tab | Removes the list from the address book. People who know the address can still send to it |
| Only allow messages from people inside my organization | Delivery management | The default. Mail from outside the organisation is rejected |
| Allow messages from people inside and outside my organization | Delivery management | Opens the list to anyone on the internet |
| Specified senders | Delivery management | Limits sending to named recipients or groups. Everyone else is rejected |
| Owners | Exchange admin center, Members tab | Every distribution list needs at least one owner |
| Member types | Exchange admin center, Members tab | User, shared, room and equipment mailboxes, mail users, mail contacts and mail-enabled groups are supported. A Microsoft 365 Group is not |
How to create a Microsoft 365 Group from Outlook
Choose a Microsoft 365 Group when the team needs a shared inbox and calendar rather than a list of addresses.
- Open new Outlook.
- Select Groups in the app bar at the side of the window, or select Go to Groups in the mailbox folder list.
- Select New Group on the ribbon, then select New Group in the drop-down.
- Enter the Name and Description, then select Create.
- Type the names or email addresses of the members and select Add. Select Not now to add people later.
Creating the group builds a shared Outlook inbox, a group email address and a shared calendar automatically.
How to send to a group without exposing everyone's address
A contact list in the To box can be expanded by any recipient, which reveals every name and address. The Bcc box is the only fix.
- Open a new message.
- On the Message Options or Options tab, in the Fields or Show Fields group, select Show Bcc or Bcc.
- Type your own email address in the To box.
- Add the contact group or distribution list in the Bcc box.
- Type your message and select Send.
Sent to the wrong list? Recalling a message in Outlook still works while the mail sits unread in the same organisation.
How to import names into an Outlook group
Outlook imports contacts, not group membership. Bring the people in as contacts first, then add them to the list.
- Save the addresses as a .csv file with UTF-8 encoding. In Excel, choose CSV UTF-8 (Comma delimited) (*.csv) under File > Save As.
- In new Outlook, select People on the navigation bar.
- Select Import contacts on the ribbon.
- Select Browse, choose the .csv file, then select Open.
- Select Import.
- Select the imported contacts on the People page, select Add to list, then select the list you want them in.
Moving from classic Outlook? Export first with File > Open & Export > Import/Export > Export to a file > Comma Separated Values, then import that file.
How to check it worked
Confirm the group exists and resolves before sending anything to real recipients.
- Open People and select Your contact lists or All contact lists. The new list appears by name.
- Open the list and count the members against the list you started with.
- Create a new message, type the group name in the To box and confirm it resolves to a single entry.
- In classic Outlook, select the To button, type a few characters of the group name and select Go. Contact groups are shown in bold.
- Put your own address in To, the group in Bcc, and send a test message to yourself.
- For a Microsoft 365 distribution list, confirm the group email address appears on the Active teams and groups page under Distribution list.
Best practices for Outlook email groups
Each rule below follows from how Outlook actually behaves, not from habit.
| Practice | Reason |
|---|---|
| Put large personal lists in Bcc | A list in To can be expanded by every recipient, showing all names and addresses |
| Keep distribution lists under 5,000 members | The Exchange admin center can return inconsistent results when filtering members in larger groups; use Exchange Online PowerShell for those |
| Leave external senders blocked unless the list needs them | Only allow messages from people inside my organization is the default and rejects outside mail |
| Save import files as UTF-8 | Greek, Cyrillic, Arabic and Japanese characters import incorrectly from other encodings |
| Add only contacts that have an email address | A contact list is a collection of addresses, so an address-less contact cannot join it |
| Share a list from classic Outlook, not new Outlook | Dragging a contact group into a message body works in classic Outlook; new Outlook does not support sharing contact lists |
| Use a Microsoft 365 Group when files and calendars are involved | A contact list carries addresses only, with no shared inbox, calendar or files |
| Plan a move off legacy Outlook for Mac | Support for legacy Outlook for Mac ends in October 2026 |
Troubleshooting common Outlook group problems
There is no New Contact Group command in your Outlook
New Outlook for Windows renamed contact groups to contact lists and dropped the ribbon command.
- Select People on the side panel in new Outlook.
- Select any contact that belongs in the list.
- Select Add to list, then select New contact list.
- To get the classic command back instead, turn off the New Outlook toggle and follow the classic Outlook steps.
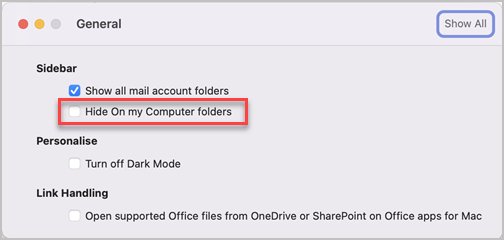
New Contact List is greyed out in Outlook for Mac
Server-side contact lists work only with Microsoft 365 and Outlook.com accounts, so a POP or IMAP account needs a local folder.
- On the Outlook menu, select Settings.
- Under Quick Settings, select Display.
- Under Sidebar, turn on Show On my Computer folders.
- Select the Contacts folder under On My Computer, then create the list there.
The group name will not resolve in the To box
Outlook is matching against the address book rather than the saved list, so the name has to be picked from the dialog.
- Select the To button to open the Select Names dialog.
- Type a few characters of the group name and select Go.
- Pick the entry shown in bold, which marks a contact group.
- If nothing matches, open People and confirm the list was saved with Save & Close or Create.
Recipients can see everyone else's email address
A contact list placed in the To box stays expandable for every recipient.
- Open a new message and turn on Show Bcc or Bcc from the Options tab.
- Put your own address in the To box.
- Put the contact group in the Bcc box.
- Send the message.
Imported contacts show garbled characters
The .csv file is not saved in UTF-8 encoding.
- Select Cancel in the import preview if the text looks wrong.
- In Excel, open a blank workbook and select Data > From Text/CSV.
- Choose the encoding that displays the characters correctly under File Origin, then select Load.
- Select File > Save As and choose CSV UTF-8 (Comma delimited) (*.csv).
- Run the import again.
A Microsoft 365 Group cannot be added to a distribution list
Microsoft 365 Groups and non-mail-enabled Entra users are not supported member types for a distribution list.
- Add the members individually instead of adding the Microsoft 365 Group.
- Add a mail contact or a mail-enabled security group, both of which are supported.
- Send to the Microsoft 365 Group's own email address as a separate recipient where both are needed.
Quick example: creating a weekly project update list
A worked run-through in classic Outlook, from empty People page to a sent update.
- Select People, then New Contact Group on the ribbon.
- Name the group Weekly Project Update.
- Select Add Members and pick the eight people on the project, then select Save & Close.
- Create a new message and turn on Show Bcc from the Options tab.
- Type your own address in To and Weekly Project Update in Bcc.
- Write the update and select Send.
To land the update at the same time each week, see how to schedule an email in Outlook.
When a member leaves the project, open the group, select Remove Member, then select Save & Close.
Frequently asked questions
How do you create an email group in Outlook?
In classic Outlook, select People, select New Contact Group, name it, select Add Members, then select Save & Close. In new Outlook, Outlook on the web and Outlook for Mac the same feature is called a contact list.
Can I create email groups in Outlook?
Yes. Every current Outlook app lets you save a set of addresses under one name. Classic Outlook calls it a contact group, while new Outlook, Outlook on the web, Outlook.com and Outlook for Mac call it a contact list.
Why can't I create an email group in Outlook?
New Outlook for Windows has no New Contact Group command, so start from a contact and select Add to list. On a Mac, New Contact List is unavailable for POP and IMAP accounts until you turn on Show On my Computer folders.
How do you create an email group in Outlook 365?
For a personal list, use the contact list steps for your Outlook app. For a company address, an admin creates a distribution list in the Microsoft 365 admin center under Teams and groups > Active teams and groups > Distribution list.
How do you create an email group in Microsoft 365?
Sign in to the Microsoft 365 admin center, select Teams and groups > Active teams and groups > Distribution list, then select + Add a distribution list. The wizard collects a name, owners, members and the group email address.
How do you create an email group list in Outlook?
On the People page, select the arrow next to New contact and select New contact list in Outlook on the web. In new Outlook, select a contact, choose Add to list, then New contact list.
How do you create a group to email in Outlook on the web?
Sign in, select People, pick the folder to save into, select the arrow next to New contact, then select New contact list. Enter a name, add addresses, and select Create.
How do you make an email group that hides recipients?
Turn on Show Bcc or Bcc on the Options tab, put your own address in To, and put the group in Bcc. A list left in the To box can be expanded by every recipient.
How do you create a group for emailing a whole team with shared files?
Create a Microsoft 365 Group instead of a contact list. Select Groups in Outlook, select New Group, enter a name and description, then select Create. It adds a shared inbox, calendar and group address.
How do you make a group for emailing on a Mac?
Select People, open the Contacts folder for the account, hover over New Contact and select New Contact List. Name the list, add addresses under Add members, then select Save.
Can a distribution list receive mail from outside the company?
Only if it is allowed. The default setting rejects outside mail. An admin enables it during setup or switches the list to Allow messages from people inside and outside my organization.
Does deleting a contact list delete the contacts?
No. Deleting a contact list removes the grouping only. Every contact stays in your Contacts folder and can be added to another list.
Bottom line
Build a contact list for anything you send yourself, and ask an admin for a distribution list only when the address must belong to the company. A contact list takes under a minute and lives in your own mailbox, while a distribution list needs admin permissions and appears in the global address list for everyone.

![How to Download and Install Language Pack in Windows 11/10 [Guide]](https://techdows.com/wp-content/uploads/2026/09/Windows-10-Language-settings-page-with-Add-a-language-button.jpg)
![How to Install/Add Microsoft Print to PDF Printer on Windows 11/10 [Tutorial]](https://techdows.com/wp-content/uploads/2026/09/Turn-Windows-features-on-or-off-dialog-with-a-scrollable-checkbox-list-600x338.jpg)