To cascade windows in Windows 11, run (New-Object -ComObject Shell.Application).CascadeWindows() in PowerShell, because the Windows 11 taskbar menu has no Cascade windows entry.
This guide covers that command, a one-click desktop shortcut with a hotkey, how to undo a cascade, and the built-in Snap layouts, Snap groups and Task View tools that replace it.
Can You Cascade Windows from the Windows 11 Taskbar?
No. Right-click the Windows 11 taskbar and the only entry is Taskbar settings, and none of the taskbar settings arranges windows.
The cascade command itself still exists in the Windows shell. Microsoft documents it as the Shell.CascadeWindows method, which has "the same effect as right-clicking the taskbar and selecting Cascade Windows" on older versions. Call it from PowerShell:
- Open the windows you want to stack and make sure none of them is minimized.
- Press Windows key + R to open the Run dialog.
- Type
powershelland press Enter. - Paste
(New-Object -ComObject Shell.Application).CascadeWindows()and press Enter. - Check the desktop: your open windows now overlap diagonally, each title bar visible below the last.
Windows 11 does not have a taskbar setting that restores the menu entry, so the command is the direct route on every edition.
What “Cascade Windows” Means
Cascading stacks open windows on top of each other with an offset, so every title bar stays visible and clickable. It is one of three classic shell arrangements, and all three are still exposed as methods of the Shell.Application object.
| Arrangement | What happens to your windows | Shell method | Windows 11 built-in equivalent |
|---|---|---|---|
| Cascade | Windows overlap diagonally with their title bars showing | CascadeWindows() |
None in the taskbar; use the PowerShell command |
| Tile vertically | Windows sit side by side in columns | TileVertically() |
Snap layouts with two or three columns |
| Tile horizontally | Windows are stacked in rows | TileHorizontally() |
Windows key + Alt + Up arrow and Windows key + Alt + Down arrow (top and bottom halves) |
| Minimize all | Every window drops to the taskbar | MinimizeAll() |
Windows key + M |
| Undo minimize all | Minimized windows come back | UndoMinimizeALL() |
Windows key + Shift + M |
Cascade Windows vs. Snap Layouts: Which Should You Use?
Cascade and Snap solve different problems. Cascade lets you see every open window's title bar at once; Snap gives each window its own non-overlapping part of the screen.
| Your situation | Use this | Why |
|---|---|---|
| You have many windows open and want to find one by its title bar | Cascade (Method 1 or Method 2) | Every title bar stays visible in one stack |
| You need two to four windows visible and readable at the same time | Snap layouts (Windows key + Z) | Windows are resized so none of them overlaps |
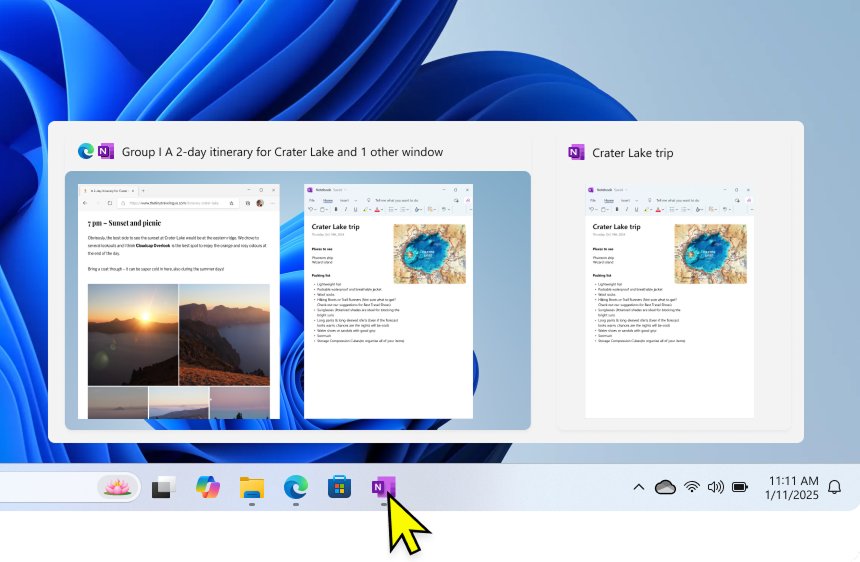
| You keep coming back to the same set of snapped apps | Snap groups | Hover a taskbar icon to restore the whole group |
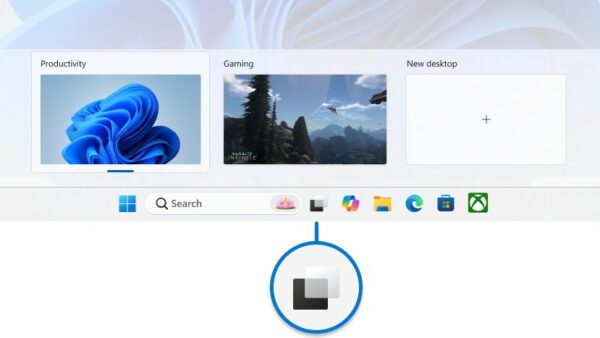
| You want to see everything open, then pick one | Task View (Windows key + Tab) | Shows all windows and desktops as thumbnails |
| You want custom zones or more than four snapped windows | PowerToys FancyZones | Lets you draw your own layout |
| You run a wide monitor and want three columns | Snap layouts | Three-column layouts need a screen at least 1,920 effective pixels wide |
Before You Start: What Cascading Will and Won’t Do
Microsoft describes CascadeWindows as cascading "all of the windows on the desktop." It takes no parameters, so you cannot choose which windows are included.
| Question | Answer |
|---|---|
| Which windows move? | The open windows on your desktop. Restore minimized ones first with Windows key + Shift + M so they are included. |
| Does it replace Snap layouts? | No. Snap settings in Settings > System > Multitasking stay exactly as they are. |
| Does it change any setting? | No. The method moves windows once and returns nothing; no policy, registry value or execution policy changes. |
| Do I need admin rights? | No. The command runs as a normal user in Windows PowerShell. |
| Is it edition-specific? | No. The shell method is part of Windows, so Home and Pro behave the same. |
| Can I undo it with one click? | No. There is no documented undo for a cascade; see How to Restore Windows After Cascading. |
Method 1: Cascade Windows Using PowerShell
New-Object -ComObject creates a COM object from its ProgID. Microsoft's own New-Object reference uses the Shell.Application object and lists CascadeWindows among its methods.
(New-Object -ComObject Shell.Application).CascadeWindows()Creates the Windows shell automation object and calls its CascadeWindows method, the same action the old taskbar menu ran. Paste it into Windows PowerShell or a PowerShell tab in Windows Terminal. It is a single command, not a script file, so the default Restricted execution policy does not block it.
You should see: PowerShell returns to the prompt without output, and your open windows are now stacked diagonally on the screen.
Run the same line again after opening more windows; it re-cascades whatever is open at that moment.
Method 2: Create a One-Click Cascade Windows Shortcut
A desktop shortcut saves you from opening PowerShell each time. The command below builds the shortcut with the documented WScript.Shell shortcut object, so there is no .ps1 file to create and no execution policy to change.
- Press Windows key + R, type
powershelland press Enter. - Paste this block as one line and press Enter:
$w = New-Object -ComObject WScript.Shell; $d = $w.SpecialFolders('Desktop'); $s = $w.CreateShortcut("$d\Cascade windows.lnk"); $s.TargetPath = "$PSHOME\powershell.exe"; $s.Arguments = '-NoProfile -WindowStyle Hidden -Command "(New-Object -ComObject Shell.Application).CascadeWindows()"'; $s.Hotkey = 'CTRL+ALT+C'; $s.Save() - Minimize or close PowerShell and look at the desktop for a new Cascade windows icon.
- Double-click Cascade windows to stack your open windows.
- Keep the shortcut on the desktop if you want the hotkey; the shortcut key only works for shortcuts on the desktop or in the Start menu.
-WindowStyle Hidden keeps the PowerShell window out of sight, and -NoProfile skips loading your PowerShell profile so the shortcut runs fast. $PSHOME points to the Windows PowerShell install folder, so run the block in Windows PowerShell rather than PowerShell 7.
Pin the Cascade Shortcut to the Taskbar or Start Menu
A pin puts the cascade action one click away even when the desktop is covered by windows.
- Press Windows key + D to show the desktop.
- Right-click the Cascade windows shortcut.
- Select Pin to Start. If it is not listed, select Show more options first.
- Select Pin to taskbar from the same menu if your build lists it.
- Open Start and confirm the Cascade windows tile appears in the pinned list.
Leave the original shortcut on the desktop. The Ctrl + Alt + C hotkey belongs to that file, not to the pin.
Add a Keyboard Shortcut for Cascading Windows
Method 2 already assigns Ctrl + Alt + C. Use this command to change the key if another app claims that combination. Microsoft's Hotkey reference accepts CTRL+, ALT+ and SHIFT+ modifiers with a letter, a digit or F1 to F12.
$w = New-Object -ComObject WScript.Shell; $s = $w.CreateShortcut("$($w.SpecialFolders('Desktop'))\Cascade windows.lnk"); $s.Hotkey = 'CTRL+ALT+K'; $s.Save()Opens the existing Cascade windows shortcut on your desktop, replaces its key combination with Ctrl + Alt + K, and saves it. Change 'CTRL+ALT+K' to any free combination; starting with Ctrl + Alt avoids most app shortcuts.
You should see: Press the new combination with several windows open and they cascade without any window flashing on screen.
How to check the cascade worked
- Open at least three windows, such as File Explorer, Settings and a browser.
- Run the command, the shortcut or the hotkey.
- Look for a diagonal stack: each window offset down and to the right, with every title bar visible.
- Click any visible title bar and confirm that window comes to the front.
- Press Windows key + Tab to open Task View and confirm no window was closed or moved to another desktop.
How to Restore Windows After Cascading
Windows has no undo command for a cascade, so put windows back with Snap and the window keys.
- Click the window you want to work in and press Windows key + Up arrow to maximize it.
- Press Windows key + Home to minimize every window except the active one; press it again to bring them back.
- Press Windows key + Left arrow or Windows key + Right arrow to snap two windows side by side.
- Press Windows key + Shift + Down arrow to restore a snapped or maximized window to its previous size.
- Press Windows key + D to show the desktop, and press it again to return the windows.
Arrange windows with Snap layouts and Snap groups instead
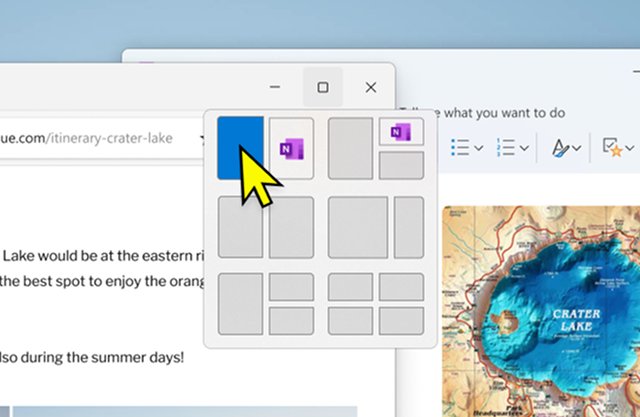
Snap layouts are Microsoft's replacement for tiling in Windows 11. The layouts on offer depend on your display size.
- Click the window you want to place first.
- Press Windows key + Z, or hover over the window's maximize button, to open the Snap flyout.
- Select a zone in one of the layouts; the window moves there.
- Pick the next window from the Snap Assist thumbnails that fill the remaining zones.
- Drag the divider between two snapped windows to resize both at once.
- Later, hover over any app in the group on the taskbar and select the Snap group to bring the whole arrangement back.
You can also drag a window to the top of the screen to open the Snap bar, or drag it to an edge or corner to snap it to half or a quarter of the screen.
Turn Snap features on or off in Multitasking settings
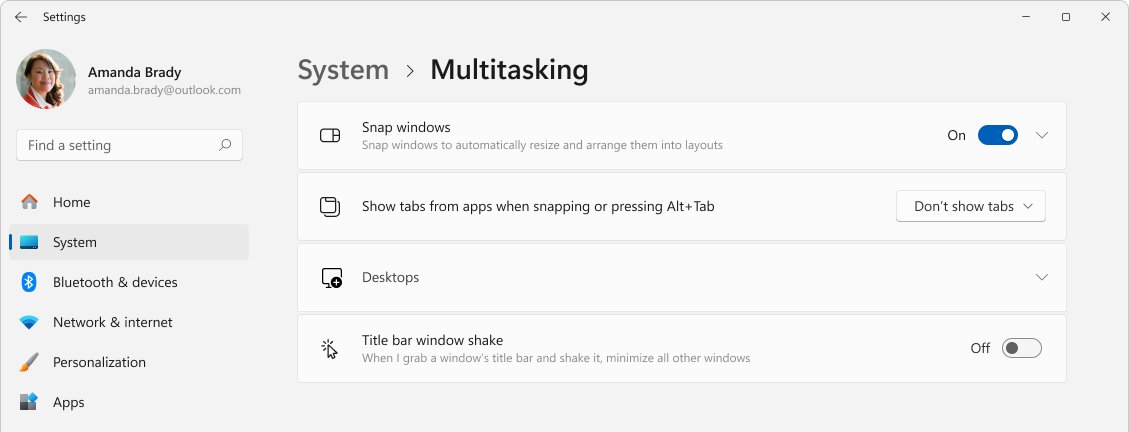
Open Settings > System > Multitasking, turn on Snap windows, and expand it. Each checkbox controls one part of Snap.
| Checkbox | What it controls |
|---|---|
| When I snap a window, show what I can snap next to it | Snap Assist thumbnails |
| Show snap layouts when I hover over a window's maximize button | The Snap flyout |
| Show snap layouts when I drag a window to the top of my screen | The Snap bar |
| Show my snapped windows when I hover over the taskbar apps, in Task View, and when I press Alt + Tab | Snap groups |
| When I drag a window, let me snap it without dragging all the way to the screen edge | Snapping before the pointer reaches the edge |
| Desktops > On the taskbar, show all the open windows | Whether the taskbar lists windows from only the current desktop or all desktops |
Other Useful Window Management Shortcuts in Windows 11
These are Microsoft's documented window keys for Windows 11. Task View is the closest built-in way to see every window at once, like a cascade does.
| Shortcut | What it does |
|---|---|
| Windows key + Tab | Open Task View with every window and desktop |
| Windows key + Z | Open Snap layouts for the active window |
| Windows key + Left arrow / Right arrow | Snap the window to the left or right side |
| Windows key + Alt + Up arrow / Down arrow | Snap the window to the top or bottom half |
| Windows key + Up arrow | Maximize the active window |
| Windows key + Down arrow | Minimize the active window |
| Windows key + Shift + Down arrow | Restore a snapped or maximized window |
| Windows key + Shift + Up arrow | Stretch the window to the top and bottom of the screen |
| Windows key + Shift + Left arrow / Right arrow | Move the window to the monitor on the left or right |
| Windows key + Home | Minimize or restore all windows except the active one |
| Windows key + M / Windows key + Shift + M | Minimize all windows / restore minimized windows |
| Windows key + D | Show or hide the desktop |
| Windows key + comma (,) | Peek at the desktop |
| Ctrl + select a grouped taskbar icon | Cycle through that app's windows |
To spread work across more screen space, open Task View and select New desktop; each desktop keeps its own set of windows.
Using Microsoft PowerToys as an Alternative
PowerToys is Microsoft's own utility set, and its FancyZones tool lets you draw window layouts that Snap does not offer. It runs on Windows 11 and Windows 10 version 2004 or later on x64 or Arm64 PCs.
- Install Microsoft PowerToys from the Microsoft Store.
- Open PowerToys, select FancyZones, and make sure it is turned on.
- Select Open layout editor, or press Windows key + Shift + ` (back-tick).
- Pick a template layout, or create a custom one, and close the editor.
- Hold Shift while dragging a window, then drop it on the highlighted zone.
- Optional: turn on Override Windows Snap to move windows between zones with Windows key + arrow keys.
FancyZones cannot move elevated windows such as Task Manager unless PowerToys itself runs as administrator.
Troubleshooting: If Cascade Windows Does Not Work
The Cascade windows option is missing from the taskbar
The Windows 11 taskbar menu only offers Taskbar settings; the command was not carried over.
- Use Method 1 to run
CascadeWindows()from PowerShell. - Use Method 2 to keep a one-click shortcut with a hotkey.
- Use Windows key + Z if you actually want windows side by side rather than stacked.
The command runs but some windows do not move
Minimized windows sit on the taskbar rather than the desktop, and windows on another virtual desktop are out of view.
- Press Windows key + Shift + M to restore minimized windows.
- Press Windows key + Tab and switch to the desktop that holds the windows.
- Run the command again.
The shortcut or hotkey does nothing
The shortcut target or arguments are wrong, or the hotkey is not on a desktop or Start menu shortcut.
- Run
(New-Object -ComObject Shell.Application).CascadeWindows()manually in PowerShell to confirm the command itself works. - Delete Cascade windows from the desktop and run the Method 2 block again in Windows PowerShell, not PowerShell 7.
- Check the file is on the desktop; a hotkey on a shortcut stored elsewhere is ignored.
- Change the key combination with the command in Add a Keyboard Shortcut for Cascading Windows if another app uses Ctrl + Alt + C.
A saved .ps1 cascade script says running scripts is disabled
Windows clients use the Restricted execution policy by default, which allows single commands but blocks script files.
- Use the Method 2 shortcut, which passes the line to
-Commandand needs no script file. - If you keep a script, set a per-user policy that still checks downloaded scripts:
Set-ExecutionPolicy -ExecutionPolicy RemoteSigned -Scope CurrentUser. - Confirm the file ends in
.ps1and not.ps1.txt.
Is This Safe?
Yes. The cascade command only calls a documented Windows shell method that moves your open windows; it installs nothing and changes no setting. The shortcut uses -Command rather than a script, so you never need to set the execution policy to Bypass or Unrestricted. Microsoft notes the execution policy is not a security boundary, but keeping the default still stops scripts from running by accident. Only paste commands whose every part you can read, like the ones on this page.
Frequently Asked Questions
How do I cascade windows in Windows 11?
Open PowerShell with Windows key + R, type powershell, and run (New-Object -ComObject Shell.Application).CascadeWindows(). Every open window on the desktop is stacked diagonally with its title bar visible. Windows 11 has no menu entry for this.
How do I cascade windows in Windows 11 Pro?
Use the same PowerShell command as on Windows 11 Home: (New-Object -ComObject Shell.Application).CascadeWindows(). The cascade method is part of the Windows shell rather than an edition feature, so the Method 2 shortcut and hotkey work the same way on Pro.
Can I cascade windows from the Windows 11 taskbar?
No. Right-clicking the Windows 11 taskbar shows only Taskbar settings. Pin a cascade shortcut to Start instead, built with the Method 2 command, so the action is one click away.
Why is the Cascade windows option missing in Windows 11?
The redesigned Windows 11 taskbar dropped the classic right-click menu, including Cascade windows. The underlying CascadeWindows shell method is still documented, so a PowerShell command or desktop shortcut can run it.
Is there a keyboard shortcut to cascade windows in Windows 11?
Not by default. Create the Method 2 desktop shortcut and it gets Ctrl + Alt + C as its hotkey. The hotkey works while the shortcut stays on the desktop or in the Start menu.
How do I cascade all open windows on the desktop?
Restore minimized windows with Windows key + Shift + M, then run the cascade command or shortcut. Microsoft describes the method as cascading all windows on the desktop, so switch to the right desktop in Task View first.
How do I arrange windows in Windows 11 without cascading?
Press Windows key + Z to open Snap layouts, choose a zone, and fill the rest from the Snap Assist thumbnails. Snap gives each window its own area, and the arrangement is saved as a Snap group you can restore from the taskbar.
How do I undo cascade windows in Windows 11?
There is no undo command. Maximize the window you need with Windows key + Up arrow, snap others with Windows key + Left or Right arrow, or press Windows key + Home to minimize everything except the active window.