To send your Windows 11 screen to a Miracast TV, projector or adapter, press Windows logo key + K and pick the display; to make the PC itself receive a screen, install the Wireless Display optional feature from Settings > System > Projecting to this PC.
This guide covers both directions: the hardware you need, how to confirm Miracast support, the display modes, projecting from another PC or an Android phone, and fixes when the display never shows up.
The fastest way to cast your Windows 11 screen to a TV
Casting from Windows 11 to a Miracast display needs no extra download. The Wireless Display optional feature is only for the opposite job, receiving a screen.
- Turn on the TV, projector or other display. If you use a Miracast dongle or adapter, plug it into the display first.
- Make sure Wi-Fi is turned on in the Network, Sound, or Battery icons at the right of the taskbar.
- Press Windows logo key + K.
- Select the display you want from the list of available devices.
- Follow any prompt shown on the TV or the PC, such as a PIN. Your desktop now appears on the TV.
If Windows says you need to connect an external display with a cable, the PC does not support Miracast. Jump to the support check below.
What Wireless Display Does in Windows 11
"Wireless display" covers two separate jobs in Windows 11, and each has its own requirement. Mixing them up is the most common reason the setup seems not to work.
| Job | What happens | What you need to install |
|---|---|---|
| Cast from this PC | Your Windows 11 screen appears on a Miracast TV, projector or adapter | Nothing. Casting is built in |
| Project to this PC | Another Windows PC or an Android device shows its screen in a window on this PC | The Wireless Display optional feature (about 1.11 MB) |
| Cast over an existing network | Windows sends the Miracast stream through your router instead of a direct Wi-Fi link, when the receiver supports it | Nothing. Windows uses it only on a trusted connection: Ethernet or a secure Wi-Fi network |
| Cast to a WiGig dock | The PC connects to a monitor or projector attached to a WiGig dock | A PC with WiGig, shown as a WiGig control under Settings > Network & Internet > Airplane mode |
Microsoft's Features on Demand list states it plainly: the Wireless Display feature adds the app that lets other devices project to the computer, and it is not required to project to another device.
What You Need Before You Start
Check both ends of the connection. The requirements differ depending on whether this PC is sending or receiving.
| Role | Requirement | Why it matters |
|---|---|---|
| Sending PC | A Wi-Fi adapter with Wi-Fi turned on | Miracast is built on Wi-Fi Direct, so a wired-only PC cannot cast this way |
| Sending PC | A WDDM 2.0 or later graphics driver with hardware H.264 (AVC) encoding | Microsoft lists both as required for its Miracast stack |
| Sending PC | HDCP 2.x support in the graphics driver | Needed to project protected content from most major streaming services |
| Receiving TV or projector | Built-in Miracast, or a Miracast adapter in an HDMI port | A display without Miracast cannot appear in the Windows + K list |
| Receiving Windows PC | The Wireless Display optional feature, Wi-Fi turned on, and the app open | Without the app launched, the PC is not discoverable |
| Receiving Windows PC | Windows 11, version 22H2 or later for the Wireless Display app | Earlier versions use the Connect app instead |
To confirm your Windows version, open Settings > System > About and read Windows specifications.
Check Whether Your Windows 11 PC Supports Miracast
The DirectX Diagnostic Tool reports Miracast support directly. It is the check Microsoft's own projection troubleshooting uses.
- Press Windows logo key + R to open Run.
- Type
dxdiagand press Enter. - Wait for the tool to finish loading, then select Save All Information.
- Save the
DxDiag.txtfile to your desktop and open it. - Press Ctrl + F and search for
Miracast. - Read the value. Available, with HDCP means the PC can cast and can send protected content.
A quicker test is to press Windows logo key + K. A PC without Miracast shows a message asking you to connect an external display with a cable.
To test whether the PC can receive, open Settings > System > Projecting to this PC. A PC that cannot receive Miracast says so on that page.
Install the Wireless Display Optional Feature
Do this only on the PC that will receive a screen. Casting from the PC works without it.
- Select Start > Settings > System > Projecting to this PC.
- Under Add the "Wireless Display" optional feature to project to this PC, select Optional features.
- Next to Add an optional feature, select View features.
- Type
wireless displayin the search box. - Select the check box next to Wireless Display, then select Next.
- Select Install and wait for the download to finish.
- Select Back to return to the Projecting to this PC page.
Windows downloads the feature from Windows Update, so the PC needs an internet connection during the install.
Install Wireless Display from Command Prompt
DISM installs the same feature by its capability name. Use it when the Settings list is empty or the install button fails.
DISM /Online /Add-Capability /CapabilityName:App.WirelessDisplay.Connect~~~~0.0.1.0Run it in Command Prompt or Terminal opened with Run as administrator. /Online targets the running copy of Windows, and /Add-Capability fetches the package from Windows Update when no /Source is given. To check the result, run DISM /Online /Get-CapabilityInfo /CapabilityName:App.WirelessDisplay.Connect~~~~0.0.1.0.
You should see: DISM reports that the operation completed successfully, and Get-CapabilityInfo lists the capability as installed. Wireless Display then appears in the search results.
Enable Projecting to This PC
These settings decide who can find the PC and whether you approve each connection. They sit on the same Settings page as the install link.
- Open Settings > System > Projecting to this PC.
- In the first drop-down, choose Available everywhere on secure networks for home or office use, or Available everywhere if the network is not marked secure.
- Under Ask to project to this PC, choose First time only or Every time.
- Leave Require PIN for pairing off for home use, or turn it on in shared spaces.
- Choose whether the PC accepts projection only when it is plugged into power.
Microsoft's help suggests First time only for convenience. Every time makes Windows ask for your permission on every attempt.
Open the Wireless Display App on the Receiving PC
The receiving PC appears in the sender's list only while this app is running.
- Select the search box on the taskbar.
- Type
wireless display. - Select Wireless Display in the results. The app opens and waits for a connection.
- On a Windows 11 version earlier than 22H2, type
connectinstead and open the Connect app. - When another device asks to project, select Yes to accept.
- Drag, resize or maximise the app window that shows the incoming screen.
On Windows 10, the same feature is reached through Action Center and the Connect app. The Windows 10 display settings guide covers that version's display page.
Cast From a Windows 11 PC to a TV, Projector, or Adapter
Every route below opens the same Windows connection list. Pick the one that matches where you are.
| Your situation | Use this | Steps |
|---|---|---|
| Keyboard to hand | Windows + K shortcut | Press Windows logo key + K, then select the TV, projector or adapter |
| You prefer search | Search for Cast | Type Cast in Windows search, select Connect to a wireless display, pick the device |
| You are already in Display settings | Settings > System > Display | Under Multiple displays, select Connect to a wireless display, then Connect |
| The display sits on a WiGig dock | Windows + K with WiGig on | Turn on the dock and the display, confirm WiGig is on, press Windows logo key + K, select the dock |
| You only want one browser tab on a Chromecast | Chrome's Cast menu | In Chrome, select More > Cast, save, and share > Cast, then the Chromecast |
The 10 ways to open Display settings in Windows 11 guide lists every route to the Display page used in the third row.
Choose Duplicate, Extend, or Second Screen Only
Windows starts a wireless display in a projection mode you can change at any time. Press Windows logo key + P while connected to switch.
| Mode | What you see | Use it for |
|---|---|---|
| PC screen only | Everything stays on the PC's own screen | Pausing what the TV shows without dropping the connection setup |
| Duplicate | The same picture on the PC and the wireless display | Presentations and showing a room what you are doing |
| Extend | One desktop spread across both screens; you can drag windows between them | Playing a video on the TV while you keep working on the laptop |
| Second screen only | Everything on the wireless display, the PC screen goes blank | Watching films on a TV with the laptop lid open |
Adjust Resolution, Scale, and Display Position
A wireless display is managed like any other monitor once it is connected. All three controls are on Settings > System > Display.
| Change | Where in Windows 11 | What to pick |
|---|---|---|
| Resolution | Display resolution row, after selecting the wireless display at the top | The value marked (Recommended) first; lower it if the picture stutters |
| Scale | Scale & layout > Scale | A larger percentage when text on the TV is too small to read from the sofa |
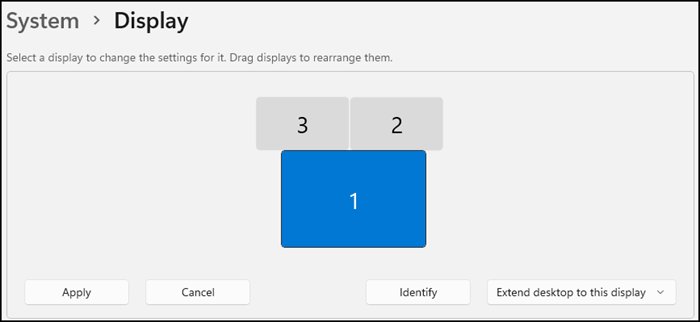
| Display position | Drag the numbered display boxes at the top, then select Apply | Match the boxes to where the TV physically sits so the mouse crosses over naturally |
| Which box is which | Select Identify under Multiple displays | Each screen shows its number |
| Mode | The Multiple displays drop-down, or Windows logo key + P | Duplicate, Extend or Second screen only |
Project From Another Windows PC to Your Windows 11 PC
Set up the receiving PC first with the three sections above. Then work on the PC you are projecting from.
- On the receiving PC, open the Wireless Display app and leave it running.
- On the sending PC, turn on Wi-Fi.
- Press Windows logo key + K on the sending PC.
- Select the name of the receiving PC in the list.
- On the receiving PC, select Yes when asked to allow the connection, and enter the PIN if one is shown.
- Press Windows logo key + P on the sending PC to switch between Duplicate and Extend.
If the receiving PC is missing from the list, confirm it has Wi-Fi turned on and the Wireless Display app installed and open.
Project From Android to a Windows 11 PC
An Android device can project to a Windows PC that is set up as a wireless display. Microsoft recommends this when the phone cannot reach a Miracast screen directly.
- On the Windows 11 PC, install Wireless Display and set Projecting to this PC to Available everywhere or Available everywhere on secure networks.
- Open the Wireless Display app on the PC.
- On the Android device, open its screen mirroring or cast option. The name and location vary by phone maker.
- Select the Windows PC's name in the list of nearby displays.
- On the PC, select Yes when Windows says another device wants to project.
- Resize or maximise the app window to fit the phone's screen.
Check your phone maker's help pages for the exact name of the mirroring feature on your model.
How to check the wireless display is working
- Press Windows logo key + P and select Extend. The mouse pointer should move off the edge of the laptop screen and onto the TV.
- Open Settings > System > Display and select Identify. A number appears on the wireless display as well as on the PC.
- Open Settings > Bluetooth & devices > Devices and look under Wireless displays & docks. The TV or adapter is listed there after the first connection.
- Play a short video and listen. If the sound stays on the laptop, open the output list from the Speakers icon and pick the TV.
Disconnect From a Wireless Display
Pick the step that matches how far you want to go: stop the picture, end a received session, or forget the device.
- To stop showing anything on the TV right away, press Windows logo key + P and select PC screen only.
- To end a session on a receiving PC, close the Wireless Display app window.
- To stop a Chrome tab cast, select Cast on the right of the address bar, then Stop casting.
- To forget the TV or adapter, open Settings > Bluetooth & devices > Devices.
- Under Wireless displays & docks, select the device and choose Remove device, then Yes.
- To remove the receiving feature, run
DISM /Online /Remove-Capability /CapabilityName:App.WirelessDisplay.Connect~~~~0.0.1.0in an administrator Command Prompt.
Troubleshooting Wireless Display in Windows 11
Work through the symptom that matches what you see. Restart the PC and the wireless display once before anything else.
Wi-Fi is off or the wireless adapter is disabled
Miracast rides on Wi-Fi Direct, so casting and receiving both stop when the wireless adapter is off.
- Open Settings > Network & internet > Airplane mode and make sure Airplane mode is off.
- Open Settings > Network & internet and make sure Wi-Fi is turned on.
- If Wi-Fi is missing, right-click Start, select Device Manager and expand Network adapters.
- Right-click your Wi-Fi adapter and select Enable device if it is disabled.
- Press Windows logo key + K again.
Your TV or wireless display does not appear in the list
The display lacks Miracast, is off, or the saved pairing is stale.
- Confirm the TV supports Miracast. If it does not, plug a Miracast adapter into an HDMI port.
- Turn the TV or adapter on, and plug the adapter into the display if you use one.
- Open Settings > Bluetooth & devices > Devices, remove the display under Wireless displays & docks, and connect again.
- Update the adapter's firmware using the maker's support site or its app from Microsoft Store.
Another Windows PC is not discoverable
The Wireless Display app is missing or closed, or Projecting to this PC blocks discovery.
- On the target PC, search for
wireless displayand open the app. - Open Settings > System > Projecting to this PC and set it to one of the Available everywhere options.
- Confirm Wi-Fi is on for the target PC.
- Search again from the sending PC with Windows logo key + K.
Wireless Display does not appear in Optional features, or fails to install
The feature downloads from Windows Update, and a work PC may point to a company update server instead.
- Connect the PC to the internet and open Settings > Windows Update to install pending updates.
- Try the DISM command from the Command Prompt section above.
- On a managed work PC, ask IT: DISM checks the Group Policy source before Windows Update.
Connection fails after selecting the display
Old drivers, a Group Policy on a work PC, or the firewall blocking Miracast traffic.
- In Device Manager, open the Wi-Fi adapter and the display adapter under Display adapters and update each driver.
- Install the latest firmware for the wireless display or adapter.
- On a domain-joined work PC, ask IT to check the wireless network policy, which can block Miracast.
- Remove the device under Wireless displays & docks, restart both ends, and connect again.
The picture is laggy or choppy
A busy Wi-Fi channel, or the adapter switching between your router's channel and the Miracast link.
- Move the PC closer to the display and away from other wireless gear.
- Connect the PC to your router's 5 GHz band if it has one.
- Lower the resolution in Settings > System > Display for the wireless display.
- Update the Wi-Fi driver; Microsoft notes some drivers perform poorly on DFS channels.
The image does not fit the TV screen
The resolution or scale Windows chose does not match the TV.
- Open Settings > System > Display and select the wireless display.
- Set Display resolution to the (Recommended) value.
- Change Scale until text and the taskbar fit.
Audio plays from the wrong device
Windows kept the laptop speakers as the default output.
- Select the Speakers icon on the taskbar.
- Select the arrow to the right of the volume slider (Select a sound output).
- Choose the TV or wireless display from the list.
- To make it stick, open Settings > System > Sound and pick the device under Output.
Security and Privacy Tips
Projecting to this PC opens a door for nearby devices. These settings keep that door under your control.
| Risk | Setting or habit | Where |
|---|---|---|
| A stranger projects to your laptop in a café or office | Choose Available everywhere on secure networks, or turn projection off when not in use | Settings > System > Projecting to this PC |
| A connection you did not expect | Set Ask to project to this PC to Every time | Same page |
| Pairing with the wrong device in a crowded room | Turn on Require PIN for pairing | Same page |
| The receiver controlling your PC | Windows allows input back from a Miracast receiver only if you explicitly allow it; decline when you do not trust the screen | Prompt during connection |
| Notifications or private tabs shown to a room | Use Extend and keep private windows on the laptop screen | Windows logo key + P |
| An unused receiving feature left installed | Remove Wireless Display with DISM if you never receive screens | Administrator Command Prompt |
Wireless Display vs. Chromecast, AirPlay, and HDMI
Windows 11's built-in wireless display speaks Miracast only. The other options work differently and need different hardware.
| Option | What it sends | Works from Windows 11 by | Best for |
|---|---|---|---|
| Miracast (Wireless Display) | The whole desktop, with Duplicate or Extend | Windows logo key + K, built in | Presentations and a second screen without cables |
| Chromecast / Google Cast | A Chrome tab, the whole screen, or a local media file | Chrome's Cast menu; the PC and the Chromecast on the same Wi-Fi | Web video, where sound plays only on the TV when you cast a tab |
| AirPlay | Video or a mirrored screen from Apple devices | Not offered for Windows; Apple lists iPhone, iPad and Mac as senders | Households built around Apple TV |
| HDMI cable | The full desktop over a wire | Plugging in; nothing to pair | Gaming, fast motion and anything where lag matters |
Best Practices for a Reliable Connection
Most wireless display trouble comes from the radio link, not from Windows settings. Set up the link well once and casting stays quick.
| Practice | Why |
|---|---|
| Connect the PC to your router's 5 GHz band | Microsoft notes 5 GHz has more bandwidth and less interference than 2.4 GHz for Miracast |
| Keep the PC and the receiver on the same trusted network | Windows can then send the stream over the existing network, which connects faster and more reliably |
| Prefer a PC with a 2×2 Wi-Fi 5 or newer adapter | Microsoft's checklist ties 2×2 antennas to a higher-quality stream |
| Keep Wi-Fi, graphics and adapter firmware up to date | Driver and firmware updates are Microsoft's first fix for failed connections |
| Use a cable for games | Microsoft ties wireless lag to busy or switching Wi-Fi channels; a cable skips the radio link |
| Remove and re-add a display that starts failing | Windows remembers each receiver it has used; removing it under Wireless displays & docks is on Microsoft's fix list |
Frequently Asked Questions
How do I enable Wi-Fi for wireless display on a PC?
Select the Network, Sound or Battery icons on the taskbar and turn on Wi-Fi, or open Settings > Network & internet and switch Wi-Fi on. Miracast needs the Wi-Fi radio on both ends, even when the PC is also plugged into Ethernet.
How do I enable the wireless network adapter if Wi-Fi is missing?
Right-click Start, open Device Manager and expand Network adapters. Right-click the Wi-Fi adapter and select Enable device. If the adapter is not listed, Windows does not detect it, and you need the driver from the PC maker's website.
How do I turn on wireless capability if airplane mode is on?
Open Settings > Network & Internet > Airplane mode and turn Airplane mode off. Airplane mode switches off Wi-Fi, which also blocks Miracast casting and receiving. Then check that Wi-Fi itself is on before pressing Windows + K.
Do I need the Wireless Display feature to cast to a TV?
No. Casting from Windows 11 to a Miracast TV, projector or adapter is built in and starts with Windows + K. The Wireless Display optional feature is only needed on a PC that should receive another device's screen.
How do I know if my PC supports Miracast?
Run dxdiag, select Save All Information and search the saved text file for Miracast. "Available, with HDCP" means the PC supports it. Pressing Windows + K also tells you: an unsupported PC asks you to connect a display with a cable.
Why is Wireless Display missing from Optional features?
The feature downloads from Windows Update, so a PC offline or tied to a company update server may not list it. Install pending updates, then try DISM /Online /Add-Capability with the name App.WirelessDisplay.Connect~~~~0.0.1.0 from an administrator Command Prompt.
Can I project my Android phone to a Windows 11 PC?
Yes, if the phone has a screen mirroring feature that supports Miracast. Install Wireless Display on the PC, open the app, allow projection in Settings > System > Projecting to this PC, then pick the PC from the phone's mirroring list.
Can Windows 11 cast to a Chromecast with Windows + K?
No. Windows + K lists Miracast displays. To reach a Chromecast, open Chrome, select More > Cast, save, and share > Cast, and choose the device. Both the PC and the Chromecast must be on the same Wi-Fi network.
Can I watch protected streaming video on a wireless display?
Only if the PC's graphics driver supports HDCP 2.0 or later. Microsoft states that most major streaming services require it to project protected content. The dxdiag check shows "Available, with HDCP" on a PC that has it.