Download the Office Deployment Tool (ODT) free from the Microsoft Download Center, extract it to get setup.exe and a sample configuration.xml, edit the XML, then run setup.exe /configure configuration.xml from an elevated Command Prompt.
This guide covers each step in order, the configuration options that matter, Office LTSC, Project and Visio installs, network-share deployments, updating and removing Office, and fixes for the errors admins hit most.
The fastest way to install Office with the Office Deployment Tool
This route installs Microsoft 365 Apps straight from Microsoft's Content Delivery Network (CDN) on one PC. You need local administrator rights on that PC.
- Open the Office Deployment Tool page on the Microsoft Download Center and select Download.
- Create a folder such as
C:\ODT, run the downloaded self-extracting file, and extract it into that folder. - Open the Office Customization Tool, choose your product, architecture, channel and languages, then select Finish and Export to save
configuration.xmlintoC:\ODT. - Open Command Prompt as administrator and run
cd C:\ODT. - Run
setup.exe /configure configuration.xmland wait for the prompt to return.
Leave SourcePath out of the XML for this route. Without it, the ODT looks for installation files next to setup.exe and then falls back to the CDN.
What Is the Office Deployment Tool?
The Office Deployment Tool is Microsoft's command-line installer for Click-to-Run versions of Office. It gives admins control over which products and languages install, how Office updates, and whether users see the installer.
| Part | What it is | What you do with it |
|---|---|---|
officedeploymenttool_<version>.exe |
The self-extracting download from Microsoft | Run it once to unpack the two files below |
setup.exe |
The ODT itself, a command-line tool | Run it with /download, /configure or /customize |
configuration.xml |
A sample configuration file | Edit it, or replace it with one exported from the Office Customization Tool |
| Office Customization Tool (config.office.com) | Microsoft's web front end that writes the XML for you | Pick options in a form and export the file |
| Office CDN | Microsoft's online source for Office installation files | The default source when no local files are found |
Supported products include Microsoft 365 Apps for enterprise and for business, Visio and Project desktop apps, and volume-licensed Office LTSC 2024, LTSC 2021 and Office 2019. Home users installing their own Microsoft 365 subscription do not need the ODT; Microsoft points them to the normal sign-in download instead.
Before You Start: Requirements and Important Notes
| Requirement | Detail |
|---|---|
| Operating system | The Download Center lists Windows 10, Windows 11 and Windows Server 2016, 2019, 2022 and 2025. Arm-based PCs need Windows 11 and the 64-bit edition of Microsoft 365 Apps. |
| Administrator rights | You must have local administrator permissions on the client PC. Run the ODT from an elevated Command Prompt. |
| Internet and network access | Download mode always needs network connectivity, even when files come from a local DownloadPath. Clients installing from a share need read access to that share. |
| Supported Office products | Click-to-Run products: Microsoft 365 Apps, Project, Visio, and volume-licensed LTSC 2024, LTSC 2021 and 2019 editions. |
| Licensing and activation | Microsoft 365 Apps activates through the user's account and needs no product key. Volume-licensed LTSC products need a PIDKEY for KMS or MAK activation. |
| Existing Office installs | 32-bit and 64-bit Office cannot sit side by side. Older MSI versions (2007 to 2016) should be removed with RemoveMSI. |
| ODT version | Always download the current ODT before a deployment. Microsoft publishes a new build regularly, and older builds do not know newer options. |
Office installs to the system drive, usually C:\, and the install location cannot be changed.
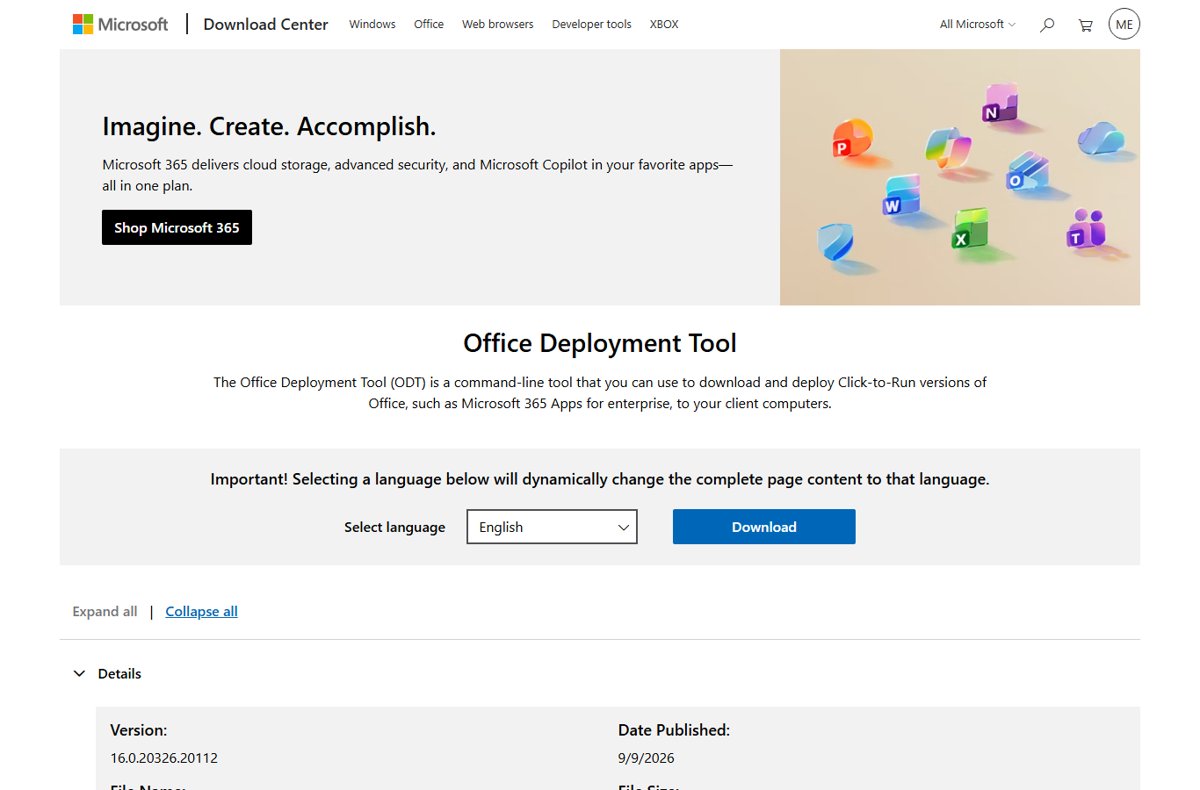
Step 1: Download the Office Deployment Tool
The ODT is free and published only on Microsoft's own Download Center. The file is small, about 3.4 MB for the September 2026 build.
- Go to the Office Deployment Tool download page on microsoft.com.
- Select Download and save the
officedeploymenttoolexecutable. - Create an empty working folder, for example
C:\ODT. - Double-click the downloaded file and extract its contents to
C:\ODTwhen it asks for a folder. - Open
C:\ODTand confirm it containssetup.exeand one or more sample XML files.
Do not double-click setup.exe to install Office. It is a command-line tool and needs a mode and a configuration file to do anything useful.
Step 2: Understand How ODT Commands Work
Every ODT command has the same shape: setup.exe, a mode switch, and the path to a configuration file. The XML decides what happens; the mode decides whether files are downloaded, installed or only customised.
| Mode | Example command | What it does |
|---|---|---|
| Download | setup.exe /download downloadconfig.xml |
Copies installation files from the CDN to the SourcePath folder. Only missing files are fetched on later runs. |
| Configure | setup.exe /configure installconfig.xml |
Installs, changes, updates or removes Office on the PC it runs on. |
| Customize | setup.exe /customize preferencesconfig.xml |
Applies only the application preferences in <AppSettings> to an existing install and ignores every other setting. |
| Help | Run setup.exe in help mode |
Prints the tool's command-line help. |
The configuration file can have any name as long as it ends in .xml. Keep separate files for download and install so you can reuse each one.
Step 3: Create a Basic Configuration XML File
Open Notepad, paste this Microsoft sample, and save it as configuration.xml in the ODT folder. It installs 64-bit Microsoft 365 Apps for enterprise in English on Monthly Enterprise Channel with no installer UI.
<Configuration>
  <Add OfficeClientEdition="64" Channel="MonthlyEnterprise">
    <Product ID="O365ProPlusRetail">
      <Language ID="en-us" />
    </Product>
  </Add>
  <Updates Enabled="TRUE" />
  <Display Level="None" AcceptEULA="TRUE" />
</Configuration>
Add holds the architecture, channel and products. Product ID selects the suite. Language ID picks the language, and the first language listed sets the Windows shell language for Office. Display Level="None" hides the installer, and AcceptEULA="TRUE" suppresses the license prompt.
You should see: A file named configuration.xml, not configuration.xml.txt, sitting next to setup.exe.
Build the XML in the Office Customization Tool instead
Microsoft recommends the web-based Office Customization Tool over hand editing. It writes a valid file and lists every option with its description.
- Open config.office.com/deploymentsettings. Sign in first if you want to save the file to the cloud.
- In Product and releases, choose the architecture, the products, the update channel and the version.
- In Language, add languages, or select Match operating system.
- In Installation, choose whether files come from the cloud or a local source, and whether users see the install.
- In Update and upgrade, choose the update source, and whether to remove MSI versions of Office.
- In Licensing and activation, accept the license terms automatically and set the activation type or product key.
- Select Finish, review the right-hand pane, select Export, accept the terms, name the file, and select Export again.
To change an existing file, open the tool, select Import, choose the XML, edit it and export it again.
Step 4: Download Office Installation Files
Skip this step if clients install straight from the CDN. Run it when you want a local copy for offline PCs, slow links or a network share. Add SourcePath="\\server\share" to the Add element first.
cd C:\ODT
setup.exe /download configuration.xml
The ODT reads the products, languages, channel and architecture from the XML and saves the matching files to SourcePath. With no SourcePath, files land in the ODT folder. The window shows no progress; the prompt returns when the download finishes.
You should see: A folder named Office inside SourcePath, containing Data and a subfolder named after the build number, such as 16.0.xxxxx.xxxxx.
Step 5: Install Office with ODT
Run configure mode on the PC that should get Office, from an elevated Command Prompt in the ODT folder.
setup.exe /configure configuration.xmlThe ODT installs what the XML lists, from SourcePath if it is set or the CDN if not. With Display Level="Full" users see the normal Office installer; with None it runs silently.
You should see: The Command Prompt prints Products configured successfully. when the install ends.
How to Install Office from a Network Share
A share lets many PCs install from one local copy instead of each downloading Office from the internet. Microsoft still recommends the CDN when bandwidth allows.
- Create the shared source folder on a server, for example
\\server\share, readable by the accounts that will run the install. - Use SourcePath in the XML: set
<Add SourcePath="\\server\share" ...>. Do not add\Officeto the end of the path. - Run
setup.exe /download configuration.xmlonce from the ODT folder to fill the share. - Copy
setup.exeand the sameconfiguration.xmlto the share. - Install from the network share: on each client, run the command with full UNC paths, for example
\\server\share\setup.exe /configure \\server\share\configuration.xml. - Add
AllowCdnFallback="True"toAddif a language pack is missing from the share and clients may fetch it from the CDN.
To feed a branch-office share from a central one, add DownloadPath="\\servera\share" and a fixed Version to the download XML. DownloadPath does not work without Version.
Common Configuration Options You Should Know
These are the settings admins change most. Each one goes inside configuration.xml, and the OCT sets the same values through its form.
| Goal | XML setting | Values and notes |
|---|---|---|
| Choose 64-bit or 32-bit Office | OfficeClientEdition on Add |
64 or 32. If left out on a clean PC, the ODT picks 64-bit, or 32-bit on 32-bit Windows or under 4 GB RAM. It must match any Office already installed. |
| Switch an existing install to 64-bit | MigrateArch="TRUE" on Add |
Converts the installed architecture to the one in OfficeClientEdition. |
| Select an update channel | Channel on Add |
Current (default on new installs), MonthlyEnterprise, SemiAnnual, CurrentPreview, SemiAnnualPreview, BetaChannel (test only, unsupported). |
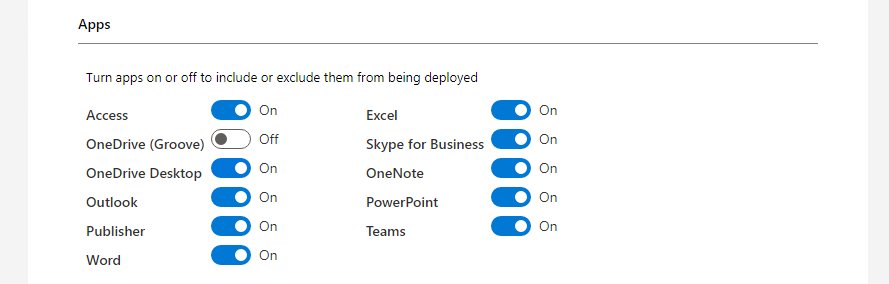
| Exclude specific Office apps | <ExcludeApp ID="..." /> inside Product |
Access, Excel, Groove, Lync, OneDrive, OneNote, Outlook, OutlookForWindows, PowerPoint, Publisher, Teams, Word. |
| Install multiple languages | Several <Language ID="..." /> lines |
The first language sets the shell UI. MatchOS copies the Windows languages; add Fallback="en-us" for unsupported ones. |
| Remove existing MSI Office versions | <RemoveMSI /> |
Uninstalls 2007, 2010, 2013 and 2016 MSI installs of Office, Visio and Project first. Use IgnoreProduct to keep one. |
| Enable shared computer activation | <Property Name="SharedComputerLicensing" Value="1" /> |
For Remote Desktop Services hosts. Does not apply to Office LTSC. |
| Hide the installer | <Display Level="None" AcceptEULA="TRUE" /> |
No progress bars, prompts or error messages are shown. |
| Close apps that block setup | <Property Name="FORCEAPPSHUTDOWN" Value="TRUE" /> |
Default is FALSE. TRUE can lose unsaved work. |
| Pin the build | Version on Add |
A build number, or MatchInstalled to add Visio, Project or a language without updating. Set Channel too. |
| Apply app preferences | <AppSettings> |
Registry-backed preferences such as macro warnings. Build them in the OCT Application preferences section. |
Installing Office LTSC, Project, and Visio
Project and Visio are extra Product entries in the same file. Volume-licensed LTSC products also need their own channel and a product key.
| You are installing | Product ID | Channel and licensing |
|---|---|---|
| Microsoft 365 Apps for enterprise (E3/E5 plans) | O365ProPlusRetail |
Any Microsoft 365 channel; user sign-in activation |
| Microsoft 365 Business Standard or Business Premium | O365BusinessRetail |
Any Microsoft 365 channel; user sign-in activation |
| Visio or Project subscription alongside Microsoft 365 Apps | VisioProRetail / ProjectProRetail |
Same channel and architecture as the installed suite |
| Office LTSC Professional Plus 2024 / Standard 2024 | ProPlus2024Volume / Standard2024Volume |
PerpetualVL2024; PIDKEY with a GVLK (KMS) or MAK key |
| Project or Visio 2024 volume | ProjectPro2024Volume, ProjectStd2024Volume, VisioPro2024Volume, VisioStd2024Volume |
PerpetualVL2024; PIDKEY |
| Office LTSC 2021 volume products | ProPlus2021Volume and matching IDs |
PerpetualVL2021; PIDKEY |
| Office Professional Plus 2019 / Standard 2019 | 2019 volume IDs | PerpetualVL2019; PIDKEY |
Plans sold without Teams use their own IDs, such as O365ProPlusEEANoTeamsRetail. Microsoft warns that a wrong product ID leaves Office unable to activate, so check your plan in the supported product ID list.
Downloading LTSC files pulls every volume-licensed product for that architecture at once, so one share serves Office, Project and Visio. The 32-bit and 64-bit files are downloaded separately.
Office LTSC 2024 sample configuration
This is Microsoft's LTSC 2024 sample. It installs 64-bit Office LTSC Professional Plus 2024 in English from a share, adds German and Spanish proofing tools, and removes older MSI Office.
<Configuration>
  <Add OfficeClientEdition="64" Channel="PerpetualVL2024" SourcePath="\\Server\Share">
    <Product ID="ProPlus2024Volume" PIDKEY="#####-#####-#####-#####-#####">
      <Language ID="en-us" />
    </Product>
    <Product ID="ProofingTools">
      <Language ID="de-de" />
      <Language ID="es-es" />
    </Product>
  </Add>
  <RemoveMSI />
  <Display Level="None" AcceptEULA="TRUE" />
</Configuration>
Replace the ##### block with your MAK key, or with the published GVLK if you activate through KMS. For Visio or Project 2024, add a second Product element with its volume ID and key.
You should see: After setup.exe /configure, the prompt returns and the LTSC apps open without a license prompt.
How to Update Office with ODT
Click-to-Run Office updates itself from the CDN by default. Use the ODT when you want updates to come from your own share, or to move PCs to another channel or build.
<Updates Enabled="TRUE" UpdatePath="\\server\updates" Channel="MonthlyEnterprise" />Add this line to the XML and run setup.exe /configure on the client. UpdatePath accepts a network, local or HTTP path; download fresh builds into it with /download. TargetVersion pins a build, and Deadline forces it by a UTC date. Rerunning /configure with the current files also updates Office, copying only changed files. A Group Policy Update Channel setting overrides the ODT channel.
You should see: In any Office app, File > Account shows the new channel and build after the next update cycle.
How to Remove Office with ODT
Removal uses the Remove element and configure mode. To remove Microsoft 365 Apps for enterprise only, list its Product ID without a language; to remove all Click-to-Run Office products, use All="TRUE".
<Configuration>
  <Remove All="TRUE" />
  <Display Level="None" AcceptEULA="TRUE" />
</Configuration>
Save it as remove.xml and run setup.exe /configure remove.xml as administrator. All="TRUE" removes every Microsoft 365 Apps product and language, including Project and Visio. To drop one language, use <Remove><Product ID="O365ProPlusRetail"><Language ID="es-es" /></Product></Remove> instead. To drop one app, rerun the install XML with an ExcludeApp line.
You should see: Products configured successfully. in the Command Prompt, and the Office apps gone from the Start menu.
How to check the deployment worked
- After
/download, open theSourcePathfolder and confirm Office > Data > a build-number folder exists. - After
/configure, read the last line of the Command Prompt. Products configured successfully. means the ODT finished without error. - Open Word or Excel, go to File > Account, and check the product name, channel and version.
- Confirm excluded apps such as Publisher or Access are missing from the Start menu.
- If anything failed, open
%temp%and read the newest ODT log file for the error.
Best Practices for Reliable Deployments
| Practice | Why it matters |
|---|---|
| Download the newest ODT before each project | Microsoft's first troubleshooting step is always the current build; old builds miss new channels and properties. |
Pin Channel whenever you pin Version |
Without a channel, the default channel is used and may not contain that version. |
Set AcceptEULA="TRUE" for unattended installs |
Otherwise users can be stopped by a license dialog. |
| Pick one architecture per file | Mixed 32-bit and 64-bit Office is not supported; the OCT enforces one architecture per file too. |
| Check languages against the product | Project and Visio do not support English (UK), French (Canada) or Spanish (Mexico); the install fails if you list them. |
Include RemoveMSI when replacing Office 2007 to 2016 |
It removes the old MSI installs before Click-to-Run Office goes on. |
| Test on a pilot group first | Display Level="None" hides every error message, so failures only show in the logs. |
Keep FORCEAPPSHUTDOWN at FALSE unless users are warned |
TRUE closes blocking apps and unsaved work can be lost. |
Troubleshooting Common ODT Problems
The ODT writes its logs to %temp% on the PC where it ran. Open that folder first; the newest log names the failing step.
The Office Deployment Tool is not working at all
Usually an outdated ODT build, a Command Prompt without admin rights, or a command run from the wrong folder.
- Download the current ODT from the Microsoft Download Center and extract it over the old files.
- Open Command Prompt with Run as administrator.
- Run
cdto the folder that holdssetup.exeand the XML, or give full paths to both. - Check the XML file name in the command matches the file on disk, including the
.xmlextension.
setup.exe /download seems to do nothing
Download mode shows no progress; the files arrive in the background.
- Leave the Command Prompt open until the prompt returns.
- Watch the
SourcePathfolder for Office > Data to grow. - Remove
Language ID="MatchInstalled"from a download XML; it cannot be used with/download.
Install fails on a PC that already has Office
The XML asks for a different architecture than the installed Office, and mixed architectures are not supported.
- Check whether the installed Office is 32-bit or 64-bit.
- Set
OfficeClientEditionto match it, or addMigrateArch="TRUE"to convert the existing install. - Add
<RemoveMSI />if an old MSI version of Office is present.
Install fails after adding languages, Project or Visio
A listed language is not supported by that product; the OCT does not stop you selecting one.
- Remove English (United Kingdom), French (Canada) and Spanish (Mexico) from the Project and Visio
Productentries. - Add
AllowCdnFallback="True"if the language pack is missing from your share. - Run
setup.exe /configureagain.
Office installs but will not activate
The product ID does not match the license, or a volume product has no key.
- Check the Product ID against your plan in Microsoft's product ID list.
- For LTSC or 2019 volume products, add a
PIDKEYwith your MAK key or the GVLK for KMS. - Remove any
PIDKEYfrom Microsoft 365 Apps products; they activate through the user's account.
Install from a network share fails
Relative paths, a SourcePath that ends in \Office, or a DownloadPath with no Version.
- Run the command with full UNC paths for both
setup.exeand the XML. - Set
SourcePathto the share root, not theOfficesubfolder inside it. - Add a
Versionattribute wheneverDownloadPathis used.
Example Complete Configuration for a Business Deployment
This file suits a small business on Microsoft 365 Business Standard or Business Premium. It installs 64-bit apps on Current Channel in English, skips Access and Publisher, removes old MSI Office, and runs silently.
<Configuration>
  <Add OfficeClientEdition="64" Channel="Current">
    <Product ID="O365BusinessRetail">
      <Language ID="en-us" />
      <ExcludeApp ID="Access" />
      <ExcludeApp ID="Publisher" />
    </Product>
  </Add>
  <Updates Enabled="TRUE" Channel="Current" />
  <RemoveMSI />
  <Property Name="FORCEAPPSHUTDOWN" Value="FALSE" />
  <Display Level="None" AcceptEULA="TRUE" />
</Configuration>
Save it as business.xml and run setup.exe /configure business.xml on each PC. Add SourcePath="\\server\share" to Add and run /download first if PCs should install from the office file server. For Microsoft 365 Apps for business, use O365BusinessEEANoTeamsRetail; for enterprise plans, swap in O365ProPlusRetail and consider MonthlyEnterprise.
You should see: Products configured successfully. and Word, Excel, PowerPoint and Outlook in the Start menu, with no Access or Publisher.
Frequently Asked Questions
How do you use the Office Deployment Tool?
Download the ODT from Microsoft, extract setup.exe and the sample XML, then edit configuration.xml or export one from config.office.com. Run setup.exe /download to cache files if needed, and setup.exe /configure to install Office, as administrator.
How do you run the Office Deployment Tool?
Open Command Prompt as administrator, change to the folder holding setup.exe, and run setup.exe /configure configuration.xml. The tool is command-line only, so double-clicking setup.exe does not install Office. Use full UNC paths when both files sit on a network share.
How do you install Office using the deployment tool?
Create an XML file that lists the product, languages, architecture and channel, then run setup.exe /configure yourfile.xml from an elevated Command Prompt. Without a SourcePath, the ODT installs straight from Microsoft's CDN. The prompt shows Products configured successfully. when installation finishes.
Why is the Office Deployment Tool not working?
The usual causes are an outdated ODT build, a Command Prompt without admin rights, an architecture that clashes with installed Office, or an unsupported language. Download the newest ODT, run it elevated, and read the newest log in %temp% to see the exact failing step.
Is the Office Deployment Tool free?
Yes. Microsoft offers the Office Deployment Tool free from the Microsoft Download Center. The tool itself costs nothing, but the Office it installs still needs a valid license, either a Microsoft 365 subscription or a volume license key for LTSC editions.
Is the Office Deployment Tool safe?
Yes, when you download it from Microsoft's own Download Center page. It is Microsoft's official tool for enterprise Office installs and pulls Office files from Microsoft's CDN. Avoid copies from download portals, and always use the current version Microsoft publishes.
Can the Office Deployment Tool install Office LTSC 2024?
Yes. Use a product ID such as ProPlus2024Volume, set Channel="PerpetualVL2024", and add a PIDKEY with your MAK key or the KMS GVLK. Microsoft publishes a sample LTSC 2024 configuration file you can adapt.
Where are the Office Deployment Tool log files?
The ODT writes its log files to the %temp% folder of the account that ran it. Type %temp% in the File Explorer address bar, sort by date, and open the newest log to find the step that failed.
Can the Office Deployment Tool uninstall Office?
Yes. Create an XML with <Remove All="TRUE" /> and run setup.exe /configure remove.xml as administrator. That removes all Click-to-Run Office products and languages, including Project and Visio. List a single Product and Language to remove only one language.
Does the Office Deployment Tool need an internet connection?
Download mode always needs network access. Configure mode needs the internet only when no local files exist, because it falls back to Microsoft's CDN. PCs installing from a filled network share with SourcePath set can install without internet access.