Press Win + A and drag the Brightness slider to adjust screen brightness on a Windows 11 or Windows 10 laptop, or use the buttons on the monitor itself on a desktop PC.
That split matters before you start: Windows' own brightness slider controls a built-in laptop or tablet screen, and Microsoft states it might not appear at all on a PC with an external monitor. The sections below lay out all nine ways, the automatic settings that change brightness behind your back, and fixes for a missing slider or dead brightness keys.
The fastest way to change brightness on a laptop
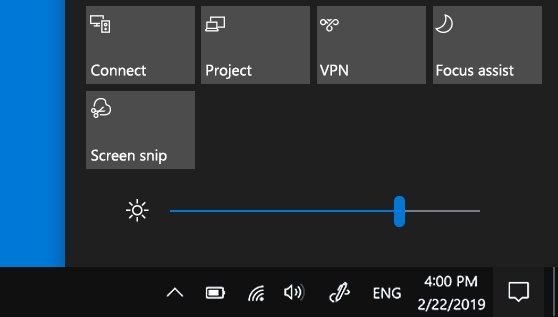
On Windows 11 the slider sits in Quick Settings. On Windows 10 the same slider sits at the bottom of Action Center.
- Press Win + A. On Windows 11 you can also select the Network icon on the right side of the taskbar; on Windows 10, select the action center icon.
- Find the Brightness slider, marked with a sun icon.
- Drag it right to brighten the screen or left to dim it.
- Click anywhere outside the panel to close it. The new level applies immediately.
No slider in the panel usually means Windows is not controlling your screen's backlight. That is normal on a desktop with an external monitor; the fix for a laptop is in the troubleshooting section.
Which of the nine ways fits your PC
The controls look different on a laptop and a desktop because Windows can only drive the backlight of a panel that reports brightness to it. Match your hardware and your goal to a row.
| Way | Works on | Use it when |
|---|---|---|
| 1. Quick Settings (Windows 11) or Action Center (Windows 10) slider | Built-in laptop and tablet screens | You want a quick change with the mouse |
| 2. Settings > System > Display | Built-in screens | You want the slider next to the automatic brightness options |
| 3. Laptop brightness keys | Laptops with sun-icon function keys | Your hands are on the keyboard |
| 4. The monitor's own buttons or joystick | Every external monitor | You use a desktop PC, or the laptop slider ignores a second screen |
| 5. PowerToys Power Display | External monitors that support DDC/CI | You want a software slider for a desktop monitor |
| 6. Change brightness automatically when lighting changes | Laptops and tablets with a light sensor | Room lighting changes through the day |
| 7. Change brightness based on content | Built-in screens on supported Windows 11 devices | You want longer battery life from content-based dimming |
| 8. Energy saver (Windows 11) or Battery saver (Windows 10) | Battery-powered PCs | You want the screen dimmed automatically when battery runs low |
9. PowerShell WmiSetBrightness |
Built-in screens that expose WMI brightness | You need to set an exact percentage from a script |
Graphics control panels such as Intel Graphics Command Center are not a separate brightness route here, but one of their power-saving options can change brightness on its own. The troubleshooting section covers it.
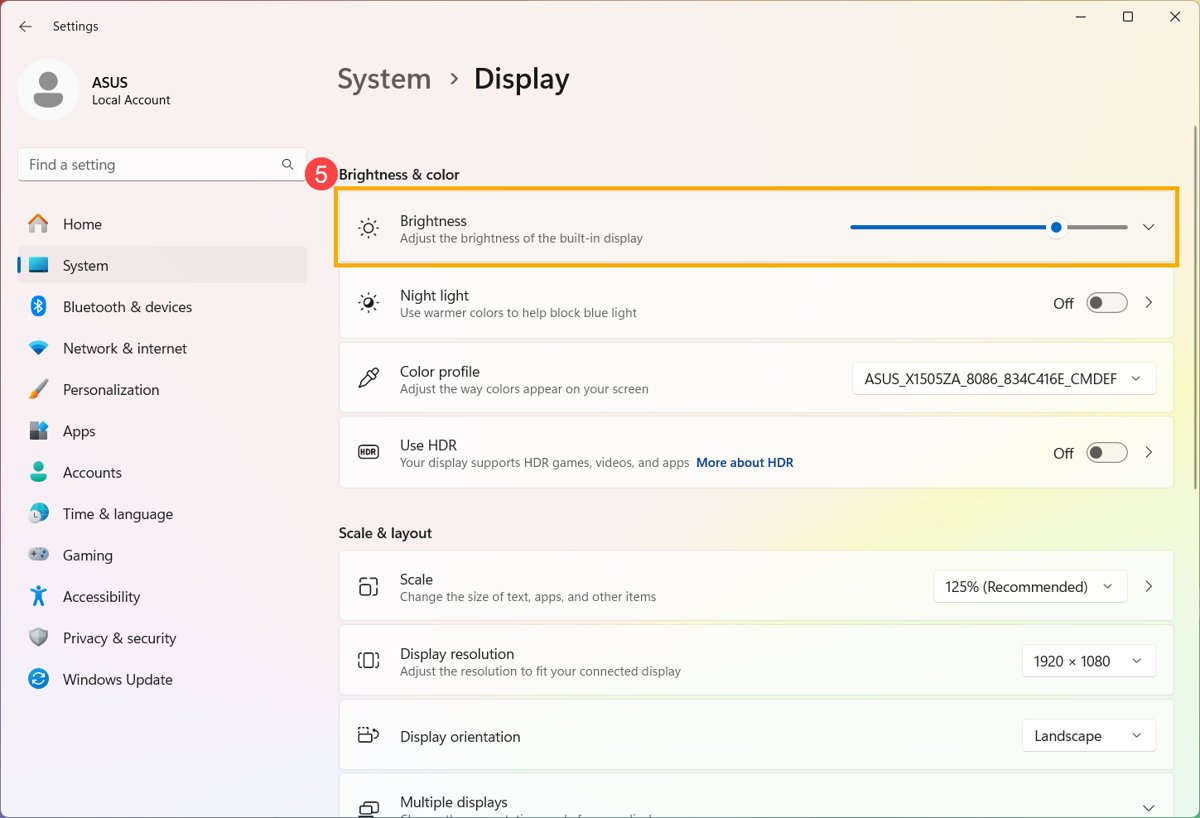
Set brightness in Settings > System > Display
The Settings app holds the manual slider and the automatic options on one page, which makes it the place to check when brightness seems to have a mind of its own.
- Press Win + I to open Settings.
- Select System, then Display.
- On Windows 11, select Brightness to expand it, then drag the Brightness slider.
- On Windows 10, drag the Change brightness for the built-in display slider under Brightness and color.
- Check the automatic options on the same page before you close it, so your level is not overridden later.
Microsoft notes that the slider might not appear on devices with an external monitor. On such a PC, the monitor's own controls are the documented way to change brightness.
Use the brightness keys on your laptop keyboard
Most laptops put brightness on two function keys marked with a small and a large sun icon. Whether you also hold Fn depends on the maker and on the Fn Lock state.
The combinations below come from each manufacturer's own support pages. For any other model, check the sun icons on the top row or the user guide for your laptop.
| Laptop | Dim / brighten | If the keys type F-keys instead |
|---|---|---|
| Dell Latitude 5000 and 7000 series released after March 2019 | F6 / F7 on their own | Fn Lock is on: press Fn + F6 / Fn + F7, or press Fn + Esc to switch Fn Lock off |
| ASUS notebooks covered by the ASUS hotkey guide | Fn + F4 / Fn + F5 | Press Fn + Esc on models with an LED on the Fn key, or pick Hotkeys mode in MyASUS |
| Any other laptop | The two keys with sun icons, alone or with Fn | Try the other way round: if the key alone fails, hold Fn and press it |
Brightness keys change only the built-in screen. They do nothing to an external monitor plugged into the laptop.
Adjust brightness on an external monitor
A desktop monitor keeps its brightness setting inside the monitor, so Windows usually shows no slider for it. Use the monitor's on-screen menu, or install Microsoft's PowerToys if the monitor supports DDC/CI.
- Press the menu button or joystick on the monitor's bezel or rear to open its on-screen menu. The monitor needs a live video signal for the menu to change settings.
- Open the picture section and select Brightness. On ASUS monitors this sits under Image on PG, XG and VG models and under Color on most VA, VP, VZ and MB models.
- Set a value between 0 and 100, then exit the menu.
- For a software slider instead, install Microsoft PowerToys, open the Power Display page in PowerToys Settings and turn on Enable Power Display.
- Read the confirmation dialog, which warns that a few monitors with malformed DDC/CI data can crash Windows, and accept it.
- Select Open Power Display or press the activation shortcut shown on that page, then drag the Brightness slider for each monitor.
Power Display offers only the controls a monitor reports over DDC/CI. With two or more supported monitors, the Link brightness levels toggle moves them together from one All displays slider.
Where the automatic brightness settings live in Windows 11 and Windows 10
Three features lower or raise brightness automatically: adaptive brightness from the light sensor, content adaptive brightness control, and the power-saving mode. Each has its own switch, and the labels differ between versions.
| Feature | What it does | Windows 11 path and label | Windows 10 path and label |
|---|---|---|---|
| Adaptive brightness | Follows room lighting through the ambient light sensor | Settings > System > Display > Brightness, toggle Change brightness automatically when lighting changes | Settings > System > Display, check box Change brightness automatically when lighting changes |
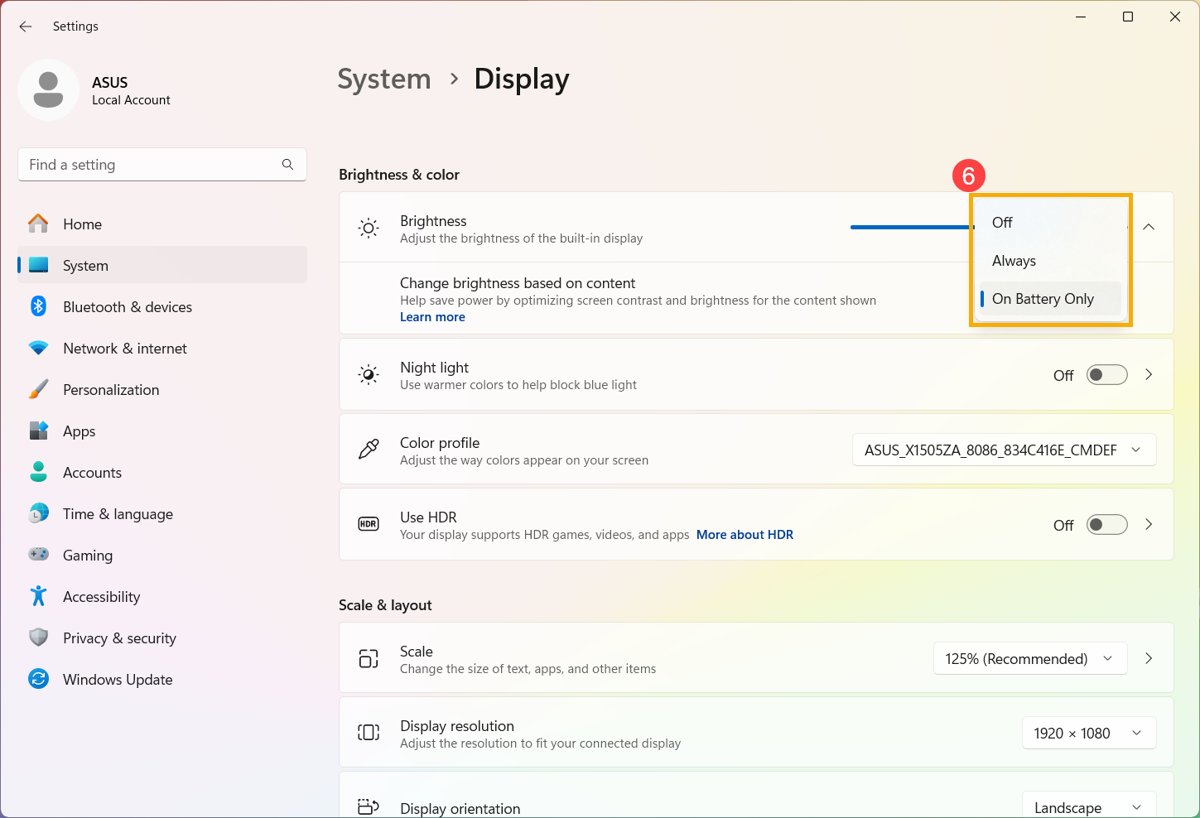
| Content adaptive brightness | Adjusts brightness and contrast to what is on screen, for example a dark page followed by a white one | Settings > System > Display > Brightness, drop-down Change brightness based on content: Off, Always or On battery only | No documented Settings control |
| Energy saver dimming (Windows 11 24H2 and later) | Cuts brightness by 30% while energy saver is on | Settings > System > Power & battery > Energy saver, toggle Lower screen brightness when using energy saver | Not applicable |
| Battery saver dimming | Dims the screen while battery saver is on | Earlier Windows 11 builds use battery saver, which energy saver replaced in 24H2 | Settings > System > Battery, check box Lower screen brightness while in battery saver |
| When the saver starts | Sets the battery level that triggers dimming | Energy saver > Turn energy saver on when battery level is at | Turn battery saver on automatically if my battery falls below: |
A missing adaptive brightness option usually means the laptop has no ambient light sensor. On Windows 11, Settings > System > Power & battery > Energy recommendations can also lower brightness for you, although Microsoft says that recommendation does not yet apply to external displays.
Set an exact brightness percentage with PowerShell
Windows exposes built-in panel brightness through the WmiMonitorBrightnessMethods WMI class. It suits scripts and shortcuts, and works only where the screen reports brightness to Windows, which rules out most desktop monitors.
(Get-WmiObject -Namespace root\wmi -Class WmiMonitorBrightnessMethods).WmiSetBrightness(5, 50)
(Get-WmiObject -Namespace root\wmi -Class WmiMonitorBrightness).CurrentBrightness
Run both lines in Windows PowerShell. WmiSetBrightness takes a timeout in seconds first and the brightness in percent second, so (5, 50) sets the screen to 50%. The second line reads the current level back from the WmiMonitorBrightness class.
You should see: The method's return value is 0 on success, the screen changes to 50%, and the second line prints 50. If the commands fail, the screen does not expose WMI brightness and needs one of the other ways.
How to check the new brightness level stuck
A level that looks right now can change again within minutes if an automatic feature is still on. These checks prove the setting is yours.
- Open Settings > System > Display and confirm the slider shows the level you chose.
- Unplug the charger, or plug it in. A jump in brightness points to energy saver dimming or content adaptive brightness set to On battery only.
- Move to a darker or brighter room. A change points to adaptive brightness from the light sensor.
- Open a mostly white page, then a mostly black one. A shift in brightness between them points to Change brightness based on content.
- On an external monitor, reopen its on-screen menu and confirm Brightness shows the saved value.
Brightness, Night light and HDR change different things
Night light and the HDR sliders sit on the same Display page as brightness, so they are easy to mistake for it. None of them sets the backlight level.
| Setting | What it changes | Where it is | Use it for |
|---|---|---|---|
| Brightness | How bright the built-in screen's backlight is | Quick Settings or Action Center, and Settings > System > Display | Making the whole screen lighter or darker |
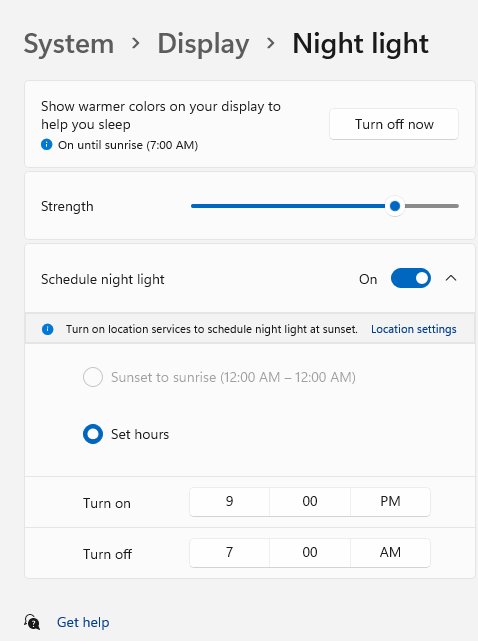
| Night light | Colour: it reduces blue light and warms the picture, without lowering brightness | Quick Settings on Windows 11; Settings > System > Display > Night light settings on Windows 10 | Evening use, with a schedule if you want one |
| SDR content brightness | How bright normal non-HDR content looks while HDR mode is on | Settings > System > Display > HDR on Windows 11 | Balancing desktop apps against HDR video |
| HDR/SDR brightness balance | The same balance on Windows 10 | Settings > System > Display > Windows HD Color settings | Balancing desktop apps against HDR video on Windows 10 |
If HDR video looks dull on battery, turn off Lower screen brightness when using energy saver, because Windows needs to push the display to maximum brightness for HDR.
Tips for choosing a comfortable brightness level
There is no single correct percentage. Pick the settings that match where and how you use the PC.
| Your situation | Set this | Why |
|---|---|---|
| Working near a window as the light changes | Turn on Change brightness automatically when lighting changes | The sensor raises brightness in daylight and lowers it at dusk |
| Editing photos or comparing colours | Set Change brightness based on content to Off | Content-based dimming alters brightness and contrast as the image changes |
| Working late in the evening | Lower the slider and turn on Night light | Brightness sets how much light the screen gives off; Night light warms its colour |
| Travelling on battery | Leave energy saver dimming on and set a trigger level | Less display brightness means longer battery life |
| Watching HDR video unplugged | Turn off energy saver dimming | HDR needs the display at full brightness |
| Two monitors that never match | Use Link brightness levels in Power Display, or match the values in each monitor's menu | Both screens then move by the same amount |
Fix screen brightness when you can't adjust it
Find your symptom, then work through only the steps under it.
The brightness slider is missing on Windows 11 or Windows 10
The screen is an external monitor, or the display driver is not passing brightness control to Windows.
- Confirm whether the screen is external. On a desktop monitor, change brightness from the monitor's buttons or PowerToys Power Display instead.
- On a laptop, right-click Start and select Device Manager.
- Expand Display adapters, right-click the adapter and select Update driver, then Search automatically for updated driver software.
- If that finds nothing, right-click the adapter, select Uninstall device, confirm with Uninstall, then restart so Windows reinstalls it.
- Open Settings > System > Display and check for the slider again.
The slider moves but the screen does not change
Duplicate monitor entries in Device Manager can block brightness control. Dell documents this on XPS laptops and states it is not a hardware fault.
- Open Device Manager from the Start menu search.
- Expand Monitors.
- Right-click each entry, select Uninstall device, and confirm.
- Restart the laptop.
- Check that Monitors now lists one entry, then try the slider again.
Brightness keys do nothing
The top-row keys are in F1-F12 mode, or the maker's hotkey software is missing.
- Hold Fn and press the sun-icon key. If that works, the keys are in function-key mode.
- Press Fn + Esc to switch Fn Lock, which Dell and ASUS both document for their laptops.
- On ASUS laptops, open MyASUS and choose Hotkeys mode for the function keys.
- Change brightness with Win + A in the meantime to confirm Windows itself still controls the screen.
- If the slider also fails, follow the missing-slider fixes above.
Why is my screen changing brightness on its own?
Adaptive brightness, content adaptive brightness, energy saver or a graphics driver power-saving option is on.
- Open Settings > System > Display > Brightness and turn off Change brightness automatically when lighting changes.
- On Windows 11, set Change brightness based on content to Off.
- Open Settings > System > Power & battery > Energy saver and turn off Lower screen brightness when using energy saver. On Windows 10, clear Lower screen brightness while in battery saver under Settings > System > Battery.
- On a PC with Intel graphics, open the Intel Graphics Command Center app and set Display Power Savings to Off.
- Use the PC for a few minutes on battery and on mains power to confirm the level holds.
Brightness stopped working after a driver update
The new display driver does not handle backlight control on your model.
- Right-click Start and select Device Manager.
- Expand Display adapters, right-click the adapter and select Properties.
- Open the Driver tab and select Roll Back Driver.
- Choose a reason, select Yes, and restart if prompted.
- Test the brightness slider and keys, then get the next driver from your laptop maker's support site rather than a third-party updater.
Frequently asked questions
How do I adjust screen brightness on a Windows PC?
On a laptop, press Win + A and drag the Brightness slider, or use the sun-icon keys on the keyboard. On a desktop PC, use the buttons or joystick on the monitor, because Windows usually shows no slider for an external screen.
How do I change screen brightness on Windows 11?
Select the Network icon on the taskbar and move the Brightness slider in Quick Settings. For more control, open Settings > System > Display > Brightness, where the slider sits beside the automatic brightness and content-based options.
How do I adjust screen brightness on Windows 10?
Select the action center icon on the right of the taskbar and move the Brightness slider. You can also open Settings > System > Display and drag Change brightness for the built-in display under Brightness and color.
Why can't I adjust the screen brightness on Windows 11?
Most often the screen is an external monitor, which Windows cannot dim, so the slider is hidden. On a laptop the usual cause is the display driver. Update it in Device Manager, reinstall it, or roll it back if the problem began after an update.
Why does my screen change brightness by itself?
An automatic feature is on. Check Change brightness automatically when lighting changes, Change brightness based on content, and Lower screen brightness when using energy saver. On Intel graphics, Display Power Savings in Intel Graphics Command Center can also shift brightness.
How do I adjust brightness on a Windows 11 desktop?
Use the monitor's own on-screen menu, opened with the buttons or joystick on the monitor. For a slider in Windows, install Microsoft PowerToys and turn on Power Display, which changes brightness on monitors that support DDC/CI.
How do I increase screen brightness beyond the current level?
Drag the Brightness slider to the far right first. If the screen is still dim on battery, turn off Lower screen brightness when using energy saver, which cuts brightness by 30%, and set Change brightness based on content to Off.
Does Night light lower screen brightness?
No. Night light changes colour, reducing blue light so the screen looks warmer, but it leaves brightness where it is. Lower the Brightness slider separately if the screen is still too bright at night, and schedule Night light in Display settings.
Can I change screen brightness with a command?
Yes, on screens that expose WMI brightness. In Windows PowerShell, run (Get-WmiObject -Namespace root\wmi -Class WmiMonitorBrightnessMethods).WmiSetBrightness(5, 50) to set 50%. Most desktop monitors do not support it, so the command returns an error there.