To wrap text automatically in Excel, select the cells and click Wrap Text in the Alignment group on the Home tab.
Once it is on, the text reflows every time you change the column width, so you set it once per range. This guide covers five methods, from the ribbon button to a VBA macro that wraps every new entry, plus checks and fixes for text that still gets cut off.
Method 1: Using the Wrap Text Button in the Ribbon
This is the fastest route in Excel for Windows. On a Mac, the Wrap Text button sits on the Home tab as well.
- Select the cell, range, column or row you want to wrap. Click the Select All button at the top-left corner of the grid to cover the whole sheet.
- Open the Home tab.
- In the Alignment group, click Wrap Text.
- Type or paste your text. Long entries now break onto extra lines inside the cell instead of spilling into the next column.
- Drag the column border wider or narrower. The wrapping adjusts automatically to the new width.
C
l
i
c
k
*
*
W
r
a
p
T
e
x
t
*
*
a
s
e
c
o
n
d
t
i
m
e
o
n
t
h
e
s
a
m
e
s
e
l
e
c
t
i
o
n
t
o
t
u
r
n
w
r
a
p
p
i
n
g
o
f
f
.
Understanding the Need for Text Wrapping in Excel
A long entry in a narrow column either spills into the empty cell beside it or gets cut off when that cell holds data. Wrapping keeps every word visible without widening the column.
| Situation | What happens without wrapping | What wrapping gives you |
|---|---|---|
| Notes, comments or addresses in a narrow column | Text is hidden behind the next filled cell | The whole entry shows on several lines in its own cell |
| Long column headers | You widen the column and the table gets too wide to read or print | Headers stack on two or three lines and the column stays narrow |
| Printed reports | Cut-off text prints cut off | Every word prints because the row grows to fit |
| Shared workbooks | Readers must click each cell to read it in the formula bar | Content is readable at a glance |
How Does Text Wrapping Work in Excel?
Wrap Text is a cell format, not a change to the text itself. The number of wrapped lines depends on the column width and the length of the content, so Excel recalculates the breaks whenever either changes.
| Behaviour | What Excel does |
|---|---|
| Where lines break | At the right edge of the column, based on the current width |
| Row height | The row grows to fit the wrapped lines, unless a fixed row height has been set on it |
| Changing column width | The wrap reflows automatically; no need to reapply it |
| Manual line break (Alt + Enter) | Forces a new line at the exact point you choose, regardless of width |
| Merged cells | Wrapped text in merged cells may not display in full |
| Row height limits | Default 15 points, maximum 409 points; text beyond that height stays hidden |
Which wrap text method should you use?
| Your situation | Use this | Why |
|---|---|---|
| You just need wrapping on a few cells | Method 1: Wrap Text button | One click, and it stays on for new text |
| You also want alignment, indent or Shrink to Fit in one place | Method 2: Format Cells dialog | Every text-control option is on one tab |
| Wrapping is on but rows stay short and text is cut off | Method 3: AutoFit row height | Removes the fixed height so the row can grow |
| You avoid the mouse | Method 4: keyboard KeyTips or Quick Access Toolbar | Wraps a selection without leaving the keyboard |
| You apply the same format to many sheets or want every new entry wrapped | Method 5: VBA macro | Runs the same formatting on demand or on every edit |
Method 2: Applying Wrap Text Using the Format Cells Dialog
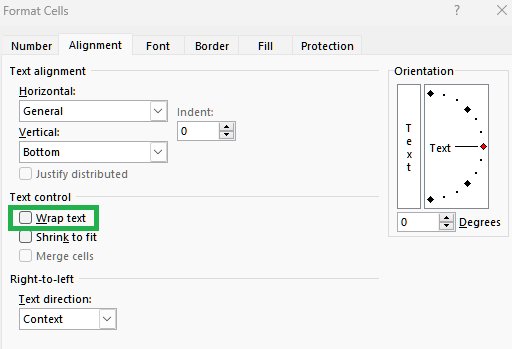
The Format Cells dialog holds the same Wrap Text setting as the ribbon, next to horizontal and vertical alignment, Shrink to fit and Merge cells. Use it when you want to set several text options at once.
- Select the cells you want to format.
- Press Ctrl + 1, or right-click the selection and choose Format Cells.
- Open the Alignment tab.
- Under Text control, select the Wrap text check box.
- Optionally set Vertical to Top so wrapped cells line up at the top of each row.
- Click OK.
*
*
S
h
r
i
n
k
t
o
f
i
t
*
*
a
n
d
*
*
W
r
a
p
t
e
x
t
*
*
s
o
l
v
e
t
h
e
s
a
m
e
p
r
o
b
l
e
m
d
i
f
f
e
r
e
n
t
l
y
:
S
h
r
i
n
k
t
o
f
i
t
r
e
d
u
c
e
s
t
h
e
d
i
s
p
l
a
y
e
d
f
o
n
t
s
i
z
e
u
n
t
i
l
t
h
e
e
n
t
r
y
f
i
t
s
o
n
o
n
e
l
i
n
e
,
w
h
i
l
e
W
r
a
p
t
e
x
t
k
e
e
p
s
t
h
e
f
o
n
t
a
n
d
a
d
d
s
l
i
n
e
s
.
Method 3: Wrapping Text Automatically with Autofit Row Heights
Wrapping only helps if the row is tall enough to show every line. If a row height was set by hand, Excel keeps that height and the extra lines stay hidden. AutoFit resets the row so it grows with the wrapped text again.
- Select the wrapped cells, or click the row numbers of the rows to fix.
- Apply Wrap Text first if it is not already on (Method 1 or 2).
- On the Home tab, in the Cells group, click Format.
- Under Cell Size, click AutoFit Row Height.
- For a single row, double-click the boundary below its row heading instead.
- On a Mac, use the Format menu, point to Row, and click AutoFit.
T
o
s
e
t
a
n
e
x
a
c
t
h
e
i
g
h
t
i
n
s
t
e
a
d
,
c
h
o
o
s
e
*
*
F
o
r
m
a
t
*
*
>
*
*
R
o
w
H
e
i
g
h
t
*
*
a
n
d
t
y
p
e
a
v
a
l
u
e
u
p
t
o
4
0
9
p
o
i
n
t
s
.
Method 4: Using Keyboard Shortcuts for Wrapping Text
Excel has no single dedicated shortcut for Wrap Text in Microsoft's shortcut list. You reach it through ribbon KeyTips, the Ctrl + 1 dialog, or a Quick Access Toolbar slot, and you add manual line breaks with Alt + Enter.
- Ribbon KeyTips: select the cells, press Alt + H to open the Home tab KeyTips, then press the letter shown on the Wrap Text button.
- Format Cells: press Ctrl + 1, move to the Alignment tab, select Wrap text and press Enter.
- Quick Access Toolbar: right-click Wrap Text on the Home tab and choose Add to Quick Access Toolbar. With the keyboard, move focus to the button and press Shift + F10, then A.
- Run it from the toolbar by pressing Alt and then the number KeyTip shown on the Wrap Text icon.
- Manual line break: double-click the cell or press F2, place the cursor where the break belongs, and press Alt + Enter on Windows or the web.
- On a Mac, the manual line break is Control + Option + Return.
I
f
t
h
e
Q
u
i
c
k
A
c
c
e
s
s
T
o
o
l
b
a
r
i
s
h
i
d
d
e
n
,
r
i
g
h
t
–
c
l
i
c
k
t
h
e
r
i
b
b
o
n
a
n
d
c
h
o
o
s
e
*
*
S
h
o
w
Q
u
i
c
k
A
c
c
e
s
s
T
o
o
l
b
a
r
*
*
.
Method 5: Automating Wrapping with VBA (Macros)
A macro applies Wrap Text and AutoFit in one run, which saves time across many sheets. VBA works in Excel for Windows and Mac only, not in Excel on the web or on iPhone and iPad.
- Turn on the Developer tab: File > Options > Customize Ribbon, select Main Tabs, tick Developer, and click OK.
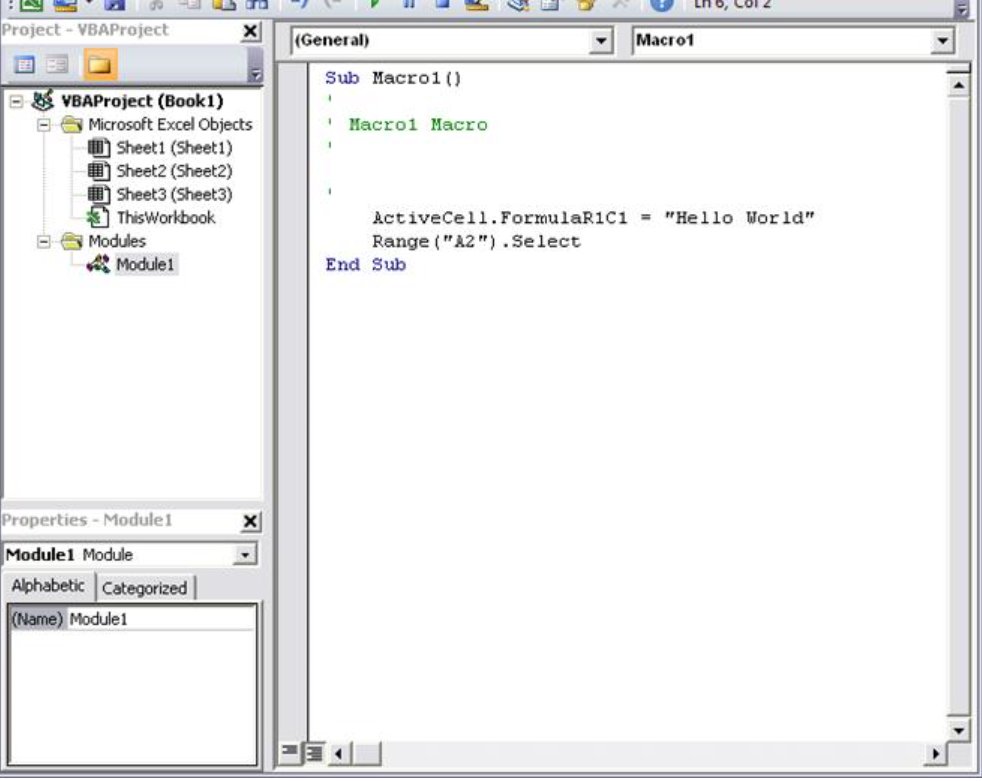
- Press Alt + F11 to open the Visual Basic Editor.
- Click Insert > Module.
- Paste a macro with these four lines:
Sub WrapSelection(),Selection.WrapText = True,Selection.EntireRow.AutoFit,End Sub. - Return to Excel, select the cells to wrap, press Alt + F8, choose WrapSelection and click Run.
- Save the file as an Excel Macro-Enabled Workbook (.xlsm). A standard .xlsx file cannot store macro code.
T
o
w
r
a
p
t
h
e
w
h
o
l
e
u
s
e
d
a
r
e
a
o
f
a
s
h
e
e
t
i
n
o
n
e
p
a
s
s
,
r
e
p
l
a
c
e
`
S
e
l
e
c
t
i
o
n
`
w
i
t
h
`
A
c
t
i
v
e
S
h
e
e
t
.
U
s
e
d
R
a
n
g
e
`
i
n
b
o
t
h
l
i
n
e
s
.
Make VBA wrap every new entry automatically
This extends Method 5. A Worksheet_Change event macro runs each time you edit a cell, so anything you type is wrapped and the row resized without a click.
In the Visual Basic Editor, double-click the worksheet name under Microsoft Excel Objects in the Project window, then paste the code into that sheet's code window.
Private Sub Worksheet_Change(ByVal Target As Range)
    Application.EnableEvents = False
    Target.WrapText = True
    Target.EntireRow.AutoFit
    Application.EnableEvents = True
End Sub
Target is the range you just changed. WrapText = True turns on wrapping and EntireRow.AutoFit resizes those rows. Turning events off while the macro runs stops its own edits from triggering it again. The event does not fire on formula recalculation, only on edits.
You should see: Type a long sentence in any cell on that sheet and press Enter. The text wraps and the row grows immediately.
How to check that wrap text is on
- Look at the cell: a long entry should sit on several lines inside the cell borders, not spill into the next column.
- Drag the column border narrower. The number of lines should increase and the row should get taller.
- Select the cell, press Ctrl + 1 and open the Alignment tab. The Wrap text check box should be selected.
- For a range checked by macro, run
MsgBox Selection.WrapText. True means every cell wraps, False means none does, and a blank result (Null) means the range is mixed.
Additional Tips and Best Practices
| Tip | Why it helps |
|---|---|
| Set wrapping on whole columns before you enter data | New entries in those columns wrap as you type, with no reformatting later |
| Pair Wrap Text with Top vertical alignment | Short and long entries line up at the top of each row, which reads more cleanly |
| Use Justify horizontal alignment for paragraph-style notes | It spreads wrapped lines to both edges; you need more than one wrapped line to see it |
| Avoid merged cells in wrapped areas | Wrapped text in merged cells may be cut off; Center Across Selection gives a similar look without merging |
| Use Alt + Enter only where the break must be exact | Manual breaks stay put when the column width changes, which can leave short, ragged lines |
| Choose Shrink to fit instead when rows must stay one line high | It reduces the displayed font size so the text fits the current width |
| Keep an eye on the 409-point row limit | Very long entries beyond that height stay hidden even with wrapping on |
How to turn off wrap text
- Select the wrapped cells.
- On the Home tab, click Wrap Text again to switch it off.
- Or press Ctrl + 1, open Alignment and clear the Wrap text check box.
- To strip all formatting from the cells instead, choose Clear > Clear Formats on the Home tab.
- Run Format > AutoFit Row Height so the rows shrink back to a single line.
Fix wrap text when it does not work
Wrap text does not automatically adjust the cell height
The row has a fixed height, set by dragging the border or with Row Height, so Excel will not expand it.
- Select the affected rows.
- Click Home > Format > AutoFit Row Height.
- Or double-click the boundary below the row heading.
Wrapped text is still cut off in merged cells
Wrapped text in merged cells may not display fully.
- Select the merged cell and click Merge & Center to unmerge it.
- Use Center Across Selection on the Alignment tab of Format Cells if you only need centred text.
- If the cells must stay merged, set the height by hand with Format > Row Height.
Excel wraps text automatically when you did not ask it to
The cells already carry the Wrap Text format, often copied along with pasted or duplicated formatting.
- Select the cells and check whether Wrap Text is on in the Home tab.
- Click Wrap Text to turn it off, or use Clear > Clear Formats.
- Check the cell for manual line breaks by pressing F2; delete any break you did not want.
Text does not expand cells because the text is longer than the row can hold
Rows stop at 409 points, so a very long entry keeps a hidden tail.
- Widen the column so each line holds more text.
- Split the content across several cells or rows.
The VBA wrap macro does not run
The file was saved as .xlsx, which drops macros, or the Trust Center blocked them on opening.
- Save the workbook as an Excel Macro-Enabled Workbook (.xlsm) and reopen it.
- When Excel warns that macros have been disabled, turn them back on for that file only if you trust it.
- Confirm the event macro sits in the sheet's own code window, not in a standard module.
Frequently Asked Questions
How do I make text automatically wrap in Excel?
Select the cells and click Wrap Text in the Alignment group of the Home tab. From then on, anything typed in those cells wraps to the column width, and the wrap adjusts on its own when you resize the column.
How do I turn on or enable wrap text?
Enable it from Home > Wrap Text, or press Ctrl + 1, open the Alignment tab and select Wrap text under Text control. Both routes set the same cell format, so use whichever is closer to hand.
Why does Excel automatically wrap text?
Excel wraps text only in cells formatted with Wrap Text. That format often arrives with pasted or copied formatting. Turn it off with the Wrap Text button, and press F2 to check for manual Alt + Enter line breaks inside the entry.
Can wrap text automatically adjust the cell height?
Yes. Excel grows the row to fit wrapped lines unless the row has a fixed height. If it does not grow, select the row and choose Home > Format > AutoFit Row Height, or double-click the border below the row number.
What is wrapping text, and what is the function of wrap text?
Wrapping text displays a long entry on several lines inside one cell instead of letting it spill into, or be hidden by, the next column. It changes only how the text is shown; the stored value stays the same.
Where is the wrap text option in Excel?
It is on the Home tab in the Alignment group, labelled Wrap Text. The same option appears as the Wrap text check box on the Alignment tab of the Format Cells dialog, which opens with Ctrl + 1.
How do I start a new line inside an Excel cell?
Double-click the cell, put the cursor where the break belongs, and press Alt + Enter on Windows or in Excel for the web. On a Mac, press Control + Option + Return. On Android and iPhone, tap and hold, then choose New Line.
Where is wrap text in Word, and what does it do there?
In Word, wrap text controls how body text flows around a picture or shape. Select the picture, then choose Layout Options or Picture Format > Wrap Text, and pick Square, Tight, Top and Bottom or another layout.
Why is my text wrapping around a picture in Word?
The picture uses a wrapping layout such as Square or Tight. Select the picture and choose In Line with Text from Layout Options to make Word treat it like a text character instead of flowing text around it.
Conclusion
Use the Wrap Text button for everyday work and follow it with AutoFit Row Height whenever a row refuses to grow. Those two steps fix almost every cut-off cell. Reach for the Format Cells dialog when you are setting alignment at the same time, and for the Worksheet_Change macro only when a sheet must wrap every new entry without anyone remembering to do it.