To uninstall Windows 11 completely, select Go back under Settings > System > Recovery within 10 days of upgrading, or after that reinstall another Windows version from Microsoft's installation media, which erases the drive.
This guide covers both official routes, a full wipe before selling a PC, replacing Windows with Linux, removing Windows 11 from a dual-boot setup, and the backups to make first.
Option 1: Roll Back from Windows 11 to Windows 10
Go back is the only route that removes Windows 11 and returns your old Windows with personal files intact. In most cases it is available for 10 days after the upgrade, then Windows deletes the files it needs.
- Copy your personal files to an external drive or OneDrive, even though Go back is designed to keep them.
- Remove any user accounts you added after the upgrade.
- Plug in the USB drive you used for the upgrade, if you upgraded from one.
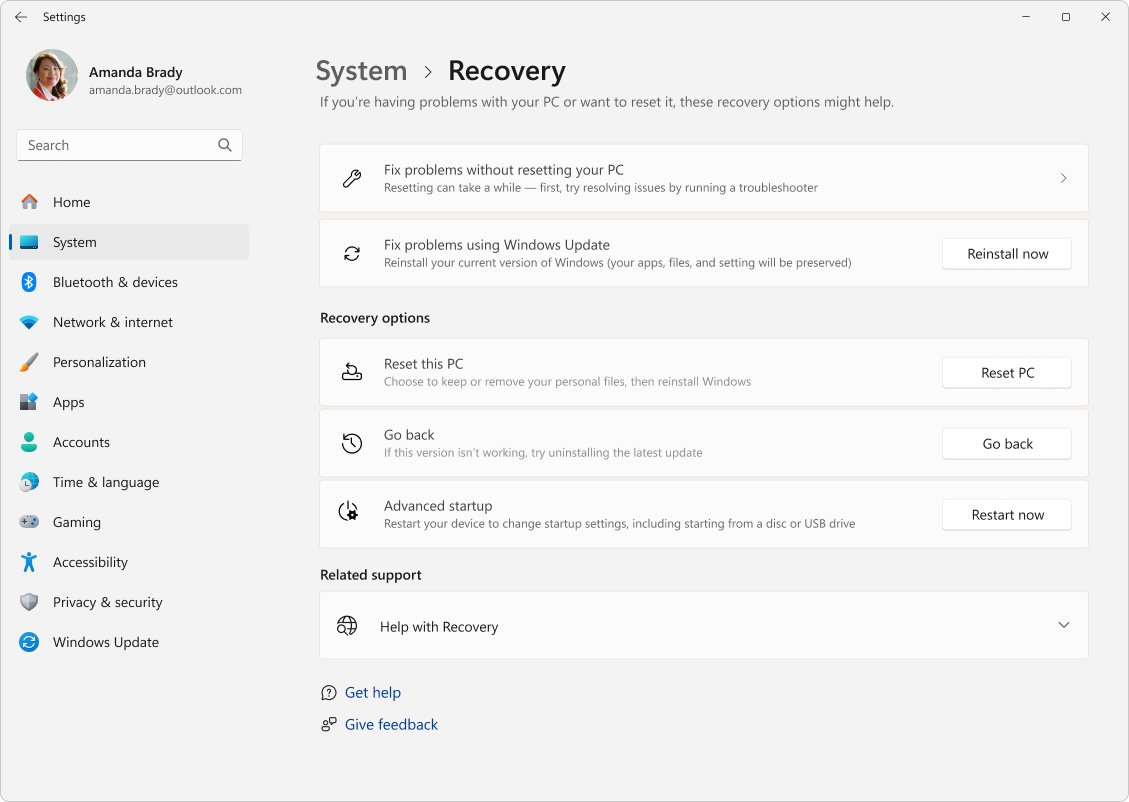
- Select Start > Settings > System > Recovery.
- Select Go back next to the previous version of Windows.
- Follow the prompts, then keep the PC plugged in while it restarts into your earlier Windows version.
The rollback keeps your personal files. It removes apps and drivers installed after the upgrade, and any changes you made in Settings, so plan to reinstall those.
Go back works only while the windows.old and $windows.~bt folders from the upgrade are still on the drive. If you deleted them with a cleanup tool, or the button is missing, use Option 2.
Which Method Should You Choose?
Match your situation to one row. The routes differ most in what happens to your files, so the last column matters more than speed.
| Your situation | Use this | What happens to your files |
|---|---|---|
| You upgraded from Windows 10 less than 10 days ago | Option 1: Go back in Settings | Kept; apps and drivers added after the upgrade are removed |
| The 10 days have passed and you still want Windows 10 | Option 2: clean install from Microsoft's Windows 10 media | Everything on the Windows drive is erased; restore from your backup |
| You want no Windows at all on the PC | Option 3: replace Windows 11 with Linux | Erased when you choose to erase the disk during the Linux install |
| You are selling, donating or recycling the PC | Option 4: Reset PC with Remove everything and Clean data | Removed and the drive cleaned, making recovery harder |
| Windows 11 sits on its own partition beside another Windows | Option 5: delete the Windows 11 volume and its boot entry | Only the Windows 11 partition is erased; the other system stays |
| Windows 11 is fine but one program is not | Uninstall the app from Installed apps instead | Nothing else changes |
Before You Uninstall Windows 11: What You Need to Know
Every route except Go back erases the Windows drive. A backup is the one step you cannot add later, so do it before you touch any recovery option.
| Check | Why it matters | How to do it |
|---|---|---|
| Back up your files first | A clean install, a reset with Remove everything and a Linux install all delete personal files | Copy files to an external hard drive, a USB flash drive or OneDrive; turn on Windows Backup under Settings > Accounts > Windows Backup to save apps and settings |
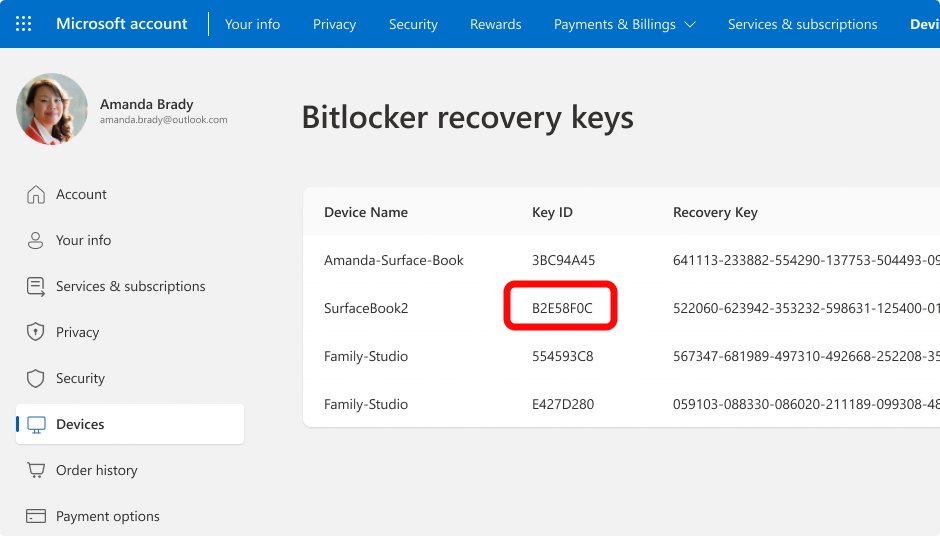
| Check BitLocker device encryption | Most recovery options ask for the BitLocker recovery key on an encrypted PC | Sign in at aka.ms/myrecoverykey from another device, or look for a printout or a USB drive where the key was saved |
| Know what you are replacing Windows 11 with | The replacement decides the route and whether you need a license | Windows 10 needs a license and matching edition; Linux needs a USB drive and at least 25 GB of storage for Ubuntu |
| Check your Windows edition | The edition you reinstall must match your license, for example Home for Home | Open Settings > System > About and read Edition under Windows specifications |
| Link your digital license to your Microsoft account | Windows reactivates after a reinstall using the license linked to your account | Sign in with a Microsoft account on the current Windows before you wipe it |
| Create installation media before you wipe | After a wipe the PC has no system to boot, so you need the USB drive ready | Use a blank USB flash drive of at least 8 GB; everything on it is deleted |
| Know that Windows 10 support has ended | Windows 10 stopped getting free security fixes on October 14, 2025 | Weigh this before Option 1 or Option 2; the PC keeps working but is more exposed to malware |
Option 2: Clean Install Windows 10 Over Windows 11
Use this after the 10-day window closes. It removes personal files, apps, manufacturer customizations and every change you made in Settings, so finish the backup first.
For the best driver support, check whether your PC maker offers its own recovery media. Manufacturer images include hardware-specific drivers that generic Microsoft media may lack.
- On a working PC, open Microsoft's Download Windows 10 page and select Download Now under Create Windows 10 installation media.
- Run the media creation tool, accept the license terms and select Create installation media for another PC.
- Select the language, edition and architecture that match your license, then choose USB flash drive.
- Plug the USB drive into the Windows 11 PC and restart it, pressing the boot menu key your PC maker lists, such as F2, F12, Delete or Esc.
- Choose your language, time and keyboard preferences, then select Install Windows.
- On the partition screen, delete each partition on Disk 0 until only Disk 0 Unallocated Space remains, and leave any other disk untouched.
- Select Disk 0 Unallocated Space, select Next and let the PC restart several times.
- Sign in with your Microsoft account during setup so your digital license is applied.
If the PC starts Windows 11 instead of Setup, it is not set to boot from USB. Check your PC maker's site for how to change the boot order, then try again.
Option 3: Replace Windows 11 with Linux
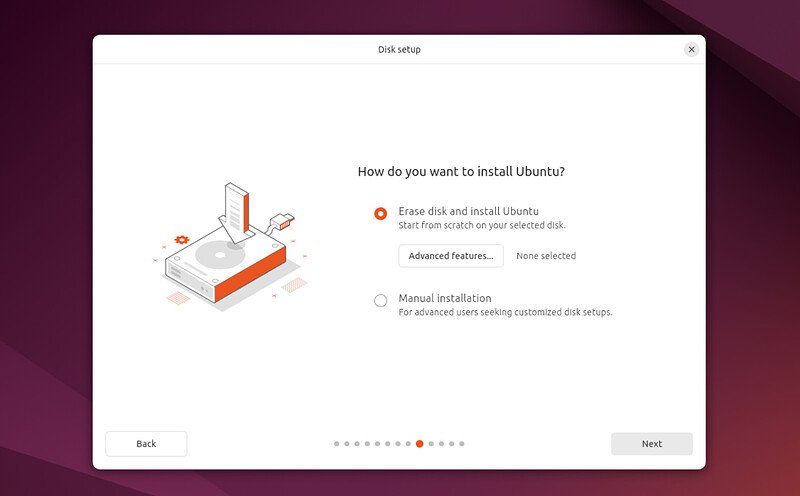
Ubuntu's own tutorial is the reference for this route. It asks for at least 25 GB of storage and recommends a flash drive of 12 GB or more.
- Back up your data, since erasing the disk deletes Windows 11 and every file on it.
- Download the Ubuntu Desktop image from ubuntu.com on a working PC.
- Write the image to a USB flash drive to create a bootable Linux USB installer; Ubuntu's tutorial uses balenaEtcher.
- Restart the PC and open the boot menu, usually with F12, or Esc, F2 or F10, then select the USB drive.
- Select Try Ubuntu first to boot Linux and test Wi-Fi, sound and display without changing the PC.
- Start the installer and, under the type of installation, choose Erase disk and install Ubuntu to remove Windows 11.
- Create your login details, choose your location and complete the installation.
- Remove the USB drive when prompted, restart, and install the available updates.
BitLocker does not block this route. Ubuntu states that turning off BitLocker is not required when you fully erase Windows; it only matters when installing alongside Windows.
Option 4: Wipe Windows 11 Completely Before Selling or Recycling a PC
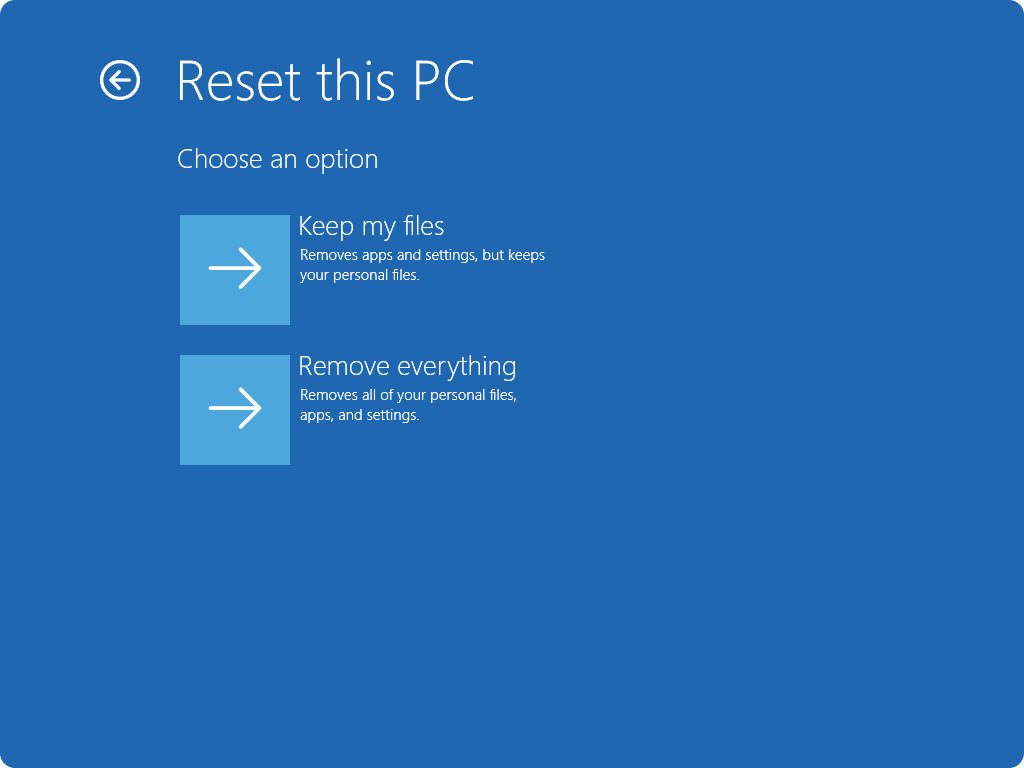
Use Windows 11 reset with drive cleaning. It leaves a fresh copy of Windows for the next owner, but none of your accounts, files or apps.
- Back up everything you want to keep, then sign out of accounts you use on the PC.
- Select Start > Settings > System > Recovery.
- Under Recovery options, select Reset PC.
- Select Remove everything.
- Choose Cloud download or Local reinstall.
- Open the additional settings and turn on Clean data so the drive is cleaned, not just emptied.
- Confirm and leave the PC plugged in; the screen can stay black for 15 minutes or more, and restarting it yourself can make the reset fail.
Microsoft notes that this data erasure is aimed at consumers and does not meet government or industry data erasure standards. For stricter needs on an SSD, check the drive or PC maker's support site for a manufacturer secure erase tool.
If the buyer should get a PC with no Windows at all, use Option 3 or delete every partition on Disk 0 from Microsoft's installation media instead.
Option 5: Remove Windows 11 from a Dual-Boot PC
Start the PC in the Windows you are keeping. DiskPart refuses to delete the running system's boot volume, which protects the copy you use.
- Boot into the other Windows and copy any files you need from the Windows 11 partition.
- Right-click Start, select Disk Management, and identify the Windows 11 partition by its drive letter, size and label.
- Select Start, type cmd, right-click Command Prompt and select Run as administrator.
- Type
diskpartand press Enter, then typelist volumeand press Enter. - Type
select volume=followed by the number or letter of the Windows 11 volume, for exampleselect volume=E. - Type
delete volumeto delete the Windows 11 partition, then typeexit. - Remove the Windows 11 entry from the boot menu with the command in the next section.
- In Disk Management, right-click the volume just before the new Unallocated space and select Extend Volume to reuse it.
Extend Volume works only when the unallocated space sits immediately after that volume on the same disk. If it does not, create a new data volume in the space instead.
Remove Windows 11 from the Boot Menu
Deleting the partition leaves a dead entry in the boot menu. Run these in the Command Prompt you opened as administrator.
bcdedit /v
bcdedit /delete {identifier}
bcdedit /v lists every boot entry with its full identifier. Find the Windows Boot Loader entry for the Windows 11 copy you deleted, then run bcdedit /delete with that identifier, braces included, for example {55556666-ffff-7777-aaaa-8888bbbb9999}. The /delete option removes the entry from both the boot menu and the boot configuration store.
You should see: Running bcdedit /v again no longer shows the Windows 11 entry, and the PC starts straight into the Windows you kept.
Never delete the entry marked {current}, because that is the Windows you are running.
How to check Windows 11 is really gone
- After Option 1 or Option 2, open Settings > System > About and confirm the Windows specifications list Windows 10 and the edition you expect.
- After Option 1, open File Explorer and confirm your Documents, Desktop and Pictures files are still there.
- After Option 3, restart the PC and confirm it boots into Ubuntu with no Windows Boot Manager menu.
- After Option 4, confirm the PC starts at the first setup screen, with none of your accounts listed.
- After Option 5, open Disk Management and confirm the Windows 11 partition no longer appears, then restart to check the boot menu is gone.
What Not to Do When Removing Windows 11
Most failed removals come from one of these shortcuts. Each row lists the mistake and the safer route.
| Do not | Why | Do this instead |
|---|---|---|
| Just delete the Windows folder | Windows cannot delete the volume it is running from, and a half-deleted system will not start | Reinstall from installation media, or delete the whole volume from another Windows (Option 5) |
| Format random partitions | Deleting partitions on the wrong disk destroys data you meant to keep | Delete partitions on Disk 0 only, and leave every other disk alone |
| Rely on Reset this PC if you want no Windows | Reset PC always reinstalls Windows, even with Remove everything | Erase the disk from a Linux installer or from installation media |
| Forget firmware and account locks | An encrypted drive asks for the BitLocker recovery key, and without it you cannot reach your files | Save the key from aka.ms/myrecoverykey before you start |
| Clean up windows.old during the first 10 days | Go back needs the windows.old and $windows.~bt folders | Wait until you are sure you are keeping Windows 11 |
| Restart the PC during a reset | A manual restart while resetting can make the reset fail | Leave it plugged in, even through a long black screen |
After Windows 11 Is Removed
The last steps depend on what you installed in its place. Work through the list that matches your PC.
- If you installed another operating system: connect to the internet and install every available update before you restore files.
- If you returned to Windows 10: connect to the internet so Windows activates, and use the Activation troubleshooter if it does not.
- If you returned to Windows 10: reinstall apps and drivers that were added while Windows 11 was installed.
- If you returned to Windows 10: remember it no longer gets free security fixes, and plan a move back to Windows 11 or to supported hardware.
- Copy your personal files back from the external drive or OneDrive.
- If you wiped the PC for sale: shut it down at the first setup screen and let the new owner complete setup with their own account.
Frequently Asked Questions
Can Windows 11 be uninstalled?
Yes. Within about 10 days of upgrading, select Go back under Settings > System > Recovery to return to your earlier Windows with files kept. After that, Windows 11 can only be removed by reinstalling another system over it, which erases the Windows drive.
How do I completely uninstall Windows 11 after 10 days?
Back up your files, create Windows 10 installation media with Microsoft's media creation tool, boot from it, and delete the partitions on Disk 0 before installing. You need a Windows 10 license, and the edition you install must match it.
Does uninstalling Windows 11 delete my files?
Go back keeps personal files but removes apps and drivers installed after the upgrade. A clean install, a reset with Remove everything, or a Linux install that erases the disk deletes everything, so copy your files to an external drive or OneDrive first.
Should I remove Windows 11 and go back to Windows 10?
Only with a clear reason. Windows 10 stopped receiving free security fixes on October 14, 2025, so a PC that goes back is more exposed to malware. If a single app or driver is the problem, fix or uninstall that instead.
How do I reinstall Windows 11 completely?
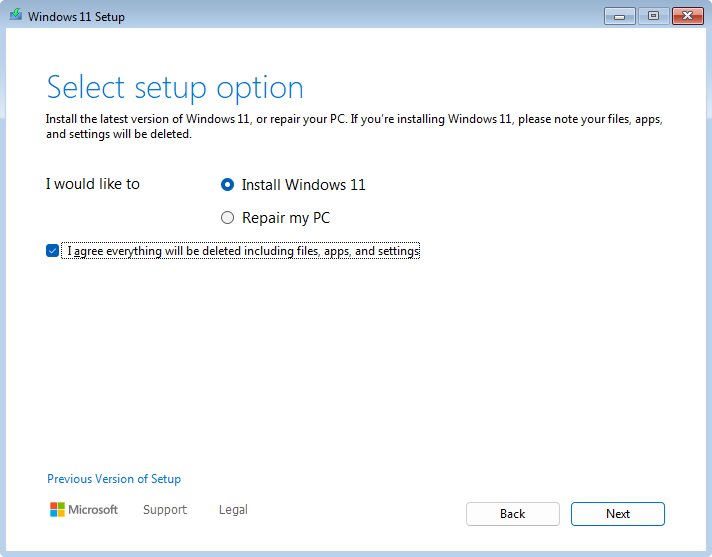
Create Windows 11 installation media on a working PC, boot from it, select Install Windows 11 and agree that everything will be deleted. Delete every partition on Disk 0, install to Disk 0 Unallocated Space, and sign in with your Microsoft account so activation applies.
How do I uninstall Windows 10 completely?
Use the same routes as for Windows 11. Install a different system from its official media and erase the drive during setup, or use Reset PC with Remove everything and Clean data if you are passing the PC on. Back up first.
How do I uninstall an app from Windows 11 instead of Windows itself?
Select Start > Settings > Apps > Installed apps, find the app, then select More > Uninstall. Some built-in apps need extra steps, covered in the guides to removing Microsoft Edge and removing OneDrive.
Why is the Go back button missing in Windows 11?
The option disappears once the rollback window ends, which is 10 days in most cases, or if the windows.old and $windows.~bt folders were deleted. A clean install of Windows 11 never has it. Use Microsoft's installation media instead.
Can I remove Windows 11 and install Linux instead?
Yes. Create an Ubuntu USB installer, boot from it, test the hardware with Try Ubuntu, then choose Erase disk and install Ubuntu. Ubuntu says turning off BitLocker is not required when you fully erase Windows.