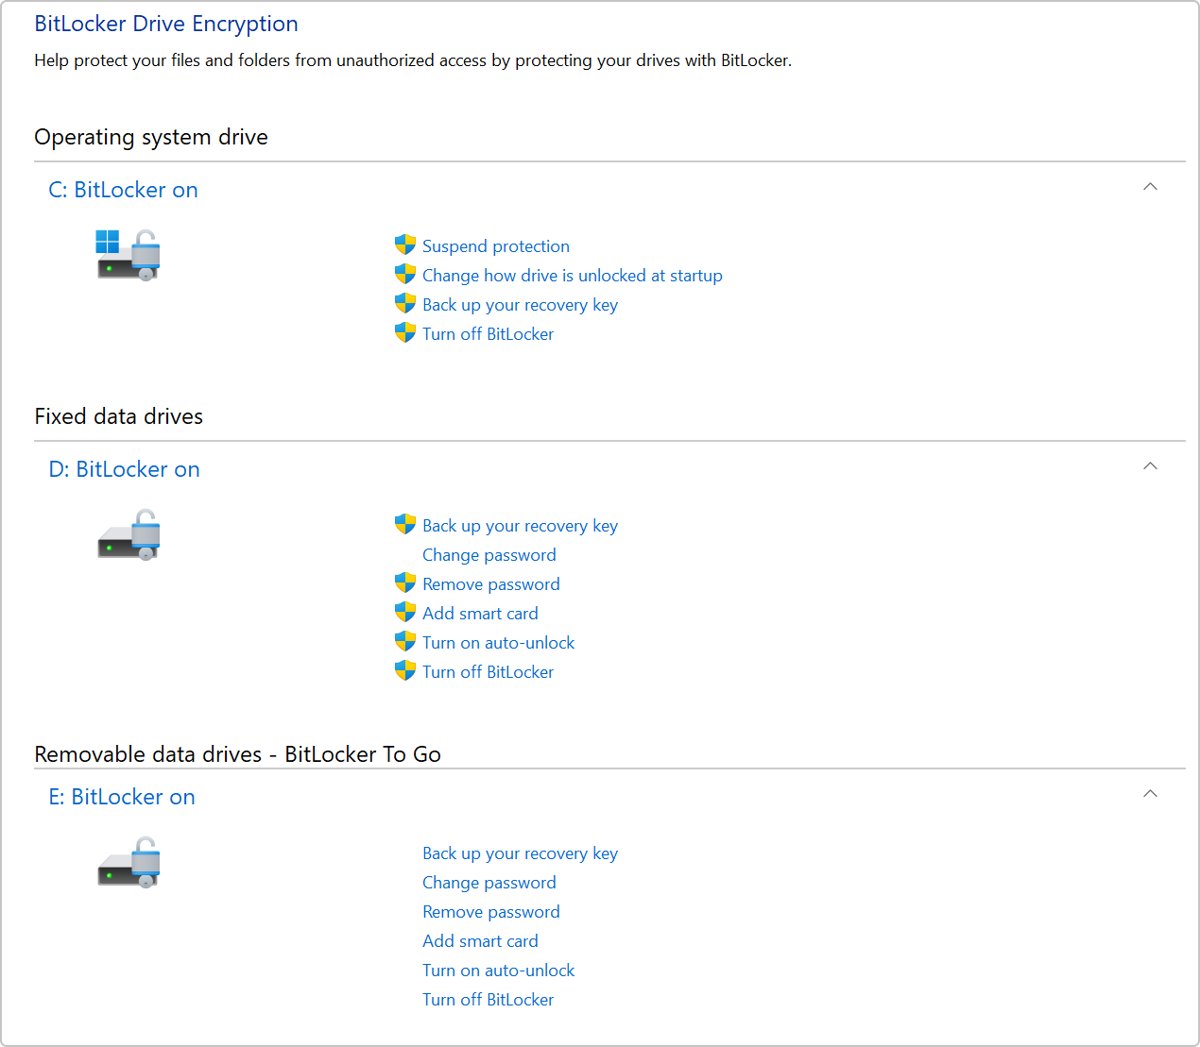
To enable or disable BitLocker on a data drive in Windows 11, open Manage BitLocker from Start and select Turn on BitLocker or Turn off BitLocker next to the drive under Fixed data drives or Removable data drives – BitLocker To Go.
This guide covers internal and USB data drives, the manage-bde and PowerShell commands, auto-unlock, Group Policy controls, and fixes for rejected recovery keys, stuck encryption and the missing Active Directory recovery tab.
How to enable or disable BitLocker in Windows 11/10
BitLocker Drive Encryption is part of Windows 11 and Windows 10 Pro, Enterprise and Education. One Control Panel applet lists the operating system drive, fixed data drives and removable drives, each with its own on and off options.
- Sign in with an administrator account. A standard account can change BitLocker on removable drives only.
- Select Start, type BitLocker, and select Manage BitLocker.
- Find the drive under Fixed data drives or Removable data drives – BitLocker To Go and expand it.
- Select Turn on BitLocker to encrypt the drive, or Turn off BitLocker to decrypt it.
- Work through the wizard to set an unlock password and back up the recovery key, or confirm the Turn off BitLocker prompt.
- Keep the drive connected until the status next to it reads On after encryption or Off after decryption.
You can keep using the PC while the drive converts. The Windows drive itself unlocks with a TPM rather than a password, so encrypting the C: drive with BitLocker follows a different set of prompts.
Does Windows 11 Home support BitLocker for data drives?
No. Windows 11 Home has no Manage BitLocker entry, so it cannot turn BitLocker on for a second drive or a USB stick. Home gets device encryption instead, which covers the Windows drive and internal fixed drives on supported hardware.
| Windows 11 edition | BitLocker Drive Encryption | Device encryption | What you can encrypt |
|---|---|---|---|
| Home | Not available | Available on supported hardware | Windows drive and fixed drives, turned on automatically; never USB drives |
| Pro | Yes | Yes | Fixed and removable data drives from Control Panel, manage-bde or PowerShell |
| Enterprise | Yes | Yes | Fixed and removable data drives, usually managed by IT policy |
| Education, Pro Education, SE | Yes | Yes | Fixed and removable data drives |
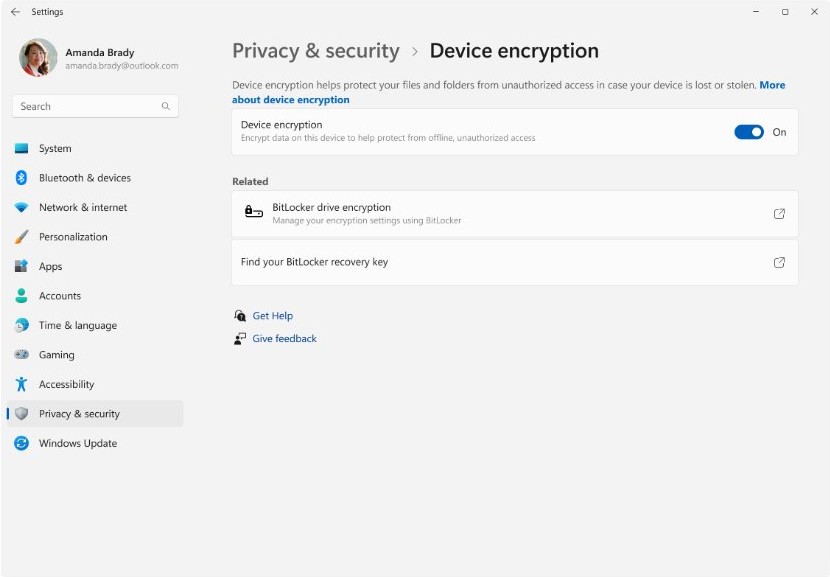
On a Home PC, device encryption in Windows 11 may already protect the internal drives, and its on/off switch lives in the Settings app rather than Control Panel.
Turn BitLocker on or off for data drives
Fixed data drives are internal disks or partitions other than the one Windows runs from, such as a second SSD shown as D:. Turning BitLocker on or off for them needs membership of the local Administrators group.
- Open Manage BitLocker from Start and expand the drive under Fixed data drives.
- Select Turn on BitLocker.
- Choose to unlock the drive with a password (or a smart card), type a password of at least eight characters twice, and select Next.
- Back up the recovery key with Save to your Microsoft account, Save to a file or Print the recovery key, then select Next. The file cannot go on the drive you are encrypting.
- Pick Encrypt used disk space only for a new, empty drive, or Encrypt entire drive for one that already holds data, and select Next.
- Select New encryption mode for a drive that stays in this PC, then select Next.
- Start the encryption on the last page of the wizard and wait for the drive status to change to On.
- To switch it off later, expand the same drive, select Turn off BitLocker, and confirm. Decryption starts straight away.
Used-space-only encryption is much faster, but deleted files count as free space and stay readable until they are overwritten. Choose the entire drive for any disk that has held private files.
Turn BitLocker on or off for removable data drives
Removable data drives are USB flash drives, SD cards and external hard disks, and BitLocker on them is called BitLocker To Go. It works on drives formatted NTFS, FAT16, FAT32 or exFAT, and a standard user can turn it on or off.
- Plug in the drive, open Manage BitLocker, and expand it under Removable data drives – BitLocker To Go.
- Select Turn on BitLocker.
- Choose a password or a smart card to unlock the drive, enter the password twice, and select Next.
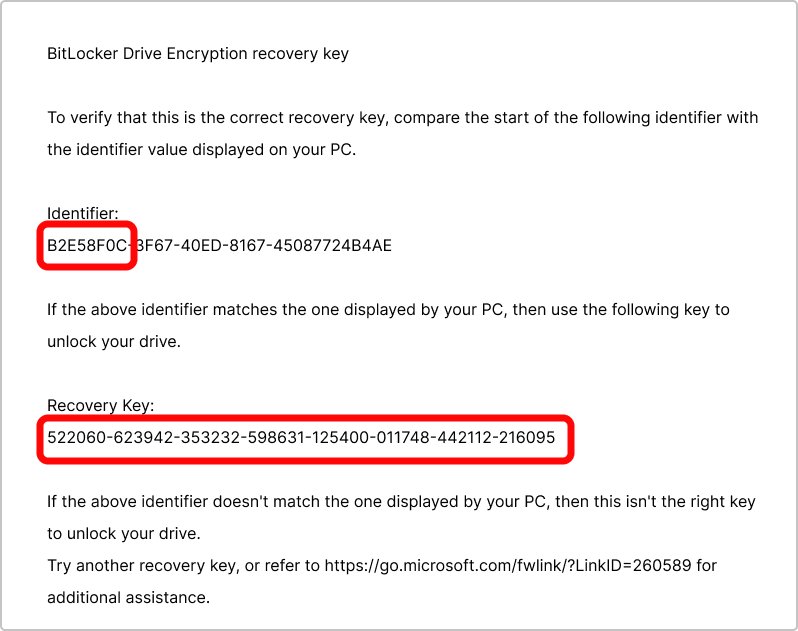
- Save the recovery key to your Microsoft account, to a file on a different drive, or print it. By default a removable drive's key cannot be stored on a removable drive.
- Choose Encrypt used disk space only or Encrypt entire drive, then select Next.
- Select Compatible mode if the drive will be used on PCs running older versions of Windows; otherwise keep New encryption mode.
- Start encrypting and leave the drive plugged in until its status reads On.
- To remove BitLocker, insert and unlock the drive, select Turn off BitLocker, and confirm.
On another computer, the drive asks for its password or smart card before it opens. It locks again as soon as you unplug it.
BitLocker enable and disable commands for data drives
Run these in Command Prompt opened as administrator or an elevated Windows Terminal, and replace E: with your drive letter. manage-bde starts decryption without a confirmation prompt, so check the letter twice.
manage-bde -protectors -add E: -recoverypassword
manage-bde -on E: -pw
manage-bde -status E:
manage-bde -off E:
The first line adds a 48-digit recovery password and prints it, so copy it somewhere off this drive. -on E: -pw turns on BitLocker and asks for the unlock password. -status shows progress, and -off decrypts the drive and removes all key protectors once decryption completes.
You should see: manage-bde -status E: shows Percentage Encrypted: 100.0% and Protection Status: Protection On after encryption, and Protection Off once -off has finished.
Enable or disable BitLocker on a data drive with PowerShell
Open PowerShell as administrator first. Enable-BitLocker accepts one protector type per run, so the recovery password is added in a second command.
$pw = Read-Host -AsSecureString
Enable-BitLocker -MountPoint "E:" -PasswordProtector -Password $pw -UsedSpaceOnly
Add-BitLockerKeyProtector -MountPoint "E:" -RecoveryPasswordProtector
(Get-BitLockerVolume -MountPoint "E:").KeyProtector
Disable-BitLocker -MountPoint "E:"
Read-Host -AsSecureString takes the unlock password without showing it. Drop -UsedSpaceOnly to encrypt the whole drive. The KeyProtector line lists the protectors, including the 48-digit recovery password to save. Run Disable-BitLocker only when you want the drive decrypted; -MountPoint C,D style lists decrypt several drives at once.
You should see: Get-BitLockerVolume -MountPoint "E:" reports VolumeStatus FullyEncrypted, ProtectionStatus On and EncryptionPercentage 100.
How to check BitLocker status of a data drive on Windows 11
- Open Manage BitLocker and read the status beside each drive: On, Off, Suspended or Waiting for Activation.
- For a percentage, open Command Prompt as administrator and run
manage-bde -status E:. - Read Conversion Status, Percentage Encrypted, Protection Status and Lock Status in the output.
- In PowerShell, run
Get-BitLockerVolumeto list every volume with its VolumeType, EncryptionPercentage and KeyProtector values. - Treat Waiting for Activation and a yellow warning icon as unprotected: the drive uses a clear key until you add a password or recovery protector.
What does disabling BitLocker do to a data drive?
Disabling BitLocker decrypts the drive, so anyone who connects it to another PC can read it. Microsoft treats decryption as the step for when protection is no longer needed, not as a troubleshooting fix.
| Action | What happens to the data | Key protectors | Typical use |
|---|---|---|---|
Turn off BitLocker (manage-bde -off, Disable-BitLocker) |
Whole drive is decrypted | All removed when decryption completes | You no longer want the drive encrypted |
Suspend (Suspend-BitLocker, manage-bde -protectors -disable) |
Stays encrypted, but the key is stored in the clear on the drive | Kept, and resealed when you resume | Firmware or hardware changes |
Pause (manage-bde -pause) |
Encryption or decryption stops part way | Kept | Free the disk during heavy work, then resume |
| Lock | Stays encrypted and unreadable until unlocked | Kept | Data drives lock at shutdown and restart, and when a removable drive is unplugged |
Control Panel offers Suspend protection for the operating system drive only, so suspending a data drive takes Suspend-BitLocker -MountPoint D or manage-bde -protectors -disable d:.
How to turn on BitLocker auto-unlock for a data drive
Auto-unlock opens a data drive without its password. A fixed data drive can auto-unlock only when the Windows drive is also BitLocker-protected; a removable drive can auto-unlock on one PC and still ask for its password elsewhere.
- Unlock the drive with its password.
- Open Command Prompt as administrator.
- Run
manage-bde -autounlock -enable E:, replacingE:with the drive letter. - For a removable drive, you can instead right-click it in File Explorer, select Manage BitLocker, and add automatic unlocking there.
- Run
manage-bde -autounlock -disable E:when you want the drive to ask for its password again.
Keep a password or recovery key on the drive as well. A data drive set to auto-unlock only must be opened with its recovery key when it is moved to another computer.
Prevent BitLocker from being enabled on data drives with Group Policy
Open the Local Group Policy Editor (gpedit.msc) as administrator and go to Computer Configuration > Administrative Templates > Windows Components > BitLocker Drive Encryption. Data drive settings sit in the Fixed Data Drives and Removable Data Drives folders.
| Policy (folder) | Set it to | Effect |
|---|---|---|
| Control use of BitLocker on removable drives (Removable Data Drives) | Disabled | Users can't use BitLocker on removable drives at all |
| Control use of BitLocker on removable drives (Removable Data Drives) | Enabled, with Allow users to suspend and decrypt BitLocker on removable data drives cleared | Users can encrypt USB drives but not remove the encryption |
| Deny write access to removable drives not protected by BitLocker (Removable Data Drives) | Enabled | Unencrypted USB drives mount read-only |
| Deny write access to fixed drives not protected by BitLocker (Fixed Data Drives) | Enabled | Unencrypted internal data drives mount read-only and saves fail with Access denied |
| Configure use of passwords for fixed data drives / removable data drives | Enabled | Sets password rules; the minimum is eight characters |
| Choose how BitLocker-protected fixed drives can be recovered (Fixed Data Drives) | Enabled | Controls recovery passwords and keys, and backup to AD DS |
Windows 11 Home has no Group Policy Editor. To stop automatic device encryption there, Microsoft documents the DWORD PreventDeviceEncryption set to 1 under HKEY_LOCAL_MACHINE\SYSTEM\CurrentControlSet\Control\BitLocker, though it recommends keeping device encryption on.
BitLocker recovery key not working on Windows 11
The recovery key is rejected for a data drive
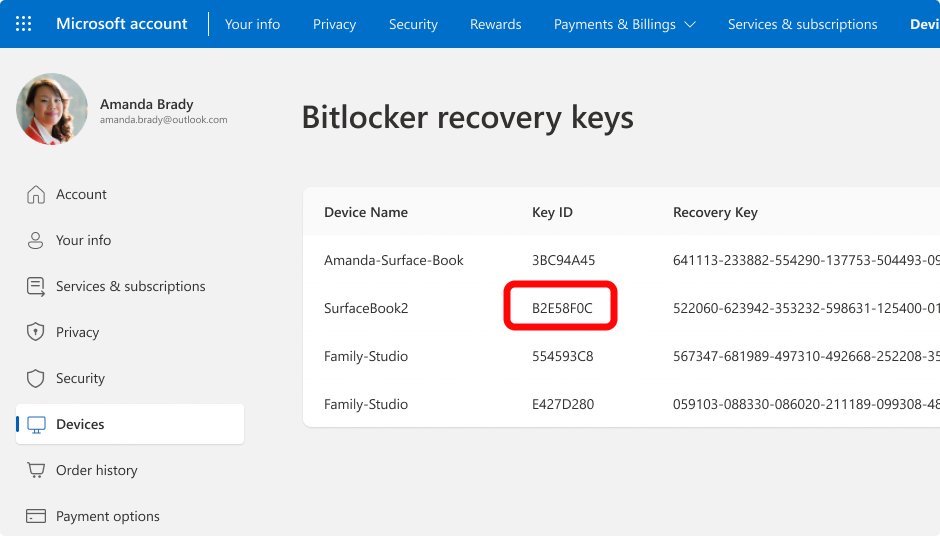
The key belongs to another drive or an older protector. Every recovery key has its own key ID.
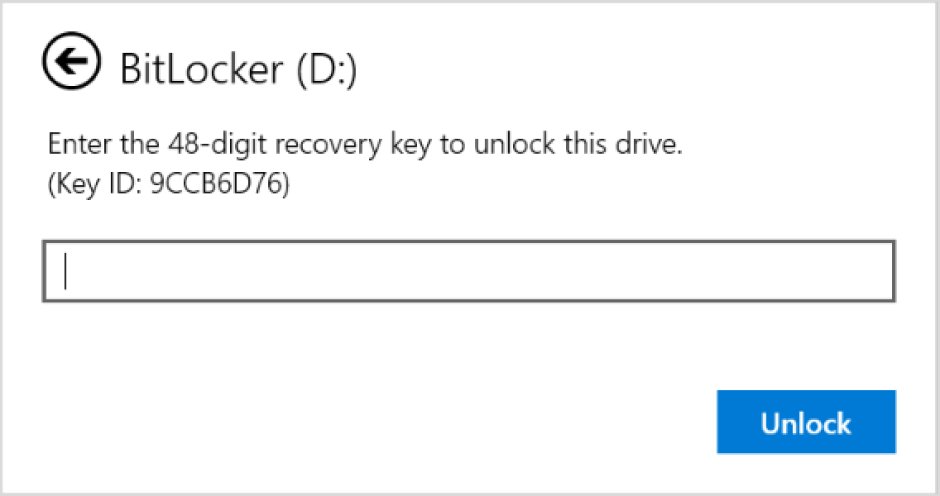
- On the unlock prompt, note the first 8 digits of the recovery key ID.
- On another device, go to
https://aka.ms/myrecoverykeyand sign in with the Microsoft account used when BitLocker was turned on. - Find the entry with the same key ID and type that 48-digit key exactly.
- Check printouts, USB flash drives and text files saved during setup for a key with a matching ID.
No BitLocker recovery key in the Microsoft account
The key was saved to a file, printed, or stored in a work or school account or by the person who set up the drive.
- Go to
https://aka.ms/aadrecoverykey, sign in with your work or school account, select Devices, and select View BitLocker Keys. - Ask whoever turned on BitLocker to check their own Microsoft account.
- On an organization's PC, ask its IT department; Microsoft Support cannot retrieve, provide or recreate a lost key.
The correct key still won't unlock the drive
The key was mistyped in the dialog, or the drive is damaged.
- Open Command Prompt as administrator and run
manage-bde -unlock E: -recoverypasswordfollowed by the 48-digit key, hyphens included. - For a physically damaged drive, use the BitLocker Repair tool (
repair-bde) with the key package stored in AD DS, if your organization backed one up. - Without any valid key, the data cannot be recovered and the drive can only be reused by formatting it.
BitLocker stuck on decrypting or encrypting in Windows 11
The encryption or decryption percentage stops moving
Large or slow drives take hours, and conversion stops while the PC is off or hibernating.
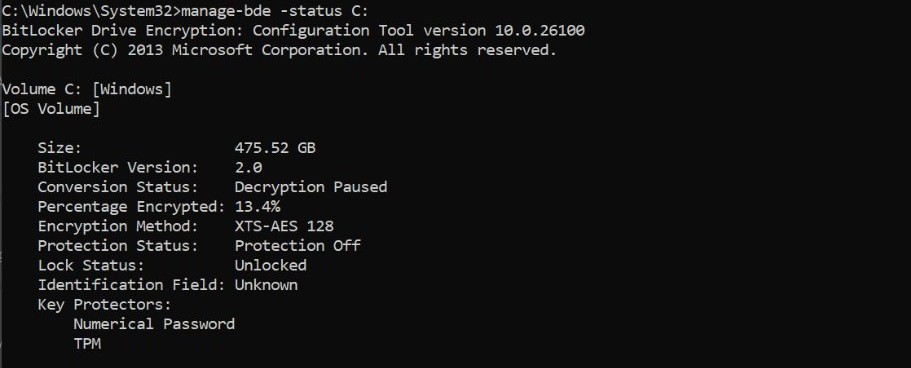
- Run
manage-bde -status E:and note Percentage Encrypted. - Check again after half an hour; any change means BitLocker is still working.
- Keep the PC awake and plugged in. After a shutdown or power cut, BitLocker resumes where it stopped the next time Windows starts.
- Restart Windows if the number has not changed for several hours, then check the status again.
Encryption was paused and never restarted
manage-bde -pause stops conversion until it is resumed by hand.
- Open Command Prompt as administrator.
- Run
manage-bde -resume E:. - Run
manage-bde -status E:and confirm the percentage is moving again.
Active Directory not showing BitLocker recovery key tab
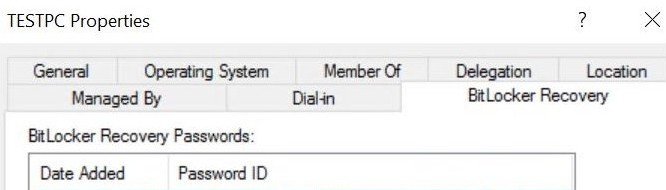
No BitLocker Recovery tab in the computer's Properties
The BitLocker Recovery Password Viewer, an extension for Active Directory Users and Computers that ships with RSAT, is not installed.
- On Windows 11 Pro or Enterprise, open Settings > System > Optional features.
- Add a feature, search for
Remote, and install RSAT: BitLocker Drive Encryption Administration Utilities with RSAT: Active Directory Domain Services and Lightweight Directory Services Tools. - On Windows Server, run the Add Roles and Features wizard, expand Remote Server Administration Tools on the Select Features page, and select the BitLocker tools.
- Reopen Active Directory Users and Computers, right-click the computer object, select Properties, and open the BitLocker Recovery tab.
The BitLocker Recovery tab is empty
The recovery password never reached AD DS. BitLocker does not retry a failed backup or back up drives encrypted before the PC joined the domain.
- Sign in with a Domain Admins account or one with delegated read access; by default nobody else can read BitLocker recovery information.
- Enable Choose how BitLocker-protected fixed drives can be recovered (or the removable drives version) with Save BitLocker recovery information to Active Directory Domain Services.
- On the client, run
manage-bde -protectors -get E:and copy the numerical password ID. - Run
manage-bde -protectors -adbackup E: -id {ID}, keeping the braces, then refresh the computer object.
Only the recovery key ID is known
The computer name is unknown, so the tab can't be opened directly.
- In Active Directory Users and Computers, right-click the domain container and select Find BitLocker Recovery Password.
- Type the first 8 characters in Password ID (first 8 characters) and select Search.
BitLocker data drive encryption FAQ
How do I enable or disable BitLocker with TPM?
The TPM protects only the operating system drive. Turn it on from Manage BitLocker by selecting Turn on BitLocker beside the Windows drive, or run manage-bde -on C:. Data drives use a password, smart card or auto-unlock instead, and manage-bde -off turns any of them off.
How do I disable BitLocker in Windows 11?
Select Start, type BitLocker, open Manage BitLocker, and select Turn off BitLocker beside the drive, then confirm. Decryption runs in the background and the status changes to Off when it finishes. Fixed drives need an administrator account; removable drives do not.
How do I disable BitLocker completely?
Turn BitLocker off on every drive listed in Manage BitLocker, or run Disable-BitLocker in an elevated PowerShell window to decrypt all encrypted volumes in one pass. Each drive's key protectors are removed once its decryption completes.
How do I permanently disable BitLocker?
Decrypt the drives, then stop it coming back. Device encryption that you turn off in Settings does not re-enable itself. On managed PCs, Group Policy such as Control use of BitLocker on removable drives set to Disabled blocks BitLocker on USB drives.
Why enable BitLocker on a data drive?
BitLocker keeps the drive unreadable if it is lost, stolen or connected to another computer, because the data appears as gibberish without the password or recovery key. It matters most for USB drives and external disks that leave the house.
What does disabling BitLocker do?
It decrypts the whole drive and removes its key protectors, so the data is readable by anyone with the drive. Suspending is different: the data stays encrypted, but the key is stored in the clear until protection is resumed.
What is the BitLocker enable and disable command?
From an elevated Command Prompt, manage-bde -on E: -pw turns on BitLocker for drive E with a password, and manage-bde -off E: decrypts it. In PowerShell, the matching cmdlets are Enable-BitLocker and Disable-BitLocker.
Does Windows 11 support BitLocker?
Yes, on Windows 11 Pro, Enterprise, Education, Pro Education and SE. Windows 11 Home does not include BitLocker Drive Encryption, so Manage BitLocker is missing; it offers device encryption, which covers internal drives but not USB drives.
How do I check BitLocker status on Windows 11?
Open Manage BitLocker to see On, Off or Suspended beside each drive. For details, run manage-bde -status in an elevated Command Prompt, which shows the percentage encrypted, protection status and lock status for every volume.