To change the resolution in Windows 10 to 1920×1080, select Start > Settings > System > Display, open the Display resolution list and choose 1920 × 1080.
This guide covers single and multiple monitors, what to do when 1920×1080 is missing or greyed out, the command-line option, and how to go back to the recommended setting.
Step-by-Step Guide to Change Resolution in Windows 10 to 1920×1080
- Select the Start button, then select Settings (the gear icon).
- Select System > Display.
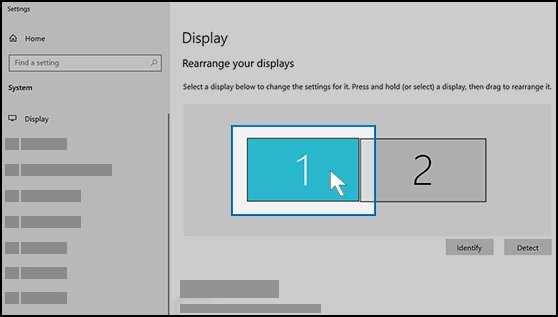
- If more than one monitor is connected, select the display you want to change in the diagram at the top.
- Under Scale and layout, open the Display resolution list.
- Select 1920 × 1080. If it is marked (Recommended), it is the monitor's native resolution.
- Check that text looks sharp and the picture fills the screen.
If 1920 × 1080 is not in the list, the monitor, cable or graphics driver is limiting the options. Jump to the troubleshooting section below.
Prerequisites and Preparations
| Check | Why it matters | How to confirm |
|---|---|---|
| The monitor supports 1920×1080 | Windows only lists resolutions the display reports | Look for 1920 × 1080 in the Display resolution list, or check the monitor's specification label or manual |
| The right display is selected | Each monitor keeps its own resolution | Select Identify under Rearrange your displays to see which number is which screen |
| A current graphics driver | An old or generic driver limits the resolution list | Run Settings > Update & Security > Windows Update > Check for updates |
| The monitor is connected directly | Adapters and old cables can cap the resolution the PC sees | Connect with the cable that came with the monitor where possible |
Understanding Display Resolution and Its Importance
Resolution is the number of pixels drawn across and down the screen. 1920×1080, often called Full HD or 1080p, is 1,920 pixels wide and 1,080 pixels tall.
| Situation | What you see |
|---|---|
| Resolution matches the monitor's native resolution | Sharpest text and images; Windows marks it (Recommended) |
| 1920×1080 on a monitor with a higher native resolution | Text is larger but less sharp, and the image might be stretched or edged with black |
| 1920×1080 on a 1920×1080 monitor | Each pixel maps to one screen pixel, the best possible picture |
| Text too small at native resolution | Change Scale instead of lowering the resolution |
How to set 1920×1080 on a second monitor
- Connect the second monitor and turn it on.
- Select Start > Settings > System > Display.
- If the monitor does not appear, scroll to Multiple displays and select Detect.
- Under Rearrange your displays, select Identify to see which number belongs to which screen.
- Select the number of the monitor you want to change.
- Under Scale and layout, open Display resolution and select 1920 × 1080.
- Drag the displays in the diagram to match their physical position, then select Apply.
Advanced Methods: Using PowerShell or Command Prompt
Windows 10 has no built-in command to change the resolution on a normal desktop. Microsoft's Set-DisplayResolution cmdlet belongs to the ServerCore module and is documented for Windows Server in Server Core mode only.
Set-DisplayResolution -Width 1920 -Height 1080 -ForceOn a Windows Server Core machine, this sets the screen to 1,920 pixels wide and 1,080 tall. -Width and -Height are in pixels, and -Force applies the change without asking for confirmation. Run Get-DisplayResolution first to see the current value.
You should see: PowerShell reports that the new display settings have been saved. On Windows 10 desktop editions, PowerShell instead reports that the term is not recognized, which means you should use Display settings.
How to check the resolution is 1920×1080
- Open Start > Settings > System > Display again.
- Select the monitor you changed in the diagram.
- Check that Display resolution now shows 1920 × 1080.
- Restart the PC and check the setting stays at 1920 × 1080.
Additional Tips for Optimizing Your Display Experience
- To make text bigger without blurring it, open Settings > System > Display and, under Scale and layout, pick a value in Change the size of text, apps, and other items.
- To set the refresh rate, select Advanced display settings, choose your monitor under Choose display and pick a rate under Refresh rate.
- To use a monitor in portrait mode, choose an option in the Orientation list and rotate the screen physically.
- Keep the graphics driver current with Settings > Update & Security > Windows Update > Check for updates.
- On a laptop with an external 1080p monitor, set each display separately; one setting does not apply to both.
Restoring Default or Previous Settings
- Select Start > Settings > System > Display.
- Select the monitor you want to reset.
- Open Display resolution and select the option marked (Recommended).
- Under Change the size of text, apps, and other items, select the (Recommended) value as well.
- If a driver update caused the change, right-click Start, select Device Manager, expand Display adapters, right-click the adapter, select Properties > Driver > Roll Back Driver, and choose a reason.
Troubleshooting Common Issues
Can't change resolution in Windows 10, or the list is greyed out
Windows is using a missing, damaged or generic graphics driver.
- Right-click Start and select Device Manager.
- Expand Display adapters, right-click your graphics adapter and select Update driver.
- Select Search automatically for updated driver software, then Close.
- If nothing changes, right-click the adapter, select Uninstall device > Uninstall, and restart the PC.
- If the list is still locked, install the driver from the PC or graphics card maker's website using Update driver > Browse my computer for drivers.
1920 × 1080 is not in the Display resolution list
The monitor, cable or adapter does not report 1920×1080 to Windows.
- Check the monitor's manual or specification label for its supported resolutions.
- Connect the monitor directly with a single cable, without a converter, and select Detect under Multiple displays.
- Update the graphics driver as in the fix above, then reopen Display resolution.
Windows 10 resolution keeps changing on its own
Microsoft names an out-of-date graphics driver as the cause of unexpected resolution changes.
- Select Start > Settings > Update & Security > Windows Update > Check for updates.
- Select Download & install if updates appear, then restart.
- Set Display resolution back to 1920 × 1080.
Picture is blurry or stretched at 1920×1080
The monitor's native resolution is higher than 1920×1080.
- Select the (Recommended) resolution instead.
- Increase Change the size of text, apps, and other items to make everything larger while keeping it sharp.
Frequently Asked Questions
How do I change the screen resolution in Windows 10?
Select Start > Settings > System > Display. Under Scale and layout, open the Display resolution list and pick the resolution you want. The option marked Recommended is the monitor's native resolution and usually gives the sharpest picture.
Why can't I change my resolution in Windows 10?
A missing or generic graphics driver is the usual cause. Open Device Manager, expand Display adapters, right-click the adapter and select Update driver, or install the driver from the PC maker's site. Restart and try Display resolution again.
How do I change the display resolution on a second monitor in Windows 10?
Open Settings > System > Display, select Identify to see the monitor numbers, then select the second monitor's number. Change Display resolution for that monitor only. Each display keeps its own resolution setting.
Why is 1920×1080 not showing in Windows 10?
Windows only lists resolutions the monitor and graphics driver report. If 1920×1080 is missing, the monitor might not support it, an adapter or cable might be limiting it, or the driver needs an update.
Is 1920×1080 the best resolution for my monitor?
Only if it is the monitor's native resolution, which Windows labels Recommended. On a higher-resolution screen, 1920×1080 looks less sharp. Keep the recommended resolution and raise the scale setting if text is too small.
How do I change the desktop resolution with a command in Windows 10?
Windows 10 desktop editions have no built-in resolution command. The Set-DisplayResolution PowerShell cmdlet works only on Windows Server Core. Use Settings > System > Display on Windows 10.
Final Thoughts
Set 1920 × 1080 in Settings > System > Display, and if it is missing, update the graphics driver before trying anything else. The Display resolution list is the only supported way on Windows 10, and a driver problem is the cause Microsoft names when resolutions are missing or change by themselves.