Make a recovery USB with the built-in Recovery Drive app on a working Windows 11 or Windows 10 PC, boot the broken PC from it, then select Troubleshoot > Advanced options > Startup Repair.
This guide covers both kinds of bootable USB, how to boot from one, Startup Repair and bootrec from the USB, a full reinstall, and what to do when the drive will not boot.
Create and use a bootable Windows 10/11 recovery USB to repair startup
This is the fastest route when you still have a working PC. Use an empty USB drive, because Recovery Drive erases everything on it.
- On a working PC, select Start, type
recovery driveand select Recovery Drive. - Keep Back up system files to the recovery drive selected and select Next.
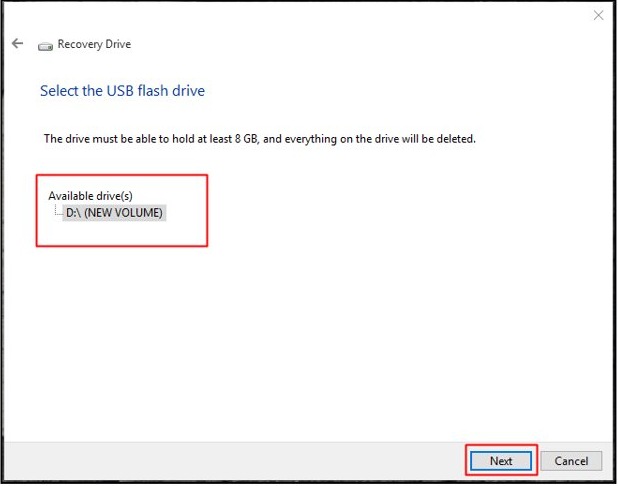
- Select the USB drive, select Next, then Create. Select Finish when it is done.
- Plug the USB into the PC that will not start and boot from it with your PC maker's boot menu key.
- Choose your keyboard layout, then select Troubleshoot > Advanced options > Startup Repair.
- When Startup Repair finishes, select Shut down, remove the USB and turn the PC on again.
A recovery drive made on one PC is meant for that PC. For a PC you have no drive for, build Windows installation media on any working computer instead.
Recovery drive vs installation media for Windows 11 repair
Both USB types boot into the Windows Recovery Environment (Windows RE), which holds Startup Repair. They differ in where you make them and what else they can do.
| Your situation | Use this USB | Why |
|---|---|---|
| You are preparing ahead on the same PC | Recovery drive from the Recovery Drive app | Boots straight to Windows RE and can reinstall Windows with the PC maker's customizations |
| The broken PC has no recovery drive | Installation media from the Media Creation Tool on another PC | Works on any compatible PC and opens Windows RE through Repair my PC |
| You want a clean reinstall of the latest release | Installation media | It downloads the current version of Windows |
| The PC is a Microsoft Surface that will not reset | Surface recovery image copied onto a recovery drive | Microsoft supplies a model-specific factory image for each Surface |
| Your PC maker offers its own recovery image | The manufacturer's recovery media | It includes hardware drivers and factory apps that generic media can miss |
What size USB do you need for a Windows recovery drive?
The prerequisites are short, but the USB size depends on which drive you make. Recovery Drive lists the space it needs on the screen where you pick the drive.
| Item | Requirement |
|---|---|
| USB drive for installation media | At least 8 GB and blank, because all content on it is deleted |
| USB drive for a Surface recovery image | Room for the image; 32 GB fits any Surface recovery image |
| USB drive for Recovery Drive | Empty, and at least the size the tool asks for when system files are backed up |
| A working PC | The same PC for a recovery drive; any PC with internet access for installation media |
| Administrator approval | Select Yes at the User Account Control prompt, or enter an admin password |
| BitLocker recovery key | Needed for most Windows RE tools if the PC's drive is encrypted |
| File system | FAT32, which a bootable USB needs; Recovery Drive and the Media Creation Tool format the drive for you |
Detailed step-by-step instructions to create a recovery drive in Windows 11
These steps are the same on Windows 10. The drive holds the built-in Windows files, the updates installed so far and any customizations from the PC maker. It does not hold your personal files.
- Plug an empty USB drive into the PC and copy off anything you need from it.
- Select Start, type
recovery driveand select Recovery Drive or Create a recovery drive. You can also press Windows key + R and runrecoverydrive.exe. - Select Yes in the User Account Control box.
- Make sure Back up system files to the recovery drive is selected, then select Next.
- Select your USB drive and select Next.
- Select Create. Many files are copied, so this can take a while.
- Select Finish when the recovery drive is ready, then label the drive with the PC's name.
Recreate the drive about once a year so it carries recent updates. Back up personal files separately with Windows Backup or File History.
How to create a bootable Windows 11 USB with the Media Creation Tool
Use this on any working PC when the broken PC has no recovery drive. The same media can repair or reinstall Windows.
- Plug a blank USB flash drive of at least 8 GB into a working PC with a reliable internet connection.
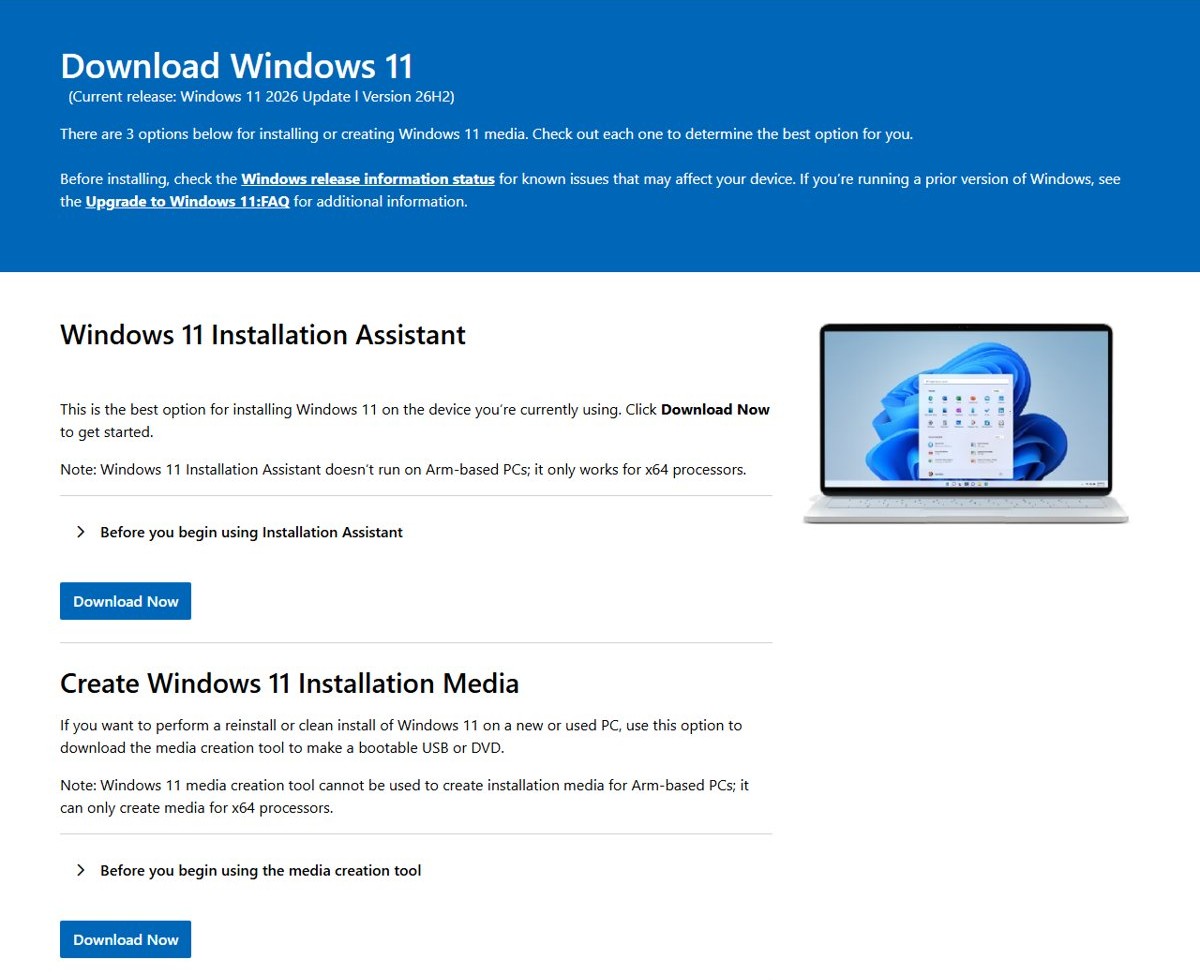
- Open the Download Windows 11 page on microsoft.com.
- Under Create Windows 11 Installation Media, select Download Now to get MediaCreationTool.exe.
- Run MediaCreationTool.exe and accept the license terms.
- Pick the language and edition that match the broken PC, then choose to create media on a USB flash drive.
- Select your USB drive and let the tool download Windows and write the drive.
For a Windows 10 PC, make bootable Windows 10 USB install media instead, so the repair tools match the installed version. If you already have a Windows 11 ISO, you can write it to a USB with Rufus instead.
How to boot from a recovery USB in Windows 11 and 10
The key that opens the boot menu differs by manufacturer, so check your PC's manual or support page. If Windows still starts, the Settings route below needs no key.
- Unplug other USB storage devices so the PC does not try to boot from them.
- Insert the recovery USB and turn the PC on, then press your PC maker's boot menu key and pick the USB drive.
- If Windows starts, go to Settings > System > Recovery (Windows 10: Update & Security > Recovery) and select Restart now next to Advanced startup.
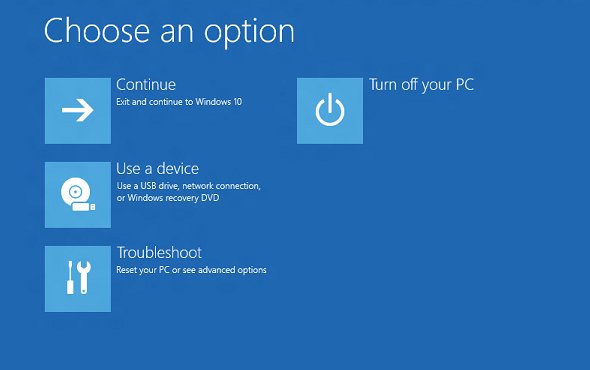
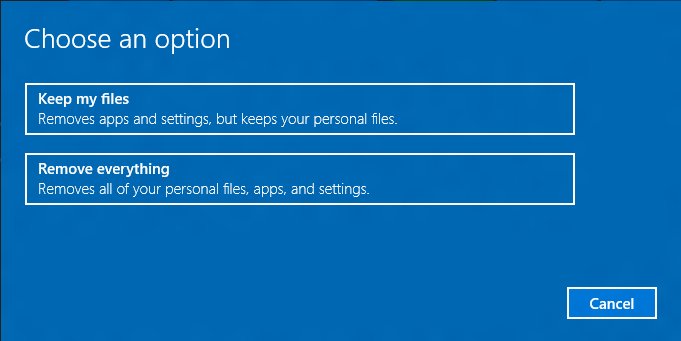
- On the Choose an option screen, select Use a device and pick the USB drive.
- On a Surface, hold volume-down, press and release power, and release volume-down when the logo appears.
- If the PC skips the USB every time, open UEFI Firmware Settings and move USB to the top of the boot order.
How to run Startup Repair from a recovery USB
Startup Repair diagnoses common startup faults, including a missing or damaged boot configuration, and tries to fix them on its own.
- Boot from the recovery drive and select your language and keyboard layout.
- From installation media instead, set your language, select Next, then select Repair my PC (older media says Repair your computer).
- On the Choose an option screen, select Troubleshoot.
- On the Advanced options screen, select Startup Repair.
- Enter the BitLocker recovery key if Windows RE asks for it.
- When the tool finishes, select Shut down, remove the USB and turn the PC on to test it.
Startup Repair writes its findings to %windir%\System32\LogFiles\Srt\Srttrail.txt. The log names the fault it found, which tells you where to start if you go on to fix boot problems with bootrec and Safe Mode.
Bootrec commands to fix Windows startup from a recovery USB
Use these when Startup Repair cannot fix a black screen with a blinking cursor, a missing operating system, or a missing or damaged BCD or Bootmgr.
Open the prompt from Troubleshoot > Advanced options > Command Prompt. On the installation media setup screen, Shift + F10 opens it too.
bootrec /fixmbr
bootrec /fixboot
bootrec /scanos
bootrec /rebuildbcd
/fixmbr rewrites the master boot code and /fixboot repairs the boot sector. /scanos lists the Windows installations it finds. /rebuildbcd rebuilds the boot configuration data; back up the old store first with bcdedit /export c:\bcdbackup.
You should see: Each command finishes without an error. Close Command Prompt, remove the USB and restart the PC to check that Windows starts.
/fixmbr only replaces the master boot code. If the partition table itself is damaged, it may not fix the fault, so move on to the next option in Windows RE.
What can you do with a Windows 11 recovery USB?
Startup Repair is one of several tools on the Advanced options screen. Try the least disruptive one first.
| Windows RE tool | What it does |
|---|---|
| Startup Repair | Diagnoses and repairs common problems that stop Windows from starting |
| Uninstall Updates | Removes a recently installed update that broke startup; files and apps are not affected |
| System Restore | Rolls system files and settings back to a saved restore point, but not personal files |
| Point-in-time restore | Rolls the whole PC, personal files included, back to a recent restore point (Windows 11, version 24H2 or later) |
| Command Prompt | Runs bootrec, chkdsk /f /r and an offline scan with SFC /Scannow /OffBootDir=C:\ /OffWinDir=C:\Windows |
| Startup Settings | Changes startup options, such as restarting into Safe Mode |
| UEFI Firmware Settings | Restarts into the firmware screen for boot order and Secure Boot |
| Reset this PC | Reinstalls Windows and lets you keep or remove personal files |
| Recover from a drive | Reinstalls Windows from a recovery drive made with system files, removing your files |
How to reinstall Windows 11 from a recovery drive
Use this only when the repairs above fail. It removes your personal files and installed apps.
- Boot the PC from the recovery drive made with Back up system files to the recovery drive selected.
- Select your keyboard layout when Windows RE loads.
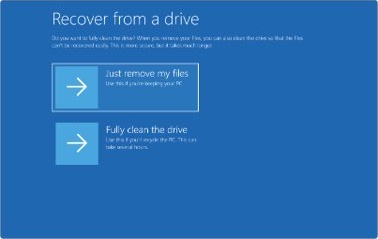
- Select Recover from a drive, or Troubleshoot > Recover from a drive.
- If a BitLocker recovery key is requested, select Skip this drive.
- Choose Just remove my files, or Fully clean the drive if you are giving the PC away.
- Select Recover and leave the PC plugged in until setup finishes.
Fully clean the drive is more secure but takes much longer than removing your files.
How to test a Windows 11 recovery USB before you need it
- Plug the recovery USB into the PC it was made for.
- Go to Settings > System > Recovery and select Restart now next to Advanced startup.
- Select Use a device, then pick the USB drive.
- Check that the keyboard layout screen appears, followed by Choose an option. That proves the drive boots into Windows RE.
- Remove the USB and select Continue to go back to Windows without changing anything.
If the healthy PC never reaches Choose an option, enable the Windows Recovery Environment on it first, then make a new drive.
Recovery USB tips, warnings, and troubleshooting notes
Two warnings apply to every recovery USB: making one erases the drive, and it never holds your personal files.
The PC will not boot from the recovery USB
Boot from USB is turned off, the boot order skips USB, or the drive is not formatted FAT32.
- Open UEFI Firmware Settings and turn on booting from USB devices.
- Move USB storage to the top of the boot order, or pick it from the one-time boot menu.
- Try another USB port, or rebuild the media on a different USB drive.
The recovery USB stopped working after a Secure Boot update
Recent Windows Boot Manager revocations stop older recovery and install media from starting a device that has them applied.
- Go to a PC that has the latest Windows security update installed.
- Make a new recovery drive with Recovery Drive, or new installation media with the Media Creation Tool.
- Boot the broken PC from the new drive.
Startup Repair couldn't repair your PC
The fault is outside what Startup Repair handles, such as a bad update or file system damage.
- Open
Srttrail.txtfrom Command Prompt in Windows RE to see what it found. - Run the bootrec commands, then
chkdsk /f /r. - Try Uninstall Updates, then System Restore, then Reset this PC, in that order.
The PC keeps restarting into Automatic Repair
Windows fails to start twice in a row, so it opens Windows RE each time.
- Select Advanced options > Troubleshoot > Advanced options > Command Prompt.
- Run
bcdedit /set {default} recoveryenabled noto break the loop. - Restart and fix the underlying fault with the tools above.
Recover from a drive is missing
The PC did not boot from the USB, or the drive was made without system files.
- Check the boot order so the USB is the first boot device.
- Recreate the drive with Back up system files to the recovery drive selected.
The USB drive shows only 32 GB after a Surface recovery
The recovery tool left a 32 GB FAT32 RECOVERY partition and unallocated space behind it.
- Go to Settings > System > Storage > Advanced storage settings > Disks & volumes.
- Open Properties on the RECOVERY partition and select Delete > Delete volume.
- On the unallocated space, select Create volume and follow the prompts.
Windows recovery USB FAQ
Can I use a recovery drive from another computer?
A recovery drive is built for bare metal recovery of the PC it was created on, with that PC's files and manufacturer customizations. For a different PC, create Windows installation media with the Media Creation Tool and use its Repair my PC option.
Does a Windows recovery drive back up my personal files?
No. A recovery drive holds Windows system files, installed updates and the PC maker's customizations, not your documents or photos. Back up personal files separately with Windows Backup or File History before you use Recover from a drive.
How often should I make a new recovery drive?
Microsoft recommends recreating the recovery drive every year so it includes the latest Windows updates. Make a new one sooner after a Secure Boot change, because older media may stop booting on an updated PC.
Where is the Startup Repair log file?
Startup Repair saves its log as Srttrail.txt in the %windir%\System32\LogFiles\Srt folder. Open it from Command Prompt in Windows RE, for example with Notepad, to see which startup fault the tool found and what it changed.
How do I get to Startup Repair without a USB?
Turn the PC on and hold the power button to force it off as the Windows logo appears, twice. On the third start, Windows opens Automatic Repair. Select Advanced options, then Troubleshoot > Advanced options > Startup Repair.
What is the difference between a recovery drive and a system repair disc?
Both boot straight into Windows RE for repairs. A system repair disc is a CD or DVD with the repair tools only, while a USB recovery drive made with system files can also reinstall Windows through Recover from a drive.
Do I need my BitLocker key to use a recovery USB?
Yes, for most Windows RE recovery options when BitLocker encrypts the PC's drive. Keep the key somewhere you can read it from another device. Recover from a drive is the exception: select Skip this drive at the recovery key prompt to continue.
Is the Repair my PC option on Windows 11 installation media the same as a recovery drive?
It opens the same Windows RE tools, including Startup Repair, System Restore and Command Prompt. It cannot restore the PC maker's factory image, so use the manufacturer's recovery media or a recovery drive for that.