To lock cells in Excel, select the cells, press Ctrl + 1, tick Locked on the Protection tab, then select Review > Protect Sheet.
This guide covers locking specific cells, formula cells and ranges, adding a password, using the $ sign and F4, keeping cells visible while you scroll, and locking cells on a Mac and in Excel online.
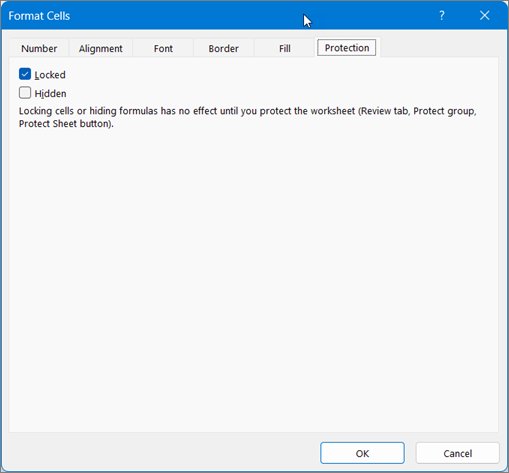
How to lock cells in Excel: Step-by-step guide
Every cell starts with the Locked setting turned on, but it does nothing until you protect the sheet. To lock only some cells, clear that setting everywhere first, then turn it back on for the cells you want to keep safe. These steps are for Excel on Windows.
- Select the whole worksheet with the Select All button, where the row numbers and column letters meet.
- Press Ctrl + 1 to open Format Cells, go to the Protection tab, clear Locked, and select OK.
- Select only the cells you want to lock. Hold Ctrl and click to pick cells that are not next to each other.
- Press Ctrl + 1 again, tick Locked on the Protection tab, and select OK.
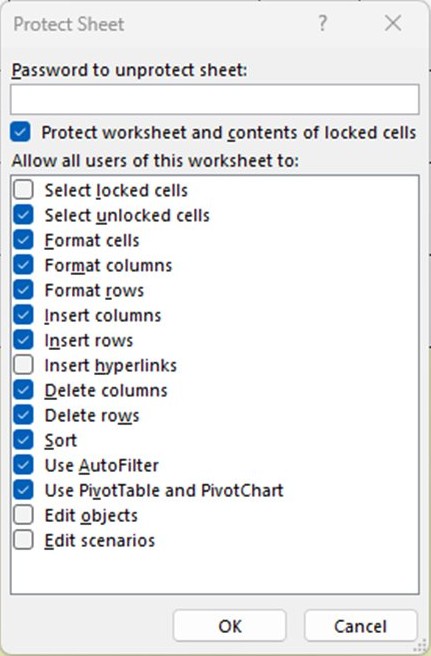
- Open the Review tab and select Protect Sheet.
- In Allow all users of this worksheet to, tick anything people may still do, such as Format cells or Sort.
- Type a password in Password to unprotect sheet if you want one, then select OK.
- Retype the password in the Confirm Password box and select OK.
The cells you ticked now refuse edits, and every other cell stays open for typing. If the sheet is already protected, select Review > Unprotect Sheet before step 1.
Which cell-locking method should you use?
"Lock" covers several different Excel features. Match what you are trying to do to a row, then jump to that section.
| What you want | Use this | Why |
|---|---|---|
| Stop edits to chosen cells | Locked plus Protect Sheet | Locked cells refuse edits while every other cell stays open |
| Protect every formula on a sheet | Go To Special > Formulas | Selects all formula cells at once, so you need not pick them by hand |
| Stop people reading a formula | Hidden plus Protect Sheet | Removes the formula from the formula bar |
| Let certain people edit certain ranges | Allow Edit Ranges | Gives a range its own password or user permissions |
| Keep a reference fixed when you copy a formula | $ or F4 | Changes how the formula copies; it does not block editing |
| Keep headers on screen as you scroll | Freeze Panes | Holds rows and columns in view; it does not block editing |
| Protect a sheet in a browser | Review > Manage Protection | The Excel online pane for sheet protection and unlocked ranges |
Why is locking cells in Excel so confusing?
Locking is a two-step process: a cell setting and a sheet command. Most mix-ups come from doing one without the other, or from expecting a lock to do something it was never built for.
| What confuses people | What actually happens |
|---|---|
| The Locked box is already ticked on a new sheet | All cells have the Locked setting by default, ready for when you protect the sheet |
| Ticking Locked changes nothing | The setting has no effect until you turn on Protect Sheet |
| Protect Sheet locks the entire sheet | Protecting a sheet locks every cell still marked Locked, so clear the setting on editable cells first |
| "Lock" in a formula means something else | A $ sign fixes a cell reference when you copy the formula, and anyone can still edit that cell |
| "Lock when scrolling" means something else | Freeze Panes only keeps rows and columns on screen |
| A sheet password sounds like file security | Microsoft says worksheet protection is not a security feature; it only stops changes to locked cells |
How to lock cells in Excel with password
The password is optional, but without one anyone can select Unprotect Sheet and change the locked cells. To lock cells in Excel so only you can edit them, set a password and keep it to yourself.
- Mark the right cells as Locked in Format Cells.
- Select Review > Protect Sheet.
- Leave Protect worksheet and contents of locked cells ticked.
- Type your password in Password to unprotect sheet and select OK.
- Retype it in the Confirm Password box and select OK.
Write the password down somewhere safe, because Microsoft cannot retrieve a forgotten one. This password protects the sheet only, so anyone can still open the file. To stop that, password protect the workbook from opening as well.
How to lock only formula cells in Excel
This method locks every formula on the sheet in one pass and leaves your input cells open. Excel selects the formula cells for you, so you cannot miss one tucked away in a far corner.
- Select the whole sheet with Select All, press Ctrl + 1, clear Locked on the Protection tab, and select OK.
- Select any cell, then select Home > Find & Select > Go To, or press Ctrl + G.
- Select Special.
- In the Go To Special dialog box, select Formulas and then OK.
- Press Ctrl + 1, tick Locked on the Protection tab, and select OK.
- Select Review > Protect Sheet, set a password if you want one, and select OK.
Formulas you add later are not picked up automatically. Unprotect the sheet and repeat these steps after you change the layout.
How to lock cells in Excel formula using dollar sign and F4
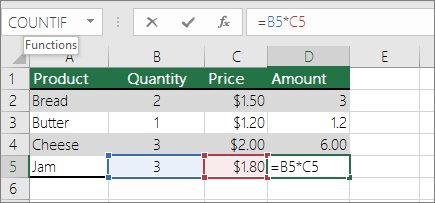
In a formula, locking means fixing a cell reference so it stays put when you copy the formula. Copy =B4*C4 from D4 to D5 and it becomes =B5*C5. Copy =$B$4*$C$4 and it stays exactly the same.
- Select the cell that contains the formula.
- In the formula bar, select the reference you want to lock, such as
B4. - Press F4 to switch between reference types. On a Mac, press Cmd + T or F4.
- Stop when the reference shows the $ signs you need, such as
$B$4. - Press Enter, then copy the formula to check that the reference holds.
You can also type the $ signs yourself. Fixing the table range this way is a standard step when you build a VLOOKUP formula, since the range must not shift as you fill the formula down.
Dollar sign in Excel formula: $A$1 vs A$1 vs $A1
The position of the $ sign decides which part of the reference stays fixed. This table shows what each type becomes when you copy the formula two cells down and two cells to the right.
| Reference | What is locked | After copying |
|---|---|---|
$A$1 |
Column and row | $A$1 |
A$1 |
Row only | C$1 |
$A1 |
Column only | $A3 |
A1 |
Nothing | C3 |
How to lock cells in Excel when scrolling
To keep headers on screen as you scroll, use Freeze Panes. It freezes the rows above and the columns to the left of the cell you select, and those cells remain fully editable.
- Select the cell below the rows and to the right of the columns you want to keep visible.
- Open the View tab.
- Select Freeze Panes > Freeze Panes.
- Scroll down and across. The frozen rows and columns stay in place.
- To undo it, select View > Freeze Panes > Unfreeze Panes.
To freeze only the first two columns, select the third column before you choose Freeze Panes. If the arrow keys move the whole sheet instead of the active cell, that is a different setting, and you need to turn off Scroll Lock.
How to use Allow Edit Ranges in Excel
Allow Edit Ranges opens chosen ranges on a protected sheet to people who have the range password or permission. User permissions require a computer on a domain, so use a range password if yours is not. The command is only available while the sheet is unprotected.
- Select Review > Allow Edit Ranges.
- In the Allow Users to Edit Ranges dialog box, select New.
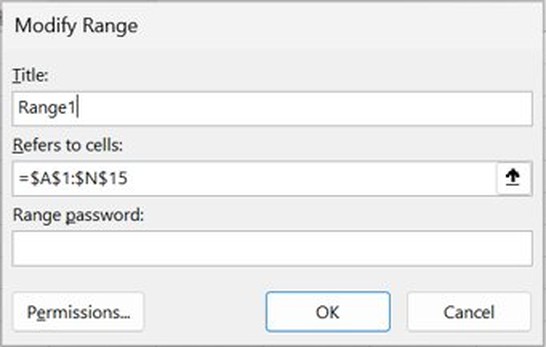
- In Title, type a name for the range.
- In Refers to cells, type an equal sign and the range reference, or select the range on the sheet.
- Type a password in Range password, or select Permissions > Add and enter the names of the people allowed to edit.
- Select OK until you return to the Allow Users to Edit Ranges dialog box, retyping the password if asked.
- Select Protect Sheet, choose what all users may change, set a sheet password if you want one, and select OK.
A cell in more than one range can be edited by anyone authorized for any of those ranges. To change or remove a range later, unprotect the sheet and use Modify or Delete in the same dialog box.
Hide formulas completely in Excel
Locking stops people editing a formula, but they can still read it in the formula bar. Tick Hidden as well to keep it out of sight. The cell still shows its result.
- Select the cells whose formulas you want to hide. You can select nonadjacent ranges or the entire sheet.
- Select Home > Format > Format Cells.
- On the Protection tab, tick Hidden and select OK.
- Select Review > Protect Sheet.
- Make sure Protect worksheet and contents of locked cells is ticked, and select OK.
Hiding also prevents those cells from being edited. To show the formulas again, select Review > Unprotect Sheet.
How to lock cells in Excel on Mac
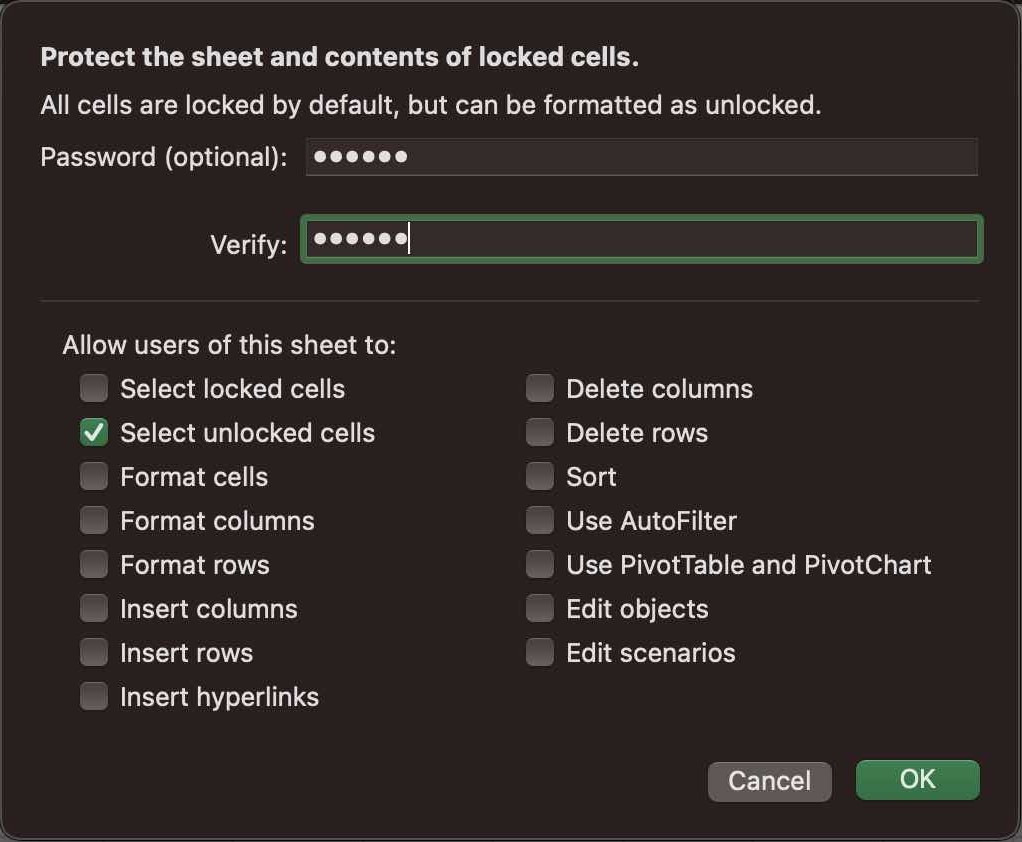
Locking works the same way on a Mac, with the same two steps. The main difference is the keyboard shortcut for Format Cells, which is Cmd + 1.
- Select the cells you want to lock.
- Select Format > Cells, or press Cmd + 1.
- On the Protection tab, make sure Locked is ticked, and select OK.
- Select any cells that should stay editable, press Cmd + 1, and clear Locked.
- On the Review tab, select Protect Sheet.
- Type a password and retype it under Verify if you want one.
- Under Allow users of this sheet to, choose what people may still do, then select OK.
How to lock cells in Excel online
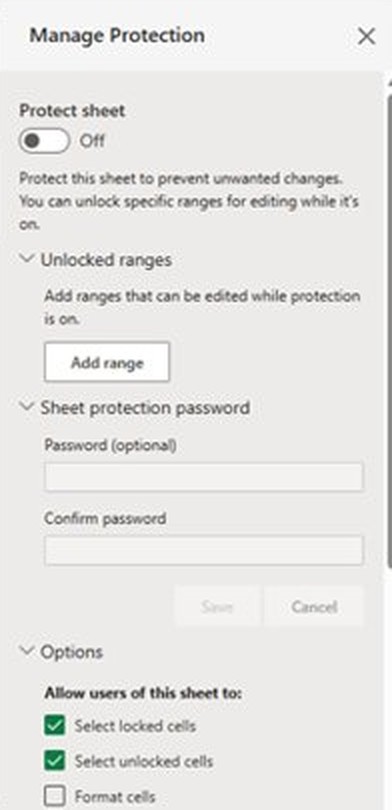
Excel online works the other way around. Protection locks the whole sheet, and you then list the ranges that stay open instead of ticking Locked on individual cells.
- Open the workbook in Excel for the web and go to the sheet.
- Select Review > Manage Protection.
- Turn on Protect sheet in the pane. The whole sheet is now locked.
- Under Unlocked ranges, add each range people should still be able to edit.
- Add a Range password to any range that needs one.
- Set a Sheet protection password to control who can change the protection settings.
- Open Options to allow actions such as sorting, using AutoFilter or formatting cells.
A locked icon on the sheet tab shows the sheet is protected. To lift protection for your own session only, select Review > Pause Protection, then Resume Protection when you finish. For the Locked setting on individual cells, select Open in Excel and use the desktop steps.
Alternative solutions for locking cells in Excel
Sheet protection guards cells. If your real goal is to protect the file or its structure, one of these file-level and workbook-level options fits better, and you can combine them with locked cells.
| What you want to stop | Use this | What it does |
|---|---|---|
| Anyone opening the file | File > Info > Protect Workbook > Encrypt with Password | Requires a password to open the file |
| Some people changing the file while others can read it | A password to open plus a password to modify | Gives read-only or edit access depending on which password you share |
| Adding, moving, deleting, hiding or renaming sheets | Review > Protect Workbook | Locks the workbook structure and leaves cell editing alone |
| Further changes to a finished file | Mark as Final | Marks the file as the final version |
| Access outside your organization's rules | Restrict Access | Applies Information Rights Management permissions your organization has set up |
Excel Protect Sheet options explained
The list in the Protect Sheet dialog box decides what people can still do after you protect the sheet. A ticked option is allowed.
| Option | What ticking it allows |
|---|---|
| Select locked cells | Moving the pointer to locked cells, which is allowed by default |
| Select unlocked cells | Moving to unlocked cells, also by default, and using the Tab key to go between them |
| Format cells | Changing options in Format Cells and Conditional Formatting |
| Format columns, Format rows | Changing width or height, and hiding columns or rows |
| Insert columns, Insert rows, Insert hyperlinks | Adding columns, rows or new hyperlinks, even in unlocked cells |
| Delete columns, Delete rows | Removing columns or rows |
| Sort | Using sort commands, though never on ranges that contain locked cells |
| Use AutoFilter | Changing filters that are already applied, though not adding or removing them |
| Use PivotTable reports | Formatting, refreshing or changing the layout of PivotTables, or creating new ones |
| Edit objects | Changing charts, shapes, text boxes and controls, and adding or editing notes |
| Edit scenarios | Viewing hidden scenarios, changing protected ones and deleting them |
Tips for locking cells like a pro
These habits save you from unprotecting and reprotecting the sheet every time someone needs to type in it.
- Unlock every cell people need to change before you protect the sheet, not after.
- Press Tab on a protected sheet to jump between unlocked cells when you share a form or template.
- Clear Select locked cells if you want people to move only through the cells they can fill in.
- Apply conditional formatting before you protect the sheet, because existing rules keep responding to new values.
- Allow Insert rows only together with Delete rows, or people can add rows they cannot remove.
- Use a password of 8 or more characters that mixes uppercase, lowercase, numbers and symbols, or a passphrase of 14 or more characters.
- Protect each sheet that needs it, since Protect Sheet applies only to the current worksheet.
How to tell if an Excel sheet is protected
- Select the Review tab on the ribbon.
- Look at the protection button. It reads Unprotect Sheet when the sheet is protected and Protect Sheet when it is not.
- Click a cell you locked and try typing. Excel refuses the edit.
- Click a cell you unlocked and type. The entry goes in as normal.
- In Excel online, look at the sheet tab for the locked icon.
How to unlock cells in Excel
Turn protection off first, then clear the setting on any cells that should stay editable. If only the workbook is protected, you need to unprotect the workbook instead.
- Go to the protected worksheet.
- Select Review > Unprotect Sheet, or File > Info > Protect > Unprotect Sheet.
- Enter the password if asked, and select OK.
- Select the cells you want to unlock, press Ctrl + 1, clear Locked on the Protection tab, and select OK.
- Select Review > Protect Sheet if other cells still need protection.
Locked cells in Excel still not working?
Match what you see to a symptom. Each fix assumes you can open the file and know any sheet password.
You ticked Locked but people can still edit the cells
The Locked setting has no effect until the sheet is protected.
- Open the Review tab and check that the button reads Protect Sheet.
- Select Protect Sheet, set any options, and select OK.
Every cell on the sheet is locked, not just the ones you picked
All cells start with Locked turned on, so protection covers every cell you did not clear.
- Select Review > Unprotect Sheet.
- Select Select All, press Ctrl + 1, clear Locked, and select OK.
- Tick Locked again only on the cells to protect, then select Protect Sheet.
Why can't I lock cells in Excel?
The sheet is already protected, so you cannot change the cell settings until you remove protection.
- Select Review > Unprotect Sheet, and enter the password if asked.
- Change the Locked setting on the Protection tab of Format Cells.
- Select Review > Protect Sheet to apply protection again.
The Unprotect Sheet button is unavailable
The Shared Workbook feature is on, and Microsoft says to turn it off first.
- Turn off the Shared Workbook feature.
- Select Review > Unprotect Sheet again.
Sorting or filtering fails on the protected sheet
People cannot sort ranges that contain locked cells, or apply or remove AutoFilter, whatever options you allow.
- Select Review > Unprotect Sheet.
- Sort the data or apply the AutoFilter.
- Select Protect Sheet again and tick Use AutoFilter so people can change the existing filters.
You forgot the password to unprotect the sheet
Microsoft cannot retrieve a forgotten password.
- Ask whoever set the protection for the password if someone else created the file.
- Open an earlier copy of the file from before the password was set, if you kept one.
- Store the new password somewhere safe once you set one on the working copy.
Worksheet protection is not available in U.S. Government Community Cloud High or Department of Defense environments, so the steps above will not help there.
Frequently asked questions about locking cells in Excel
Can I lock cells in Excel without protecting the whole sheet?
No. The Locked setting only takes effect once the sheet is protected. You can protect the sheet and leave most of it editable, though, by clearing Locked on every cell except the ones you want to keep safe.
Why lock cells in Excel?
Locking stops people from accidentally or deliberately changing, moving or deleting data. A common use is a shared report or form where others fill in specific cells and cannot alter the formulas, headers or layout around them.
How do I lock only cells that contain formulas?
Clear Locked on the whole sheet, then press Ctrl + G, select Special, choose Formulas and select OK. Press Ctrl + 1, tick Locked on the Protection tab, select OK, and finish with Review > Protect Sheet.
Does locking cells work the same on Mac?
Yes. Excel for Mac uses the same Locked setting and Protect Sheet command. Press Cmd + 1 to open Format Cells, and type your password in the Password and Verify boxes when you protect the sheet.
Can people still see the contents of locked cells?
Yes. Locked cells still show their values and formulas. Tick Hidden on the Protection tab as well to keep a formula out of the formula bar. The cell still shows the result, so never rely on locking to hide sensitive data.
How do I unlock cells in Excel again?
Select Review > Unprotect Sheet and enter the password if asked. Then select the cells, press Ctrl + 1, and clear Locked on the Protection tab. Protect the sheet again if other cells still need the lock.
Is a protection password secure?
No. Microsoft says worksheet protection is not intended as a security feature, and it warns against assuming a password makes a file secure. To stop people opening a file, encrypt it, and think twice before sharing sensitive data at all.
Can I lock cells in Excel online?
Yes. Select Review > Manage Protection and turn on Protect sheet, which locks the whole sheet. Then add any cells people may edit under Unlocked ranges. You can also set a sheet protection password in the same pane.
What is the shortcut to lock cells in Excel?
There is no single key that locks a cell. Press Ctrl + 1 on Windows or Cmd + 1 on a Mac to open Format Cells, where the Locked box lives. In a formula, press F4 to lock a cell reference with $ signs.
How do I lock cells in Excel so I can scroll?
Use Freeze Panes rather than cell locking. Select the cell below the rows and to the right of the columns you want to keep, then select View > Freeze Panes > Freeze Panes. Those rows and columns stay visible as you scroll.