Before returning a Windows 11 laptop, back up your files with Windows Backup, sign out of paid apps, turn off Find my device, reset the PC with Remove everything and Clean data, then remove it from your Microsoft account.
This guide covers each step in order, what changes for a work laptop, how to confirm the wipe, and the packing and paperwork a store return needs.
What to Do Before Returning a Laptop with Windows 11
Do the steps in this order. The reset in step 6 deletes everything, so the backup and sign-outs must come first.
- Check the seller's return window and condition rules, and start the return request.
- Back up your folders and settings with Windows Backup, then confirm the files are on OneDrive.com.
- Sign out of or deauthorize apps that count devices, such as Microsoft 365 and the Apple Music app.
- Turn off Find my device so the laptop stops reporting its location to your account.
- Note where your BitLocker recovery key is stored, in case the reset asks for it.
- Open Settings > System > Recovery, select Reset PC, choose Remove everything and turn on Clean data.
- Sign in at account.microsoft.com/devices and select Remove device for the returned laptop.
- Clean the laptop, photograph its condition, and pack it with every accessory in the original box.
A work or school laptop follows different rules; see the table below before you reset anything.
Which steps apply to your laptop
| Your situation | What to do | Why |
|---|---|---|
| Personal laptop going back to a store or online seller | Every step in this guide, including the full reset | The next buyer gets the laptop, so your accounts and files must be gone |
| Work laptop going back to your employer | Copy only your personal files off it, sign out of personal accounts, then ask IT before resetting | The organization may need the data, and its BitLocker key and device record belong to IT |
| School laptop going back at the end of term | Same as a work laptop: save personal files, then follow the school's return instructions | School devices are managed the same way as work devices |
| Laptop sent for repair, not returned for a refund | Back up, but do not reset unless the repair service asks | You get the same laptop back, and a reset only adds setup work |
| Laptop will not start | Skip the backup and reset; remove it from your Microsoft account and tell the seller | You cannot wipe a laptop that does not boot, so record that in the return notes |
1. Understand the Return Policy
Read the seller's policy before you wipe anything. A reset takes time, and some sellers refuse returns that arrive late or incomplete.
Microsoft Store is a useful benchmark: it accepts most physical products within 60 days, in like-new condition, in the original packaging with all parts and documentation.
| What to check | Why it matters | Microsoft Store example |
|---|---|---|
| Return window | The clock usually starts when you receive the laptop, not when you ordered it | Start the return within 60 days after you receive the product |
| Condition | Scratches or missing parts can reduce or void the refund | Like-new condition |
| Packaging and accessories | Missing chargers or manuals can block the refund | Original packaging with all parts and documentation |
| How to start | Most sellers need a return request before you ship | Order history in your Microsoft account, then Request a return |
| Refund timing | Plan around the processing time | Refund to the original payment method in 3-5 business days after the item is checked |
| Exclusions | Some products are final sale | Surface Hub, HoloLens and Windows DevKit are excluded |
2. Back Up Your Data
Windows Backup copies your Desktop, Documents, Pictures, Videos and Music folders to OneDrive and saves your settings to your Microsoft account. It works with a personal Microsoft account only; work or school accounts are not supported.
A free Microsoft account includes 5 GB of OneDrive storage. If your folders are larger, copy them to an external drive as well.
- Open Settings > Accounts > Your info and confirm you are signed in with a Microsoft account. If you see Sign in with a Microsoft account instead, select it.
- Select Start, type
backup, and open Windows Backup. - Expand Folders and turn on Desktop, Documents, Pictures, Videos and Music.
- Expand Installed apps, Accounts, Wi-Fi network and passwords, Personalization and the other settings you want, and turn each one on.
- Select Back up and leave the laptop on and online until OneDrive finishes uploading.
- Copy files stored outside those folders, such as a second drive or a game save folder, to an external drive or into OneDrive manually.
- Sign in to Microsoft Edge and turn on sync if you want your favorites on the next PC.
3. Double-Check Your Backups
Check the backup before the reset, not after. Once Remove everything runs, anything not copied is gone.
- Open Settings > Accounts > Windows backup and confirm each folder and setting shows as backed up.
- Open onedrive.com on another device or in a browser and open a few recent files from Documents and Pictures.
- If Windows Backup shows an error from OneDrive, check that you are signed in to OneDrive and have enough storage, then run the backup again.
- Open any external drive copy on a different computer to prove it is readable.
- Export anything that lives only inside an app, such as local email archives or license keys, and store it with your backup.
4. Deauthorize Applications
Some paid apps count the computers you use. A reset does not free that slot on the vendor's side, so release it while the laptop still works. Follow each vendor's own instructions.
| App or service | What to do | Why |
|---|---|---|
| Microsoft 365 subscription | Sign out of Office on the laptop, or sign it out remotely from your Microsoft account in a browser, as Microsoft's *Deactivate an installation of Office* page describes | Office signs out old devices automatically to stay within the limit, but signing out yourself closes the laptop's access now |
| Apple Music app or Apple TV app | Open the app, click your name at the bottom of the sidebar, click Deauthorize Machine, sign in, and click Deauthorize | Apple allows up to five authorized computers at a time |
| Microsoft Store apps and games | Handled by removing the laptop from your Microsoft account in step 5 | Store content can be downloaded to only 10 devices on one account |
| Other paid software (creative, security, backup tools) | Use the vendor's sign-out or deactivate option from its own help pages before the reset | Many licenses are tied to an activation count that only the vendor can release |
| Browsers, email and chat apps | Sign out, or rely on the reset to remove them | The reset deletes local sign-ins, but signing out ends sessions you may forget |
5. Turn Off Find My Device and Remove the Laptop from Your Account
Find my device ties the laptop to your Microsoft account and shows its location on account.microsoft.com/devices. The reset does not take the laptop off that list, so remove it there as well.
- Press Win + R, type
ms-settings:findmydevice, and press Enter. - Turn Find my device off.
- Press Win + R, type
ms-settings:emailandaccounts, press Enter, and remove the extra personal accounts you added, such as a second Outlook or Gmail account. - After the reset in step 7, go to account.microsoft.com/devices on another device and sign in.
- Find the returned laptop and select Remove device.
- Check the box to confirm removal, and select Remove.
On a work laptop, leave Access work or school alone. IT uses that connection to manage the returned device.
6. Save Your BitLocker Recovery Key
Microsoft tells you to have the key ready before any reset, and a reset started from the Windows Recovery Environment on an encrypted drive needs it. Microsoft Support cannot retrieve or recreate a lost key.
- On another device, go to aka.ms/myrecoverykey and sign in with the Microsoft account used on the laptop.
- Match the key ID shown for the laptop and write down the 48-digit recovery key.
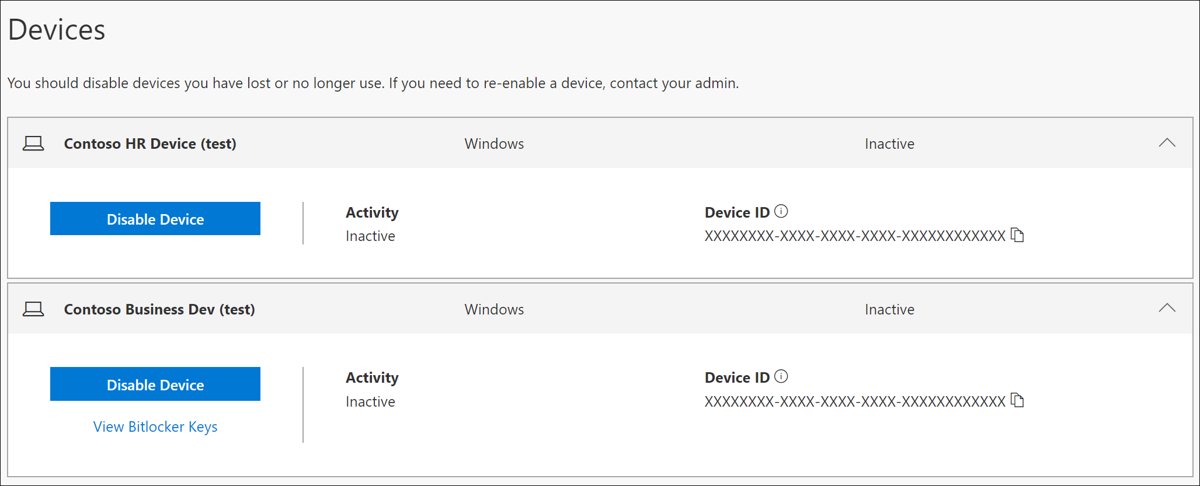
- For a work or school laptop, go to aka.ms/aadrecoverykey instead, select Devices, expand the laptop, and select View BitLocker Keys.
- If neither account has the key, check for a printout or a text file saved on a USB drive when BitLocker was turned on.
- Keep the key until the reset finishes and the laptop is shipped.
7. Erase Personal Data
Remove everything reinstalls Windows and deletes your files, apps and settings. Clean data also cleans the drive so removed files are harder to recover; Microsoft recommends it when you sell, donate or recycle a PC.
The reset can take a long time, and the screen can stay black for 15 minutes or more. Do not restart the laptop yourself during it, or the reset can fail.
- Plug the laptop into its charger.
- Open Settings > System > Recovery.
- Under Recovery options, select Reset PC.
- Select Remove everything.
- Choose Cloud download for a fresh copy of Windows, or Local reinstall on a slow connection.
- In the reset settings, turn on Clean data.
- Follow the on-screen instructions to start the reset, then leave the laptop alone until it finishes.
If Windows will not start, open the Windows Recovery Environment and select Troubleshoot > Reset this PC, then choose the same options. You need the BitLocker key from step 6 for this route.
Microsoft notes that this erase is aimed at consumers and does not meet government or industry data-erasure standards.
How to check the laptop is wiped
- Confirm the laptop restarts to Windows' first-time setup screens instead of your lock screen or desktop.
- Stop at the first setup screen and hold the power button to shut it down. Do not sign in with your account.
- On another device, open account.microsoft.com/devices and confirm the laptop is no longer listed.
- Open onedrive.com and confirm your backed-up folders are still there.
- Open the Apple Music app or other apps on your new computer and confirm the old laptop no longer counts against your limit.
8. Clean the Laptop
Sellers grade returns on physical condition, so a clean laptop avoids a restocking argument.
- Shut the laptop down and unplug the charger.
- Remove stickers, screen protectors and anything else you added.
- Wipe the lid, keyboard deck and touchpad with a soft, lint-free cloth.
- Wipe the screen gently with a separate clean, dry cloth.
- Take out any USB drives, memory cards or discs left in the ports.
Check your laptop maker's support site for the cleaning products it allows before you use any liquid.
9. Document the Condition of the Laptop
- Photograph the lid, screen, keyboard, underside and every port in good light.
- Photograph the screen powered on to show there are no dead pixels or cracks.
- Record the serial number from the label on the laptop or the box. For a laptop still on your account, it is also under Info and support at account.microsoft.com/devices.
- Photograph the packed box, the accessories inside it, and the shipping label.
- Keep the photos, the order number and the return confirmation until the refund arrives.
10. Gather Original Accessories and Packaging
| Item | Where it usually is | Note |
|---|---|---|
| Charger and power cable | In the laptop bag or plugged in at your desk | Most refunds depend on it |
| Original box and inserts | Where you stored the packaging | Microsoft Store asks for the original packaging |
| Manuals and paperwork | Inside the box | Include all documentation that shipped with it |
| Bundled extras (pen, dongle, sleeve) | Desk drawers, other bags | Missing bundle items can reduce the refund |
| Anything you added | Ports and the underside | Remove your own drives, adapters and cases |
11. Arrange for Shipping or Drop-Off
The steps below are Microsoft Store's own process. Other retailers use the same pattern: request, label, ship, wait for the check.
- Open Order history in your Microsoft account and find the laptop.
- Select Request a return and follow the instructions.
- Print the prepaid shipping label.
- Pack the laptop in its original packaging with all parts and documentation.
- Ship it with the label, or take it to the store if you bought it in person, and keep the receipt.
12. Prepare for New Device Setup (if applicable)
If a replacement laptop is coming, the backup from step 2 moves your setup across.
- During setup on the new PC, sign in with the same Microsoft account you used for the backup.
- When Windows offers to restore, pick the backup. If you have more than one PC backed up, select More options and choose the right one.
- On the desktop, select the restored app pins to reinstall Store apps; apps from outside the Store send you to the web installer.
- Sign in to OneDrive with the same account to get your files back.
- Sign in to Microsoft 365 and reauthorize the Apple Music app or other deauthorized apps.
Fix problems before you hand the laptop back
Windows Backup shows a OneDrive error
You are not signed in to OneDrive, OneDrive is full, or OneDrive has its own sync problem.
- Select the OneDrive icon in the taskbar and confirm you are signed in.
- Check your storage on onedrive.com and free space or buy more if it is full.
- Copy the remaining files to an external drive if OneDrive cannot take them before the return deadline.
- Run Windows Backup again and select Back up.
The reset asks for a BitLocker recovery key
The drive is encrypted and you started the reset from the Windows Recovery Environment.
- Note the first 8 digits of the recovery key ID on the screen.
- On another device, open aka.ms/myrecoverykey, or aka.ms/aadrecoverykey for a work or school account.
- Find the matching key ID and type the 48-digit key.
- If you cannot find the key on a work laptop, contact IT; do not keep guessing.
The screen stays black during the reset
Reset can keep the screen black for long periods, occasionally more than 15 minutes, and may restart on its own.
- Keep the charger connected.
- Wait, and do not press the power button.
- If the reset fails, start it again from Settings > System > Recovery or from Troubleshoot > Reset this PC.
The laptop is not listed at account.microsoft.com/devices
Windows 11 laptops are added automatically when you sign in with that Microsoft account, and a device can take up to 24 hours to show.
- Confirm you signed in with the same account you used on the laptop.
- Company-managed laptops cannot be added to a personal account, so a work laptop never appears here.
Conclusion
Back up, confirm the backup on OneDrive.com, sign out of licensed apps, turn off Find my device, then reset with Remove everything and Clean data before you remove the laptop from your account. That order keeps your files and licenses safe until the last moment, and the reset leaves the next owner with a clean Windows install and none of your accounts.
Frequently Asked Questions
What should I do before returning a laptop?
Back up your files, sign out of paid apps, turn off Find my device, and reset the laptop with Remove everything and Clean data. Then remove it from your Microsoft account, clean it, and pack it with every accessory in the original box.
What should I do before returning a computer or PC?
The same steps apply to a desktop PC. Back up with Windows Backup, deauthorize licensed apps, reset from Settings > System > Recovery with Remove everything, and remove the PC at account.microsoft.com/devices.
What should I do before returning a work laptop?
Copy only your personal files off it and sign out of personal accounts such as a private email or Apple account. Ask IT before resetting, because the organization may need the data and manages the laptop's BitLocker key and device record.
What should I do before returning a laptop to a store?
Check the store's return window and condition rules first. Then back up, sign out, reset with Remove everything, and bring the laptop in its original box with the charger, manuals and your receipt or order number.
What should I do before a reset?
Back up your files, make sure you know where your BitLocker recovery key is stored, and sign out of apps that count devices. The reset reinstalls Windows and, with Remove everything, deletes your files, apps and settings.
Does Reset this PC remove my Microsoft account?
It removes the account from the laptop, but not the laptop from your account. Sign in at account.microsoft.com/devices afterwards, select Remove device, confirm, and select Remove.
Is Clean data enough to protect my files?
For a consumer return, yes. Clean data cleans the drive so removed files are harder to recover. Microsoft states it does not meet government or industry data-erasure standards, so a business with those rules needs its own erasure process.
Should I turn off Find my device before returning a laptop?
Yes. Find my device links the laptop's location to your Microsoft account. Press Win + R, type ms-settings:findmydevice, turn it off, then remove the laptop at account.microsoft.com/devices after the reset.

![What Is Microsoft OneDrive And Do I Need It [Answered]](https://techdows.com/wp-content/uploads/2026/09/Outlookcom-storage-settings-page-showing-shared-Microsoft-account-usage.jpg)