Run iperf3 -s on one computer and iperf3 -c <server IP> on another, and iPerf reports the network bandwidth between them in about 10 seconds.
This guide covers installing iPerf on Windows and Linux, running it in VMware ESXi virtual machines, upload, download and UDP tests, and reading the results.
The fastest way to test network speed with iPerf3
iPerf needs two computers: a server that listens and a client that sends. The example address 192.0.2.10 stands for your server's IP address, so replace it with your own. You can find your IP address on Windows if you are not sure what it is.
- Install iPerf3 on both computers, using the Windows or Linux steps below.
- Allow TCP port 5201 through the server's firewall.
- On the server, run
iperf3 -sand leave the window open. - On the client, run
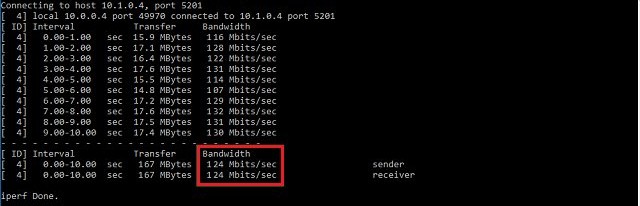
iperf3 -c 192.0.2.10. - Read the Bitrate value on the final
senderandreceiverlines.
By default the client sends data to the server for 10 seconds, so this first result is the client's upload speed.
iPerf vs iPerf3 differences
iPerf3 is a new implementation that shares no code with the original iPerf and is not backward compatible. Install the same major version on both computers.
| Detail | iPerf 2 | iPerf3 |
|---|---|---|
| Linux package name | iperf |
iperf3 |
| Default port | 5001 | 5201 |
| Default client test length | 10 seconds | 10 seconds |
| Reverse direction | -r runs each direction in turn |
-R makes the server send to the client |
| Both directions at once | -d |
--bidir |
| Parallel streams | -P |
-P |
How to use iPerf on Windows
iPerf has no installer on Windows. You extract the files and run iperf3.exe from Command Prompt. On Windows 11, run Command Prompt as an administrator for the firewall rule in the steps below. Microsoft and Broadcom both point to the iPerf download page for Windows builds.
- Download the Windows build on both PCs and extract it to a folder such as
C:\iperf3. - On the server PC, open Command Prompt with Run as administrator.
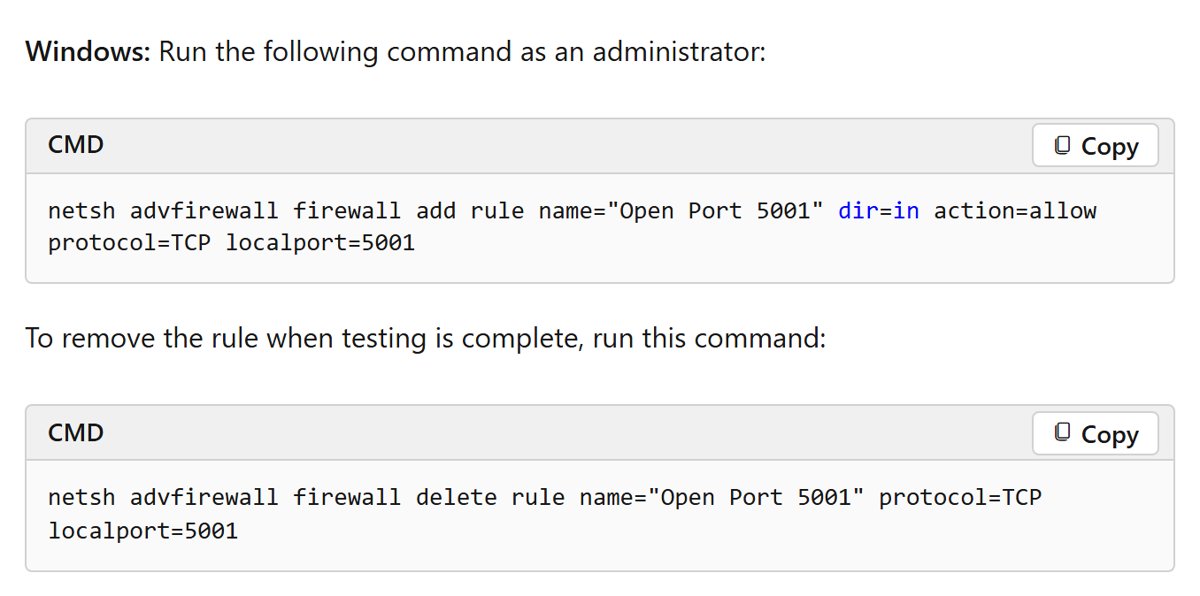
- Allow the port:
netsh advfirewall firewall add rule name="iPerf3" dir=in action=allow protocol=TCP localport=5201 - Run
ipconfigand note the server's IPv4 Address. - Go to the folder with
cd C:\iperf3, then start the server withiperf3.exe -s. - On the client PC, open Command Prompt in the same folder and run
iperf3.exe -c 192.0.2.10. - When you finish, remove the rule on the server:
netsh advfirewall firewall delete rule name="iPerf3" protocol=TCP localport=5201
Microsoft's VPN throughput guide says iPerf is limited to 3 Gbps on Windows VMs, and it names NTTTCP as an alternative. Keep that limit in mind on fast virtual links.
Installing iPerf on Linux
iPerf3 is in the standard package repositories for Ubuntu, Debian and Fedora. On Ubuntu 24.04 the package sits in the universe section.
- On Ubuntu or Debian, run
sudo apt install iperf3. - On Fedora, run
sudo dnf install iperf3. - Check the install with
iperf3 --version. - If you use ufw, allow the port with
sudo ufw allow 5201/tcp. - If you use firewalld, allow the port with
sudo firewall-cmd --add-port=5201/tcp. This runtime rule ends at the next firewall reload or restart. - Run
ip addressand note the server's address. - Start the server with
iperf3 -s, or add-Dto run it in the background as a daemon. - Remove the rule afterwards with
sudo ufw delete allow 5201/tcporsudo firewall-cmd --remove-port=5201/tcp.
For iPerf 2, install the iperf package instead. It listens on port 5001, so open that port rather than 5201.
How to use iPerf on VMware ESXi host
Broadcom's ESXi troubleshooting article measures bandwidth with iPerf running inside virtual machines, not in the ESXi shell. That tests the host's virtual switch and physical network path, and Broadcom notes that VMware does not endorse any particular third-party utility.
- Install iPerf in two virtual machines, using the Windows or Linux steps above.
- On the server VM, run
iperf -s. - On the client VM, run
iperf -c 192.0.2.10 -P 1 -i 1 -p 5001 -w 64K -f m -t 10. Broadcom sets a 64K TCP window because throughput depends on that value. - Test two VMs on the same host, port group and vSwitch.
- Test against a machine on the same VLAN and physical switch.
- Test against a machine outside the host, then compare the three results.
Broadcom says good results between VMs suggest that CPU, memory and storage are not the bottleneck. A drop only on the tests that leave the host points to the physical network path.
These commands use iPerf 2, as Broadcom's article does. With iPerf3, type iperf3 instead and use port 5201 on both VMs.
Testing network speed and bandwidth with iPerf
The client always starts the test, and its flags decide the direction, length and number of connections. Microsoft recommends running throughput tests outside peak hours, because a busy link skews the result.
- Measure upload from the client:
iperf3 -c 192.0.2.10 - Measure download to the client:
iperf3 -c 192.0.2.10 -R - Measure both directions at once:
iperf3 -c 192.0.2.10 --bidir - Run longer with several streams:
iperf3 -c 192.0.2.10 -t 30 -P 4 - Skip TCP slow start in the totals:
iperf3 -c 192.0.2.10 -t 30 -O 2 - Use another port if 5201 is blocked:
iperf3 -s -p 5002on the server andiperf3 -c 192.0.2.10 -p 5002on the client. - Swap the server and client roles and test again, so each computer has run both ends.
With -P, read the [SUM] lines for the combined bandwidth rather than a single stream.
How to run an iPerf3 UDP test for jitter and packet loss
UDP tests show delay jitter and datagram loss, which matter for voice and video traffic. iPerf3 sends UDP at only 1 Mbit/sec by default, so always set a target rate with -b.
- Allow UDP on the server's port as well as TCP, for example
sudo ufw allow 5201/udp, or a secondnetshrule withprotocol=UDP. - Start the server with
iperf3 -s. - On the client, run
iperf3 -c 192.0.2.10 -u -b 100Mto send at 100 Mbit/sec. - Read the jitter and lost datagram figures on the final
receiverline. - Raise
-bin stages until loss appears.-b 0removes the limit altogether.
iPerf3 command options and switches
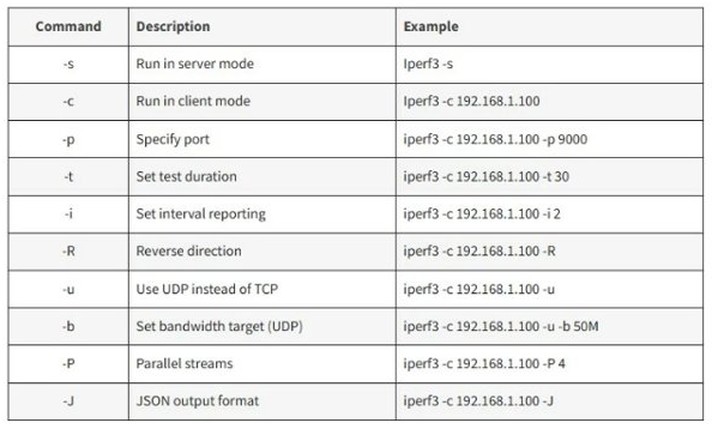
These are the flags you will use most often. Defaults come from the iPerf3 manual.
| Option | What it does | Default |
|---|---|---|
-s |
Run as the server | Not set |
-c <host> |
Run as the client and connect to this host | Not set |
-p |
Port to listen on or connect to | 5201 |
-t |
Test length in seconds | 10 |
-i |
Seconds between progress reports; 0 turns them off | 1 |
-P |
Number of parallel client streams | 1 |
-R |
Reverse the test so the server sends | Client sends |
-u |
Use UDP instead of TCP | TCP |
-b |
Target bitrate | 1 Mbit/sec for UDP, unlimited for TCP |
-w |
Socket buffer or TCP window size | System value |
-f |
Report units: k, m, g or t bits | Automatic |
-J |
Print the output as JSON | Off |
--logfile |
Send output to a file | Off |
-1 |
Server handles one client, then exits | Off |
How to read iPerf3 results: Bitrate, Retr and Cwnd
iPerf prints one line per second, then a total for each side. Use the final sender and receiver lines as your result, not a single second.
| Column | What it means | How to use it |
|---|---|---|
| Interval | The seconds this line covers | 0.00-10.00 on the final lines is the whole test |
| Transfer | Data moved in that time, in bytes | Handy for a rough size check |
| Bitrate | Speed in bits per second | Compare it with your link speed |
| Retr | TCP segments sent again | A high count suggests packet loss or congestion |
| Cwnd | TCP congestion window size | A window that keeps shrinking also suggests loss |
Bitrate is in bits, while file copies show bytes. Divide by 8 to convert, so 800 Mbits/sec equals 100 MBytes/sec.
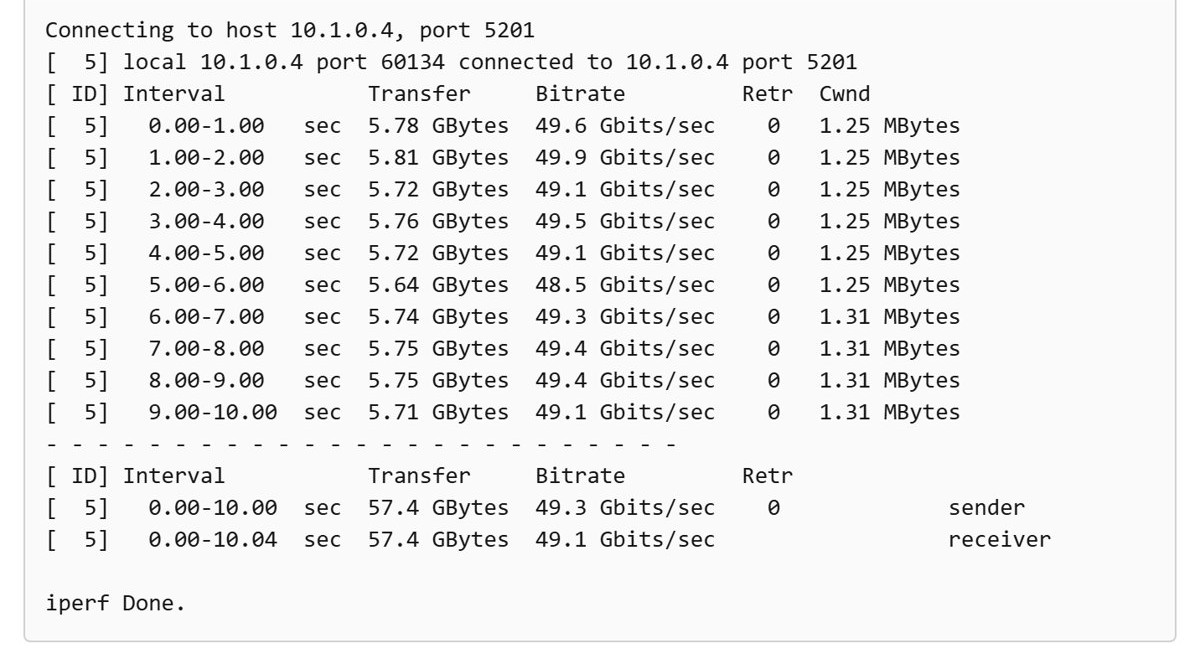
How to tell if the iPerf3 server is listening on port 5201
- Start the server and look for the line
Server listening on 5201. - Start the client and look for
Connecting to host 192.0.2.10, port 5201. - Check that a
connected toline follows and that numbered interval lines begin to appear. - Wait for the
senderandreceivertotals and the closingiperf Done.line.
If the client stops at the first line, the connection never reached the server. Work through the connection fixes below, and ping the server's IP address to check that the two computers can reach each other.
Internet speed test with iPerf
iPerf has no built-in internet test, because it needs a server at the far end. The result only covers the path between your computer and that server, so choose a server with more capacity than your connection.
A Speed Test app for Mac and similar tools use the provider's test servers, which makes them easier. iPerf lets you test the exact path you care about, such as your office to a cloud host.
- Use a server you control outside your network, such as a cloud VM or a computer at another site.
- Open the port in that host's firewall and any cloud rule in front of it, such as an Azure network security group.
- On the server, run
iperf3 -sand note its public IP address. - From your own computer, test upload with
iperf3 -c 203.0.113.10 -t 30. - Test download with
iperf3 -c 203.0.113.10 -t 30 -R. - Add
-P 4if a single stream falls short of your plan's speed. - Remove the firewall rule and stop the server when you finish, because an open test port invites unwanted traffic.
Public iPerf servers run by third parties also exist, but other people share them. Treat any result from one as a rough figure, and use your own server for numbers you plan to rely on.
If your own server confirms a slow connection, you can fix a suddenly slow download speed next.
iPerf3 not connecting or showing slow speed: how to fix it
iPerf3 client cannot connect to the server
A firewall is blocking the port, the server is not running, or the ports do not match.
- Confirm that the server window shows
Server listening on 5201. - Allow the port on the server's firewall with the
netsh,ufworfirewall-cmdcommand above. - For a cloud VM, add a rule to its network security group or access control list as well.
- If you set
-pon the server, set the same port on the client. - Add
--connect-timeout 3000on the client to get a faster answer while you test.
iPerf3 speed is lower than the link speed
Competing traffic, a single stream or a limit on the virtual machine can hold the figure down.
- Repeat the test outside peak hours.
- Add parallel streams with
-P 4, then compare the[SUM]line. - On a virtual machine, check the bandwidth limit for its size. Microsoft says that VM limits, rather than the network, are often the cause in Azure.
- Check the
Retrcolumn. A high count points to loss, so check the cable, the switch port or the wireless signal.
iPerf is fast but file copies are slow
iPerf never touches the disk, so it does not measure storage or the copy program.
- Check disk read and write speed on both computers.
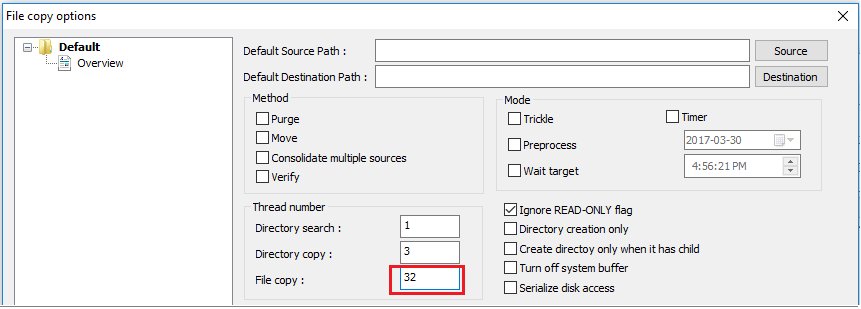
- Try a multi-threaded copy tool, because Microsoft notes that File Explorer and RDP copies do not use multiple threads.
iPerf 2 and iPerf3 will not connect to each other
iPerf3 is not backward compatible with iPerf 2.
- Run
iperf3 --versionoriperf --versionon each computer. - Install the same major version on both ends.
iPerf network speed test FAQ
What port does iPerf3 use?
iPerf3 uses port 5201 by default, and iPerf 2 uses port 5001. Change the port with the -p option on both the server and the client, which helps when a firewall in your network blocks the default.
What is the difference between iPerf and iPerf3?
iPerf3 is a separate implementation that shares no code with the original iPerf and is not backward compatible. The two use different default ports and different flags for bidirectional tests, so install the same version on both computers.
Do I need two computers to use iPerf?
Yes. iPerf measures the path between a server and a client, so a real network test needs two machines. Running both ends on one computer only measures that computer's own network stack, and says nothing about your cabling or router.
How do I test download speed with iPerf3?
Add -R to the client command, as in iperf3 -c 192.0.2.10 -R. The server then sends data to the client, which measures the client's download speed. Without -R, the client sends and the result is its upload speed.
Can iPerf3 test upload and download at the same time?
Yes. Add –bidir to the client command, and the client and server send and receive at the same time. Each direction gets its own totals. iPerf 2 does the same thing with its -d option.
How long does an iPerf3 test take?
A default iPerf3 client test runs for 10 seconds. Set a different length in seconds with -t, such as -t 30. Microsoft's VPN throughput example uses 30 seconds with 32 parallel streams, on port 5001.
Does iPerf test disk speed?
No. Microsoft describes iPerf as generating its own TCP traffic without any disk reads or writes. That makes it a clean network test, but it also means a fast iPerf result does not prove file copies will be fast.
Can iPerf test my internet speed?
Yes, if you have a server outside your network to test against, such as a cloud VM. Run iperf3 -s there and iperf3 -c with its public IP address from your computer. Add -R to measure download as well as upload.