To use Quick Assist, both people press Ctrl + Windows + Q, the helper selects Help someone and reads out the security code, and the person receiving help enters it and selects Allow.
This guide covers the setup on each PC, how to keep the session secure, and fixes for codes, connection, control, UAC and audio problems.
Step-by-step: Use Quick Assist (secure setup)
Only connect with someone you contacted first, such as a family member or your own IT desk. Microsoft never makes unsolicited calls asking for access to your PC.
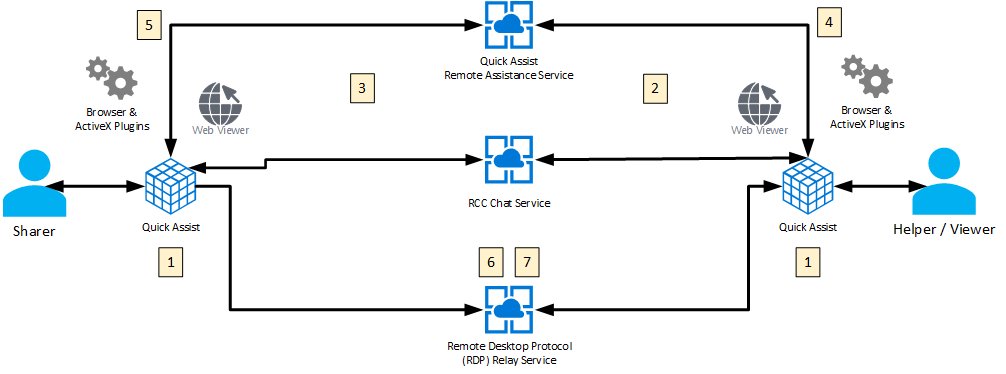
- Both people open Quick Assist with Ctrl + Windows + Q, or by typing Quick Assist in Windows search.
- The helper selects Help someone and signs in with a Microsoft account.
- The helper reads the security code to the other person by phone or message.
- The person getting help types it into Security code from assistant and selects Submit.
- That person selects Allow to share their screen.
- The helper selects Request control if they need to use the mouse and keyboard, and the other person selects Allow.
Quick Assist prerequisites
| Requirement | Helper | Person getting help |
|---|---|---|
| Quick Assist app | Installed (Microsoft Store if missing) | Installed (Microsoft Store if missing) |
| Account | Microsoft account or Microsoft Entra ID | No sign-in needed |
| Network | Internet over HTTPS, port 443 | Internet over HTTPS, port 443 |
| Microsoft Edge WebView2 | Built into Windows 11; Windows 10 app installs it | Built into Windows 11; Windows 10 app installs it |
| Domain or admin role | Not required | Not required |
Quick Assist for macOS exists, but only for sessions with Microsoft Support.
Part A — on the helper PC (the person giving help)
- On Windows 11, open Start > All apps > Quick Assist. On Windows 10, open Start > Windows Accessories > Quick Assist.
- Under Help someone, select Help someone.
- Choose your account or sign in when asked.
- Read the time-limited security code to the other person, without sending it to anyone else.
- Wait for them to accept screen sharing, then select Request control if you need full control.
Part B — on the recipient PC (the person receiving help)
- Open Quick Assist with Ctrl + Windows + Q.
- Check that the helper is someone you called or messaged first.
- Type the code into Security code from assistant under Get help and select Submit.
- Check the name shown in the permission dialog (first name and last initial).
- Select Allow to share your screen, and Allow again only if you want to hand over control.
Part C — During the session (keeping it secure and controlled)
| Need | What to do | Who does it |
|---|---|---|
| Show without handing over control | Keep the session view-only and use annotations | Helper |
| Stop the helper for a moment | Pause the session from the Quick Assist toolbar | Either person |
| Admin prompt appears | Respond to the User Account Control prompt yourself | Person getting help |
| Something looks wrong | Close Quick Assist to disconnect immediately | Person getting help |
The keyboard layout and mouse settings of the person getting help are used throughout the session.
Tips for a safer Quick Assist session
Anyone with control of your PC can install apps and change settings, so the safety rules matter more than the steps.
| Rule | Why |
|---|---|
| Only accept a session you started | Tech support scammers call first and ask for a code |
| Never share passwords or bank logins | The helper sees everything on screen |
| Refuse urgent demands for access | Pressure is the usual sign of a scam |
| Stay at the PC for the whole session | You can deny control or close the app at any time |
| Report a scam session | Use Microsoft's technical support scam form |
Microsoft keeps only session start and end times, errors and features used, for no longer than three days. No logs are written on either PC.
Check the Quick Assist connection is working
- The helper should see the other person's desktop in the Quick Assist window.
- After Request control is allowed, moving the helper's mouse should move the pointer on the other PC.
- Both people should be able to send messages in the chat panel.
Troubleshooting: Quick Assist not working (common fixes)
1) Quick Assist is missing or won't open
The app was removed, or Microsoft Edge WebView2 is missing on Windows 10.
- Open the Microsoft Store, search for Quick Assist and select Install or Update.
- On Windows 10, install the WebView2 Runtime if Quick Assist says it is missing.
- Restart the PC and press Ctrl + Windows + Q.
2) Code is rejected or expired
The security code is time-limited and works for one session only.
- The helper selects Help someone again to get a fresh code.
- Read it out slowly and enter it right away.
- Make sure the code goes into Security code from assistant, not a search box.
3) Stuck on "Connecting…" or blank screen
A firewall, VPN or proxy is blocking the Quick Assist service on port 443.
- Disconnect any VPN on both PCs and try again.
- On a work network, ask IT to allow
*.support.services.microsoft.comand the other Quick Assist endpoints over port 443. - Close and reopen Quick Assist on both PCs, then start with a new code.
4) Full control doesn't work (view-only works)
Control was never requested, or the request was denied.
- The helper selects Request control in the toolbar.
- The person getting help selects Allow in the dialog that appears.
5) UAC/admin prompts stop the helper
User Account Control prompts must be answered by the person at the PC.
- The person getting help selects Yes on the prompt, or types an admin password.
- The helper waits until the prompt closes, then carries on.
6) Audio/voice isn't working (Quick Assist doesn't "call")
Quick Assist shares the screen and a text chat, not a voice call.
- Keep a phone or Teams call open alongside the session.
- Use the chat panel for links and short instructions.

Windows Quick Assist FAQ
These answers cover the common questions about Quick Assist sessions.
What is the shortcut for Quick Assist?
Press Ctrl + Windows + Q on Windows 11 or Windows 10. You can also type Quick Assist in Windows search and press Enter, or open it from the Start menu's app list.
Does the person getting help need a Microsoft account?
No. Only the helper signs in, with a Microsoft account or Microsoft Entra ID. The person sharing their screen just enters the security code and selects Allow.
Is Quick Assist safe?
Quick Assist traffic is encrypted with TLS 1.2, and nothing happens until you enter a code and select Allow. The risk is the person you connect to, so only accept a session you started yourself.
Can Quick Assist be used without permission?
No. The person getting help must enter the code, allow screen sharing and separately allow control. Closing Quick Assist ends the session at once.
How do I uninstall Quick Assist?
Go to Settings > Apps > Installed apps, select the three dots next to Quick Assist and choose Uninstall. You can reinstall it from the Microsoft Store later.
Does Quick Assist work on a Mac?
Quick Assist for macOS is only offered during sessions with Microsoft Support. A support agent guides you through installing it; it is not available for general use.
What is the difference between Quick Assist and Remote Assistance?
Quick Assist is the current Store app that connects through Microsoft's service with a code. The older Windows Remote Assistance tool is built into Windows and uses invitation files instead.
If the app is missing entirely, download Quick Assist for Windows from the Store link first.