To enable transcription in a Teams meeting, select More actions in the meeting controls, select Transcribe, confirm the spoken language and select Confirm; after the meeting, open the meeting chat and select Recap > Transcript to view it.
This guide covers who can transcribe, the admin policy that must allow it, turning it on before a meeting, downloading the .docx or .vtt file, Copilot and recap, storage, and fixes when the option is missing.
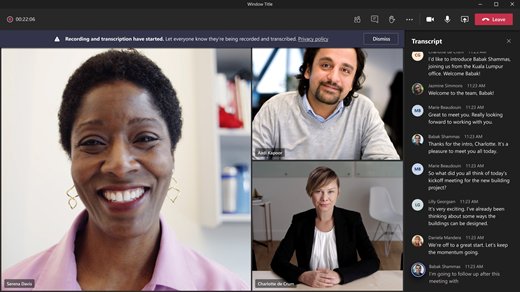
How to start transcription during a Teams meeting
Live transcription runs in Teams for desktop. Organizers, co-organizers and presenters from the organizer's organization can start it.
- Join the meeting in the Teams desktop app.
- Select More actions in the meeting controls.
- Select Transcribe.
- Confirm the language everyone is speaking in the meeting.
- Select Confirm. Every participant sees a notification that transcription has started, and the transcript pane opens beside the meeting.
Recording a meeting starts transcription automatically, so you do not need both steps when you select More actions > Record. To stop, select More actions and then Transcribing or Recording; either option stops the transcript. Transcription also ends when everyone leaves.
What Teams transcription does
Transcription creates a written, real-time record of what is said, with timestamps and speaker names. Live captions look similar on screen but are not saved.
| Feature | What you get | Saved after the meeting? |
|---|---|---|
| Live transcription | Running text with speaker attribution in a side pane | Yes, in the meeting chat Recap and the calendar event |
| Live captions | Subtitles under the video while people talk | No |
| Transcript with a recording | Searchable text next to the video, plus closed captions during playback in Stream | Yes, stored with the recording |
| Live translated transcription | The transcript shown in each viewer's chosen language (Teams Premium) | No, only the original-language transcript is kept |
Requirements for Teams meeting transcription
Transcription is both a per-organizer and a per-user policy. The organizer and the person who starts it must both have it allowed.
| Requirement | Details |
|---|---|
| Supported Teams accounts and licenses | A work or school account in the organizer's organization; recording needs a license such as Office 365 E1, E3, E5, F3, A1, A3, A5 or Microsoft 365 Business, Business Premium or Business Essentials |
| Admin policy must allow transcription | Transcription is turned on in the meeting policy for the organizer and for the person starting it |
| Who can start transcription | Organizers, co-organizers and presenters; attendees who are not presenters, guests, people from other organizations and anonymous users cannot |
| Teams for desktop | Live transcription starts only on desktop, so keep the Teams desktop app updated; the mobile app shows the transcript after the meeting ends |
| The meeting language matters | Pick the language people actually speak; Teams prompts the organizer when it detects a mismatch |
| Teams Premium or Copilot license | Only needed for extras: live translated transcription, choosing who can record and transcribe, and intelligent recap |
How an admin enables transcription for Teams meetings
If the Transcribe option is missing for everyone, the meeting policy is the first thing to check. The setting is on by default for new policies.
- Sign in to the Teams admin center and go to Meetings > Meeting policies.
- Select the Global policy to change it for everyone, or select or create a custom policy.
- In the Recording & transcription section, turn the Transcription toggle On.
- Select Save.
- To assign a custom policy to people, select it, then Manage users > Assign users, add the names and select Apply.
- For groups, open the Group policy assignment tab, select Add, enter the group, pick the policy and select Apply.
Webinars and town halls use Meetings > Events policies instead, with the Transcription for events up to 1k attendees and Transcription for events optimized for a large audience toggles. Policy changes can take time to reach users.
Enable Teams transcription with PowerShell Set-CsTeamsMeetingPolicy
The PowerShell option for administrators does the same job from the Teams PowerShell module.
Set-CsTeamsMeetingPolicy -Identity Global -AllowTranscription $trueAllows everyone without a custom meeting policy to transcribe meetings, events and group calls. To target people instead, set -AllowTranscription $true on a named policy and assign it with Grant-CsTeamsMeetingPolicy -Identity "[email protected]" -PolicyName "Your Policy Name".
You should see: The Transcribe option appears under More actions for users with the policy once the change has applied.
How to enable transcription before a meeting
Organizers can make a meeting record and transcribe the moment it starts, so nobody has to remember during the call.
- Open the Teams Calendar and select the meeting.
- Select View event, then Options. Meeting options open in a browser window.
- Turn on Record and transcribe automatically.
- With Teams Premium or a Copilot license, set Who can record and transcribe to the roles you want.
- Save the meeting options.
Who can record and transcribe is hidden while Record and transcribe automatically is on, and setting it to No one turns automatic recording off. Microsoft 365 Education A1 subscriptions do not include automatic recording and transcription.
Change the spoken language in Teams transcription
A wrong spoken language produces a transcript full of nonsense. Teams lists about 80 languages, and a change applies for everyone in the meeting.
- In the transcript pane, select Language settings.
- Open the Spoken language in this meeting dropdown menu.
- Select the language people are speaking.
- Select Update. The transcript continues in the new language.
How to view the transcript after a Teams meeting
The transcript is ready as soon as the meeting ends, in two places on desktop and one on mobile.
- View the transcript from Teams calendar: open the past meeting event in Calendar and open its recap.
- View the transcript from meeting chat: select Chat, open the past meeting chat, select Recap and then Transcript.
- View the transcript from the recording: play the recording in the recap, and the transcript scrolls beside the video with speaker names.
- On a phone, open the past meeting chat, find the Meeting ended message and tap Transcript below it.
People from other organizations can follow the live transcript but cannot open it afterwards, and anonymous or dial-in callers have no access. If you need the video too, you can download or share the Teams recording from the same recap.
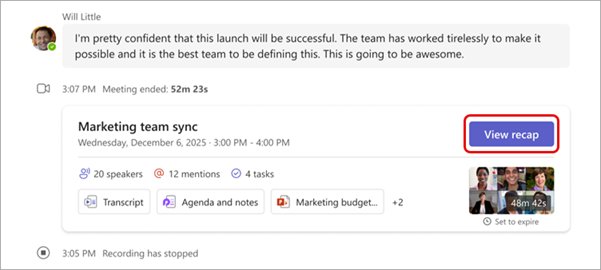
How to download or copy a Teams transcript
Organizers and co-organizers can download by default. Others in the organization can view, and can download only if IT policy or the organizer allows it.
- Select Chat in Teams.
- Open the past meeting chat.
- Select Recap.
- Select Transcript.
- Select the dropdown arrow next to Download and choose .docx for a Word document or .vtt for a caption file.
To copy text from the transcript, open the .docx file in Word and copy what you need. Admins can let organizers block copying and forwarding of transcripts, so the option to copy can be missing in sensitive meetings.
Example uses for downloaded transcripts include meeting minutes, quotes for a report, and a .vtt caption track for a training video.
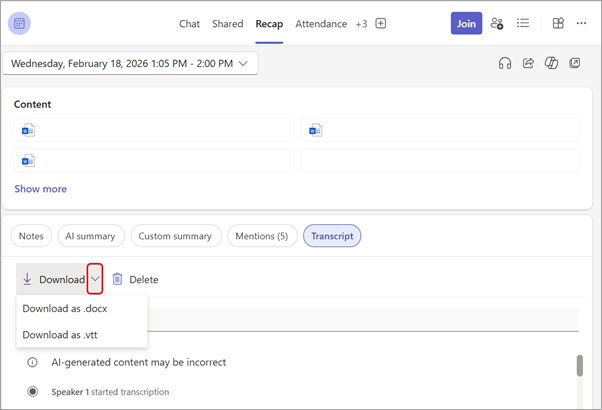
How to edit or delete a Teams meeting transcript
Meeting organizers can edit the transcript text, and organizers and co-organizers can delete it.
- To edit, select OneDrive on the left of Teams, then My files > Recordings.
- Hover over the recording, select More actions > Open > Open in browser, then select Transcript on the player page.
- Hover over the line you want to fix, select Edit, change the text and select Done.
- To delete, open the past meeting chat, select the Recap tab, then Transcript.
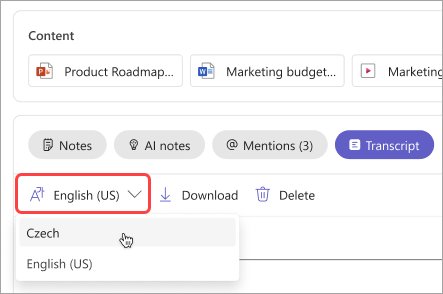
- If there are transcripts in several languages, choose the one to remove from the language dropdown, then select Delete.
How to use Teams transcription with meeting recap and Copilot
The transcript feeds two recap levels. Standard meeting recap is in every meeting chat; intelligent recap and Copilot need a license.
| Feature | What it adds | Needs |
|---|---|---|
| Standard meeting recap | Recording, transcript, shared files and notes in the Recap tab | No extra license |
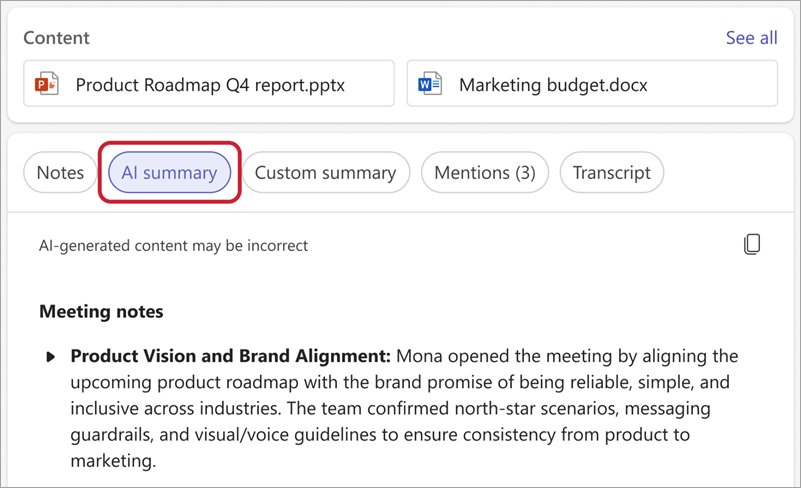
| Intelligent recap and AI notes | AI summary with notes and follow-up tasks; topics and speaker markers | Teams Premium or a Microsoft 365 Copilot license; the meeting must be transcribed and last at least five minutes, and topics and speakers also need a recording |
| Copilot during the meeting | Private questions such as "Where do we disagree on this topic?" from Copilot in the meeting controls | Transcription is not required with Only during the meeting, but is required for During and after the meeting |
| Copilot after the meeting | Answers about what was said, from the Recap tab | A saved meeting transcript |
When Copilot is not working in Teams, licensing and meeting options are the usual causes. Turning Copilot off for a meeting also turns off recording and transcription.
Privacy, compliance, and storage considerations
Tell participants transcription will be used, and set access before sensitive meetings start, because a change during the meeting needs a restart to apply.
| Topic | What happens |
|---|---|
| Where transcripts are stored | The meeting organizer's OneDrive for work or school, next to the recording; channel meetings use the channel's SharePoint Recordings folder |
| Who can access the transcript | Set Who has access to the recording and transcript to Everyone, Organizers and co-organizers or Specific people (Teams Premium or Copilot license; not available for channel meetings) |
| Retention and deletion | Transcripts stay until the organizer deletes them, unless an admin's expiration or Microsoft Purview retention label policy removes them |
| Sensitive meetings | Admins can enforce recording rules with meeting templates or sensitivity labels, and can require participant agreement before people unmute or turn on video |
| Set the correct meeting roles | Only presenters and organizers can start transcription, so make attendees who should not start it attendees, not presenters |
Troubleshooting: transcription option missing or not working
Find the line that matches what you see. Most causes are a role, an account type or a policy, not a broken app.
Your organization has disabled transcription
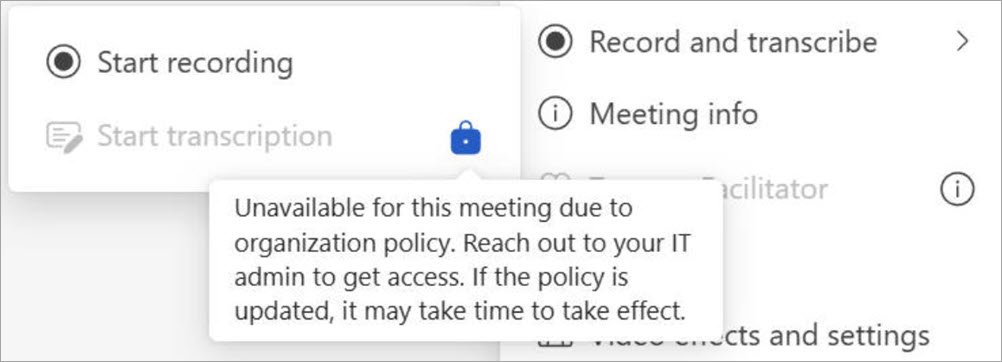
The meeting or calling policy assigned to you or the organizer has Transcription turned off.
- Ask your Teams admin to turn on Transcription in your meeting policy, and in the calling policy for calls.
- Wait for the policy change to apply, then rejoin the meeting.
- Admins can run the Teams transcripts diagnostic in the Microsoft 365 admin center with your email address and the meeting URL.
Transcribe button is greyed out or missing for you only
You are a guest, an anonymous user, from another organization, or an attendee rather than a presenter.
- Sign in with your work or school account instead of joining anonymously.
- Ask the organizer to make you a presenter under Who can present in meeting roles, or a co-organizer.
- If you are external, ask someone from the organizer's organization to start transcription and share the transcript afterwards.
"The organizer turned this off"
The organizer limited who can record and transcribe, set it to No one, or turned off Copilot for the meeting.
- Ask the organizer to change Who can record and transcribe to include presenters, or to make you a co-organizer.
- If Allow Copilot is off, the organizer turns it on in meeting options.
- End and restart the meeting so the new options take effect.
Transcript text is wrong or in the wrong language
The spoken language set for the meeting does not match what people speak.
- Open Language settings in the transcript pane.
- Choose the correct language under Spoken language in this meeting and select Update.
- Ask the person who started transcription to change it if the option is unavailable to you.
No transcript appears after the meeting
Transcription or recording was never started, or the organizer's transcript access setting hides it from you.
- Check the Recap tab in the meeting chat and the calendar event.
- Ask the organizer whether Who has access to the recording and transcript includes you.
- For the next meeting, turn on Record and transcribe automatically in meeting options.
Best practices for Teams meeting transcription
| Practice | Why it helps |
|---|---|
| Confirm the spoken language before you start | Teams transcribes only the selected language unless multilingual speech recognition is on (Teams Premium or Copilot license) |
| Tell participants transcription will be used | Everyone is notified, but saying it up front avoids surprises in external calls |
| Use Record and transcribe automatically for recurring meetings | The transcript starts even if the organizer joins late |
| Join with your work account on desktop | Live transcription runs only in Teams for desktop and not for anonymous users |
| Download the .docx soon after important meetings | Expiration or retention policies may delete transcripts later |
Frequently asked questions about Teams transcription
Does recording a Teams meeting also transcribe it?
Yes. When you record a Teams meeting, transcription starts automatically. You can also transcribe without recording by selecting More actions > Transcribe.
Do you need Teams Premium for transcription?
No. Standard transcription works with a supported work or school license when the admin policy allows it. Teams Premium or a Copilot license adds live translated transcription, recording permissions and intelligent recap.
Can guests start transcription in Teams?
No. Guests, anonymous users and people from another organization cannot start transcription. External participants can view the live transcript but cannot open it after the meeting.
Where are Teams meeting transcripts stored?
Transcripts are stored in the meeting organizer's OneDrive for work or school together with the recording. Channel meeting transcripts go to the channel's SharePoint Recordings folder.
Who can download a Teams meeting transcript?
By default, organizers and co-organizers can download the transcript as .docx or .vtt from the Recap tab. Other people in the organization can view it, and download only if IT policy or the organizer allows it.
Can I use Teams transcription on my phone?
Only to read it. Live transcription is available in Teams for desktop, and the mobile app shows the transcript after the meeting from the Meeting ended message in the meeting chat.
How do I delete a Teams transcript?
Open the past meeting chat, select Recap, then Transcript, and select Delete. Only meeting organizers and co-organizers can delete a meeting transcript.
Do participants know when transcription starts?
Yes. When someone starts transcription, every participant in the meeting gets a notification, and admins can add a custom privacy link to that notice.