To fix ntoskrnl.exe high CPU or blue screens, find the driver, device or hardware fault that the Windows kernel is reporting, because ntoskrnl.exe itself is rarely the broken part.
The sections below explain what ntoskrnl.exe and the System process are, how to read a stop code or minidump, and every fix from Windows Update to a clean installation on Windows 11 and Windows 10.
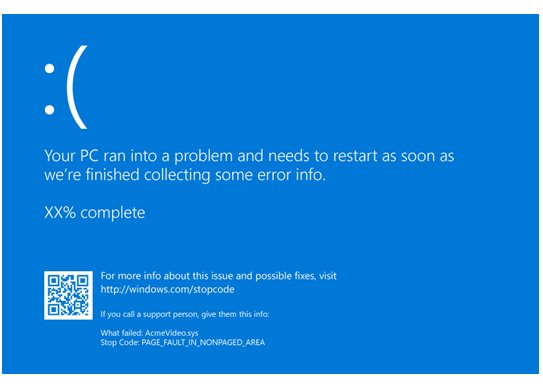
How to fix ntoskrnl.exe BSOD or CPU issues
Microsoft's crash analysis attributes about 70% of stop errors to third-party driver code and 10% to hardware, so work outward from the kernel to what it was running.
- Select Start > Power > Restart, then install everything in Settings > Windows Update, including Optional updates under Advanced options.
- Write down the stop code and any
.sysfile name on the blue screen, or open the newest file inC:\Windows\Minidump. - Update, roll back or uninstall the driver that the stop screen or dump names, and unplug hardware you added before the problems began.
- In an administrator Command Prompt, run
DISM.exe /Online /Cleanup-image /Restorehealth, thensfc /scannow. - Run Windows Memory Diagnostic with
mdschedand check the system drive withchkdsk C: /scan. - If crashes continue, open Settings > System > Recovery and select Reinstall now next to Fix problems using Windows Update.
The repair reinstall keeps apps, files and settings. High CPU under System works the same way: a driver thread is doing the work, so fix that driver.
What is ntoskrnl.exe?
Every Windows 11 and Windows 10 PC loads this file at startup, and it stays loaded until the PC shuts down.
| Question | Answer |
|---|---|
| What it is | The Windows kernel image: the core code that schedules threads, routes hardware interrupts and hosts the managers that drivers call |
| Where it lives | C:\Windows\System32\ntoskrnl.exe on a standard installation |
| Mode it runs in | Kernel mode, alongside drivers, in one shared virtual address space |
| How it shows in Task Manager | As work under the System process, not as an entry of its own |
| Who signs it | Microsoft; Sigcheck from Sysinternals shows the signing chain |
| Can Windows start without it | No. A missing kernel stops startup with a message that ntoskrnl.exe is missing or corrupt |
What is a system process?
In Task Manager, System is a process that holds kernel-mode threads rather than an app you started.
| Fact | What it means for ntoskrnl.exe problems |
|---|---|
Drivers create their own threads with PsCreateSystemThread, and those threads belong to the system process |
A network, storage or audio driver stuck in a loop shows up as System CPU |
| System threads have no user-mode context and run only in kernel mode | You cannot end them like an app; you fix or remove the driver that owns them |
Driver-fault dumps in Microsoft's examples report PROCESS_NAME: System |
System in a dump points at kernel or driver code, not at an app |
| Task Manager splits CPU load into kernel and user time with Show kernel times | A large kernel share at idle confirms the load sits in drivers or the kernel |
What does ntoskrnl.exe do?
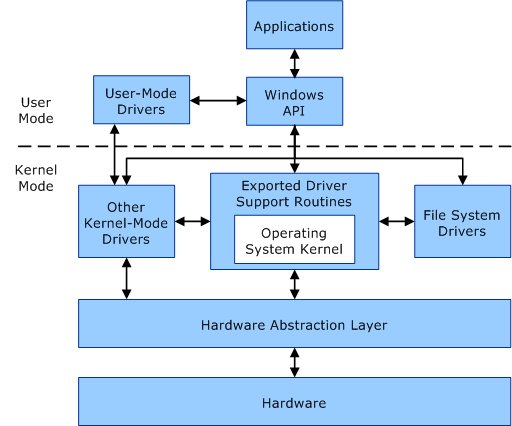
Drivers link against NtosKrnl.lib and call routines that ntoskrnl.exe exports, so the file is both the kernel and the toolbox every driver uses.
| Part inside ntoskrnl.exe | Routine prefix | What it handles |
|---|---|---|
| Kernel library | Ke | Thread scheduling, interrupt routing and other low-level operations |
| Process and thread manager | Ps | Process and thread objects, including the system threads drivers create |
| Memory manager | Mm | Virtual memory, paging and the routines drivers look up at run time |
| I/O manager | Io | Device objects and the I/O requests passed between drivers |
| Power manager | Po | System power transitions such as sleep, hibernation and fast startup |
| Run-time library | Rtl | String, memory and security descriptor helpers |
All kernel-mode code shares one virtual address space. Microsoft states that when a kernel-mode driver crashes, the entire operating system crashes, which is why a driver bug ends in a blue screen.
Why does ntoskrnl.exe cause blue screen (BSOD) errors?
When Windows hits a condition that compromises safe operation, the kernel calls KeBugCheckEx and stops the system. That routine lives in ntoskrnl.exe, so nt!KeBugCheckEx sits at the top of the crash stack even when a driver caused the fault.
The stop screen shows the stop code and, when available, the module that was running. Use the code to choose where to start, and look up any code not listed here among the common Windows stop codes.
| Stop code | Hex | What Microsoft ties it to | Start with |
|---|---|---|---|
| DPC_WATCHDOG_VIOLATION | 0x133 | A driver that does not finish its work within the allotted time | Minidump analysis, then update or disable that driver |
| IRQL_NOT_LESS_OR_EQUAL | 0xA | A driver or system memory accessing invalid memory | Driver updates and Windows Memory Diagnostic |
| DRIVER_IRQL_NOT_LESS_OR_EQUAL | 0xD1 | A driver using an improper address, often a network driver | Update the named driver |
| PAGE_FAULT_IN_NONPAGED_AREA | 0x50 | Invalid system memory referenced, disk errors or a damaged recent install | The named driver, then chkdsk /f /r |
| KMODE_EXCEPTION_NOT_HANDLED | 0x1E | A faulting driver, often one added recently | Remove or disable new drivers, in Safe Mode if needed |
| SYSTEM_SERVICE_EXCEPTION | 0x3B | Missing or corrupted system files are one documented cause | DISM and System File Checker |
| NTFS_FILE_SYSTEM | 0x24 | NTFS corruption, bad sectors or a faulty disk driver | chkdsk and the drive maker's diagnostics |
| VIDEO_TDR_TIMEOUT_DETECTED | 0x117 | The display driver | A driver update from the GPU vendor |
| WHEA_UNCORRECTABLE_ERROR | 0x124 | A hardware error | Stock clocks, temperatures, RAM and firmware |
Microsoft's root-cause split is about 70% third-party drivers, 10% hardware, 5% Microsoft code and 15% unknown because memory was too corrupted to analyze.

Why does ntoskrnl.exe cause high CPU issues?
High CPU under System means kernel-mode code is busy, and most of that code belongs to drivers rather than to ntoskrnl.exe.
| Cause | What happens | Fix to try |
|---|---|---|
| A driver thread stuck in a loop | Driver-created threads run in the system process, so their CPU time shows as System | Find the driver in Process Explorer, then update or roll it back |
| Heavy interrupt and DPC work from a device | DPCs take priority over threads at any priority level, so nothing else runs on that core meanwhile | Update network, storage, audio and chipset drivers |
| Driver Verifier left enabled | Verifier consumes lots of CPU while it checks drivers | Run verifier /reset and restart |
| Memory pressure | When the commit charge reaches the commit limit, Windows can freeze or crash | Return the page file to system-managed |
| Kernel-level malware | Code that loads as a driver runs inside the kernel | Microsoft Defender full and offline scans |
Common symptoms of ntoskrnl.exe problems
Match what you see to the closest symptom, then work through the fix under it.
ntoskrnl.exe System high disk usage
Disk work issued through the kernel, such as paging, indexing or file system repair.
- Run
resmon, open the Disk tab and check which files the System process reads or writes. - If the busy file is
pagefile.sys, set virtual memory back to automatic and close memory-heavy apps. - Run
chkdsk C: /scanand check the drive's health in Disks & volumes.
DPC_WATCHDOG_VIOLATION blue screen naming ntoskrnl.exe
A driver did not complete its work within the allotted time.
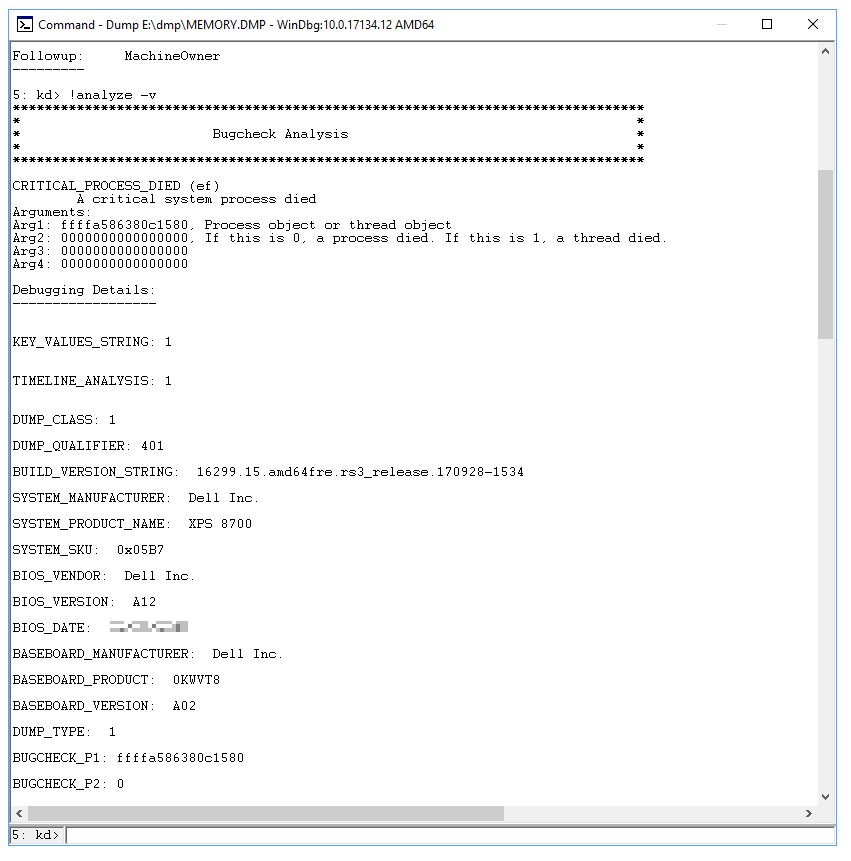
- Open the newest minidump in WinDbg and run
!analyze -vto find the driver. - Check the System log in Event Viewer for errors that point to the same device.
- Update or temporarily disable that device's driver, and confirm new hardware is compatible with your Windows version.
ntoskrnl.exe failed boot loop
A driver or update crashes Windows during startup, before you can sign in.
- Let Windows fail to start twice so it opens the Windows Recovery Environment, or interrupt startup twice with the power button.
- Select Troubleshoot > Advanced options > Startup Settings > Restart, then press 9 or F9 for Disable automatic restart on system failure so the stop code stays on screen.
- Restart into Safe Mode with 4 or F4 and remove the newest driver or app.
- If Safe Mode also fails, use Uninstall Updates or System Restore under Advanced options.
Windows could not start because ntoskrnl.exe is missing or corrupt
Microsoft documents a case where key presses during startup make Windows report the kernel as missing although the file is intact.
- Restart and do not press any keys until the Windows startup screen appears.
- If the message returns, open the Windows Recovery Environment and run Startup Repair from Advanced options.
- If startup still fails, use System Restore or Troubleshoot > Reset this PC.
Resolving ntoskrnl.exe issues
Pick the starting point from the evidence you already have, then work down the fixes that follow.
| What you have | Start with | Why |
|---|---|---|
| A stop screen that names a .sys file | Update or roll back problem drivers | The named module was running when Windows stopped |
| A stop screen that names only ntoskrnl.exe | Analyze BSOD minidump files | The kernel raised the crash; the dump shows what led to it |
| Kernel-heavy CPU at idle | Identify what is driving the high CPU usage | Thread stacks show which driver is busy |
| Crashes that started after new hardware | Disconnect external devices and test | New hardware and its driver are the first suspects |
| Kernel-Power Event ID 41 with a bug check code of 0 | When to suspect hardware failure | Microsoft links zero values to power supply problems |
| Crashes that stop in Safe Mode | Perform a clean boot | A non-Microsoft service or startup app is involved |
Before you start: confirm it is the real Microsoft file
A file named ntoskrnl.exe outside System32 is not the Windows kernel, so check the real one before you chase drivers.
- Open File Explorer and go to
C:\Windows\System32; the kernel is thentoskrnl.exefile in that folder. - Download Sigcheck from Microsoft Sysinternals and run
sigcheck -i C:\Windows\System32\ntoskrnl.exein an administrator Command Prompt. - Check that the catalog and signing chain in the output belong to Microsoft.
- Scan any other copy of ntoskrnl.exe with Windows Security > Virus & threat protection > Scan options > Custom scan.
- If the System32 copy fails the signature check, run
sfc /scannowto replace damaged protected files.
Restart and check for pending Windows updates
Microsoft's first steps for repeated stop errors are a restart and the latest pending Windows updates; use Restart, because fast startup carries the kernel session across a normal shutdown.
- Select Start > Power > Restart rather than Shut down.
- Open Settings > Windows Update and select Check for updates.
- Install everything offered, then open Advanced options > Optional updates and install the driver updates listed there.
- Restart again, even if no update asked for it.
- Use the PC normally and watch whether the crash or CPU load returns.
Identify what is driving the high CPU usage
- Press Ctrl + Shift + Esc, select the CPU column header on the Processes tab and confirm System is the top entry.
- Open the Performance tab, right-click the CPU graph and select Show kernel times to see the kernel share in a second color.
- Select Start, type
resmon, open Resource Monitor and sort by Average CPU. - Install Process Explorer from Sysinternals, right-click System, select Properties and open the Threads tab.
- Select the busiest thread and select Stack; the name before the
!on each line is the module, such as a.sysdriver. - For a load you cannot catch live, record a Windows Performance Recorder trace for three to five minutes while it happens.
If Task Manager lists System interrupts at the top instead of System, troubleshoot System interrupts high CPU usage as its own problem. Processes such as Microsoft Compatibility Telemetry and Vmmem sit outside the kernel and have their own fixes.
Update or roll back problem drivers
Driver code causes most stop errors, so the driver named on the stop screen, in a dump or in a thread stack comes first.
- Right-click Start and select Device Manager, then look for devices marked with an exclamation point.
- Right-click the device, select Update driver and choose the automatic search.
- If the trouble began after a driver update, right-click the device, select Properties, open the Driver tab and select Roll Back Driver.
- Choose a reason when prompted and select Yes.
- If neither helps, select Uninstall device, confirm with Uninstall and restart so Windows reinstalls the driver.
- For graphics, network, storage and chipset drivers, install the current version from the PC or device maker's support site.
Disconnect external devices and test
In one of Microsoft's own debugging examples, the driver of a USB mobile broadband adapter, WwanUsbMp.sys, caused the page fault, and disconnecting the device was the fix.
- Shut down and unplug docks, USB hubs, external drives, capture devices and any hardware added recently.
- Start the PC with only the keyboard, mouse and display connected.
- Repeat the task that normally triggers the crash or CPU load.
- Reconnect devices one at a time, restarting between each, until the problem returns.
- Update that device's driver, check it is compatible with your Windows version, or leave it disconnected.
Run System File Checker and DISM
DISM repairs the component store that System File Checker copies from, so run DISM first.
- Select Start, type
cmd, right-click Command Prompt and select Run as administrator. - Run
DISM.exe /Online /Cleanup-image /Restorehealth; it can take several minutes and uses Windows Update as its file source. - Run
sfc /scannowand leave the window open until verification reaches 100%. - Restart the PC after any repair.
Windows Resource Protection did not find any integrity violations means system files are intact. Could not perform the requested operation means you should run the scan in Safe Mode. Files SFC cannot fix call for a repair install.
Check your RAM for errors
Bad memory corrupts whatever the kernel stores in it, so a RAM fault can produce a different stop code on every crash.
- Save your work, press Windows + R, type
mdschedand select OK. - Select Restart now and check for problems (recommended).
- For a deeper pass, press F1 during the test, change Test Mix to Extended and press F10.
- After sign-in, read the result notification, or open Event Viewer and find the MemoryDiagnostics-Results entries.
- Event ID 2001 means no memory errors; any reported error means a module needs replacing.
Check disk and SSD health
- Open Settings > System > Storage > Advanced storage settings > Disks & volumes and select Properties for the system disk.
- Check Estimated remaining life, Available spare and Temperature; Windows reports these for NVMe SSDs only.
- In an administrator Command Prompt, run
chkdsk C: /scanfor an online check of the NTFS volume. - If it finds problems, run
chkdsk C: /f /r, type Y to schedule the check and restart. - Run the drive maker's own diagnostic tool, and keep 10% to 15% of the drive free.
A critical storage warning such as Reliability is degraded means back up first and troubleshoot second.
Scan for malware
Malware that loads as a driver runs at kernel level, where it can crash the system or burn CPU under System.
- Open Windows Security > Virus & threat protection > Scan options.
- Select Full scan and start it.
- When it finishes, save open files, select Microsoft Defender Antivirus (offline scan) and start it.
- Let the PC restart; the offline scan runs in the Windows Recovery Environment before Windows loads.
- Open Protection history afterwards to see what was found and removed.
Disable overclocking and unstable performance features
Microsoft's guidance for unexplained restarts starts with disabling overclocking and checking that the PC runs at its rated speed.
- Return CPU, GPU and memory overclocks to stock settings in UEFI setup or in the vendor's tuning app.
- Confirm all memory modules run at the same speed and are configured correctly.
- Check component temperatures for overheating under load.
- Run at defaults for several days before reapplying any tuning, one change at a time.
Update BIOS or UEFI firmware
Outdated system firmware is on Microsoft's list of stop error causes, and updates come only from the PC or motherboard maker.
- Select Start, type
msinfo32and open System Information. - Note the system model and the BIOS version listed in the summary.
- Open the maker's support page for that exact model and compare its latest firmware version.
- Follow the maker's update instructions, with a laptop plugged into power.
- Leave the PC alone until the update finishes, then install chipset and storage drivers from the same page.
Turn off fast startup
With fast startup on, Shut down saves the kernel session and loaded drivers to hiberfil.sys, so a driver in a bad state can carry into the next session. Restart always performs a full boot.
- Open Control Panel and select Power Options.
- Select Choose what the power buttons do.
- Clear Turn on fast startup (recommended); if the box is greyed out, unlock the page's administrator settings first.
- Save the change and shut down the PC.
- Test for a few days, and turn the option back on if nothing changes, because Microsoft does not recommend leaving hybrid shutdown off.
Check power and sleep settings
Crashes that cluster around sleep, wake or shutdown point to a driver failing a power transition, which Windows reports as DRIVER_POWER_STATE_FAILURE (0x9F).
- Open Settings > System > Power & battery > Screen, sleep & hibernate timeouts and note when the PC sleeps.
- Compare those times with the crash times in Reliability Monitor or Event Viewer.
- In Event Viewer, open the Event ID 41 entry and check the SleepInProgress and BugcheckCode values.
- If crashes line up with sleep transitions, update chipset, storage, network and graphics drivers from the PC maker.
Use Reliability Monitor to find patterns
Reliability Monitor lays out failures by day, which makes a repeating trigger easy to spot.
- Press Windows + R, type
perfmon /reland press Enter. - Select each day that shows a critical event and read what failed.
- Look for the same driver, device or app failing before each crash, or an update installed that day.
- Open Event Viewer, go to Windows Logs > System and filter for Event ID 41 and Event ID 6008 around those times.
- Convert a decimal BugcheckCode to hex to name the stop code; 159, for example, is 0x9F.
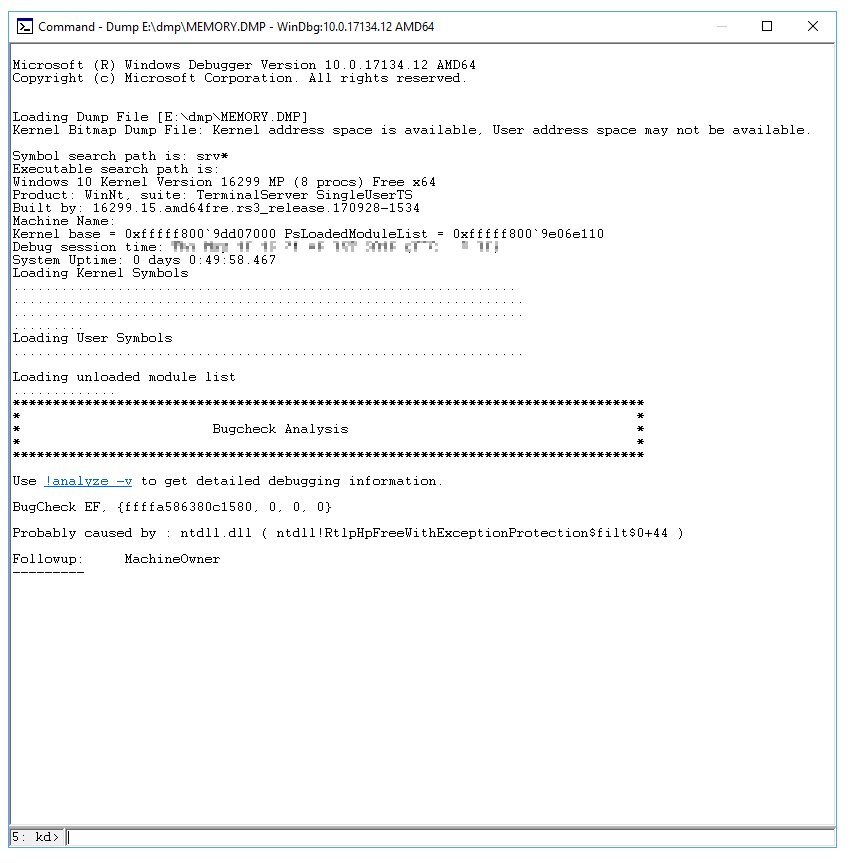
Analyze BSOD minidump files
- Search for Advanced system settings, select Settings under Startup and Recovery on the Advanced tab, and keep Write debugging information on Automatic memory dump.
- After the next crash, find the newest
.dmpfile inC:\Windows\Minidump. - Install WinDbg with
winget install Microsoft.WinDbgor from the Microsoft Store. - Open the dump file in WinDbg and run
!analyze -v. - Read MODULE_NAME and IMAGE_NAME, and in STACK_TEXT skip the
nt!lines down to the first third-party module. - Update, roll back or remove that driver; if it is a Microsoft driver such as
NDIS.SYS, update or disable the device that uses it.
WinDbg needs Microsoft's public symbol server, https://msdl.microsoft.com/download/symbols, to show readable function names in the stack.
Remove problematic third-party software
Software that installs its own kernel driver runs inside the kernel. In July 2024 a CrowdStrike issue, documented in Microsoft's KB5042421, caused 0x50 and 0x7E stop errors on Windows endpoints.
- Open Settings > Apps > Installed apps.
- Find apps installed or updated just before the problem began, such as security, VPN, monitoring or tuning tools.
- Select the … button next to the app and choose Uninstall.
- Restart and test for a few days.
- Reinstall the newest version from the vendor if you still need the app.
Perform a clean boot
- Sign in as an administrator, select Search, type
msconfigand open System Configuration. - On the Services tab, select Hide all Microsoft services, then Disable all, then Apply.
- On the Startup tab, select Open Task Manager and disable every enabled startup app, noting each one.
- Select OK in System Configuration and restart.
- If the problem is gone, re-enable half the services at a time and restart until it returns.
- When finished, choose Normal Startup on the General tab and select Enable all on the Services tab.
Check for Windows Search or indexing problems
Microsoft notes indexing performance problems above 400,000 items, and near the 1 million item limit the indexer can drive CPU, memory and disk use high.
- Open Settings > Privacy & security > Searching Windows and check the Indexed count.
- Select Add an excluded folder to drop large folders you never search.
- To rebuild, open Advanced indexing options, select Advanced and then Rebuild.
- Leave the PC on for up to 24 hours while the index rebuilds.
- Wait for Indexing complete before you judge CPU use again.
Reset virtual memory settings
A custom or disabled page file can cause memory pressure, and it can stop Windows from writing the crash dumps you need for diagnosis.
- Search for Advanced System Settings and open it.
- Select Settings in the Performance section, then open the Advanced tab.
- Select Change in the Virtual Memory section.
- Select Automatically manage paging file size for all drives and select OK.
- Restart the PC.
Avoid No paging file. Without a page file or dedicated dump file, Windows logs event ID 46, Crash dump initialization failed!, and cannot save the dump that names the crashing driver.
Use Driver Verifier carefully
Driver Verifier stresses chosen drivers until a faulty one triggers a bug check, usually 0xC4, that names it. Microsoft warns that it consumes lots of CPU, causes extra crashes and belongs on PCs you are testing.
- Confirm you can reach Safe Mode before you start.
- Open Command Prompt with Run as administrator and type
verifier. - Select Create standard settings, select Next, then choose Select driver names from a list.
- Select only non-Microsoft drivers you suspect, 10 to 20 at most per round, then select Finish and restart.
- Use the PC until it crashes, and read the driver name from the new dump.
- Turn Verifier off with
verifier /resetand restart; if Windows will not start, boot into Safe Mode, where Verifier does not run, and reset it there.
Boot into Safe Mode
Safe Mode starts Windows with a limited set of files and drivers, so a problem that disappears there points to a non-default driver, service or app.
- Open Settings > System > Recovery and select Restart now next to Advanced startup, or hold Shift while you select Restart.
- Select Troubleshoot > Advanced options > Startup Settings > Restart.
- Press 4 or F4 for Safe Mode, or 5 or F5 for Safe Mode with Networking.
- Enter your BitLocker recovery key if the PC asks for it.
- Test, remove the suspect driver or app, then restart to leave Safe Mode.
If the PC keeps booting into Safe Mode, run msconfig and clear Safe boot under Boot options.
Try System Restore
System Restore rolls system files, registry settings and installed programs back to a restore point without touching personal files.
- Press Windows + R, type
rstrui.exeand press Enter. - Choose a restore point dated before the crashes or CPU load started.
- Confirm the restore and let the PC restart.
- If Windows will not start, open the Windows Recovery Environment and select Troubleshoot > Advanced options > System Restore.
- Have your BitLocker recovery key ready on an encrypted device.
Repair install Windows
A repair install puts a fresh copy of your current Windows version in place through Windows Update and keeps your apps, files and settings.
- Open Settings > System > Recovery.
- Next to Fix problems using Windows Update, select Reinstall now.
- Choose whether the PC restarts automatically 15 minutes after installation, then select OK.
- Keep the PC plugged in and online while Windows Update downloads and installs the repair version.
- Restart manually if you turned automatic restart off.
The option can be missing on work or school PCs, on releases older than the Windows 11 2022 update, or before the February 2024 optional update.
Reset Windows or perform a clean installation
A reset reinstalls Windows when repairs fail, but a hardware fault survives it, so rule hardware out first.
- Back up your files and find your BitLocker recovery key.
- Open Settings > System > Recovery and select Reset PC.
- Choose Keep my files to keep personal files, or Remove everything for a clean start.
- Pick Cloud download for a fresh copy of Windows or Local reinstall to use files already on the PC.
- Do not restart the PC yourself during the reset, even if the screen stays black for a long time.
- If Windows will not start, reset from Troubleshoot > Reset this PC, or boot installation media made with the Media Creation Tool.
When to suspect hardware failure
Microsoft attributes about 10% of stop errors to hardware, and these signs move a crash into that group.
| Sign | What it points to | Next step |
|---|---|---|
| WHEA_UNCORRECTABLE_ERROR (0x124) | A hardware error reported by the platform | Stock clocks, temperatures, a RAM test and a firmware update |
| Windows Memory Diagnostic reports errors | Faulty RAM | Replace the failing module |
| Event ID 41 with BugcheckCode 0 | Power loss, a drained battery, or an underpowered or faulty power supply | Check the power supply and cabling |
| A critical storage warning or low NVMe spare capacity | A failing SSD | Back up now and replace the drive |
| Hard freezes where Caps Lock no longer toggles | A hard hang, typically hardware | Check overheating and power, then memory |
| Crashes continue in Safe Mode and after a reset | Hardware rather than software | Run the PC maker's hardware diagnostics |
What you should not do
| Do not | Why | Do this instead |
|---|---|---|
| Delete, rename or replace ntoskrnl.exe | Windows cannot start without the kernel | Run DISM and SFC, or a repair install |
| Download ntoskrnl.exe from a file download site | You cannot verify the copy, and the real file comes with Windows | Let SFC or Reinstall now restore it |
| Install driver updaters or PC cleaner tools | They add more third-party code to a PC that is already crashing | Get drivers from Windows Update or the device maker |
| Run Driver Verifier on every driver or leave it on | It slows the PC, causes more crashes and can make it unusable | Verify 10 to 20 suspect drivers, then run verifier /reset |
| Turn off Microsoft Defender to cut CPU load | Kernel-level malware is one of the causes | Run a full scan and an offline scan |
| Set the page file to No paging file | Windows cannot write crash dumps and can run short of commit memory | Let Windows manage the page file |
How to check ntoskrnl.exe CPU usage and new crash dumps
- Close your apps, open Task Manager and confirm System drops back down the CPU column.
- On the Performance tab, keep Show kernel times on and check that the kernel share stays low while the PC is idle.
- With dumps enabled, check
C:\Windows\Minidumpafter a few days; no new.dmpfiles means no new stop errors. - Open Reliability Monitor with
perfmon /reland look for new critical events. - In Event Viewer, check the System log for new Event ID 41 entries.
ntoskrnl.exe BSOD and high CPU FAQ
Is ntoskrnl.exe a virus?
No. The genuine ntoskrnl.exe is the Windows kernel in C:\Windows\System32. A file with that name in another folder is not the kernel, so check the System32 copy with Sigcheck and run Microsoft Defender full and offline scans.
Can I delete ntoskrnl.exe?
No. Windows loads the kernel at every startup and stops with a missing or corrupt ntoskrnl.exe message without it. If the file seems damaged, run DISM and System File Checker, or use Reinstall now in Recovery settings.
Where is ntoskrnl.exe located?
On a standard installation, ntoskrnl.exe is in C:\Windows\System32. Task Manager does not list it by name; kernel activity and the threads drivers create appear under the System process.
What driver is ntoskrnl.exe?
None. ntoskrnl.exe is the kernel image that drivers link to and call. When a crash names it, open the minidump in WinDbg and run !analyze -v; MODULE_NAME and IMAGE_NAME show the driver involved.
Why does the blue screen say ntoskrnl.exe failed?
The stop screen names the module that was running when Windows stopped, and the kernel raises every bug check. Treat the name as a pointer; the stop code and minidump show which driver or device led there.
How to repair ntoskrnl.exe?
Run DISM.exe /Online /Cleanup-image /Restorehealth, then sfc /scannow, from an administrator Command Prompt. If SFC cannot fix the files, select Reinstall now in Settings > System > Recovery, which keeps apps, files and settings.
How to run ntoskrnl.exe?
You do not run it yourself. At a cold startup the boot loader loads the kernel file into memory, and the kernel then sets up core functions, enumerates devices and loads their drivers. It runs until shutdown.
Why does ntoskrnl.exe take so much CPU?
It usually does not. The CPU time belongs to driver threads and device interrupt work inside the System process. Use Show kernel times in Task Manager and the Threads tab in Process Explorer to find the driver.
Why is ntoskrnl.exe System using 100% disk?
Disk work from drivers and the memory manager is counted under System. Check which files System touches on Resource Monitor's Disk tab, set the page file to automatic and run chkdsk C: /scan.