To clean up system files on a Windows PC, open Disk Cleanup, pick the C: drive, select Clean up system files, tick the items you no longer need and confirm.
This guide covers Disk Cleanup, the Storage page in Settings, Storage Sense, Windows Update cleanup with DISM, restore points, and which files you should never delete by hand on Windows 11 and Windows 10.
Run Disk Cleanup as Administrator
Disk Cleanup opens in a limited mode that only shows your own files. The Clean up system files button reopens it with administrator rights, which adds previous Windows installations and Windows Update files to the list.
- Select Start, type Disk Cleanup, and select Disk Cleanup from the results.
- Select the drive that holds Windows, usually C:, and select OK.
- Select Clean up system files and approve the administrator prompt.
- Select the C: drive again if asked, and wait while Disk Cleanup measures each category.
- Tick the categories you want to remove, such as temporary files, the Recycle Bin and Windows Update cleanup.
- Select OK, then confirm that you want to permanently delete the files.
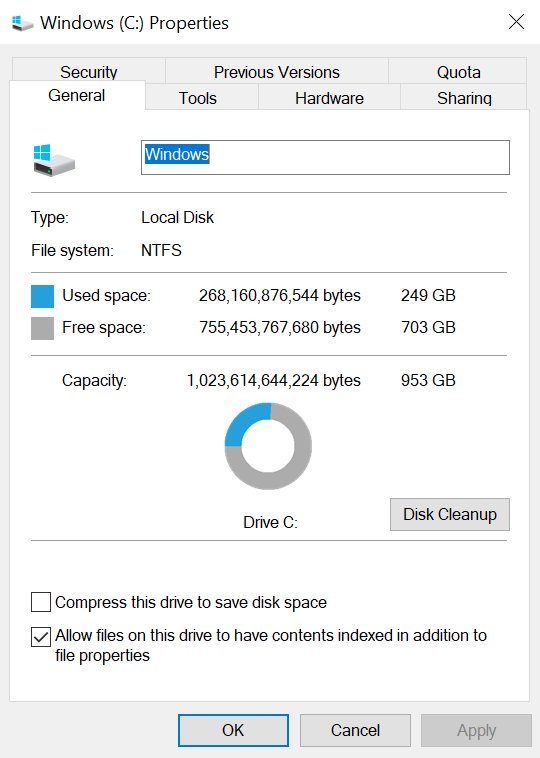
You can also open Disk Cleanup from File Explorer: right-click the C: drive, select Properties, and select Disk Cleanup on the General tab.
Which cleanup tool should you use?
| Your situation | Use this | Why |
|---|---|---|
| You want the classic one-off cleanup | Disk Cleanup with Clean up system files | Shows every category with its size before anything is deleted |
| You are on Windows 11 and prefer Settings | Temporary files or Cleanup recommendations in Storage | Same categories, plus large files and unused apps |
| You never want to think about it again | Storage Sense | Runs on a schedule or when the drive is low |
| The WinSxS folder looks huge | DISM /StartComponentCleanup |
Removes superseded update components safely |
| Restore points fill the drive | System Protection slider or vssadmin delete shadows |
Caps or removes shadow copies |
| You just upgraded Windows | Wait before removing Previous Windows installation(s) | Deleting it removes the option to go back |
Check Storage Usage Before Cleaning
Measure first, so you know which tool will help and can confirm the result afterwards.
- Select File Explorer on the taskbar, then select This PC on the left.
- Note the free space shown under Devices and drives for the drive with the Windows logo.
- Open Settings > System > Storage to see which categories, such as apps, temporary files or system, use the most space.
- If the capacity bar on the Storage page is red, the PC is in a low disk state and cleanup should start with temporary files.
- To see the true size of the WinSxS folder, open Command Prompt as administrator and run
Dism.exe /Online /Cleanup-Image /AnalyzeComponentStore.
File Explorer overstates the size of WinSxS because it counts hard-linked files more than once. The DISM report gives the actual size and says whether cleanup is recommended.
Remove Temporary Files in Windows Settings
On Windows 11 the Storage page lists the same system categories as Disk Cleanup, with the space each one uses.
- Select Start > Settings > System > Storage.
- Under disk usage, select Temporary files and wait for the scan to finish.
- Tick the categories you want to remove. Leave Downloads cleared unless you have checked its contents.
- Tick Previous Windows Installation(s) only if you are sure you will not roll back.
- Select Remove files and confirm.
Use Cleanup recommendations in Windows 11
- Select Start > Settings > System > Storage > Cleanup recommendations.
- Review Temporary files, Large or unused files, Files synced to the cloud and Unused apps.
- Select the items you want to remove. Windows shows how much space each choice saves.
- Select the Clean up button for each section.
If it has been fewer than 10 days since you upgraded Windows, your previous version appears here as a system file. Deleting it removes the Windows.old folder and cannot be undone.
Enable and Configure Storage Sense
Storage Sense deletes temporary files and old Recycle Bin items automatically. It works on the system drive only, and it is off by default unless Windows turned it on during a low-space event.
- Select Start > Settings > System > Storage.
- Set Storage Sense to On.
- Select Storage Sense to open its settings.
- Under Run Storage Sense, choose how often it runs.
- Set Delete files in my recycle bin if they have been there for over: and the matching Downloads option.
- Select Run Storage Sense now to clean up immediately.
Storage Sense runs only while you are signed in and online for more than 10 minutes. Settings apply to your account only; other users set their own.
Clean Up Windows Update Files Safely
Old update components live in the WinSxS folder. Never delete files from it by hand; Microsoft warns that doing so can leave the PC unable to boot or update. Use DISM instead.
Dism.exe /online /Cleanup-Image /StartComponentCleanupRemoves superseded versions of updated components right away, without the 30-day grace period that the built-in StartComponentCleanup scheduled task waits for, and without its one-hour time limit. Run it from Command Prompt opened as administrator.
You should see: The progress bar reaches 100% and DISM reports: The operation completed successfully.
Adding /ResetBase removes every superseded component, but afterwards the updates already installed can no longer be uninstalled. Use it only on a PC that has run stable on its current updates. Disk Cleanup's Windows Update cleanup entry is the click-based alternative.
Delete Old Restore Points and Shadow Copies
System Restore points are stored as shadow copies. Deleting them frees space but is permanent, and any restore points that depend on them are lost too.
vssadmin delete shadows /for=c: /oldestDeletes only the oldest shadow copy on drive C:. Run vssadmin list shadows first to see what exists. Use /all instead of /oldest to remove every client-accessible shadow copy on that drive.
You should see: Running vssadmin list shadows again shows one fewer shadow copy for C:.
To stop restore points from growing back, press Windows + R, type systempropertiesprotection.exe, select Configure, and use the slider to lower the maximum disk space System Protection may use, then select Apply.
How to check the cleanup worked
- Open File Explorer > This PC and compare the free space on C: with the figure you noted earlier.
- Open Settings > System > Storage and check that the capacity bar is no longer red.
- Run
Dism.exe /Online /Cleanup-Image /AnalyzeComponentStoreagain; compare Number of Reclaimable Packages and Date of Last Cleanup with your first run. - Restart the PC and confirm Windows starts and Windows Update opens normally.
How To Recover Files Deleted from the Recycle Bin [Windows 11]
Disk Cleanup and Storage Sense can empty the Recycle Bin. Check it before cleaning, and act quickly if something you need was removed, because new files can overwrite the deleted data.
- If the file is still in the Recycle Bin, open Recycle Bin, right-click the file and select Restore.
- If the bin was emptied, check backups first, such as File History or OneDrive.
- Otherwise install Windows File Recovery from the Microsoft Store and open it from Start, selecting Yes at the prompt.
- Run a command such as
winfr C: E: /regular /n \Users\<username>\Documents\to copy recovered files to another drive. - Enter Y to start. The files land in a folder named Recovery_ with the date and time on the destination drive.
The source and destination drives must be different. Use /regular for recently deleted files on NTFS, and /extensive for older deletions or FAT and exFAT drives.
Fix low disk space that comes back after cleanup
Low Disk Space error soon after using Cleanup recommendations
The Temp folder is filling up with Microsoft Store app (.appx) files.
- Select Start > Settings > System > Troubleshoot > Other troubleshooters, then select Run next to Windows Store Apps.
- Press Windows + R, type
wsreset.exeand select OK to clear the Store cache. - Run the Windows Update troubleshooter from the same page.
- Restart the PC and check the free space again.
Previous Windows installation is not listed
It is listed only when fewer than 10 days have passed since the upgrade, or it was already removed.
- Open Settings > System > Storage > Temporary files and look for Previous Windows Installation(s).
- If it is missing, there is nothing left to remove; move on to DISM cleanup or large files.
Not enough space for a Windows update even after cleaning
Personal files, not system files, fill the drive.
- In Cleanup recommendations, review Large or unused files.
- Move videos and photos to an external drive with Cut and Paste in File Explorer.
- Under Settings > System > Storage > Advanced storage settings > Where new content is saved, pick another drive for new files.
Best Practices to Avoid Removing Critical System Files
| Do this | Never do this |
|---|---|
| Use Disk Cleanup, Storage settings or DISM | Delete files from C:\Windows\WinSxS or the whole folder by hand |
| Keep Previous Windows Installation(s) until the new version runs well | Remove Windows.old in the first days after a feature update if you might roll back |
| Check the Recycle Bin and Downloads before ticking them | Let Storage Sense clear Downloads without reviewing the setting |
| Create a restore point before large cleanups | Delete all shadow copies on a PC that has no other backup |
Use /ResetBase only on a stable PC |
Run it when you may need to uninstall a recent update |
| Use the built-in tools | Install a third-party registry or PC cleaner |
Frequently Asked Questions
Clean up system files: what will this do?
The Clean up system files button restarts Disk Cleanup with administrator rights. It adds system categories, such as Windows Update cleanup and previous Windows installations, to the list. Nothing is deleted until you tick categories and confirm.
What does clean up system files mean?
It means removing files Windows no longer needs: temporary setup files, superseded update components, old Windows installation files and similar leftovers. Your documents, apps and settings are not part of these categories.
Is it safe to clean up system files?
Yes, when you use Disk Cleanup, Storage settings or DISM. These tools only offer files Windows can rebuild or no longer needs. The risks are removing Windows.old before you are sure about an upgrade and deleting WinSxS files by hand.
How do I clean up system files on Windows 11?
Open Settings > System > Storage > Temporary files, tick the categories you want and select Remove files. You can also search Start for Disk Cleanup, pick C:, and select Clean up system files.
How do I clean up system files on Windows 10?
Search Start for Disk Cleanup, open it, choose the C: drive and select Clean up system files. Tick the items to remove and confirm. Storage Sense is also available on Windows 10 for automatic cleanup.
How do I clean up system files in the C drive?
Right-click the C: drive in File Explorer, select Properties, then Disk Cleanup, then Clean up system files. Storage Sense also works only on the system drive, which is usually C:.
Is there a free tool to clean up system files?
Yes. Disk Cleanup, Storage Sense, Cleanup recommendations and DISM are all built into Windows at no cost. There is no need for a third-party cleaner.
Can I delete the WinSxS folder to save space?
No. Some important system files exist only in WinSxS, and deleting it can stop Windows from booting or updating. Run Dism.exe /online /Cleanup-Image /StartComponentCleanup to shrink it safely.
Bottom Line
Run Disk Cleanup with Clean up system files once, then turn on Storage Sense so temporary files never pile up again. Disk Cleanup reaches the large system categories in one pass, Storage Sense keeps the drive tidy without effort, and both only remove files Windows has marked as safe to delete.