To set up Plex Media Server, install the free server app from the Plex Downloads page, open Plex Web App to claim it with your Plex account, then point a library at each folder of movies, TV shows or music.
It covers Windows, macOS, Linux and NAS installs, file naming, fixing matches, player apps, remote access, transcoding, sharing, backups and the fixes for common setup failures.
The fastest way to set up Plex Media Server
Plex Media Server has no window of its own; you manage it from Plex Web App in a browser.
- Put your movies in one folder (for example
D:\Media\Movies) and your TV shows in another (D:\Media\TV Shows). - Go to the Plex Downloads page on plex.tv, pick your platform under Plex Media Server and download the installer.
- Run the installer and select Launch on the final screen.
- Sign in or create a free Plex account in the browser tab that opens, and accept the terms of service.
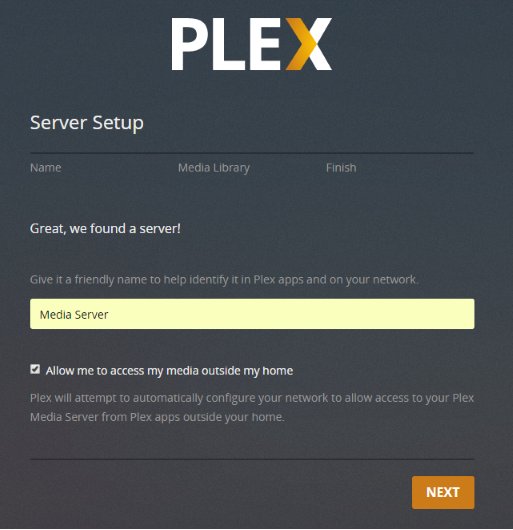
- In the setup wizard, type a Friendly Name for the server and leave Allow me to access my media outside my home ticked if you want remote access.
- Select Add Library, choose Movies, select Browse for Media Folder, pick your movies folder and select Add Library. Repeat for TV shows.
- Finish the wizard, then wait for the first library scan to complete before you start playing.
What You Need Before You Start
Plex Media Server is free. These are Plex's own minimums for the server; viewing devices only need a Plex app or a browser.
| Requirement | What Plex specifies |
|---|---|
| Windows | Windows 10 (version 1607) or newer, or Windows Server 2016 or newer. Intel or AMD (x86/x64) processors only; ARM-based Windows PCs are not supported. |
| macOS | macOS 10.13 High Sierra or newer. |
| Linux | Official packages for Ubuntu 16.04+, Debian 8+, Fedora 27+, CentOS 7+ and SUSE 15+. FreeBSD 11.2 or newer is also supported. |
| NAS | Many QNAP, Synology, Asustor, ReadyNAS, TerraMaster, Western Digital and unRAID models, but not every model. Check the NAS Compatibility List before you buy. |
| CPU | Intel Core i3 or equivalent as a minimum. Several people streaming at once, or content that needs transcoding, needs a faster processor. |
| RAM | 4 GB is typically more than enough. |
| Account | A free Plex account. It lets apps find the server and is required for remote access. |
| Internet | Needed during installation so the wizard can sign you in. |
| File system | One that supports symlinks and hardlinks; check drive pools first. |
The server computer has to stay switched on with Plex Media Server running. If it sleeps or shuts down, every app loses access to your media.
Choosing the best device for your Plex server
The deciding question is transcoding: whether your players will need the server to convert video on the fly. Most apps need it at least some of the time, for example for remote streams or burned-in subtitles.
| Your situation | Run the server on | Why |
|---|---|---|
| You have a spare or everyday desktop PC or Mac | That computer | The most flexible option; a modern Intel or AMD CPU handles transcoding for several streams. |
| You already own a NAS with an Intel or AMD CPU | The NAS | One box stores and serves the files. Many NAS processors manage 720p transcodes, and very few handle 1080p well. |
| Your NAS has an ARM processor | A PC, with the NAS used only as storage | ARM NAS models generally cannot transcode video at all; files that need converting show an error instead of playing. |
| You were thinking of a rented server in a data centre | A machine at home instead | Plex is licensed for personal use and expects servers to run from home; some hosting providers do not work. |
Step 1: Prepare and Organize Your Media Files
Plex identifies each title from its folder and file name, so naming decides whether matches come out right. Mixing movies and TV shows in one folder causes wrong matches and skipped files.
- Create one parent folder per type, such as
/Media/Movies,/Media/TV Showsand/Media/Music. Never use a drive root such asD:\as a library folder. - Give each movie its own folder named with the title and year, and name the file the same way.
- Put each TV show in a show folder containing Season 01, Season 02 and so on, and name episodes with the
sXXeYYpattern. - Arrange music as artist folder, then album folder, then numbered tracks.
- Extract files from ZIP or RAR archives and convert ISO or VIDEO_TS disc images to a normal video file, because Plex skips both.
Test with a small folder of each type first; a library can be deleted and rebuilt at any time.
Movie, TV show and music naming formats Plex expects
| Content | Folder and file pattern | Example |
|---|---|---|
| Movie (recommended) | Movies/Title (Year)/Title (Year).ext |
Movies/Batman Begins (2005)/Batman Begins (2005).mp4 |
| Movie with an exact ID | Add {imdb-tt…} or {tmdb-…} to the folder and file name |
Batman Begins (2005) {imdb-tt0372784} |
| TV episode | TV Shows/Show (Year)/Season 02/Show (Year) - s02e17.ext |
Band of Brothers (2001) - s01e01 - Currahee.mkv |
| Date-based TV episode | Show - YYYY-MM-DD.ext inside a season folder |
The Colbert Report (2005) - 2011-11-15.avi |
| Miniseries | Always use Season 01 |
From the Earth to the Moon (1998)/Season 01/ |
| Music track | Music/Artist/Album/TrackNumber - Track.ext |
Music/U2/Joshua Tree/01 - Where the Streets Have No Name.mp3 |
Plex ignores anything in square brackets, such as [1080p Bluray], when matching TV. Use the English word Season even for foreign-language shows, and put specials in Season 00.
Step 2: Create or Sign In to a Plex Account
A Plex account is free, and Plex recommends one even if you never stream outside your home, because it is how your TV, phone and console apps find the server.
- Go to plex.tv and select Sign Up Free, or Sign In if you already have an account.
- Create the account with an email address and password, or use the Apple or Google sign-in buttons.
- Stay signed in to plex.tv in your default browser, so the setup wizard can link the server to this account without asking again.
Step 3: Download Plex Media Server
- Open the Plex Downloads page from the Download link at the top of plex.tv.
- Select Plex Media Server rather than a player app.
- Choose your platform: Windows, macOS, Linux or your NAS brand.
- Pick the matching build (for Linux, the package for your distribution) and download it to the computer that will act as the server.
- For a NAS, check whether the manufacturer offers Plex in its own app store or package centre first, because Plex says NAS installs should follow the manufacturer's add-on installation procedure.
Step 4: Install Plex Media Server
Installation follows each platform's normal method. Keep the server connected to the internet while it installs so the first-run sign-in works.
| Platform | How to install | How to start the server |
|---|---|---|
| Install on Windows | Run the downloaded .exe, follow the prompts and select Launch at the final screen. |
It runs in the system tray (the Plex > icon). If you skipped Launch, start Plex Media Server from the Start menu. |
| Install on macOS | Move the downloaded Plex Media Server app into your Applications folder. | Double-click Plex Media Server in Applications. Its > icon appears in the menu bar. |
| Install on Linux | On Ubuntu, Debian, Fedora or CentOS, add the official Plex repository with curl -LsSf https://repo.plex.tv/scripts/setupRepo.sh | sudo bash, which also installs the latest server. You can instead install the downloaded package with your package manager. |
sudo systemctl start plexmediaserver |
| Install on a NAS | Install Plex Media Server from the NAS's app store or package centre, or upload the NAS package from the Plex Downloads page, as the manufacturer's add-on procedure describes. | Start it from the NAS control panel, then open http://NAS-IP-address:32400/web. |
| Install with Docker | Use Plex's official Docker container and its documentation. Map volumes for the server's data and your media folders when you create the container. | Start the container, then open http://host-IP-address:32400/web. |
Step 5: Open the Plex Web Interface and Claim the Server
Claiming links the server to your Plex account. On first run the browser usually opens by itself and starts the setup wizard; if it does not, open Plex Web App manually.
- On Windows, right-click the Plex > icon in the system tray and choose Open Plex…. On a Mac, click the > icon in the menu bar and choose Open Plex….
- On Linux, open a browser on the server and go to
http://127.0.0.1:32400/web. For a NAS or another computer on your network, go tohttp://server-IP-address:32400/web, for examplehttp://192.168.1.5:32400/web. - Sign in with your Plex account when asked. From Plex Media Server v1.29.2, Open Plex… on an unclaimed server starts the claim process automatically.
- In the setup wizard, enter a Friendly Name such as
Living Room Server; if you leave it blank, the computer's network name is used. - Tick Allow me to access my media outside my home if you want remote streaming, then continue to the library step.
- If the wizard was skipped, go to Settings > Server > General and select Claim Server.
After setup, use the hosted web app at https://app.plex.tv/desktop from any browser; Plex recommends it because it is always the latest version.
Step 6: Add Your Media Libraries
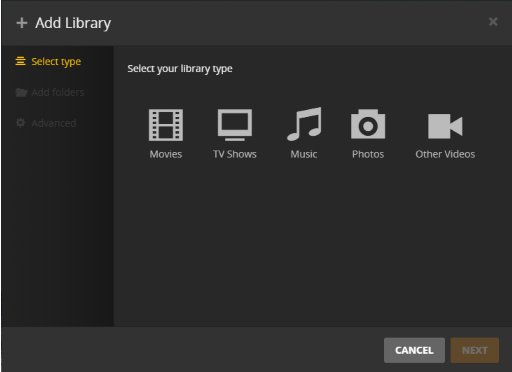
A library is a collection of one media type. Plex offers five types: Movies, TV Shows, Music, Photos and Other Videos. Use Other Videos for home videos and clips; they get no internet artwork.
- In Plex Web App, open the Settings menu and make sure the correct server is selected.
- Select Libraries under Manage, then select Add Library.
- Choose the library type, edit the name if needed, set the language for downloaded metadata, and select Next.
- Select Browse for Media Folder, choose the parent folder such as
D:\Media\Movies, and select Add. Add more folders the same way to merge them into one library. - Leave Advanced alone unless you need it, then select Add Library.
- Open the new library and watch the scan fill it. Let a large first scan finish before judging matches.
Choosing library agents and metadata settings: the Advanced tab sets the scanner and the metadata agent; the defaults suit most people. Change a TV library's Episode ordering only if your files follow TheTVDB numbering.
Step 7: Fix Incorrect Matches and Missing Artwork
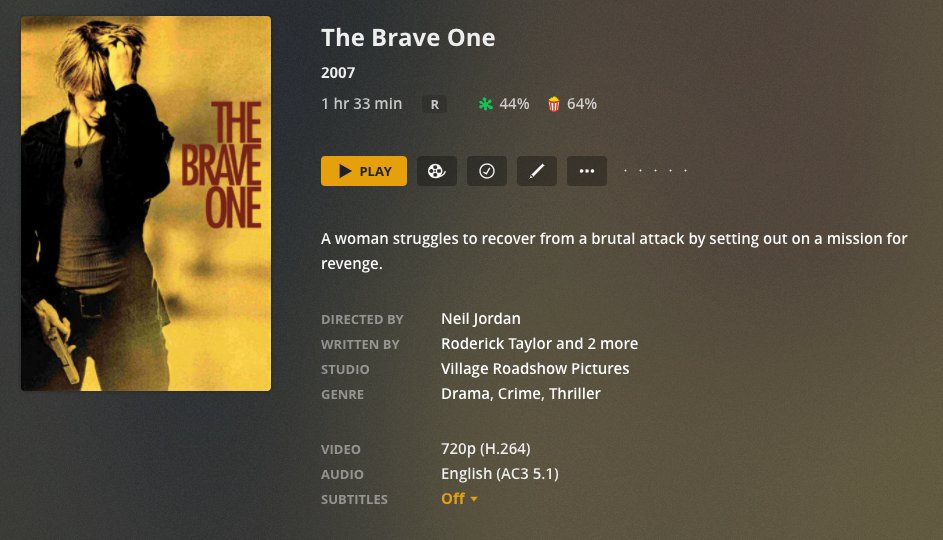
A wrong match usually means a title without a year, for example the 2012 film Brave matched as the 2007 film The Brave One. Rename the file first if its name is the problem, then correct the match.
- Fix a wrong movie or show match: open the item's details screen in Plex Web App and select … in the action bar.
- Choose Fix Match… (or Match for an unmatched item). For TV, this works only at show level, not on a season or episode.
- Pick the correct result from the suggestions, or open Search Options to enter the exact title, year and language.
- For an exact hit, search by ID:
imdb-tt1217209in a movie library,tvdb-110381ortmdb-10283in a TV library. - Change posters and backgrounds: open the item's edit options, go to the artwork row (poster, background, logo or square art) and pick another image. Your choice saves immediately.
- To use an image from the web, open the artwork row's menu and paste the image URL.
Step 8: Install Plex Apps on Your Devices
The server ships with Plex Web App for browsers. Every other screen needs a free player app, available on Windows, Mac, Linux, Android, iOS, Apple TV, Android TV, Fire TV, Roku, smart TVs and game consoles.
- Install the Plex app from the device's app store, or get Plex for Windows or Mac from the Plex Downloads page.
- Open the app and select Sign In.
- Sign in with the same Plex account that owns the server, following the app's on-screen prompts.
- Confirm your server's libraries appear on the home screen or in the sidebar.
- Play a title to confirm the device can reach the server.
Away from home, apps also need the remote access set up in the next step.
Step 9: Configure Remote Access
Remote access lets you and anyone you share with reach the server over the internet. Since April 29, 2025, remote video playback also needs a Plex Pass on the server owner's account, or a Plex Pass or Remote Watch Pass on the viewer's. Remote music and photos stay free.
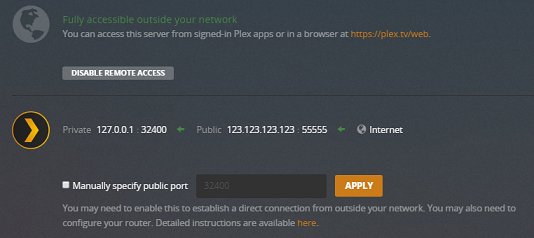
- Enable remote access: in Plex Web App, go to Settings > Server > Remote Access. The server must already be signed in to your Plex account.
- Select Enable Remote Access. The server tries to open a port on your router automatically with UPnP or NAT-PMP.
- If the page reports success, you are done. If it fails, turn on UPnP or NAT-PMP in your router's settings and try again.
- Manual port forwarding: reserve a fixed local IP address for the server in your router, then forward an external TCP port (32400, or any free port from 20000 to 50000) to internal TCP port 32400 on that IP address.
- Back in Remote Access, select Show Advanced, tick Manually specify public port, enter the external port and select Retry or Apply.
- Test the forward from outside your network, for example with mobile data on a phone with Wi-Fi turned off.
If your ISP uses CGNAT: compare the WAN address on your router's status page with the address a what-is-my-IP site shows. If they differ, or the router's WAN address falls between 100.64.0.0 and 100.127.255.255, you are behind carrier-grade NAT and port forwarding cannot work. Ask the ISP for a public or static IP address. For an ordinary double NAT (your router behind the ISP's router), put one of the two devices into bridge mode.
Step 10: Set Streaming Quality and Transcoding Options
Transcoding happens when a player cannot handle a file's format or bitrate and the server converts it on the fly. It is the most CPU-heavy thing Plex does, so these settings decide how many streams your server can manage.
| Setting | Where to find it | What to choose |
|---|---|---|
| Recommended client settings: local quality | Each Plex app's quality settings | The highest option on wired devices, so files play directly; one step lower on weak Wi-Fi. |
| Client remote quality | Each Plex app's quality settings | Slightly below the server's upload speed, such as 8 Mbps on a 10 Mbps upload. |
| Transcoder quality | Settings > Server > Transcoder | Automatic, as Plex recommends for most users. |
| Use hardware acceleration when available | Settings > Server > Transcoder | On with Plex Pass and a supported GPU, for more simultaneous transcodes. |
| Transcoder temporary directory | Transcoder > Show Advanced | A local drive with free space of the source file's size plus 100 MB, never a network share. |
| Internet upload speed, Limit remote stream bitrate | Settings > Server > Remote Access | Your measured upload speed and a per-stream cap (Plex Pass). |
Step 11: Add Users and Share Your Library
Plex offers two kinds of sharing. A Plex Home is for people in your household who share one sign-in on shared devices. Library access is for friends and family who use their own Plex accounts, including in other homes.
- Create managed users at home: go to Settings > Plex Home and create a Managed User. Choose a name and rating profile, and pick which libraries it can see.
- Add a PIN to your own account when prompted, so children cannot switch into the admin profile.
- Switch between profiles from the user menu in any Plex app; managed users need no email address or password.
- Share with another Plex account: go to Settings > Manage Library Access and select Grant Library Access.
- Enter the person's Plex username or email address, select your server or individual libraries, and select Send.
- Ask them to accept from the invitation email or under Library Invitations Received in their own Plex Web App.
Shares reach people outside your home only once remote access works. Share restrictions and download permissions need Plex Pass.
Step 12: Secure and Maintain Your Plex Server
| Task | How to do it | Why it matters |
|---|---|---|
| Keep Plex updated | Settings > Server > General > Server version updates > Automatically during scheduled maintenance (Windows and macOS). Linux updates through the Plex repository; a NAS through its app store. | Fixes arrive without you checking. |
| Back up your Plex data | Copy the data folder to a location outside it: %LOCALAPPDATA%\Plex Media Server (Windows), ~/Library/Application Support/Plex Media Server/ (macOS), /var/lib/plexmediaserver/Library/Application Support/Plex Media Server/ (Debian, Ubuntu, Fedora, CentOS). The Cache folder can be skipped. |
It holds watch history, metadata and settings. |
| Back up extra settings | Windows: export HKEY_CURRENT_USER\Software\Plex, Inc.\Plex Media Server. macOS: copy ~/Library/Preferences/com.plexapp.plexmediaserver.plist. |
The data folder alone does not include them. |
| Monitor storage and library health | Settings > Server > Scheduled Tasks: keep Backup database every three days and Optimize database every week on. They run 3 a.m. to 6 a.m. by default. | Three rotating database backups; not a replacement for a full backup. |
| Lock down ports | Open only TCP 32400 in the firewall and router. On a public IP or router DMZ, never open the extra discovery and DLNA ports. | Only 32400 is needed for access. |
How to check your Plex server is working
- Open
https://app.plex.tv/desktopand confirm your server's friendly name appears in the sidebar with your libraries under it. - Open a library and check that titles show posters and descriptions rather than bare file names.
- Play a movie in the browser and on a TV or phone app on the same network.
- Go to Settings > Server > Remote Access and confirm the page shows Remote Access as enabled, not as unsuccessful or disabled.
- Turn off Wi-Fi on your phone and play something over mobile data to prove remote access works end to end.
Step 13: Troubleshoot Common Plex Setup Problems
Plex cannot find your server
The app and server are signed in to different accounts, the server is not running, or a VPN or proxy is hiding its address.
- Confirm Plex Media Server is running on the server computer and that it is the current version.
- Check that the server is listed on the Devices page of your Plex account.
- Turn off any VPN or proxy on the server computer or router.
- Sign out of Plex in both the app and the server, sign the server in first, then sign the app in.
- On the same network, make sure the app and server are on the same subnet.
Setup wizard not showing up, or the server is missing from Settings
The server has not been claimed yet, and the hosted web app cannot see an unclaimed server.
- On Windows or macOS, choose Open Plex… from the Plex tray or menu bar icon; on an unclaimed server this starts the claim.
- On Linux, NAS or other devices, open
http://localhost:32400/webon the server itself, orhttp://server-IP-address:32400/webfrom another computer on the same network. - Sign in, then go to Settings > Server > General and claim the server.
"You do not have permission to access this server"
The server is signed in to an old or different account, or its sign-in token became invalid after a password change.
- Quit Plex Media Server.
- Back up, then delete the
PlexOnlineHome,PlexOnlineMail,PlexOnlineTokenandPlexOnlineUsernameentries: in the registry keyHKEY_CURRENT_USER\Software\Plex, Inc.\Plex Media Serveron Windows, or inPreferences.xmlin the data folder on Linux. - On macOS, run
defaults delete com.plexapp.plexmediaserver PlexOnlineTokenand the same command for the other three entries. - Start the server again and claim it with the right account. Libraries are not lost.
Server cannot sign in to your Plex account or be claimed
Usually a wrong system clock, or security software, a proxy or a VPN interfering with Plex's security certificate.
- Set the server's date and time to update automatically from the internet.
- Turn off any VPN or proxy on the server and try claiming again.
- If security software is the cause, add Plex Media Server as an allowed application in it, rather than leaving it switched off.
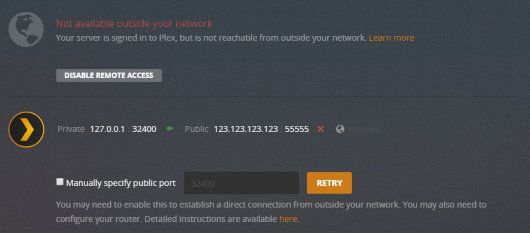
Remote access says "Not available outside your network"
Automatic port mapping failed, a manual forward is wrong, or the connection sits behind double NAT or CGNAT.
- Turn on UPnP or NAT-PMP in the router, or toggle it off and on, then select Retry.
- If you forwarded a port by hand, confirm it points to internal TCP port 32400 on the server's current local IP and that Manually specify public port is ticked.
- Check for double NAT or CGNAT as described in Step 9.
- If your network uses jumbo frames (MTU above 1500), switch back to 1500.
Library is empty or some files are not found
Wrong naming, disc-image or archive formats, missing folder permissions, or a scan that ran while files were still copying.
- Rename files to the patterns in Step 1. Movie scanners skip files named like TV episodes, and TV scanners skip everything else.
- Make sure the account Plex runs under can read the folders: your logged-in user on Windows and macOS,
plexon Linux and most NAS installs. - Copy new files to a staging folder first, then move them into the library folder once the copy finishes.
- Select … next to the library in the sidebar and choose Scan Library Files.
Recommended Plex Settings for Most Home Users
For a household with one server and a few viewers, these are the values to set once and leave.
| Setting | Recommended value |
|---|---|
| Friendly name | A clear name such as Home Server |
| Server version updates | Automatically during scheduled maintenance |
| Remote access | On only if someone watches away from home |
| Transcoder quality | Automatic |
| Hardware acceleration | On, with Plex Pass and a supported GPU |
| Backup database every three days | On (the default) |
| Update all libraries during maintenance | On (off by default), as a nightly safety scan |
| App local quality | Maximum |
| App remote quality | Just below the server's upload speed |
Frequently Asked Questions
How does Plex Media Server work?
Plex Media Server runs on the computer or NAS that stores your files. It scans your folders, matches each title to online information, and streams to Plex apps, converting (transcoding) any file a device cannot play directly.
How do I set up Plex Media Server on Windows 11?
Windows 11 is supported because Plex requires Windows 10 version 1607 or newer. Download the Windows installer from plex.tv, run it, select Launch, then sign in and finish the setup wizard. Windows 11 on ARM processors is not supported; the server needs an Intel or AMD CPU.
How do I set up Plex Media Server on Synology?
Install Plex Media Server from Synology's Package Center or with the Synology package from the Plex Downloads page. Then open http://NAS-IP-address:32400/web to claim the server and add libraries. ARM-based Synology models cannot transcode video.
How do I set up Plex Media Server on QNAP?
Install Plex Media Server through QNAP's own app store or with the QNAP package from the Plex Downloads page. Then open http://NAS-IP-address:32400/web, sign in and run the setup wizard. Check Plex's NAS Compatibility List for your model first.
How do I set up Plex Media Server on TrueNAS?
Plex does not offer an official TrueNAS or FreeNAS package. Plex's support page describes a third-party plugin, built from the official FreeBSD package, installed from the Plugins section of the FreeNAS web interface. Once it runs, choose Manage to open Plex Web App and claim the server.
How do I add a media server to Plex?
Install Plex Media Server on the computer that holds your media, then sign it in to your Plex account through Settings > Server > General or the setup wizard. Once it is claimed, the server appears automatically in every Plex app signed in to the same account.
How do I log in to Plex Media Server?
You sign in through Plex Web App rather than the server itself. Go to app.plex.tv/desktop, or open http://server-IP-address:32400/web on your home network, and sign in with the Plex account that owns the server. The server then appears in the sidebar.
How do I open or launch Plex Media Server?
On Windows, start Plex Media Server from the Start menu; on a Mac, double-click it in Applications; on Linux, run sudo systemctl start plexmediaserver. Then choose Open Plex from its tray or menu bar icon, or browse to port 32400/web.
How do I access Plex Media Server from another device?
Install the Plex app on the device and sign in with the same account, or open a browser on the same network and go to http://server-IP-address:32400/web. Access from outside your home also needs remote access enabled, and remote video playback needs Plex Pass or Remote Watch Pass.
How do I build a Plex media server?
Any modern Windows, Mac or Linux computer with an Intel Core i3-class CPU and 4 GB of RAM can run Plex. Add enough storage for your library, and pick a faster CPU or a GPU if several people will stream at once.