To change printer default settings in Windows 11, open Settings > Bluetooth & devices > Printers & scanners, select the printer, then choose Set as default to make it the default printer or Printing preferences to change its default paper, colour and duplex options.
Windows 10 uses Settings > Devices > Printers & scanners instead. This guide covers both meanings of "default settings", both Windows versions, command-line and all-users options, and fixes for defaults that keep changing or will not save.
The fastest way to change printer default settings in Windows 11
These steps set the default printer and its default print options in one pass. Skip steps 2 to 4 if you only want different paper, colour or duplex settings.
- Select Start > Settings > Bluetooth & devices > Printers & scanners.
- Under Printer preferences, turn Let Windows manage my default printer off.
- Select the printer you want from the list.
- Select Set as default. The printer's status changes to Default.
- On the same printer page, select Printing preferences.
- Change the paper size, colour, two-sided or quality options on the driver's tabs, then select OK.
On Windows 10, open Start > Settings > Devices > Printers & scanners, select the printer, and use Manage to reach the same two controls.
Decide which default printer setting you actually need to change
"Default printer settings" covers two separate things in Windows. One is which printer receives your jobs. The other is the options that printer uses when an app does not ask for something else. Match your goal to a row.
| What you want | Change this | Where |
|---|---|---|
| Jobs go to the wrong printer unless you pick one each time | The default printer | Printers & scanners > printer > Set as default, with Let Windows manage my default printer off |
| The default printer switches by itself | The Let Windows manage my default printer option | Turn it off on the Printers & scanners page |
| Every print should be black and white, double-sided, or a different paper size | Printing preferences | Printer page > Printing preferences (Windows 11) or Manage > Printing preferences (Windows 10) |
| Sharing, ports, the driver, or the printer's installed hardware options | Printer properties | Printer page > Printer properties (Windows 11) or Manage > Printer properties (Windows 10) |
| One document needs different settings this time only | The app's print dialog | In Word, File > Print > Settings |
| The same defaults for every user of a PC | The printer's global defaults | Set-PrintConfiguration in an administrator PowerShell window |
Printing preferences are your own defaults. Microsoft's printing documentation calls them per-user defaults, stored in your profile. Global defaults for everyone on the PC are set by an administrator.
Change the default printer in Windows 11
Windows 11 hides the Set as default button while it manages the default printer for you, so the switch comes first.
- Press Win + I to open Settings.
- Select Bluetooth & devices > Printers & scanners.
- Scroll to Printer preferences and turn Let Windows manage my default printer off.
- Scroll back up and select the printer you want as the default.
- Select Set as default.
- Go back to Printers & scanners and confirm the word Default appears under that printer's name.
To let Windows pick instead, turn Let Windows manage my default printer on. Windows then uses the printer you used most recently. On a laptop, Microsoft notes the default can follow the last printer used at each location.
Change the default printer in Windows 10
Windows 10 shows the same option as a check box rather than a switch.
- Select Start > Settings > Devices > Printers & scanners.
- Clear the Let Windows manage my default printer check box.
- Select the printer you want, then select Manage.
- Next to Printer status, select Set as default.
Another Windows 10 route: select the printer, select Open queue, open the Printer menu and select Set As Default Printer. Clear Pause Printing and Use Printer Offline there if either is ticked.
Change default printing preferences in Windows 11
Printing preferences come from the printer driver, so the tabs and labels differ between an HP, Canon, Epson, Brother or Windows built-in driver. The route into the dialog is the same for all of them.
- Select Start > Settings > Bluetooth & devices > Printers & scanners.
- Select the printer whose defaults you want to change.
- Select Printing preferences.
- Look through the driver's tabs for paper size, paper type, colour, two-sided printing and print quality.
- Change the values you want as your new defaults.
- Select Apply if the dialog has it, then select OK.
Microsoft's print quality guidance applies here too: set quality to Normal or Best, turn off any Economy, Draft or Toner saver mode you do not want, and match the paper type to the paper loaded.
Change default printing preferences in Windows 10
On Windows 10 the printer's controls sit one level deeper, behind Manage.
- Select Start > Settings > Devices > Printers & scanners.
- Select the printer, then select Manage.
- Select Printing preferences.
- Change paper size, paper type, colour, two-sided and quality options on the driver's tabs.
- Select OK to save them as your defaults.
Use Control Panel for more printer settings
The classic Devices and Printers window is still reachable from Settings. Use it when you prefer right-click menus or a driver adds options there.
- On Windows 11, open Settings > Bluetooth & devices > Printers & scanners, select the printer, then select More devices and printer settings.
- On Windows 10, open Settings > Devices and select Devices and printers.
- Right-click the printer icon and select Printing preferences to change your default print options.
- Select the Advanced button if the Printing Preferences dialog shows one, to reach the driver's advanced options.
- Select OK in each dialog to save.
Make black-and-white, double-sided, or a paper size the default
Each of these is a Printing preferences setting. The exact label depends on your driver, so use the second column as a guide to what to look for, not a guaranteed name. The third column changes the same default for all users from PowerShell.
| Default you want | What to look for in Printing preferences | PowerShell parameter (admin) |
|---|---|---|
| Black-and-white or greyscale printing | A colour option set to grayscale, black and white, or black ink only | -Color $false |
| Double-sided printing | A two-sided or duplex option, set to flip on long edge or short edge | -DuplexingMode TwoSidedLongEdge or TwoSidedShortEdge |
| One-sided printing again | The two-sided option set to none or one-sided | -DuplexingMode OneSided |
| Paper size such as Letter or A4 | A paper size or document size list | -PaperSize Letter or -PaperSize A4 |
| Paper tray | A paper source or tray list | No parameter; set it in the driver |
| Media type such as photo or envelope | A paper type or media type list | No parameter; set it in the driver |
| Collated copies | A collate check box | -Collate $true |
If no two-sided option appears at all, check the printer manual or the manufacturer's site to confirm the model can print on both sides, then update the driver.
Change the default printer using PowerShell or Command Prompt
Use this for scripts, remote sessions, or a PC where the Settings page is hard to reach. Replace Printer name with the name exactly as Windows shows it. Run Get-Printer in PowerShell to list the names; it does not need administrator rights.
rundll32 printui.dll,PrintUIEntry /y /n "Printer name"printui.dll,PrintUIEntry runs the Windows printer configuration functions. /y sets the default printer and /n names the printer. PrintUIEntry is case sensitive. In PowerShell, Invoke-CimMethod -InputObject (Get-CimInstance -ClassName Win32_Printer -Filter "Name='Printer name'") -MethodName SetDefaultPrinter does the same through the documented Win32_Printer SetDefaultPrinter method, which returns 0 on success.
You should see: Settings shows Default under the printer. In PowerShell, Get-CimInstance -ClassName Win32_Printer -Filter "Default=True" returns only that printer.
Turn Let Windows manage my default printer off first, or Windows can move the default to the next printer you use.
To open one printer's Printing preferences straight from a command line, run rundll32 printui.dll,PrintUIEntry /e /n "Printer name".
Change default printer settings for all users with PowerShell or Print Management
Set-PrintConfiguration changes a printer's own default colour, duplex, paper size and collate settings, which every user starts from. It needs an administrator PowerShell window.
Print Management is the console administrators use for printers, drivers and print servers. Microsoft lists it as the Print Management Console feature on demand for Windows 10 version 2004 and later. The PowerShell cmdlet below changes the same printer defaults without opening the console.
Set-PrintConfiguration -PrinterName "Printer name" -Color $false -DuplexingMode TwoSidedLongEdge -PaperSize Letter-Color $false makes greyscale the default, -DuplexingMode accepts OneSided, TwoSidedLongEdge or TwoSidedShortEdge, and -PaperSize takes values such as Letter, Legal or A4. Wildcards are not accepted in the printer name. Use only the parameters you want to change.
You should see: Get-PrintConfiguration -PrinterName "Printer name" lists the new Color, DuplexingMode and PaperSize values. It runs without administrator rights.
A user who has already changed their own Printing preferences keeps those per-user values, so check that user's preferences if a new global default does not seem to apply.
Set printer options from an app for one document
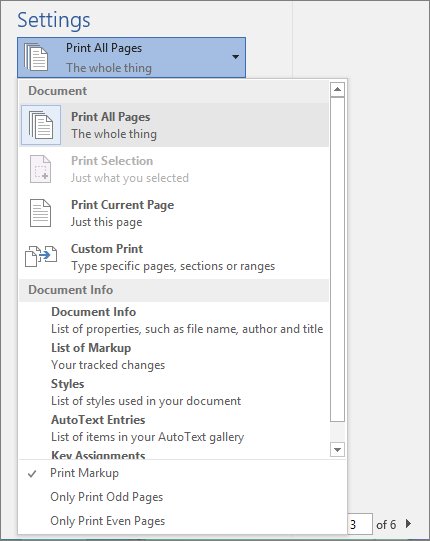
An app's print screen overrides your defaults for the job you are sending. Use it for one-off changes and keep Printing preferences for the settings you want every time. Word is the example here.
- In Word, select File > Print.
- Choose the printer from the Printer list if it is not the one you want.
- Under Settings, open Print One Sided and select Print on Both Sides for automatic duplex, or Manually Print on Both Sides if the printer cannot flip pages.
- Under Settings, choose the colour printing option if the printer offers colour, black and white, or grayscale.
- Select Print.
If Print on Both Sides is missing, Word is telling you the installed driver is not set up for automatic duplex printing.
Quick checklist: confirm the new defaults took effect
- Open Printers & scanners and confirm Default appears under the printer you chose.
- Confirm Let Windows manage my default printer is still off after a restart.
- Reopen Printing preferences and check that paper size, colour and two-sided values are the ones you saved.
- Open Notepad, press Ctrl + P, and check that the new default printer is preselected.
- Print a short test document and check the output for colour, sides and paper size.
- For all-user changes, run
Get-PrintConfiguration -PrinterName "Printer name"and read the values.
Fix printer default settings that change, will not save, or cannot be changed
Find the symptom that matches, then work through the fix under it.
Windows keeps changing your default printer
Let Windows manage my default printer is on, so Windows makes the most recently used printer the default.
- Open Settings > Bluetooth & devices > Printers & scanners (Windows 11) or Settings > Devices > Printers & scanners (Windows 10).
- Turn Let Windows manage my default printer off, or clear the check box on Windows 10.
- Select your printer and select Set as default again.
- Remove duplicate or unused printer entries: select the extra printer, then Remove (Windows 11) or Remove device (Windows 10), and confirm with Yes.
- On a work PC, ask IT whether the Turn off Windows default printer management policy is set to Disabled, which forces Windows to manage the default.
The Set as default button is missing, or you cannot change the default printer
The button stays hidden while Windows manages the default, and an administrator policy can control that option on managed PCs.
- Turn Let Windows manage my default printer off on the Printers & scanners page.
- Select the printer again; Set as default now appears.
- On Pro, Enterprise or Education editions of Windows 10 or 11, an administrator can enable Turn off Windows default printer management under User Configuration > Administrative Templates > Control Panel > Printers.
- If the PC belongs to an organisation, contact the administrator rather than editing policy yourself.
Printing preferences do not save or reset later
Preferences are saved per user and per printer entry, so a different printer entry, a different account, or an app's own settings can make them look lost.
- Check you opened Printing preferences for the exact printer entry you print to, not a duplicate with a similar name.
- Make the change, select Apply if shown, then OK, and reopen the dialog to confirm it held.
- Sign in with the account that prints; another user's preferences do not carry over.
- Update the driver through Windows Update, which Microsoft recommends for printer drivers, or from the manufacturer's support site.
- If a print server or administrator pushes defaults, ask them to set the change with
Set-PrintConfiguration.
One app ignores the Windows printer defaults
Many apps keep their own print settings or send their own options with each job, which override Printing preferences for that job.
- Open the app's print dialog and check the printer, sides, colour and paper settings shown there.
- Change them in the app to match your defaults, then print.
- In Word, check File > Print > Settings for Print One Sided or Print on Both Sides.
- Test with Notepad; if Notepad follows your defaults, the app's own setting is the cause.
Printer options are greyed out or missing
The installed driver does not expose the option, the printer does not support it, or the setting needs administrator rights.
- Install the latest driver through Windows Update or from the manufacturer's support site.
- Remove the printer and add it again from Printers & scanners so Windows installs a fresh driver.
- Approve the User Account Control prompt with an administrator account when a printer properties change asks for one.
- On a company network, ask the network administrator whether printer settings are restricted.
Frequently asked questions
How do I change printer default settings?
Open Settings > Bluetooth & devices > Printers & scanners on Windows 11, or Settings > Devices > Printers & scanners on Windows 10. Select the printer, open Printing preferences, change paper, colour or two-sided options, and select OK. Those values become your defaults for that printer.
How do I change printer default settings on a PC?
On a Windows PC, printer defaults live in the printer's Printing preferences dialog. Reach it from Printers & scanners in Settings, or right-click the printer in Devices and Printers. Changes there apply to every print job unless an app chooses different options.
How do I change my default printer in Windows 11?
Open Settings > Bluetooth & devices > Printers & scanners and turn Let Windows manage my default printer off. Select the printer you want and select Set as default. The word Default then appears under its name.
How do I change the default printer settings in Windows 10?
Open Settings > Devices > Printers & scanners, select the printer, and select Manage. Choose Set as default to make it the default printer, or Printing preferences to change its default paper size, colour, quality and two-sided options.
How do I change HP printer default settings?
HP printers use the same Windows route as any other printer. Open Printers & scanners, select the HP printer, and open Printing preferences. The tabs inside come from the HP driver, so look there for paper, colour, quality and two-sided options, then select OK.
How do I make printer settings the default instead of choosing them every time?
Set the options in Printing preferences rather than in an app's print dialog. App dialog changes apply to one job, while Printing preferences are saved as your default for that printer. For every user on the PC, an administrator can run Set-PrintConfiguration.
How do I change printer default settings to one-sided?
Open the printer's Printing preferences and set the two-sided or duplex option to none or one-sided, then select OK. For all users, run Set-PrintConfiguration -PrinterName "Printer name" -DuplexingMode OneSided in an administrator PowerShell window.
How do I change the default printer driver settings?
Default driver settings are the values in Printing preferences, which apply to your account. Hardware and driver-level options such as ports, sharing and installed accessories are in Printer properties. Global defaults for all users are set with Set-PrintConfiguration by an administrator.
Why does my default printer keep changing?
Let Windows manage my default printer is turned on, so Windows makes the most recently used printer the default. Turn it off in Printers & scanners, then select your printer and choose Set as default. The choice then stays until you change it.