Open Control Panel > Hardware and Sound > Power Options to switch power plans, change their settings, or create a custom power plan in Windows 11 and Windows 10.
This guide covers every route into Power Options, the advanced settings worth editing, the Windows 11 power mode, powercfg commands for creating and backing up plans, and fixes when a power plan will not change.
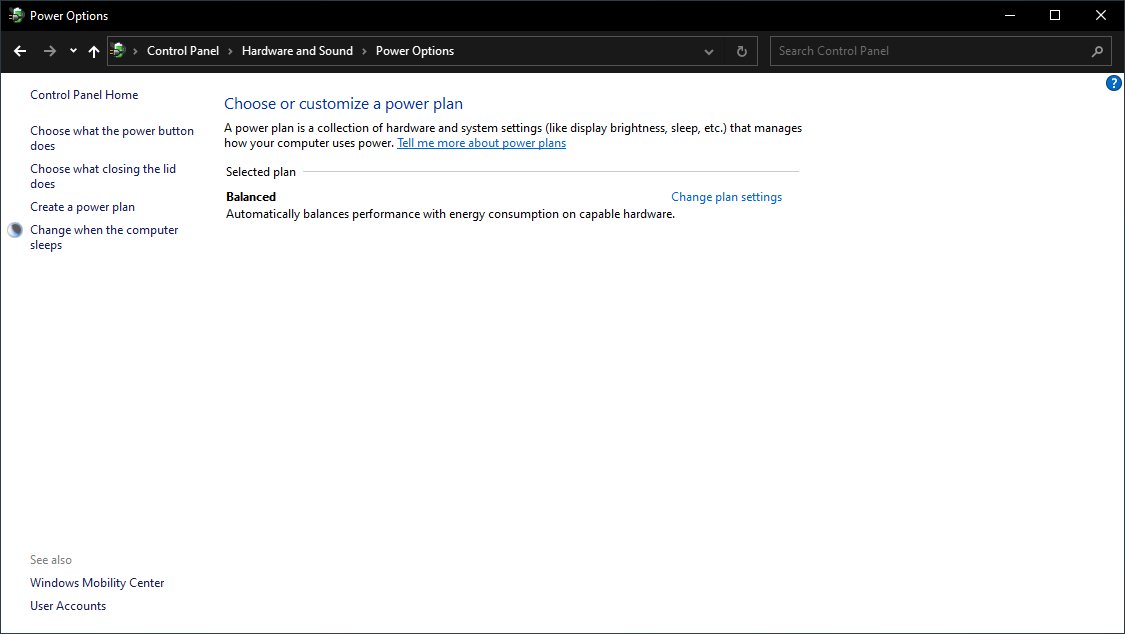
Change power plan, settings & options; create custom power plans in Windows 11/10
The same Power Options window exists in Windows 11 and Windows 10, so these steps work on both.
- Press Win + R, type
control /name Microsoft.PowerOptionsand press Enter. - Under Select a power plan, pick the plan you want to use; it becomes active straight away.
- Select Change plan settings next to that plan to set when the display turns off and when the PC sleeps.
- Select Change advanced power settings to edit options such as USB, sleep and processor power management, then select Apply and OK.
- Select Create a power plan in the left pane when you want a new plan based on an existing one.
On Windows 11, the Power mode setting in Settings changes performance on top of the active plan, covered below.
Understanding power plans in Windows
A power plan, also called a power scheme, is a set of hardware and system settings that controls how the PC uses and saves power. Only one plan is active at a time.
Windows defines three default plans. Many laptops show only Balanced, because Modern Standby devices allow only Balanced or a plan built from it.
| Power plan | What it does | GUID |
|---|---|---|
| Balanced | Automatically balances performance and power use according to demand; the default plan | 381b4222-f694-41f0-9685-ff5bb260df2e |
| Power saver | Delivers reduced performance to increase power savings | a1841308-3541-4fab-bc81-f71556f20b4a |
| High performance | Delivers maximum performance at the cost of higher power use | 8c5e7fda-e8bf-4a96-9a85-a6e23a8c635c |
| Custom plan | A copy of one of the plans above with your own name and settings | A new GUID created by Windows |
The GUIDs matter when you manage plans from the command line, because powercfg identifies each plan by its GUID.
How to access power plans in Windows 10 and Windows 11
Power Options has several entry points. Pick the one that suits how you work.
| Route | Windows 11 | Windows 10 |
|---|---|---|
| Control Panel | Control Panel > Hardware and Sound > Power Options | Control Panel > Hardware and Sound > Power Options |
| Run box | control /name Microsoft.PowerOptions |
control /name Microsoft.PowerOptions |
| Edit the active plan directly | control /name Microsoft.PowerOptions /page pagePlanSettings |
control /name Microsoft.PowerOptions /page pagePlanSettings |
| Advanced settings dialog | control powercfg.cpl,,3 |
control powercfg.cpl,,3 |
| Create a power plan page | control /name Microsoft.PowerOptions /page pageCreateNewPlan |
control /name Microsoft.PowerOptions /page pageCreateNewPlan |
| Settings app | Settings > System > Power & battery (power mode and timeouts) | Settings > System > Power & sleep > Additional power settings |
| Search | Type edit power plan in Start search and select Edit power plan | Type edit power plan in the taskbar search box |
Changing existing power plans in Windows
Each plan keeps separate values for when the PC runs on battery and when it is plugged in. Desktop PCs show only the plugged-in values.
- Open Power Options with
control /name Microsoft.PowerOptions. - Select Change plan settings next to the plan you want to edit.
- Set when the display turns off and when the computer sleeps, for battery power and for plugged-in power.
- Save the changes to update the basic timeouts.
- Select Change plan settings again, then Change advanced power settings.
- Expand a category, such as Sleep or USB settings, and change the On battery or Plugged in value.
- Select Apply and OK.
To change which plan is active rather than edit it, select a different plan under Select a power plan. On Windows 10, select Show additional plans to reveal High performance when it is hidden.
Power Options edit plan settings: advanced settings explained
The advanced dialog holds dozens of settings, and most of them depend on your hardware. These are the ones people change most often.
| Advanced setting | Where it is | What changing it does |
|---|---|---|
| USB selective suspend setting | USB settings | Disabled stops Windows from cutting power to idle USB devices |
| Allow wake timers | Sleep | Controls whether scheduled tasks, such as updates, can wake the PC |
| Minimum and Maximum processor state | Processor power management | Sets the lowest and highest CPU performance level the plan allows |
| Link State Power Management | PCI Express | Sets no, moderate or maximum power savings for PCIe devices |
| Hard disk timeout | Hard disk | Sets how long an idle disk stays powered before Windows turns it off |
| Hibernate timeout | Sleep | Moves a sleeping PC into hibernation after the set time, if hibernation is on |
Settings for the power button and lid live in a separate page. You can customize the power button settings from Choose what the power buttons do in the left pane.
If a USB device keeps disconnecting, you can also change USB power settings in Device Manager as well as in the plan.
Creating a custom power plan in Windows 10/11
A custom plan starts as a copy of Balanced, Power saver or High performance. Windows then lists it under Select a power plan with the name you give it.
- Open Control Panel, select Hardware and Sound, then Power Options.
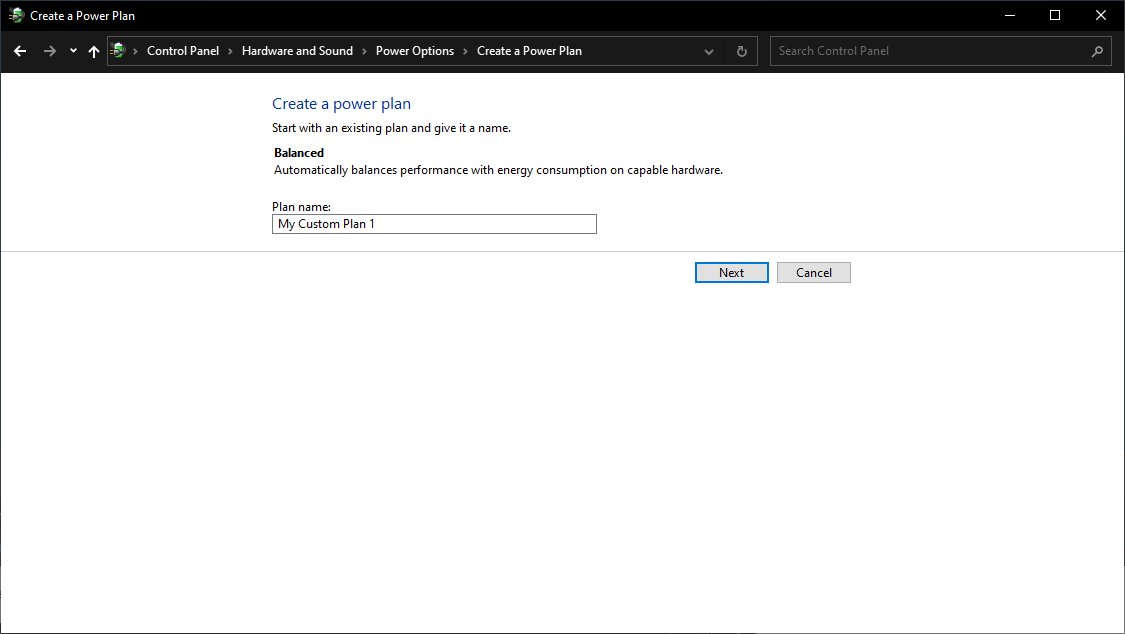
- Select Create a power plan in the left pane.
- Choose the existing plan to base the new one on.
- Type a name for the plan, such as Presentation or Gaming, and continue to the next screen.
- Set the display and sleep timeouts for the new plan.
- Create the plan; Windows makes it active.
- Select Change plan settings > Change advanced power settings to fine-tune it.
On many Windows 11 laptops, only Balanced is available to copy, though you can still add the High performance plan with powercfg. A plan made from Balanced still works with the Power mode setting.
Create and switch power plans with powercfg in Windows 11/10
Use powercfg when you want to script a plan or work on a PC without opening Control Panel. Run these commands in Terminal or Command Prompt.
powercfg /duplicatescheme 381b4222-f694-41f0-9685-ff5bb260df2eCopies the Balanced plan into a new custom plan and prints the new plan's GUID. Rename it with powercfg /changename <new GUID> "Work plan", then make it active with powercfg /setactive <new GUID>.
You should see: A line such as Power Scheme GUID: … (Balanced) with a new GUID that differs from the original.
Run powercfg /list to see every plan with its GUID. The active plan carries an asterisk.
Change basic timeouts in the active plan with powercfg /change monitor-timeout-ac 10 or powercfg /change standby-timeout-dc 15. The value is in minutes, and the other names are monitor-timeout-dc, standby-timeout-ac, disk-timeout-ac, disk-timeout-dc, hibernate-timeout-ac and hibernate-timeout-dc.
Advanced tips and techniques for power plans: export, import and AC/DC values
Export a plan before you change it and you can restore it at any time, or copy it to another PC. Open Terminal as administrator for these commands.
powercfg /export C:\PowerPlans\work.pow 381b4222-f694-41f0-9685-ff5bb260df2eSaves the plan with that GUID to a .pow file. Create the C:\PowerPlans folder first. Restore it on any PC with powercfg /import C:\PowerPlans\work.pow, which adds it as a new plan with a new GUID.
You should see: The work.pow file appears in C:\PowerPlans, and an imported plan shows up in powercfg /list.
To change an advanced setting from the command line, run powercfg /query to find the subgroup and setting GUIDs and their allowed values. Then use powercfg /setacvalueindex for plugged-in power or powercfg /setdcvalueindex for battery power, followed by the plan, subgroup and setting GUIDs and the value.
Run powercfg /aliases to see short names you can use in place of many GUIDs.
Choose power plan settings with Power mode in Windows 11
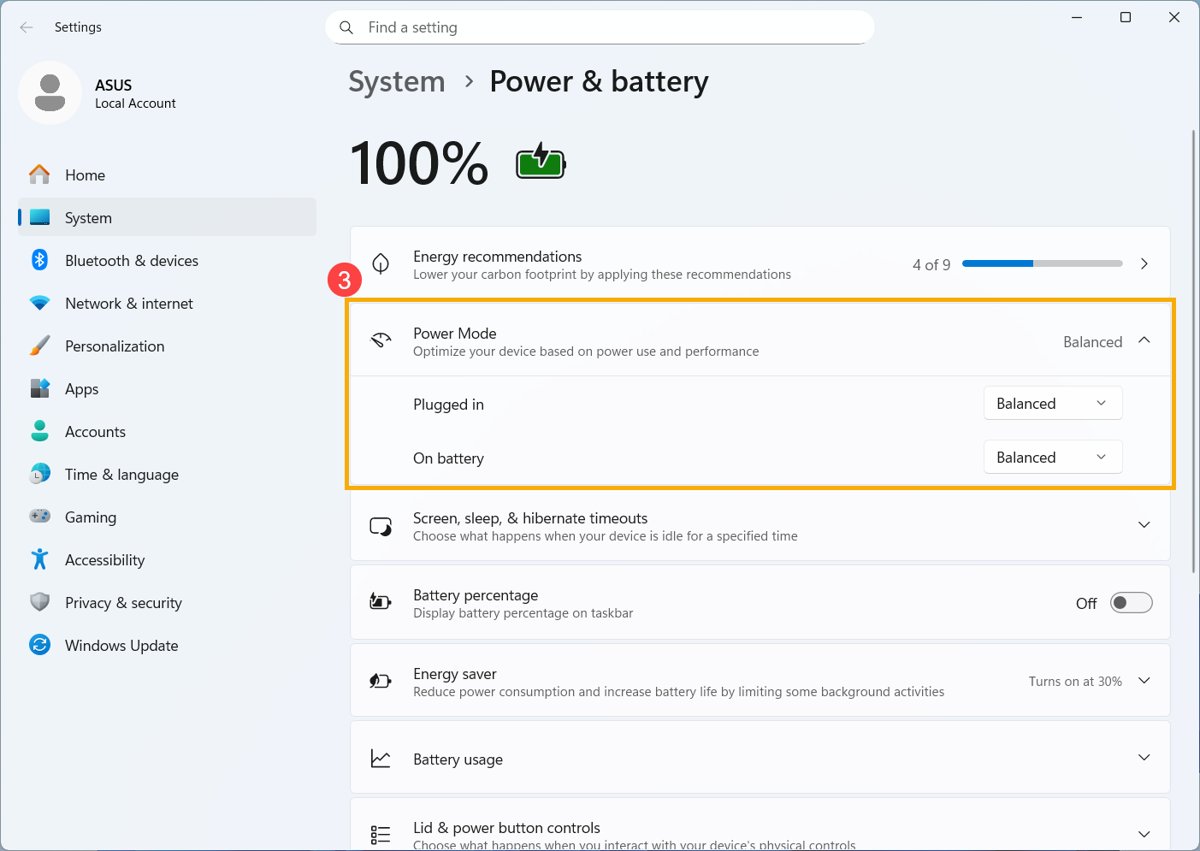
Windows 11 adds Power mode, which tunes performance against battery life without changing the plan. It appears only while Balanced, or a plan created from Balanced, is active.
- Open Start > Settings > System > Power & battery.
- Find Power mode.
- Choose Best power efficiency, Balanced or Best performance for Plugged in and On battery.
- On Windows 10, select the battery icon on the taskbar and drag the slider between Best battery life and Best performance instead.
Power mode changes performance settings only. Display and sleep timeouts still come from the plan, or from Screen, sleep, & hibernate timeouts on the same Windows 11 page.
The Windows 10 slider needs version 1703 or later and depends on the hardware maker. For more battery options, customize Windows 11 battery settings on the same page.
How to see which power plan is active in Windows
powercfg /getactiveschemePrints the GUID and name of the plan Windows is using right now.
You should see: Power Scheme GUID: 381b4222-f694-41f0-9685-ff5bb260df2e (Balanced), or the name of your custom plan.
In Control Panel, the active plan is the one selected under Select a power plan. In the output of powercfg /list, it is the plan marked with an asterisk.
Delete a custom power plan in Windows 11/10
Remove a custom plan you no longer use so it stops cluttering the plan list. Switch to another plan before you delete it.
- Run
powercfg /listand copy the GUID of the plan you want to remove. - Make another plan active, for example
powercfg /setactive 381b4222-f694-41f0-9685-ff5bb260df2efor Balanced. - Run
powercfg /deletefollowed by the GUID you copied. - Run
powercfg /listagain to check the plan is gone. - Restore an exported copy later with
powercfg /importif you need it back.
Troubleshooting common issues with power plan settings
Why can't I change power plan settings or power mode?
A custom or High performance plan is active, and the Windows 11 power mode only works with Balanced or a plan built from it. On work PCs, Group Policy can also lock power settings.
- Open Control Panel > System and Security > Power Options.
- Select Balanced under Select a power plan.
- Reopen Settings > System > Power & battery and change Power mode.
- On a work or school PC, ask your IT admin if the settings stay locked.
Power plan not changing to High performance
The plan is hidden, or the PC uses Modern Standby, which allows only Balanced and plans derived from it.
- On Windows 10, open Power Options and select Show additional plans.
- Run
powercfg /listto see every plan Windows has. - If High performance is not listed, run
powercfg /duplicatescheme 8c5e7fda-e8bf-4a96-9a85-a6e23a8c635cfrom an administrator Terminal. - On a Modern Standby laptop, use Best performance in Power mode instead.
Power button and lid options are greyed out
Those system-wide options need administrator rights to change.
- Open Power Options and select Choose what the power buttons do.
- Select Change settings that are currently unavailable and approve the prompt.
- Change the options, then save the changes.
PC wakes up on its own after sleep
A wake timer in the active plan lets scheduled tasks wake the PC.
- Run
powercfg /waketimersfrom an administrator Terminal to see which task set a timer. - Open Change advanced power settings for the active plan.
- Expand Sleep > Allow wake timers and set it to Disable.
- Select Apply and OK.
Energy saver, hibernate and battery reports sit outside power plans, among the wider Windows power management settings.
Best power plan settings for laptops and desktops
These recommendations follow how Microsoft describes each plan. Balanced suits most PCs, and the other plans trade battery life against speed.
Keep Balanced active on a laptop and use Power mode to switch between battery life and speed; use High performance or a custom copy only on a desktop that runs heavy workloads. Balanced is the only plan that supports Power mode and the only one Modern Standby laptops allow, while High performance keeps the processor at full speed and raises power use even when the PC is idle. Export a plan before you edit it so you can undo the change.
Power plan settings FAQ
How do I change my power plan?
Open Control Panel > Hardware and Sound > Power Options and select the plan you want under Select a power plan. It becomes active immediately. You can also run powercfg /setactive followed by the plan's GUID.
How to open power plan settings?
Press Win + R, type control /name Microsoft.PowerOptions and press Enter, then select Change plan settings. To open the active plan's settings directly, add /page pagePlanSettings to that command.
How to change power plan on PC?
On any Windows 11 or Windows 10 PC, open Power Options from Control Panel and pick a plan. On Windows 11 you can also change Power mode in Settings > System > Power & battery while Balanced is active.
Why can't I change power plan settings?
A custom or High performance plan may be active, which hides the Windows 11 power mode. Select Balanced in Power Options. Power button and lid settings also need Change settings that are currently unavailable.
How do I create a custom power plan in Windows 11?
Open Control Panel > Hardware and Sound > Power Options and select Create a power plan. Choose a plan to base it on, name it, set the display and sleep timeouts, and create it. Windows makes the new plan active.
How do I change the default power plan?
The plan you select under Select a power plan stays active until you choose another, so it acts as the default. From the command line, run powercfg /setactive with the plan's GUID.
Why is only the Balanced power plan showing?
PCs that use Modern Standby allow only Balanced or plans created from it. On Windows 10, Show additional plans can reveal High performance on PCs that support it.
Can I back up a power plan?
Yes. Run powercfg /export with a file path and the plan's GUID to save it as a .pow file. Restore it later, or on another PC, with powercfg /import and the same file path.