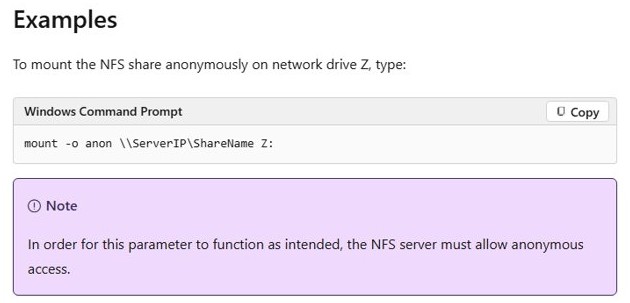
Install Client for NFS in Windows, then run mount -o anon \\ServerIP\ShareName Z: in Command Prompt to mount an NFS share to drive Z.
This guide covers enabling the client on Windows 11, Windows 10 and Windows Server, mounting from File Explorer, PowerShell or CMD, and mapping Windows users to Linux accounts.
How to mount an NFS share in Windows with the mount command
These steps assume the NFS server allows anonymous access. Replace ServerIP and ShareName with your server address and export name.
- Turn on Client for NFS in Windows features, as described in the next section.
- Open Command Prompt. It does not need to be elevated.
- Run
mount -o anon \\ServerIP\ShareName Z:to mount the share as drive Z. - Open Z: in File Explorer to confirm that the files on the export appear.
The mount command also accepts the ServerName:/ShareName form, and * in place of a drive letter uses the first available letter. If the server is at another site, you can set up a built-in VPN connection to reach it first.
What NFS versions does the Windows NFS client support?
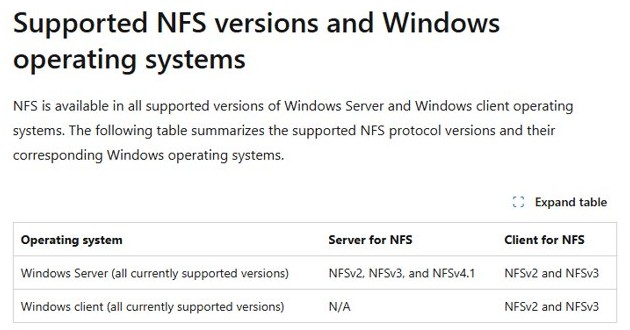
Client for NFS speaks NFSv2 and NFSv3 only, on every currently supported Windows release. Check that your server offers one of those versions before you troubleshoot anything else.
| Windows edition | Client for NFS | Server for NFS |
|---|---|---|
| Windows client (currently supported versions) | NFSv2 and NFSv3 | Not available |
| Windows Server (currently supported versions) | NFSv2 and NFSv3 | NFSv2, NFSv3 and NFSv4.1 |
A Windows client cannot mount an NFSv4.1 volume. Enable NFSv3 on the export, or use SMB if the server can present the same data through both protocols.
How to enable an NFS client on Windows
The mount utility exists only after Client for NFS is installed. You need an administrator account to change Windows features.
- Press Windows + R, type
optionalfeaturesand press Enter. - Wait for the Turn Windows features on or off dialog to load.
- Expand the Services for NFS entry.
- Select Client for NFS and click OK.
- Wait for Windows to apply the change, and restart if it asks you to.
- Open Command Prompt and run
mountto check that the command now exists.
On Windows Server, open Server Manager, go to Manage and then Add Roles and Features, and select Client for NFS on the Select features page. If no NFS entry appears in the dialog on a Windows PC, that installation does not offer the component.
Enable Client for NFS with PowerShell on Windows 11 and Windows 10
List the NFS features first and copy the exact names from your own output. Use PowerShell as administrator.
Get-WindowsOptionalFeature -Online | Where-Object FeatureName -like "*NFS*"
Enable-WindowsOptionalFeature -Online -FeatureName <FeatureName> -All
The first line lists every NFS feature on this PC with its state. The second enables the one you name, and -All also enables any parent features it depends on. Repeat it for each client feature in the list, such as ClientForNFS-Infrastructure.
You should see: The feature shows State : Enabled when you run the first line again, and mount runs without an error.
Mount an NFS share on Windows using File Explorer, PowerShell, or CMD
All three routes use the same Client for NFS component, so the choice comes down to options and whether the drive should come back after you sign in again.
| Your situation | Use this | Why |
|---|---|---|
You need mount options such as mtype=hard or fileaccess |
CMD with mount |
It exposes every Client for NFS option |
| You are scripting, or want a saved drive from the shell | PowerShell with mount.exe or New-PSDrive -Persist |
It works inside existing automation |
| You prefer a graphical route and want the drive at each sign-in | File Explorer with Map network drive | Reconnect at sign-in keeps the mapping |
How to mount an NFS share from Command Prompt
This example uses a hard mount, which Microsoft recommends to reduce disruption during server reboots. It also sets default permissions for new files.
mount -o mtype=hard -o fileaccess=764 \\ServerIP\ShareName Z:mtype=hard keeps retrying when the server drops out, and fileaccess=764 gives new files rwx for the owner, rw for the group and r for everyone else. Repeat -o for each option, as Microsoft's Azure NetApp Files examples do.
You should see: Z: appears under This PC, and running mount with no arguments lists the share and its options.
With a hard mount, apps that use the share can appear to stop responding while the NFS server is down, because the client retries until the server returns.
How to mount an NFS share in PowerShell
In PowerShell, plain mount is an alias for New-PSDrive, so it asks for a drive name instead of running the NFS tool. Type mount.exe to reach the NFS command.
mount.exe -o anon \\ServerIP\ShareName Z:
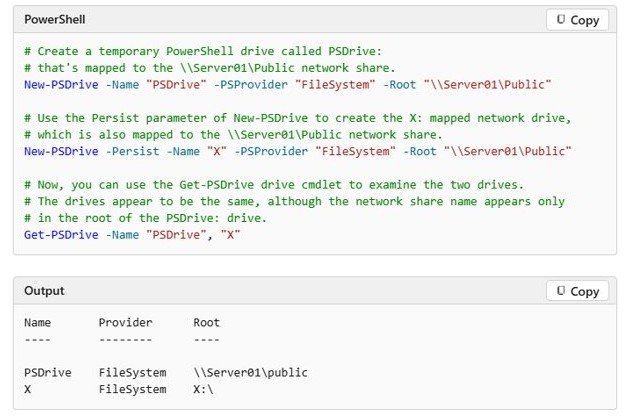
New-PSDrive -Name "Z" -PSProvider "FileSystem" -Root "\\ServerIP\ShareName" -Persist
Run one line or the other, not both. The first calls the NFS mount tool with its options. The second creates a saved Windows mapped drive that File Explorer and other PowerShell sessions can see, but it takes no NFS options.
You should see: Get-ChildItem -Path Z: lists the files on the export.
Without -Persist, New-PSDrive creates a temporary drive known only to that PowerShell session. In a script, add -Scope Global so the drive survives after the script ends.
How to map an NFS share as a network drive in File Explorer
You can map a network drive to an NFS export the same way as a Windows share, once Client for NFS is on.
- Open File Explorer and select This PC in the left pane.
- Select More on the ribbon and choose Map network drive.
- Pick a letter in the Drive list.
- Type
\\ServerIP\ShareNamein the Folder box. - Select Reconnect at sign-in if you want the drive back every time you sign in.
- Select Finish.
If Map network drive is not on the More menu, right-click This PC in the folder pane to find it.
Windows mount command options for NFS shares
| Option | What it does | Default or values |
|---|---|---|
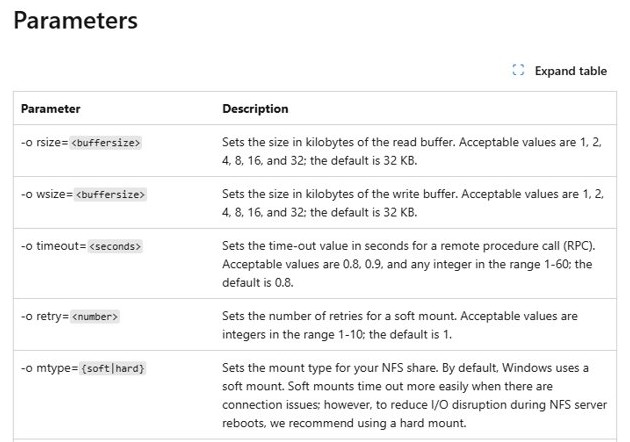
-o mtype=soft or hard |
Sets the mount type. Soft mounts time out more easily, while hard mounts keep retrying | Soft |
-o rsize= and -o wsize= |
Set the read and write buffer sizes in kilobytes | 1, 2, 4, 8, 16 or 32, with 32 as the default |
-o timeout= |
Sets the RPC time-out in seconds | 0.8, 0.9 or 1-60, with 0.8 as the default |
-o retry= |
Sets retries for a soft mount | 1-10, with 1 as the default |
-o fileaccess= |
Sets the default permissions for new files as owner, group and world digits | Three digits, each 0-7 |
-o anon |
Mounts as an anonymous user | The server must allow anonymous access |
-o nolock |
Disables file locking | Locking is on by default |
-o casesensitive |
Forces case-sensitive file lookups on the server | Off unless you set it |
-o lang= |
Sets the language encoding for the share | One value, such as euc-jp, Big5 or Ansi |
-o sec= |
Sets the security mechanism | sys, krb5, krb5i or krb5p |
-u: and -p: |
Supply a user name and password, and * prompts for the password |
A name without a leading backslash counts as a UNIX user name |
sec=sys performs no authentication checks and does not encrypt data. sec=krb5p adds encryption to Kerberos authentication, so use it when the server supports Kerberos and the data is sensitive.
Configure NFS client mapping of Windows users to Linux users/groups
Mapping tells the client which UNIX UID and GID belong to a Windows account, so files on the share get the right owner. A standalone PC can use two local files, and they work on clients and servers alike.
Both files must exist in %SystemRoot%\system32\drivers\etc. The only fields Windows reads are the user name, UID and GID in passwd, and the group name, GID and group list in group.
- Create a file named
passwdwith no extension in%SystemRoot%\system32\drivers\etc. - Copy the matching user line from
/etc/passwdon the Linux server, and change the first field to your Windows account name. - Create a file named
groupin the same folder. - Copy the matching group line from
/etc/groupon the Linux server, and change its name to your Windows group if it differs. - Run
nfsadmin client stop, thennfsadmin client start, in an elevated Command Prompt. - Run
Resolve-NfsMappedIdentity -Id 1000 -AccountType Userwith your own UID to see which account it resolves to. - Mount the share again and check the owner of a new file on the Linux server.
By default, members of BUILTIN\Users can read both files. Mapping events are logged in the ServicesForNfs-Server\IdentityMapping channel in Event Viewer, which is the place to look when a lookup fails.
NFS identity mapping with Active Directory, LDAP or local files
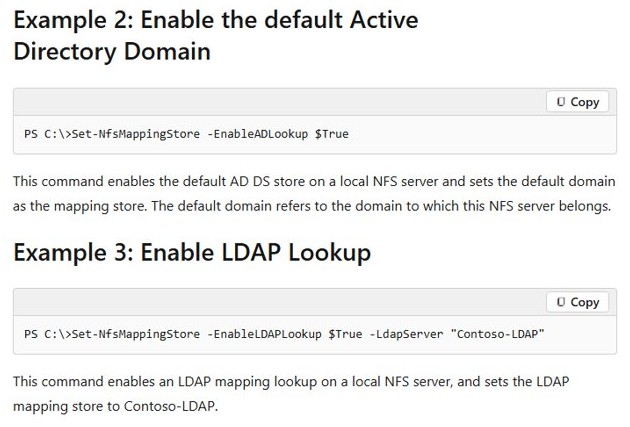
Use a central store when more than a few machines need the same mapping. Active Directory is the source Microsoft recommends in place of the old mapping server.
| Mapping source | Works for Client for NFS | Best fit | How to set it up |
|---|---|---|---|
| Active Directory | Yes | Domain-joined machines | Set-NfsMappingStore -EnableADLookup $True, with uidNumber and gidNumber set on accounts |
| AD LDS or another RFC 2307 LDAP store | Yes | Domain and non-domain machines | Set-NfsMappingStore -EnableLDAPLookup $True -LdapServer "Contoso-LDAP" |
Local passwd and group files |
Yes | Standalone PCs and small setups | Files in %SystemRoot%\system32\drivers\etc |
| User Name Mapping server | Yes, but deprecated | Existing older deployments only | mapadmin manages an existing server |
| Unmapped UNIX User Access | No, Server for NFS only | Servers using AUTH_SYS | Not applicable to a client |
With Active Directory or LDAP, New-NfsMappedIdentity -UserName "JBrown" -UserIdentifier 500 -GroupIdentifier 41 creates a mapping. These cmdlets can only read file-based mappings, so edit the local files by hand.
How to see mounted NFS shares in Windows
- Run
mountwith no arguments in Command Prompt to list each mounted NFS share and its options. - Run
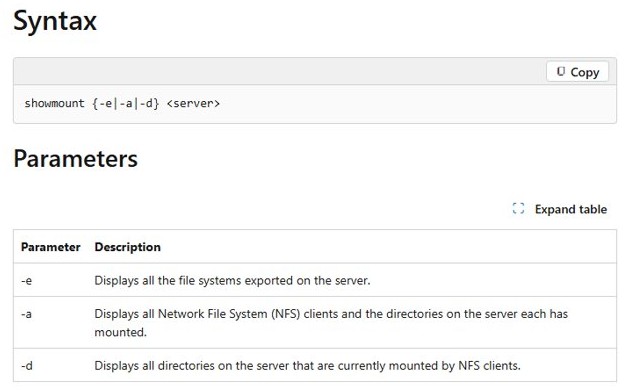
showmount -e ServerIPto display the file systems the server exports. - Run
nfsadmin clientto display the current Client for NFS settings. - Create a test file on the share, then check its owner and mode on the Linux server.
How to unmount an NFS share in Windows
- Close any files and folders open on the drive.
- Run
umount Z:in Command Prompt to remove the drive. - Add
-fto force the unmount if a drive will not disconnect, as inumount -f Z:. - Run
umount -ato remove every NFS-mounted drive at once. - Run
Remove-PSDrive -Name Zin PowerShell if you created the drive withNew-PSDrive.
How to change default NFS client settings in Windows
Change the defaults when every mount on the PC should use the same values. Options on a mount command still apply to that single mount.
- Open Command Prompt as administrator.
- Run
nfsadmin clientto see the current settings. - Run
nfsadmin client config mtype=hardto make hard mounts the default. - Run
nfsadmin client config fileaccess=750to set the default file permissions. - Run
nfsadmin client stop, thennfsadmin client start, and mount the share again.
In PowerShell, Set-NfsClientConfiguration -DefaultAccessMode 755 -ReadBufferSize 64 -WriteBufferSize 64 changes similar settings, and Get-NfsClientConfiguration shows the result. Run nfsadmin client config perf=default to restore the default performance values.
NFS mount not working on Windows
mount is not recognized in Command Prompt
The utility is available only when Client for NFS is installed.
- Turn on Client for NFS in Windows features.
- Restart Windows if it asks you to.
- Open a new Command Prompt and run
mountagain.
mount in PowerShell asks for a name or a root
PowerShell treats mount as an alias for New-PSDrive.
- Press Ctrl + C to cancel the prompt.
- Type
mount.exewith the same options and path.
Windows cannot mount an NFSv4.1 export
Client for NFS supports NFSv2 and NFSv3 only.
- Enable NFSv3 for the export on the server.
- Run
showmount -e ServerIPto confirm that the export is listed. - Mount the share again.
Anonymous NFS mount fails or files are read-only
-o anon works only when the server allows anonymous access, and the export's own permissions still apply.
- Confirm that the export allows anonymous access on the server.
- Check the export permissions from a Linux client, where
chmod 775gives the owner and group write access. - Mount with
-u:username -p:*or set up identity mapping if the export requires a real account.
NFS share disconnects or times out on Windows
Windows uses a soft mount by default, and soft mounts time out more easily during connection problems.
- Unmount the drive with
umount Z:. - Mount it again with
-o mtype=hard. - Raise
-o timeout=on a soft mount if a hard mount does not suit your apps.
Windows NFS client slow when browsing folders
Case-insensitive lookups can slow searches through folders and subfolders.
- Run
Set-NfsClientConfiguration -CaseSensitiveLookup 1in PowerShell as administrator. - Mount the volume again.
- Keep in mind that file names on the share must now match in case.
Windows NFS client FAQ
Does Windows 11 have a built-in NFS client?
Yes, Client for NFS is a Windows component that you turn on through Windows features. Microsoft documents the mount, nfsadmin and showmount commands for Windows 11 and Windows 10, and the client supports NFSv2 and NFSv3.
Can Windows mount NFSv4 shares?
No, Client for NFS on Windows client and Windows Server supports NFSv2 and NFSv3 only. Microsoft states that mounting NFSv4.1 volumes on Windows clients is not supported, so the export must offer NFSv3.
How do I mount an NFS share automatically at sign-in?
Map the share in File Explorer with Reconnect at sign-in selected, or run New-PSDrive with the Persist switch in PowerShell. Microsoft's reference for the mount command lists no option that makes a mount permanent.
How do I mount an NFS share with a username and password?
Add -u: and -p: to the command, as in mount -u:username -p:* followed by the share and drive letter. The asterisk prompts for the password, and a name with no leading backslash is treated as a UNIX user name.
What is the difference between a soft and hard NFS mount in Windows?
A soft mount returns a failure to the app after its retries run out, and it is the Windows default. A hard mount keeps retrying until the server returns, which Microsoft recommends to reduce disruption during server reboots.
Is NFS on Windows encrypted?
Not with sec=sys, which performs no authentication checks and sends data unencrypted. Encryption comes from sec=krb5p, which adds privacy to Kerberos authentication, and your NFS server has to support that mode for the mount to work.
How do I list the NFS exports on a server from Windows?
Run showmount -e followed by the server name or address. It displays the file systems the server exports, so you can copy the exact share name into your mount command before you try to connect.