A CPU light that stays on after you press the power button means the motherboard cannot detect the processor or the processor failed its first startup check.
The usual causes are a missing CPU power cable, a badly seated chip, bent or dirty pins, or a BIOS too old for the processor. This guide covers what the light means, the fixes in the order that finds the fault fastest, and what to do when the light comes on after a new CPU, a BIOS update or an overclock.
How to fix a solid CPU LED on a motherboard
Work through these checks in order and power on after each one. Most solid CPU LEDs clear at step 2, 3 or 4.
- Shut down the PC, flip the switch on the back of the power supply to off, and unplug the power cord.
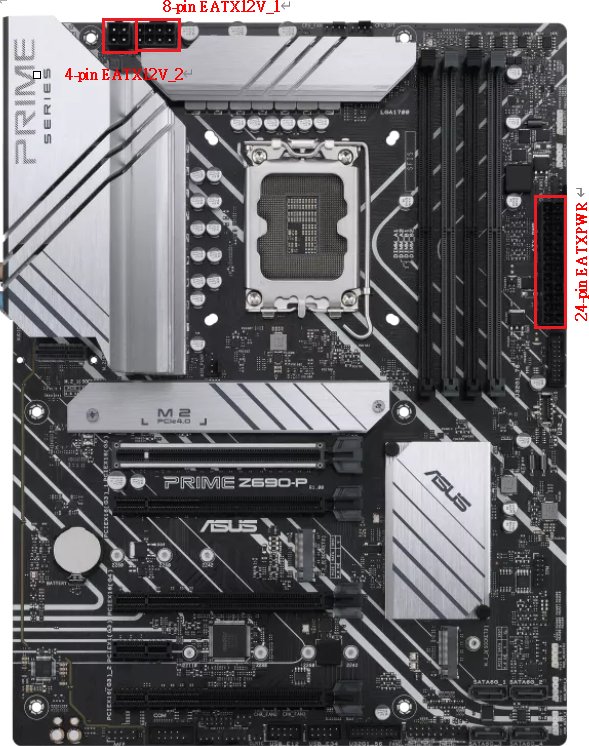
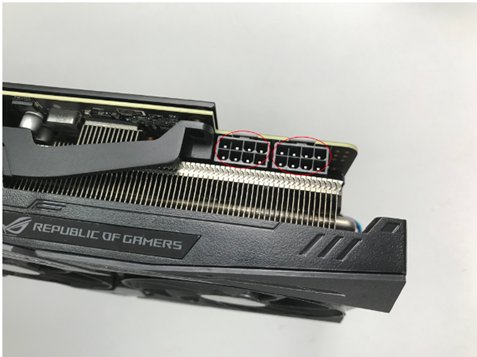
- Push every CPU power cable fully into the motherboard. ASUS boards can carry an 8-pin EATX12V_1, a 4-pin EATX12V_2 and the 24-pin EATXPWR, and ASUS recommends connecting all of them.
- Look up your board on the maker's support site and confirm your processor is on its CPU support list, along with the BIOS version that list requires.
- Remove the cooler, lift the CPU out and check the socket and the chip for dirt or bent and broken pins. Clean any dirt, then reinstall the CPU.
- Refit the cooler and plug its fan cable into the CPU fan header on the motherboard.
- Clear CMOS with the board's Clear CMOS button, its CLRTC pins or by removing the CMOS battery, then power on.
- If the CPU LED still stays on, update the BIOS with the board's BIOS flashback feature, or test the CPU in another compatible motherboard before you replace it.
If a different LED stays on once the CPU LED goes out, the CPU stage has passed and the fault has moved to memory, graphics or the boot drive.
Why is there a red CPU light on my motherboard?
ASUS states that a CPU LED which stays on after power-on means there is no CPU or the CPU is faulty. In practice, "no CPU" covers any reason the board cannot talk to the chip, not only an empty socket.
| Cause | Typical sign | Fix |
|---|---|---|
| CPU power cable missing or loose | Fans spin and lights come on, but the CPU LED never goes out | Seat the 8-pin (and any 4-pin) CPU power connector fully |
| Processor not seated correctly | Light appeared after a new build or a cooler swap | Reinstall the CPU and refit the cooler evenly |
| Dirty, bent or broken pins | Light appeared after the CPU was removed or the board was moved | Clean dirt; with broken pins, try another CPU |
| BIOS does not support the processor | Light appeared right after a CPU upgrade on an older board | Check the CPU support list and update the BIOS |
| Corrupt or unstable BIOS settings | Light appeared after an overclock or a BIOS change | Clear CMOS and load optimized defaults |
| Weak or faulty power supply | Board behaves the same with every reseat | Test with a known good power supply |
| Failed processor or motherboard | Every check above passes and the light stays on | Test the CPU in another board, or another CPU in this board |
CPU, DRAM, VGA and BOOT LED meaning on a motherboard
Boards with diagnostic LEDs check the processor, memory, graphics and boot drive in turn. The LED that stays lit marks the stage where startup stopped.
| LED that stays on | What it means (ASUS Q-LED) | First thing to check |
|---|---|---|
| CPU | No CPU detected, or the CPU is faulty | CPU power cable, CPU seating, socket pins |
| DRAM | No memory detected, or the memory is faulty | Memory fully clicked in; try one module at a time |
| VGA | No graphics card detected, or it is faulty | Graphics card seated and powered; F-suffix Intel CPUs have no integrated graphics |
| BOOT | No boot device detected, or it is faulty | SATA cable or M.2 drive and its screw |
ASUS places the Q-LEDs near the 24-pin power connector or the memory slots on most boards. Some older models put each LED beside the slot it monitors.
How to fix red light on a motherboard
When the quick checks above do not clear the light, run a full pass through every connection. These steps follow the hardware order that ASUS and Intel use for no-boot faults.
- Check the CPU cooler fan: confirm it spins, clear dust from it, and plug its cable into a different fan header to rule out a dead header.
- Check the CPU connection: reseat the processor and confirm the cooler sits flat with even pressure.
- Check the power supply: confirm the wall socket and extension lead work, the PSU rear switch is on, and the 24-pin and CPU power cables are fully seated.
- Reseat the RAM until each module clicks in, and reseat the graphics card along with its power cable.
- Reconnect the storage drives: unplug and replug each SATA cable at both ends, and reseat any M.2 SSD with its screw tightened.
- Reset the BIOS by clearing CMOS, or update it with BIOS flashback if the CPU is newer than the board's BIOS.
- Check the CMOS battery: remove it, clear CMOS, then refit it or fit a fresh coin cell of the same type.
- Reconnect all hardware one piece at a time after a minimal-component boot works, powering on after each addition.
If the light first appeared after a change, Intel's advice is to revert that change before anything else.
How to connect the 8-pin CPU power cable and test the PSU
A board with no power to the CPU cannot start the processor, so it reports the CPU stage as failed. This is the first cable to check on a new build.
- Turn off the PSU switch and unplug the power cord.
- Find the CPU power connector on the motherboard; ASUS labels it EATX12V and some boards add a second 4-pin or 8-pin socket beside it.
- Press each CPU power plug in until its latch clicks; connect every CPU power socket the board has.
- Press the 24-pin EATXPWR plug in until its latch clicks.
- Confirm the power cord, wall socket and any extension switch are on, and the PSU rear switch is set to on.
- If the light stays on, swap in a known good power supply and try again.
How to reseat a CPU and check for bent pins
Unplug the PC and ground yourself before you touch the socket. Lift the processor straight up and set it down straight, never at an angle.
- Unplug the CPU fan cable and remove the cooler.
- Release the socket lever or retention frame and lift the CPU straight out.
- Inspect the socket pins and the underside of the CPU for dust, debris or old thermal paste, and clean any you find.
- Look for bent or broken pins; with broken pins, test with another CPU.
- Line up the CPU's alignment marks with the socket, lower it straight in and close the lever.
- Refit the cooler with even pressure, reconnect its fan cable and power on.
ASUS's own order for a stuck CPU LED is reinstall, clean, check pins, then replace the CPU only if those three fail.
Check if my CPU is compatible with my motherboard
A new processor on an older BIOS is one of the most common reasons for a CPU light on a working board. The board's CPU support list shows the minimum BIOS version for each chip.
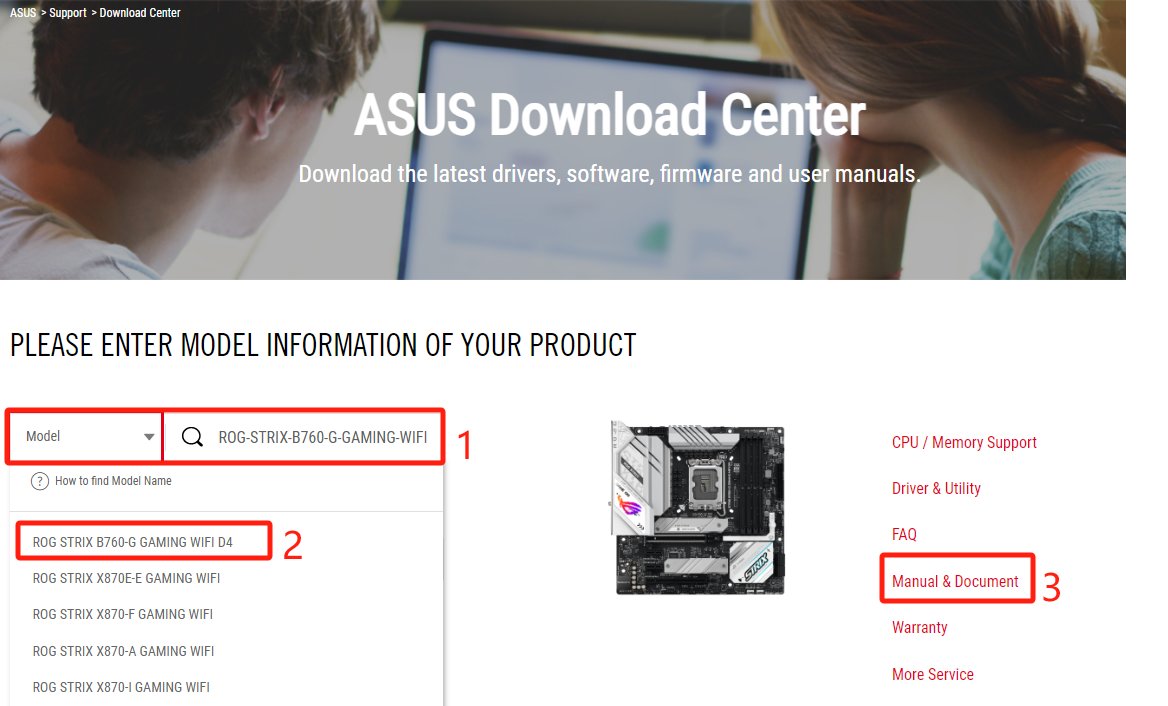
- Open your motherboard maker's support site and enter the exact model name printed on the board.
- Open the CPU support list; on ASUS this is CPU/Memory Support > CPU Support.
- Find your processor in the list and note the BIOS version it requires.
- Compare that with the BIOS version on the board, if you know it; a board bought before the CPU launched usually has an older one.
- If an update is needed, flash it with BIOS flashback, or boot once with an older supported CPU and update from inside the BIOS.
Intel also keeps a compatible-motherboard lookup for its processors on its support site.
How to update BIOS without a CPU using USB BIOS FlashBack
ASUS USB BIOS FlashBack updates the firmware while the PC is shut down, so it works when the board will not post. Not every board has it; check the specifications or the manual for a FlashBack button and port.
- Format a USB drive of 1 GB or more as FAT32 (FAT16 or FAT32, MBR) on another computer.
- Download the latest BIOS for your exact board from the ASUS Download Center under Driver and Utility > BIOS and FIRMWARE.
- Extract the file, run BIOSRenamer to rename the .CAP file, and copy the renamed .CAP file to the root of the USB drive.
- Plug the drive into the USB FlashBack port; the board manual shows which port it is.
- Shut down the PC but leave the power supply plugged in and switched on.
- Hold the BIOS FlashBack button for three seconds until its LED blinks three times.
- Wait until the LED goes out, which can take up to eight minutes, then power on.
Do not remove the USB drive, cut power or press CLR_CMOS while the LED is blinking. ASUS warns that an interrupted update leaves the board unable to boot.
How to clear CMOS to fix a red CPU light
Clearing CMOS resets the BIOS settings, date, time and BIOS password stored in the board's real-time clock memory. Use it after an overclock, a voltage change or a BIOS update that left the board stuck.
- Shut down the PC and unplug the power cord.
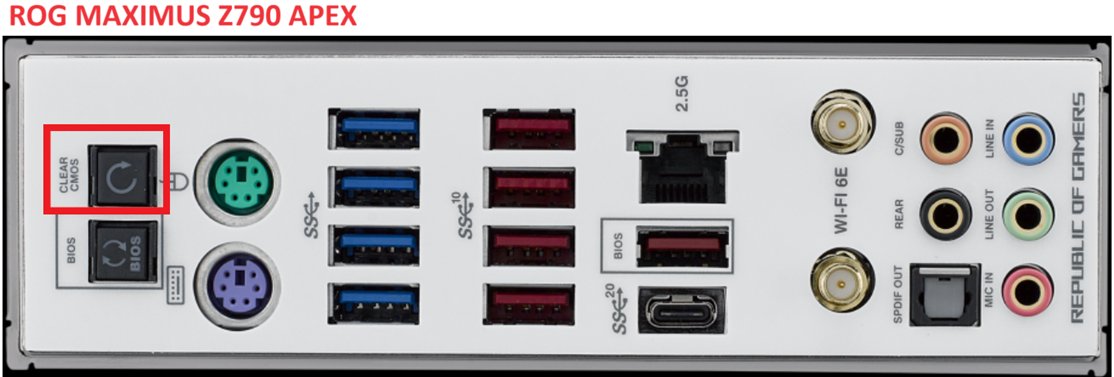
- Press and hold the Clear CMOS (CLR_CMOS) button for 5 to 10 seconds, if your board has one.
- Without a button, short the two CLRTC pins with a jumper cap or a metal screwdriver tip for 5 to 10 seconds.
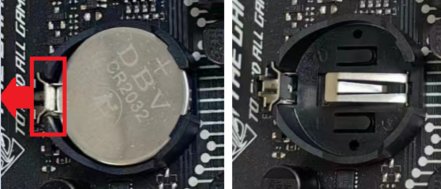
- Without either, remove the CMOS coin battery, or unplug its 2-pin cable on boards with a wired battery, then refit it.
- Plug in the power cord and turn the PC on.
- At the reset prompt, press F1 to enter BIOS setup, set the date and time, press F5 for Load Optimized Defaults, and press F10 to save and exit.
The board manual shows which of the three methods your model supports and where the button or pins sit.
How to boot a PC with minimum components
A minimal boot removes everything that is not needed to reach the BIOS. If the CPU light clears with the minimum fitted, one of the removed parts is the cause.
- Leave only the CPU, CPU cooler and fan, one memory module, the power supply and the graphics card connected.
- Unplug all USB devices, including the keyboard, mouse and flash drives.
- Remove extra PCIe cards and disconnect drives, network cables and audio cables.
- Connect one monitor and power on.
- If the board posts, reconnect one device at a time and power on after each until the light returns.
If the CPU light stays on even with the minimum fitted, the fault is in the CPU, the board, the power supply or the BIOS version.
ASUS Q-LED Core blinking power LED meaning
Some newer ASUS boards have no separate CPU LED. Q-LED Core reports the same checks through the power LED's blink rate instead.
| Power LED pattern | Intel board | AMD board |
|---|---|---|
| Fast blinking, about 4 times per second | No memory detected | No CPU detected |
| Slow blinking, once every 2 seconds | No graphics detected | No graphics detected |
| Very slow blinking, 4 seconds on and 4 seconds off | No boot device detected | No boot device detected |
| Solid light | Normal boot | Normal boot |
On an AMD board, fast blinking calls for the same CPU fixes as a solid CPU LED. The feature can be turned off in BIOS under Advanced > Onboard Devices Configuration > Q-LED Core.
How to tell if the motherboard CPU light problem is fixed
A fixed board moves past the CPU stage within seconds of pressing the power button.
- Power on and watch the diagnostic LEDs: the CPU LED should go out instead of staying lit.
- On a Q-LED Core board, the power LED should end on a solid light rather than blinking.
- Press Del or F2 during startup and confirm the BIOS screen opens.
- On the BIOS Main page, confirm the BIOS version matches the one you flashed.
- Let the PC boot to Windows and run it for a while to confirm it no longer restarts or shuts down.
Motherboard CPU light on but fans spinning and no display
CPU light on after installing a new CPU
The board's BIOS predates the processor, so it cannot initialise it.
- Check the board's CPU support list for the BIOS version your processor needs.
- Update with BIOS flashback, or fit an older supported CPU, update the BIOS and swap the new CPU back in.
- If neither is possible, ask the board maker's service center to update the BIOS.
CPU light on after a BIOS update
Old settings no longer suit the new firmware, or the update did not finish.
- Clear CMOS and power on again.
- If the update was interrupted, run BIOS flashback again with a freshly copied file.
- If it still fails, contact the board maker's support.
CPU light on after overclocking
Manual CPU or memory frequency and voltage settings are unstable.
- Clear CMOS to reset every BIOS setting.
- Load optimized defaults with F5 and save with F10.
- Reapply any overclock in small steps.
CPU light flashes and the PC keeps restarting
The cooler is not cooling the processor, so the system shuts down to protect it, or the board is power cycling without POST.
- Check the fan cable is in the CPU fan header and the fan spins.
- Try the fan cable in a different header.
- Reseat the cooler so it sits flat on the CPU, and clear dust from the fins and fan.
FlashBack LED blinks for five seconds then stays solid
BIOS flashback did not run, usually because of the USB format or the file name.
- Reformat the USB drive as FAT32 with MBR.
- Download the BIOS for the exact board model and rename it with BIOSRenamer again.
- Repeat the flashback steps; if it still fails, contact ASUS support.
CPU light goes out but the DRAM or VGA light stays on
The processor passed; the fault is now memory or graphics.
- For DRAM, reseat the memory and boot with one module, then add the rest one at a time.
- For VGA, reseat the graphics card and its power cable, and connect the monitor to the card, not the motherboard.
- With an Intel CPU whose model number ends in F, fit a graphics card, because those chips have no integrated graphics.
Red CPU light on motherboard FAQ
What does the CPU light on a motherboard mean?
A CPU light that stays on means the board found no processor or the processor failed its first startup check. The cause is usually CPU power, CPU seating, damaged pins or a BIOS that does not support the chip.
Where is the CPU LED on a motherboard?
On ASUS boards the Q-LEDs usually sit near the 24-pin power connector or the memory slots. Some older boards place each LED beside the part it checks. The board manual shows the exact position for your model.
Can a bad power supply cause a red CPU light?
Yes. A missing or loose CPU power cable, or a failing power supply, leaves the processor without power, so the board reports the CPU stage as failed. Reseat every CPU power plug, then test with a known good power supply.
Can I update the BIOS without a CPU?
Yes, on boards with a BIOS flashback feature. ASUS USB BIOS FlashBack updates the firmware while the PC is shut down or the CPU is removed, using a FAT32 USB drive and the renamed BIOS file.
Will clearing CMOS fix a red CPU light?
Clearing CMOS fixes a CPU light caused by bad BIOS settings, such as a failed overclock or changed voltages. It does not fix a missing power cable, bent pins or a BIOS too old for the processor.
Why does the CPU light come on after installing a new CPU?
The board's BIOS is often older than the processor. Check the board's CPU support list for the minimum BIOS version, then update with BIOS flashback or with an older supported CPU fitted.
Does a CPU fan problem cause the CPU light?
A cooler that is not plugged in or not seated can stop the PC booting or make it restart in a loop. Plug the fan into the CPU fan header, confirm it spins and reseat the cooler.
Is my CPU dead if the CPU light stays on?
Not necessarily. Rule out power cables, seating, pins and BIOS support first. If the light stays on after all of them, test the CPU in another compatible board, or another CPU in this board, before you replace either.
Can RAM cause the CPU light to come on?
A memory fault normally lights the DRAM LED instead. On ASUS Q-LED Core boards, fast blinking means no memory on Intel boards but no CPU on AMD boards, so check which platform you have.